Classes, Project LIfe

WHAT’S ALL THE FUSS ABOUT PROJECT LIFE???

Are you tired of all your photos in boxes or on the computer??

Do you want an efficient way to manage your memories??

Come and see what all the fuss is about Project Life.  The simple, time-efficient system to manage your memories.

WHEN: 20th September at 2pm in my classroom East Corrimal.

COST: $20 or free with a minimum order.  This includes 2 plastic sleeves, 6 project Life cards a selection of embellishments Plus a Black Journalling Pen.

BYO: Adhesives plus 8-10 Photos (6”x4”).

Please Book and Pay by Friday 12th September so I can order your Kit.

Project Life

Come and check it all out but don’t forget to book and pay by this Friday so I can have all your Project Life goodies.

3D projects, Masculine

RECTANGULAR GIFT BOX!

I was playing around the other day and created this Rectangular style box. I was inspired by some packaging we received on something we bought.  I liked the design so I tweaked it to fit our Australian size cardstock.  Here are the boxes I made. Keep reading too for the tutorial to make your own.
P1140380


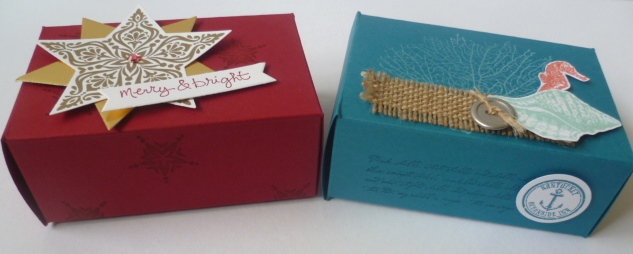
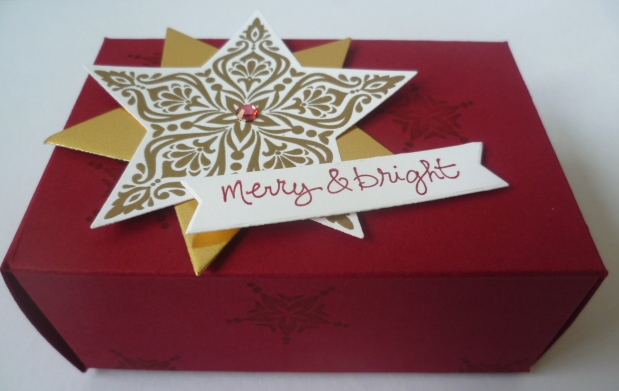
A Cherry Cobbler box ready for Christmas.  I used the ‘Bright and Beautiful’ Stamp set and embossed one of the gorgeous stars with Gold Embossing Powder.  I cut this out and one in Gold card with the Star Framelits.  I coloured a Rhinestone with the Cherry Cobbler Blendabilities.  BEFORE assembling make sure you stamp the cardstock.  So much easier!  The greeting on this box is from the ‘Good Greetings’ stamp set.  This is the Free set you can get this month when your party sales reach a minimum or $300.  This set is very useful with greetings for all occasions.

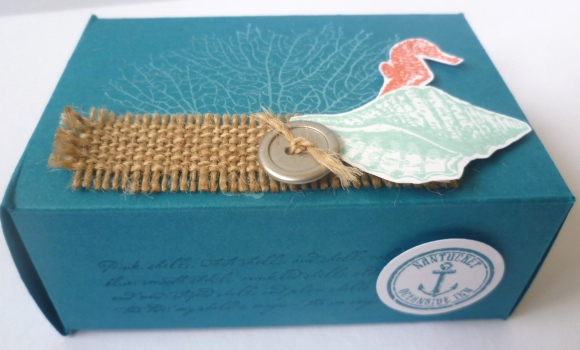
The Island Indigo box might suit the men in your life.  On this one I stamped the seaweed from ‘By The Tide’ with White Craft Ink.  The shell was stamped in Pool Party and the Seahorse in Calypso Coral.  I stamped the verse on each side of the box with Island Indigo ink.  For the Burlap trim I cut a length and cut off the sewn edges.  I then frayed the edges by pulling out some of the thread.  I used one of the threads to tie off on the Silver button.

Here they both are individually.
P1140381 - Copy     P1140387

Here you can see how the end flaps fold in.
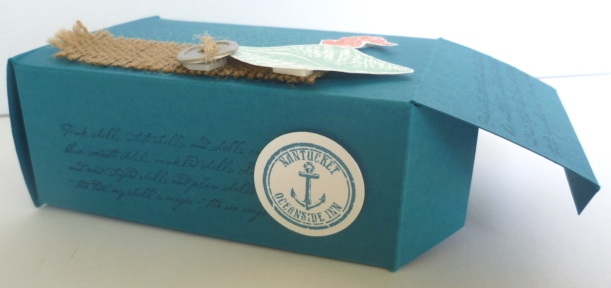
P1140412

So do you want to know how to make one yourself.  Here you go.

RECTANGULAR GIFT BOX TUTORIAL

(Finished size is 10cm x 4cm x 7cm)

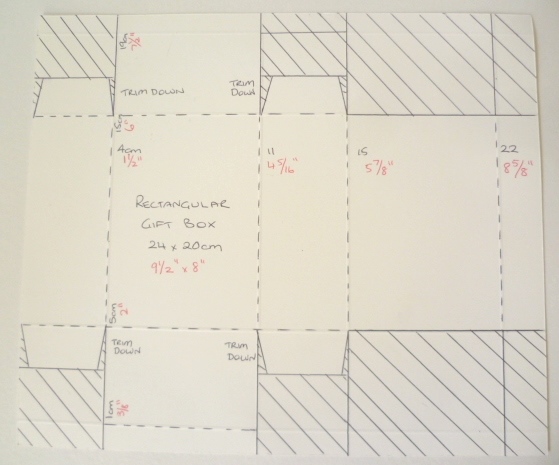
1. Cut cardstock METRIC:  24cm x 20cm.  On the 24cm side score and 4cm, 11cm, 15cm and 22cm.  On the 20cm side score at 1cm, 5cm, 15cm and 19cm.

                            IMPERIAL: 9 1/2″ x 8″.  On the long side score at  1  1/2″, 4  5/16″, 5 7/8″ and 8 5/8″.  On the 8″ side score at 3/8″, 2″, 6″ and 7 1/2″ (NOTE: I haven’t tested these measurements yet so I do hope they are correct! Let me know if I am wrong.  There are some odd measurements!)

Here is the template.  (This has now been updated).
P1140404

2. Cut off all the shaded areas.  Cut up on the tab lines (filled in line).  Where I have marked “Trim Down” I cut these tabs down shorter.  These are the tabs you fold in on the ends and then I angled the tabs to fold in more neatly.  I hope that makes sense??

3. Fold on all the scored lines.  Stamp the cardstock as you like before assembling.

4. Add Sticky Strip along the narrow tab on the right hand end (the underside).

5. Assemble by lining up the edge of the tab with the Sticky Strip to the other end.  Then fold in the flaps on each of the ends.

Hope this all makes sense.  Please ask if you are unsure.  Enjoy making them.

Jenny

Uncategorized

JUST ADD INK #229 – RAINBOWS

It has been a while since I had a chance to play along with a Challenge.  I had a little time today and when I saw the challenge at Just Add Ink this week I thought this would be a good one to try. This week ‘ Rainbows’.  We certainly have had a lot of rain recently to relate to this but I did like the fun colours to work with.  Here is the inspiration.

JAI229

Here is the card I came up with.  It certainly took a lot longer than I thought it would but I am pleased with the final result.  I love all the bright, happy colours.

P1140349

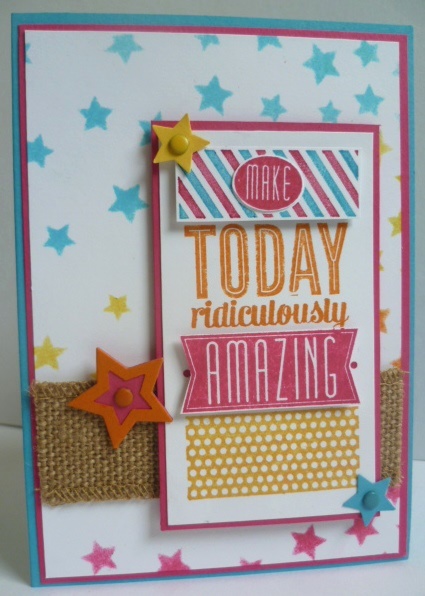
This was the first chance I have had to use the Star stencil too so that was fun.  I sponged sections with Tempting Turqoise, Daffodil Delight, Pumpkin Pie and Melon Mambo.  This was adhered to a Melon Mambo mat and Tempting Turquoise card base.  I added some Burlap ribbon across the front.  I coloured sections of the stamp from ‘Amazing Birthday’ with the markers.  I stamped some again to raise them up too.  This was adhered to a piece of Melon Mambo card and raised up off the white card front.  What I discovered too was the small star in the Itty Bitty Accents Punch Pack co-ordinates nicely with the small star framelit.  So I punched out the small star in Pumpkin Pie and then cut out the star using the framelit around the punched one.  I cut another star in Melon Mambo and adhered them together. I was quite excited about the result.  I punched out some more stars in Tempting Turquoise and Daffodil Delight.  I added some Brights Candy Dots to the centre of the stars too.

Job done! Challenge Completed!!  I hope this brightens your day wherever you are.

If you want to join in the Just Add Ink challenge then head to the blog post here.  There is not a lot of time left.

Jenny

cards

ORNAMENTAL PINE!

I have made quite a few of these cards recently to send out with the Holiday Catalogue.  I really liked this stamp set when I first saw it.  Most days I see these type of pine trees when I go walking. I love that you get some beautiful images Plus special greetings all in the one set.

P1140275

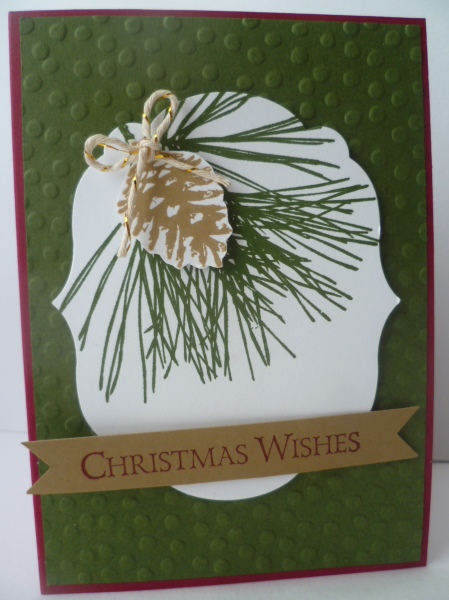
I have used Mossy Meadow and Cherry Cobbler which might be a popular colour combination this Christmas.  I love the richness of them together.  I embossed the Mossy Meadow piece with the ‘Decorative Dots’ Embossing Folder.  I stamped the pine branch in Mossy Meadow on Whisper White and then cut it out with the Labels Framelits.  I stamped the pinecone in Baked Brown Sugar ink and cut it out.  This was raised up off the White stamped piece with a little Gold Twine bow added.  The Greeting was stamped in Cherry Cobbler onto a strip of Baked Brown Sugar card and then I flagged the ends.  This was raised up off the card too.  A simple card but one that is easily reproduced many times I think.

Have a great day,

Jenny

cards

“GOOD GREETINGS” FREE!

Don’t you love all the freebies you get when you host a party! What you didn’t know about that??? When you get the qualifying sales (which is very easy to meet), you get FREE products to choose on whatever you want!!! Well, can I tell you that from now until October 31st you get not just these special rewards because you are the “Hostess with the Mostest” BUT you can receive a FREE STAMPSET with $300 minimum in orders OR if you don’t want to party then order $300 of products just yourself!!!  That can be very easy to do especially now with the Holiday Catalogue out!

Let me tell you this stamp set is great.  There are so many greetings in this set that you can use it for any occasion all year. That’s why they call it ‘Good Greetings’.  Check it out below.

Good Greeting promo


You will want a closer look at the greetings, won’t you!

Good Greetings

So many uses for this set – and to think it is FREE! There are quite a few you could use even now as you start your Christmas creating. Now if it has been some time since you had a party OR you haven’t got around to having one yet, then maybe NOW is the time.  If you are not sure how a party all works then check out the website here to help you with your concerns.   If you are local I would love to share stamping with you and your friends.  It’s a lot of fun and I know  you and your guests will have a great time.  Let’s set a date.  We can use this set at your party too so you can see some ideas to use it.  Can’t wait to show you.  🙂

Stampin' Up!

2014 HOLIDAY CATALOGUE AVAILABLE NOW!!

It’s here TODAY!!! The Holiday Catalogue is available NOW!

You have been starting to see little sneaks here and there but now you can see it all.  The Holiday Catalogue is out NOW! How do you get your very own copy??

1) Check the link HERE or at the link in the right hand column to view it online.

OR

2) Contact me and I will get one in the post for you ASAP.  You will want to see it – AND isn’t it better to have it in your hot little hands yourself than looking at it on a computer screen!! YES!!

OR

3) If you are local come and join me at my Holiday Catalogue Launch (2pm) and pick up your own copy AND play with some new products.  Let me know ASAP.

HAPPY CHRISTMAS CREATING!!  🙂

q1_holiday_customer_9-1-31-2014_sp

Classes, Stampin' Up!

START THINKING CHRISTMAS!

I know we don’t want to think about it but it is time to start your Christmas creating.  The new Holiday Catalogue will be available Tomorrow! Exciting times! I know you are going to love it.  SO… 


“LET’S KICK OFF CHRISTMAS”

You are invited to Welcome in the new Holiday Catalogue.  Come and see all the new products Stampin’ Up! have for your Christmas Creating this year.

WHEN: Saturday August 30th at 2pm in East Corrimal.

COST: $15 or Free with a Minimum purchase.  

The afternoon includes playing with new Christmas products, Make and Take, Afternoon Tea and Give Aways.  Come and Join us.

RSVP: Thursday, August 28th

Bring along a friend I haven’t met and pick a prize.  I love to meet new stampers.  Looking forward to seeing you there.

Psst! Here is a sneak of what we might be making.  😉

P1140326

cards, Stampin' Up!, Techniques, Tutorials

BLENDABILITIES + WHITE EMBOSSING = COOL EFFECT!!!!

I am loving using the new Blendabilities.  Have you had much of a play yet?? When they first came out I discovered this cool technique but I only got a chance to try it out a couple of weeks ago. Finally I can show you the cards PLUS I have a tutorial so you can try this out yourself.

For this card I used the Hostess Set “Hello There”.  I love how you can get the different coloured effect.  Isn’t it cool???  Once I coloured it (which you can read about in the tutorial below), I added it to my card.  For the card I wrapped some White Baker’s Twine around a piece of Sweet Taffy DSP and adhered this to a card base of Melon Mambo. I added the little flowers punched from the Itty Bitty Accents punch pack.  It is hard to see it clearly but I added some Dazzling Diamonds to the centre to add some sparkle.

P1140207

So how do you create the effect?  I will show you.

COLOURING WHITE EMBOSSING WITH BLENDABILITIES

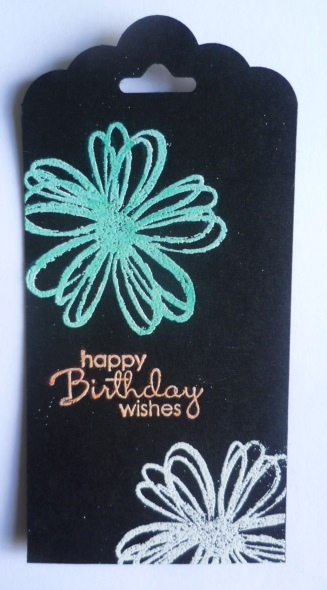
To show you how to create the technique I am making some little tags using the Scallop Tag Topper Punch.

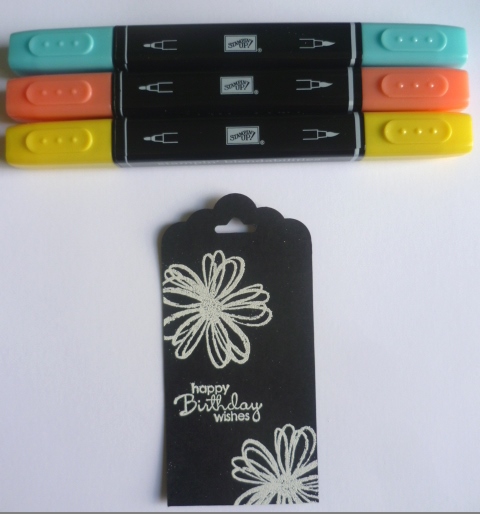
1. White emboss your image. If you are not familiar with that then I will just explain this.  Swipe your cardstock with the Embossing Buddy (this reduces the static on your project in which stray specks of embossing powder will cling to).  Stamp your image in Versamark and then pour over your White embossing powder.  Tip off the excess then heat the image with your Heat Tool to melt the Embossing Powder.  (I love watching the embossing powder melt.  It is so magic.  I don’t think you ever get sick of watching it.)

Take just a minute to let this dry before you start colouring.

2.  Select your Blendabilites.  I used Coastal Cabana, Calypso Coral and Daffodil Delight.  Colour over your image as you like.  I found using the fine tip more effective especially on the finer parts of the image.

P1140279


P1140281

3. Once you have finished colouring you can complete your project.

P1140277

I made lots of these at the time to give out.

P1140282

Now you can go and try this technique yourself and watch the magic happen.  ENJOY!!

Until next time 🙂

Jenny


Stampin' Up!

MORE VALUE IN THE STARTER KIT – BUT FOR ONE WEEK ONLY!

So, you like the Stampin’ Up! Products don’t you??  Would you like a regular discount when you purchase, access to a Global forum PACKED FULL OF INSPIRATION, Sneak peeks of the products before they are even released???  Well, these are only available if you are part of the Stampin’ Up! family.  For ONE WEEK ONLY 22nd August – 29th August you will get MORE in your Starter Kit.  Pay $169 and you will get $255 of products on WHATEVER you like.

My Project 61-001

How good is that!  I have more information on my page HERE. (NB: The price listed there is the regular price but the extra value is available until August 29th).  Stop by, have a read and then you can talk to me more if you have any questions Or ask me for an information pack.  If you can’t wait any longer then head to the link on my page to go right to my website and join now. Too Easy!  You can stay as long as you like and join for your own discount or to sell to others.

I look forward to welcoming you to my team – JEN’S INK.

Jenny

Classes, Stampin' Up!

IT’S A BOGO SALE!!!!

Sale

Everyone loves a Sale! This year my Sale Day is even better!

Come and join me at my –

BOGO SALE!!!


Purchase retiring Stamps and Accessories and receive the same value  in new product from the current Stampin’ Up! Catalogue for FREE!!

BOGO – BUY ONE GET ONE (free)

HOW DOES IT WORK???

– Retired product is priced at retail value (there will be a select number of items reduced).

– Total the amount that you spend on full priced items.

– Pick out the same $ amount in the NEW catalogue (*shipping and handling applies to new product).  You get that product for Free!

You get double the product for your money!!

WHEN – Sunday 24th August between 2pm and 3.30pm. Drop by anytime between then.  Be early though for the Pick!

WHERE – My place, East Corrimal. Message me for the address.

SEE YOU THERE!!