3D projects

BOX WEEK – BOX #4

Have you been enjoying the different boxes this week? I hope so.  Today I have another box for you.

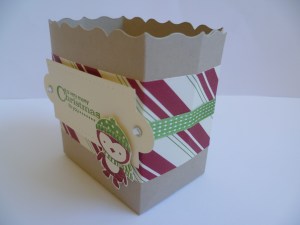
This one is made using the Fancy Favor box.

P1070283

This is another easy box.  I have wrapped a strip of the “Be of Good Cheer” DSP around the box and then ran some of the Gumball Green Satin Stitched ribbon around the DSP.  The greeting panel was cut from Very Vanilla Card using the Apothecary Framelits.  I pierced an edge around this with the Piercing Pack.  The greeting is stamped in Gumball Green and is from the “More Merry Messages” set.  The cute little penguin dude is from “No Peeking” and coloured with the markers.  I love that little guy! I added some Rhinestones just for Bling factor.

Here is the side view.

P1070424

All you need to do is add some chocolates in a cello bag or add a little gift and you are done.  It wouldn’t take long to whip up a few boxes like these.

We are over half way through the week now.  Stop by again tomorrow for Day 5 of Boxes.

Jenny

3D projects, Stampin' Up!

BOX WEEK – BOX #3

This gift box today is an idea that has been around the blog world for years.  I thought I would give it a Christmas touch.

P1070312

P1070282-1

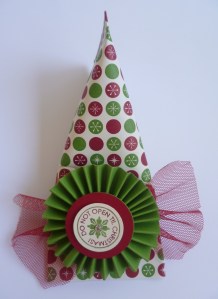
This gift box is known as a Sour Cream Box or as we know it downunder as a Sunny Boy Box.  You can find the instructions here.  They are just too easy!

I have created a medallion using the Simply Scored from Gumball Green card.  The greeting is from “More Merry Messages and coloured with Markers.  It was then punched out with the 3/4” circle punch.  I cut a strip of the Cherry Cobbler Tulle and wrapped around some cotton thread in the middle to gather it up.  This was all adhered together and added to the box with Dimensionals.

Thanks for stopping by for Day 3.

See you again tomorrow.

Jenny

3D projects

BOX WEEK – BOX #2

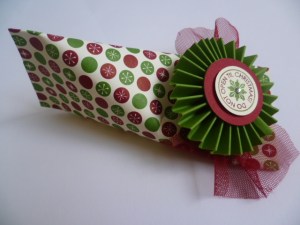
Here is a little pocket for your Christmas treats.  This is using the Petite Pocket Die again.  I found this idea for the Sparkly flap from Dawn here.

P1070317

The DSP is from the Candlelight Specialty pack from the Seasonal Mini.  I have cut circles with the Die to create the circle tie-downs and wrapped twine around them.  I cut the flap again from the Silver Glimmer Paper.   I think it is quite classy!

This is just the right size for a Chocolate treat or as a money holder – or even a Gift Card 😉

Thanks for stopping by today.  See you tomorrow.

Jenny

3D projects

BOX WEEK – BOX #1

Welcome to ‘BOX WEEK’.  Every day this week I will show you a different Gift Box or Treat Holder to help inspire you for your Christmas Packaging.  I have been busy making these fun projects and can’t wait to share them with you.  So, let’s get on with it.

BOX #1

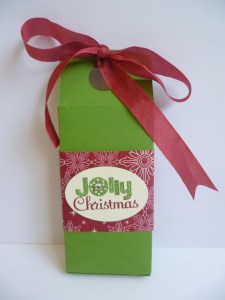
This is a cute Treat Holder made using the Petite Pocket Die.  I found the idea from Tanya here.  It is so easy to make.  Tanya has a link to a video so you can easily recreate this little box.

P1070273

I have added a strip of the “Be of Good Cheer” DSP. The greeting is from ‘No Peeking’ and coloured with the markers.  You can’t see it very well but I have added a Rhinestone to the centre of the ‘O’.  Then you can tie it off with some Cherry Cobbler Seam Binding.

Here is a side view.

P1070318-1

Thanks for stopping by for Day 1.  Make sure you visit again tomorrow.  I have another version using the Petite Pocket Die.

Jenny

3D projects

BOX UP YOUR CHRISTMAS!

Christmas is fast-approaching whether we like it or not.  How are your plans coming along??  Why not join me next week for my ‘BOX WEEK’.  Each day starting on Monday I will share a different Gift Box for you.  I hope this might help you for Christmas.  So you don’t miss any make sure you have subscribed to my blog.  Just click on the link in the Right Hand column.  I can’t wait to share these boxes with you.  They have been a lot of fun creating them.

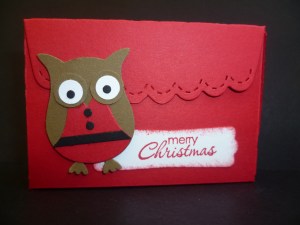
Here is a bonus one for you to get you started.  Don’t we all love this little Owl?  Why not a Christmas Owl! I have added him on a Treat box using the Scallop Envelope Die.  You can’t see the top view but I cut 2 of the Envelopes, cut off about 1/2″ on the bottom flaps and then adhered the 2 together.  I turned back the Scallop Envelope Flap and adhered them down.  This is just a good size for a small chocolate or little treat.

P1060559

See you on Monday for Day 1 of ‘Box Week’.

Jenny

scrapbooking

SCRAPPING OUR HAWAII SNAPS!

I have to show you these!  Sorry to go back to our Hawaii Holiday but I have just scrapped our photos!  I am pretty excited I have to say.  Now I have only done a few single-page scrap pages before so to do a whole album is a MAMMOTH achievement for me.  I don’t know what I was thinking though, seriously a whole album!!! Yep, 41 pages!! I was really pleased with the final result and thought I would show you some of the pages.  I am not going to bore you with the whole album.  If you come along to a class you can check it all out.  So, here we go~

(If you subscribe to my blog and receive this via your email, I don’t think the slideshow comes out.  If you click on it, it will take you to my blog and you can check it out there).

This slideshow requires JavaScript.

Just a few tips for you that I learnt through the process if you were going to undertake such a task.

1) Keep the layouts simple.  I chose 3-4 simple layouts that I repeated throughout the album.  I looked around the internet and in books for a few ideas first of some layouts to use.

2) Keep the embellishments simple.  For an album you don’t want to have lots of embellishments and busy-ness.  It gets too complicated – and takes too long.  I chose the Naturals Designer Buttons and the Brights Brads.  I used the stamp set “Sweets For The Sweet” as well.  I used the same title settings for each page using the Big Shot and Alphabet Dies.  I used one of the Apothecary Framelits Die for my journalling tags.

3)  Choose a few colour schemes to use throughout the album to create uniformity.  I used the Polka Dot Parade DSP and added a couple of pages from the Patterns Paper Stack (Brights Collection).  It made it SO much easier.

Stampin’ Up! makes creating Scrapbooking Albums such an easier task.  It narrows the choices down so it is not so overwhelming.  Everything is available and co-ordinates from the paper, the ink and embellishments.  This helps a lot.

Would I do it again??? Not in a hurry I have to say BUT the thought of doing single pages now is not so daunting.  I think I could even handle it!  I hope to give it a go very soon.  Well, I do have a lots of photos lying around waiting to be scrapped.  So stay tuned.  I might even have some to show you – later!

I hope you enjoy a little viewing of our holiday again.

Thanks for stopping by,

Jenny x

3D projects, Classes, Uncategorized

KID’S CHRISTMAS CLASS!

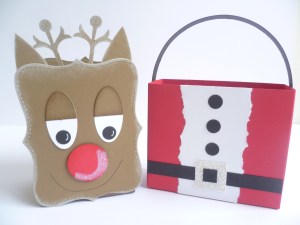
Hey, Mum and Nan bring the kids along to join us at my ‘Kids Christmas Class’. We will make this cute Reindeer Gift Box and Santa Box.

P1070254

WHEN: Saturday 8th December at 2.30-4pm.

WHERE: East Corrimal.  I will let you know the address when you register.

COST: $10

RSVP: Wednesday 5th December. BOOK EARLY AS SPACE IS LIMITED!!!  To RSVP Add a comment with your phone number or email address and I will get back to you.

BRING A FRIEND ALONG FOR LOTS MORE FUN!!  I CAN’T WAIT TO SEE YOU THERE!

Uncategorized

CHRISTMAS GIFT CLASS!!!

Christmas is fast approaching.  Have you got your Gift Packaging sorted???  Come and join in on my Christmas Gift Class THIS FRIDAY!  It’s not too late!  Here is what we will make.

We will create a Gift Card Holder, a Pocket Treat Holder and a Gift Box.   These will be fun to give out this Christmas.  Fill them with the treats you like!

WHEN: Friday 30th November 10am or 7.30pm at my studio in East Corrimal.

RSVP: Wednesday 28th November.  (Just add a comment with your email address and I will get back to you).

COST: $15 if you bring your own adhesives

              $20 to use my adhesives.

*  Adhesives includes Sticky Strip or double-sided tape, glue stick, Dimensionals or Mounting Tape.

This is our last class for the year so I look forward to seeing you.
3D projects

“CARD CANDY PROJECTS”

Where has the last week gone to??? I can’t believe they are flying past.  Already it is mid November!!!  I am here to finally show you my projects for the Inspiration Board at Heartfelt Stampin’ Up! event in Sydney last week.  I had been thinking about what to do for some time but when it came to it and there was one week to go, there was not a lot of time left.  So, what was I going to do??? I decided to make some Card Candy.  I don’t know about you but I am always on the lookout for these ideas.  They are great to quickly add to a card front or a tag and as a Demonstrator they can make great gifts for your hostesses.  So, with that I got creating!  Also, I thought I don’t have a lot of time, so these would be quick to whip up.  Well I was wrong on that count.  They probably took longer than a card because there were so many bits to them, but I had a lot of fun making them.  Once I started there was so many ideas coming.  Ok, so here they are for you.

Since Christmas is nearly upon us I thought Christmas Card Candy would be good.  Here is the Christmas one.

Here is a close-up of some of them.

Stamp Sets Scentsational Season,  Merry and Type, Four Frames.

Ink   Cherry Cobbler, Gumball Green, Soft Suede.

Card Cherry Cobbler, Gumball Green, Very Vanilla, Silver Glimmer Paper, Be of Good Cheer DSP.

Punches Curvy Label Punch, Decorative Label Punch, Large Oval, 1 3/8”  Circle Punch, Itty Bitty Shapes Punch.

Big Shot Snow Flurry Die, Holiday Collection Framelits, Perfect Polka Dots Folder,

Accessories Cherry Cobbler Seam Binding, Gumball Green Satin Stitched Ribbon, Victoria Crochet Trim, Cherry Cobbler Bakers Twine, Adhesive Rhinestones.

Then since I had the ‘Tea Shoppe’ set on my table from another project (which I will show you another time), I decided to use that.

I will show close-ups of these ones.

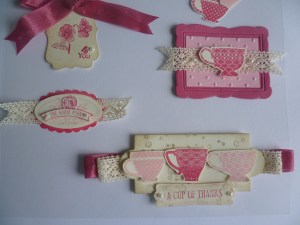
Stamp Sets Tea Shoppe, Tiny Tags.

Ink   Pretty in Pink, Rose Red, Crumb Cake.

Card Pretty in Pink, Rose Red, Very Vanilla.

Punches Modern Label Punch, Decorative Label Punch, Large Oval, Scallop Oval.

Big Shot Labels Framelits, Apothecary Accents Framelits, Designer Frames Folder, Perfect Polka Dots Folder,

Accessories Blender Pen, Linen Thread, Rose Red Seam Binding, Victoria Crochet Trim, Adhesive Pearls.

I have just adhered these to a sheet of clear acetate with glue dots.

So maybe you will be inspired by these little projects.

I hope you have a wonderful Inky week ahead,

Jenny x

3D projects, Stampin' Up!

‘HEARTFELT’ STAMPIN’ UP! EVENT – SYDNEY

On Saturday I went to the Stampin’ Up! Regional Event in Sydney.  These days are always full of inspiration and awesome creativity.  I wanted to show you some of the happenings.  Silly me though was so busy chatting and checking out all the different demonstrations I didn’t take any photos of the overall displays!!!!!!!  Still somehow I managed to take over 500 photos.  Seriously how can one person take that many photos of paper and card!!! I think I have a problem!  There was so much to take in and my head is buzzing with all the new ideas.  I can’t wait to try them out.  There were so many fantastic presentations by some very clever people.  I want to be clever like them when I grow up!

I will show you some of the ideas I saw.

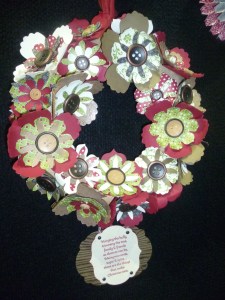
Check this wreath out!  This was created by Sophie, one of the team from Stampin’ Up!  This is created with various different flowers and then with buttons and bit added and all attached to a foam ring.  It looked even more spectacular in real life!

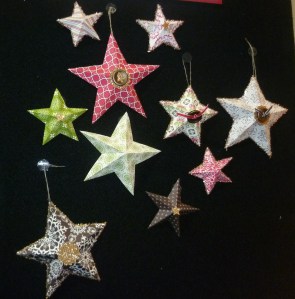
Aren’t these stars gorgeous?  They were created by Tania Willis.  She will have a tutorial on her blog in the next few days on how to create them.

Look at these awesome ideas on using the Lattice Bigz die.  These are fantastic.  They were created by the very talented Teresa Dabrowski.  (Sorry I couldn’t find a blog for Teresa).

Here is a close-up of one of them.  This is cut from the silver Shimmer paper.

I think I will be making some of these this Christmas.  How clever are they??  Little chocolates wrapped in the Lattice Bigz Die made to look like little puddings.

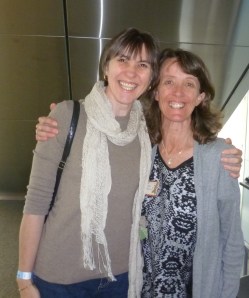
Apart from all the creativity, these events are fantastic for meeting up with stamping buddies.  One special person I FINALLY managed to meet was my very loyal blog friend Lynda.  Lynda has faithfully commented on my blog for over 3 years and we have swapped many a late night emails.

Thanks Lynda for all your encouragement and friendship over the years.  Hopefully it won’t be so long next time until we meet again. x

Come and visit again very soon.  I will show you my project I made for the display boards.

Until next time,

Jenny x