cards, Catalogues, Stampin' Up!

SUNDAY SUITES – FLOWERS FOR EVERY SEASON!

I have been sharing recently about some of the products in the Flowers For Every Season Suite particularly the lovely Sunflowers.  I thought for Sunday Suites today we will look closer at all the products in the suite.

There are 2 different bundles within the suite.  The Jar of Flowers and the Celebrate Sunflowers. Both of them co-ordinate with the other elements like the paper and the ribbon.

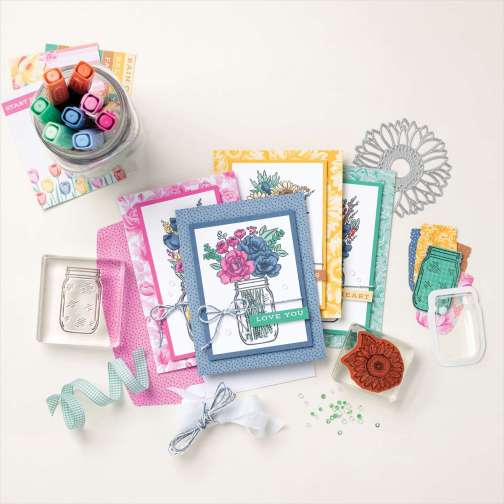
Here is all that is included in the Flowers For Every Season Suite.  It retails for $313.25 AUD  You can buy the full suite or the different elements on their own.

The Flowers for Every Season Suite Collection features gorgeous flowers representing each of the four seasons.  You will be able to make projects for many different occasions.

You can get a whole collection of coordinating products, including clear stamps and rubber stamps, beautiful floral paper, craft jewels, craft ribbon, and more!

The Flowers for Every Season Suite Collection includes (and it’s a lot!) –

* Jar of Flowers Photopolymer Stamp Set
* Jar Punch
* Celebrate Sunflowers Cling Stamp Set
* Sunflower Dies
* Flowers for Every Season 6″ x 6″ (15.2 x 15.2 cm) Designer Series Paper
* Flowers for Every Season Memories & More Card Pack
* Flowers for Every Season Memories & More Cards & Envelopes
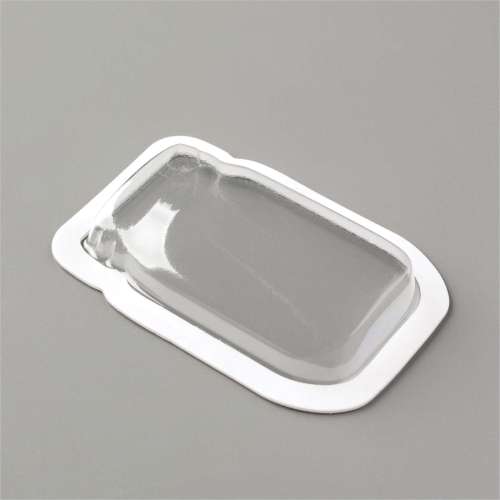
* Mason Jar Shaker Domes
* Flowers for Every Season Ribbon Combo Pack
* Flowers for Every Season Gems
* Cinnamon Cider Stampin’ Blends Combo Pack
* Just Jade Stampin’ Blends Combo Pack
* Magenta Madness Stampin’ Blends Combo Pack
* Misty Moonlight Stampin’ Blends Combo Pack

Product colours: Bumblebee, Cinnamon Cider, Just Jade, Magenta Madness, Misty Moonlight, Poppy Parade, Whisper White

Let’s look at them closer.

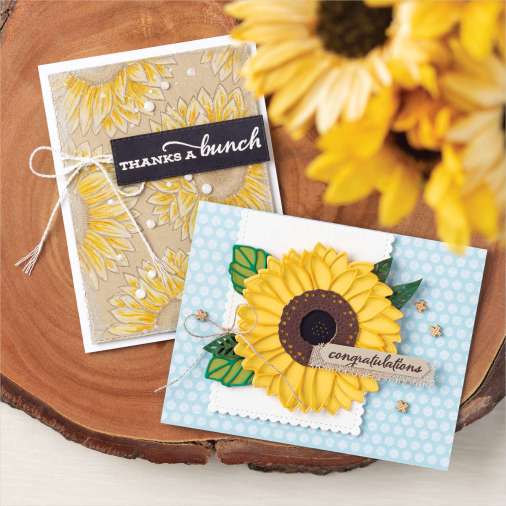
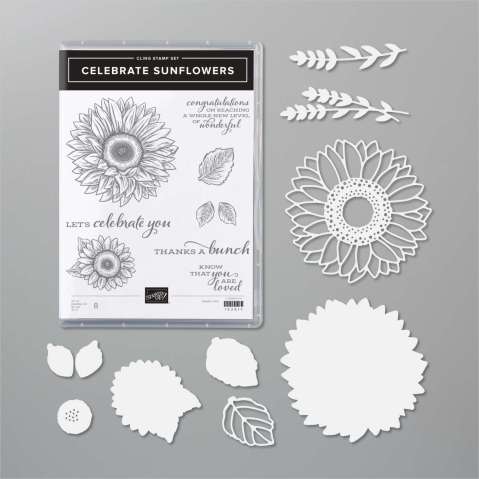
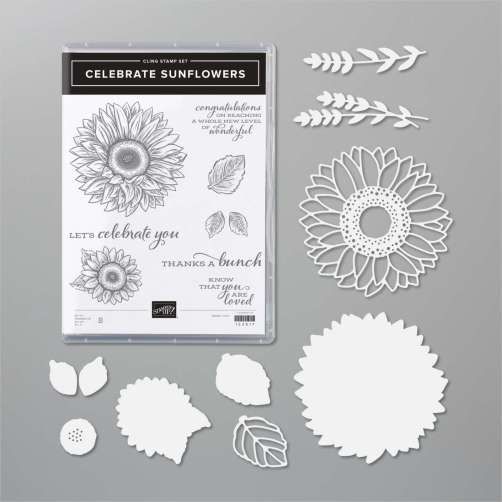
The Celebrate Sunflowers bundle I have featured a lot.  I love the detailed sunflowers in the die set.
The Jar of Flowers Bundle with the stamp set and the cool punch.

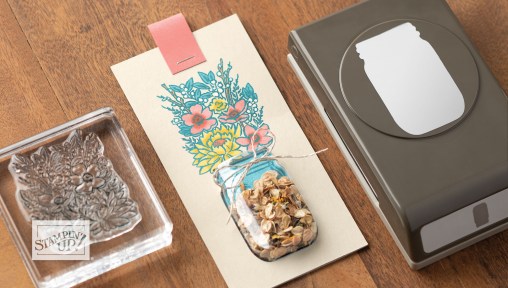
The Jar Punch will punch the little jar shapes out and co-ordinates with the jar in the Jar of Flowers stamp set.  It will punch the hole too so you can insert the Jar Shaker Domes.  It’s very cool.

I have seen little notepads created by punching out some pieces of white printer paper and bundling them up and help together with a hole punched in with a ring.  Very clever! I’m sure there are lots of other great uses for it.

The Jar Shaker Domes can be added in to your project with the jar has been punched.  They can then be filled with all matter of items.  Only limited to your imagination really. (Check the sample further below).
The Flowers For Every Season Designer Series Paper pack IS ABSOLUTELY GORGEOUS!! I have to say I wasn’t sure at first as the flowers were all very bright and some are very big but they are beautiful.

They will create cards in no time by simply adding them to the front of the card on their own and just add a sentiment.  But they will also work very nicely with either of the stamps in the suite too.

There are 48 sheets of patterned paper: 4 each of 12 double-sided designs and in 6″ x 6″ (15.2 x 15.2 cm) size.

The colours are Bumblebee, Cinnamon Cider, Just Jade, Magenta Madness, Misty Moonlight, Poppy Parade, Whisper White

The Flowers For Every Season Memories and More Includes 50 total double-sided cards (2 each of 25 designs) in 3″ x 4″ (7.6 x 10.2 cm) and 4″ x 6″ (10.2 x 15.2 cm) sizes; 4 sticker sheets, 2 each of 2 designs.

The colours are Bumblebee, Cinnamon Cider, Just Jade, Magenta Madness, Misty Moonlight, Poppy Parade, Whisper White.  Available for $19.25 AUD  You can use these cards for your memory Keeping but they will work so well

In addition to all these products there is also the Gems and the Ribbon Combo Pack.

The Flowers For Every Season Ribbon Combo Pack This contains  3 different types of ribbon in the pack including Just Jade Gingham Ribbon, Whisper White Faux Linen Ribbon and Misty Moonlight/silver Baker’s Twine.

Now for some samples.  These are created by Stampin’ Up! Artists. They really showcase how all the gorgeous products work together.
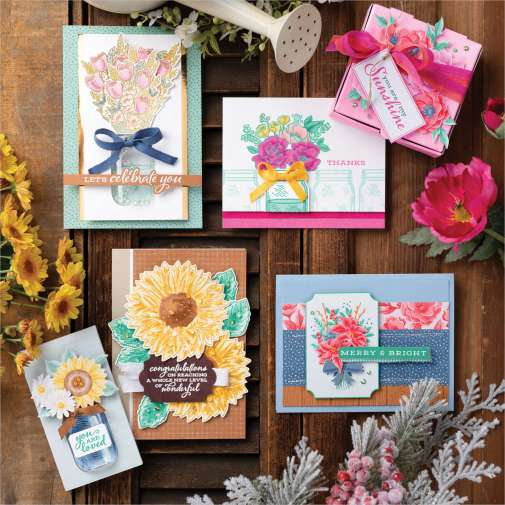
Check below how you can fill these cute Jar Shaker Domes.  What fun different shakers you can create with them.
This suite has been very popular already.  It is such a versatile suite of  products.

Love to get any of these products and are in Australia??

I would love to help you out.  It is all available in my store now -> HERE Please use the Host Code:  3MDURVQZ if ordering online. 

OR

You can contact me directly by email at jghayward@yahoo.com and I can place your order for you.

Place an order for any of the bundles and I will send you a card kit for 2 cards.

Thanks for visiting,

Jenny

cards, Catalogues, Stampin' Up!, Videos

RAINBOW GLIMMER BLOSSOMS + A VIDEO!

I have been playing with the so sparkly Rainbow Glimmer Paper.  It is just gorgeous.  I love the colours in it.

I created a card using it with the Many Layered Blossoms Dies.  I wondered how the diecut flowers would turn out when using the Glimmer Paper.  Let me just show you. 

I really hope you can see the sparkle in these cards.  The photo just doesn’t do them justice.

I put together a video.  I share a few tips in the video so be sure to check it out.

Have you subscribed to my Youtube channel yet?  Be sure to do that too. Click -> HERE to go straight to Youtube.

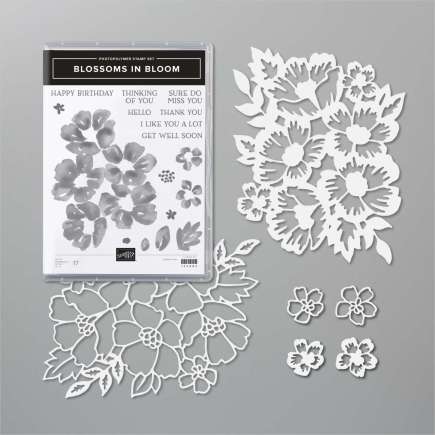
The Blossoms in Bloom Bundle are one of my favourites from the catalogue.  They are so pretty.

You can find them in my store -> HERE.

You can see the gorgeous Rainbow Glimmer Paper -> HERE. 

In Australia?  If you don’t have a current demonstrator I would love to help you place your order either online or contact me to order directly for you.

Ordering Online? Please use the Host Code: 3MDURVQZ

Thanks for shopping with me.  Remember this month you receive a $9 Bonus Day Voucher with each $90 order.  

Happy Shopping,

Jenny
Catalogues, Stampin' Up!

BONUS DAYS ARE BACK WITH STAMPIN’ UP!

They are back!!! Bonus Days are here again in July.

How do they work??

For every $90 AUD you order on Stampin’ Up! products you earn a $9 voucher that you can redeem on your order in August. 

How cool is that!

With a new catalogue you would be making up your Wish List right?? Now you can grab some of those favourite items this month, earn that voucher, and you can then tick off some other items on your list in August.  Saving money along the way.

Are you in Australia?

If you don’t have a current Demonstrator I am happy to help you out.   I like to send out a little Thank You with your order so be sure to let me know your details.

How to order?

If you would like me to place your order for you then you can phone me on 0439 844574 or email me at jghayward@yahoo.com

OR

Head to my online store and shop away.  (You should check out the new look store too. It’s pretty fresh). 🙂

Head -> HERE.  Please use the Host Code 3MDURVQZ

Happy Shopping,

Jenny
cards, Catalogues, Stampin' Up!, Techniques, Tutorials

WEDNESDAY’S WOW! #105 – LINING UP THE SUNFLOWER STAMP AND DIES!

If you have the Celebrate Sunflowers Bundle do you find it a little frustrating to line up the sunflower die with the stamp OR to even put the stamp back in the stamp case after you have finished?? I have to say I find it quite frustrating – and time consuming. 🙂

I came up with a little tip to reduce frustration – and save time.  I thought  I  would share it  with you today for our Wednesday’s WOW!

Wednesday’s WOW! #105 – Lining up the Sunflower Stamp with the dies and also how to get that stamp back in the stamp case. 

1. Getting the stamp back in to the case.

Firstly we will start with the stamp set. I keep the rubber surround for the stamp set in the case and put the stamps back in to the rubber when I have finished stamping.  It keeps them secure in the case AND you can quickly see if you are missing a stamp.  Which is really good.

With the large sunflower stamp I found it hard to find the position to put it back in.  You had to keep turning it until you thought it lined up.  It took some time.

So, once I had it in the case I placed a mark with a Black permanent marker on the rubber surround and on the edge of the sunflower stamp. Then it can easily slip in place in to the right position. 

I made the mark on the front of the stamp on to the side and then over the edge on to the back of the stamp.  So you can see it when you are stamping. 

2. The next challenge was to line the die up with the stamp.

You now have the mark on the stamp so you can now position the die and make a mark on the die. 

To do this you need to position the stamp face down as that is how will stamp out.  NOTE: I have  placed the sticker  on the back of the stamp. I know some people don’t add the sticker. I think for this type of detailed stamp it would be helpful to.

Then you can  line up the die with the image.  On this image  below I see the mark is fading.  It is up the top.  I will need to add another mark.  I didn’t use permanent marker on this one I think.

3. Now lining up the die with the stamped image to diecut it.

Before you stamp the image on white card make a pencil mark on the card.  Then ink up the stamp and stamp it on to the card with the mark on the stamp lining up near the mark on the card.

Then you can easily position the die on to the card as you line up the marks.  Then diecut that lovely sunflower out.

I hope these tips are clear for you.  I am sure they will save you a lot of time.  It certainly has saved my sanity.

Be sure to the PIN the images to save them for future reference.

In Australia? If you would like to order the Celebrate Sunflowers Bundle they are available in my store now -> HERE. 

Please use the Host Code: 3MDURVQZ

Or

Email me at jghayward@yahoo.com and I can place the order for you.

I will drop a little card in the mail for you to say THANK YOU. 🙂 I appreciate your orders.

Happy Stamping,

Jenny


Catalogues, Classes, Stampin' Up!

2 DAYS LEFT FOR FREE BUNDLE WHEN YOU JOIN THE STAMPIN’ UP! FAMILY!

There is not much time left to grab your free bundle when you join the Stampin’ Up! Family this month.  What great value this is!! Some of these bundles are over $100 that you can choose from.

You receive $66 of free products when you join already.  (Pay $169 and get $235 of products – and you save also as you don’t pay shipping on these products)

The extra Bundle could be over $100 depending on what one you choose. So you could get over $160 of free products.  

This is just some Stamp/Die Bundles you could choose.  There are so many more.

Your orders after this you get a minimum 20% discount.

Have you got a long Wish List??? This could be a way to check some items off your list – and I would love to welcome you to my JEN’s INK team.  🙂

Now let’s answer some of those questions you are thinking.

People ask – What are my commitments?

– To remain active with Stampin’ Up! you submit orders (yours or with others) of about $480 per quarter.  If you can’t make that – no stress.  You drop as a demonstrator and continue as a customer.  But you have all those bonuses already. WINNING!

– You stay as long as you like. There is no obligation to stay around, or sell or have classes.  It’s all fun however long you want it to be. Most of my team members are “hobby Demonstrators”.  They love getting the discount just for their own crafting.

Still not sure?? I share some reasons why you just need to join Stampin’ Up! Find out more -> HERE on my blog.

Email me on jghayward@yahoo.com or phone me for more information.  I would love to welcome you to my JEN’s INK Team.  

But be quick.  You don’t want to miss out on this great value.

Jenny

cards, Catalogues, Stampin' Up!

BLOSSOMS IN BLOOM FLOWER WREATH!

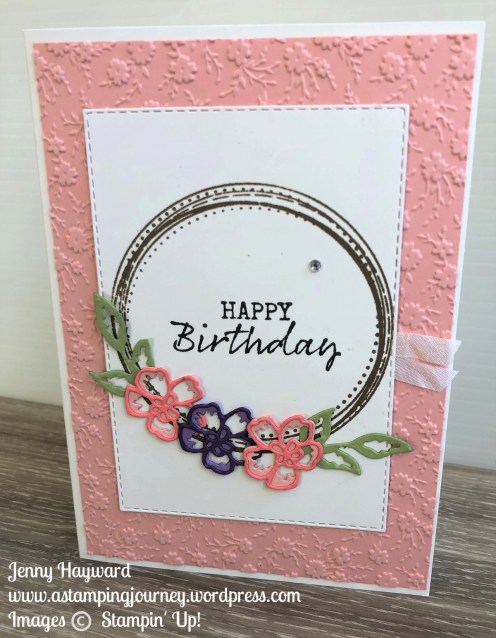
I have a different card for you today using the Blossoms In Bloom Bundle. 

I created a flower wreath using the small flower dies in the Many Layered Blossoms Dies.  

Like the large blossom dies in the set the smaller ones have the thin outline and then the wider “edge”.  If you can describe it like that.

The pinks were Blushing Bride for the inner flower and Flirty Flamingo for the inside flower. The purple flower was Gorgeous Grape for the outside and Highland Heather for the inside flower. The leaves were Pear Pizzazz.

The wreath was created by stamping the dotty circle from the Swirly Frames stamp set.  It was stamped in Soft Suede.

The Blushing Bride card mat was embossed with the Ornate Floral 3D Embossing Folder.

The sentiment is from the Seaside Notions stamp set.  

You can see the Blossoms in Bloom in my store now -> HERE.  In Australia?  If you love it and just have to get them then you can order at that link. 

Or drop me an comment and I will get back to you to arrange the order for you.

Thanks for your order.  I do appreciate it. I will drop a little card and a little something in the mail for you as I do appreciate it.

Thanks for visiting me today. I hope it inspires you to create something different with these dies.

Have a great day,

Jenny

cards, Catalogues

CELEBRATE SUNFLOWERS!

I have another card to share with you today using the Celebrate Sunflowers Bundle.  When I first start using a new bundle I “warm up” to it by CASE-ing some cards I find I Pinterest.  Which is what I did with this card.

This is my card.

The card I CASED from Beth can be seen -> HERE.

I didn’t have the In Good Taste Designer Series Paper that was used on the original card so I used Smoky Slate card and embossed it with the Pinewood Planks 3D Embossing Folder.  The sunflowers are coloured with the Stampin’ Blends.

The sunflowers are so bright and happy aren’t they?? 🙂

In Australia and want the Celebrate Sunflowers Bundle for your collection?  It is certainly a great bundle. You can see it in my store -> HERE.

Place an order over $100 and receive a card kit to create 2 cards using the Celebrate Sunflowers Bundle.

Thanks for visiting me today,

Jenny

Blog Hops, cards, Catalogues, Stampin' Up!

ESAD ANNUAL CATALOGUE BLOG HOP!

Today’s Blog Hop with the ESAD team is showcasing the 2020-2021 Annual Catalogue.  SO MANY gorgeous new products.  It’s hard to choose. 🙂

You would have come from Narelle’s blog HERE or just starting out.  Either way grab a cuppa and take the Hop.

First things first.

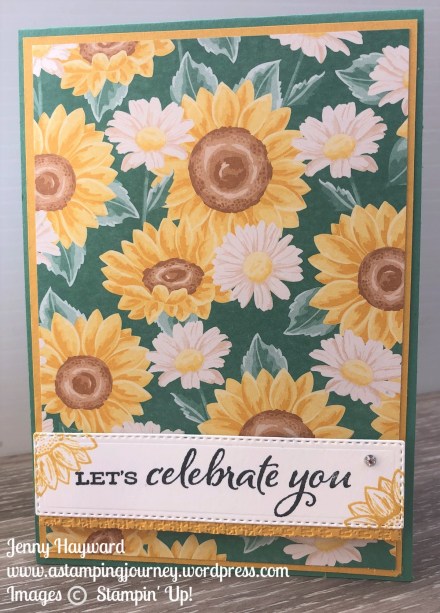
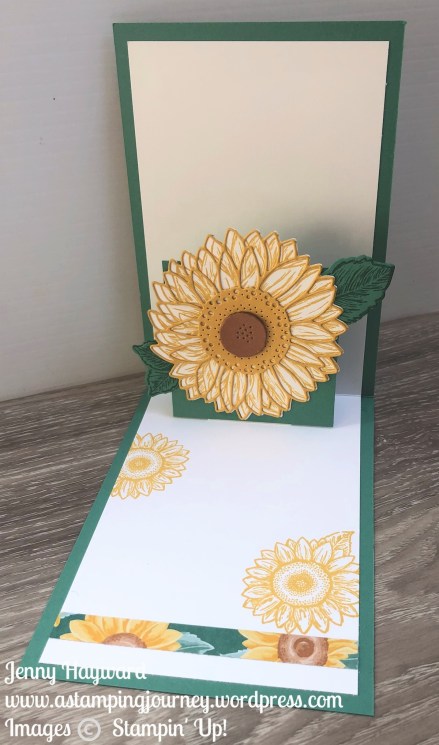
For my project today I have used the Celebrate Sunflowers Bundle  and created a Pop-Up card.

I have used the gorgeous Flowers For Every Season Paper too.  How pretty is this paper?? I have only just discovered it.

Do you want to make your own Pop-Up Card?? Download the Tutorial by clicking -> HERE.

Now continue on your Blog Hop.  Head to Maria’s Blog Here or clicking the NEXT arrow.  The list for all participants in the Blog Hop are listed just below.

Blog participant list

  1. Nicole Wilson
  2. Lou Kitzelman
  3. Denise Buetler
  4. Libby Dyson
  5. Lauren Meiklejohn
  6. Narelle Fasulo
  7. Jenny Hayward
  8. Maria Henderson
  9. Sharni Haines
  10. Monique Fielder
  11. Sharon Dalton
  12. Kayla McCreadie
  13. Rebecca Scurr
  14. Bronwyn Eastley
  15. Lynsey McCord
  16. Cathy Pinchbeck
  17. Melissa Gifford
  18. Kelly Kent

***

Before you go, this is the Celebrate Sunflowers Bundle.  

In Australia? Order The Celebrate Sunflowers Bundle available now -> HERE.

Place an order over $100 and receive a 2 card kits with the Celebrate Sunflowers Bundle with one of them a card kit for this card.

Happy Hopping,

Jenny

cards, Catalogues, Stampin' Up!

WEDNESDAY’S WOW! #104 – LAYERING THE TASTEFUL LABELS DIES!

I have been using the Tasteful Touches Bundle A LOT lately.  While I love the stamp set I really love the dies.  I love that you can use them for your sentiments or for small images and I love that they can be layered together to use on your projects.  I thought you might like to see how to use them more.

Our Wednesday’s WOW! #104 – Layering the Tasteful Labels Dies. 

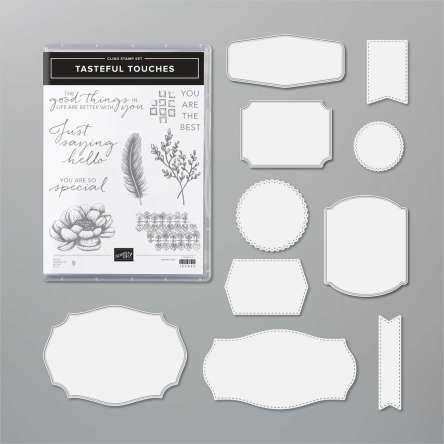
Firstly, let’s look closely at the dies.  There are 10 dies in the set.  The largest die is 8.9cm x 6.4cm (3-1/2″ x 2-1/2″)

I know it may be a bit hard to tell in this image but with these dies some have a scored edge (top half) and others have a stitched edge (bottom half).  It’s great that there is the different looks in the one set.

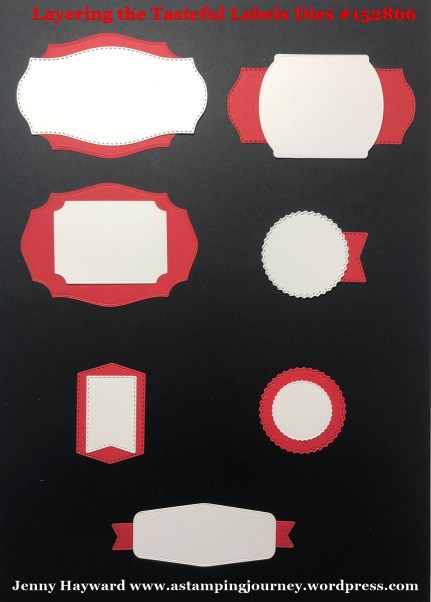
Most of the dies can be layered together for your images or sentiments.  I have shown some below for you.  There are so many other options though.

How cool are they??

I hope you found the chart helpful to see ways that you can put your diecuts together. Be sure to PIN the image so you can refer back to it.

If you must have the Tasteful Labels Dies in your stash then they are now available in my store.  Grab them on their own or get them in the Bundle with the Tasteful Touches stamp set.

In Australia?  I would love to help you with ordering them. Visit -> HERE to order.

Please use the Host Code: YQQGTXQR

As a Thanks when you order them I will send you card kits for 2 cards I have created recently with them.  Some of the cards you can check back on the past posts.

Thanks for visiting me.

Jenny

cards, Catalogues

INCOLOR FEATHERS WITH TASTEFUL TOUCHES!

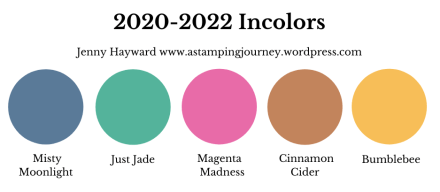
We have talked about the new Stampin’ Up! Incolors for 2020 and you have probably seen them a little around your travels on the internet.

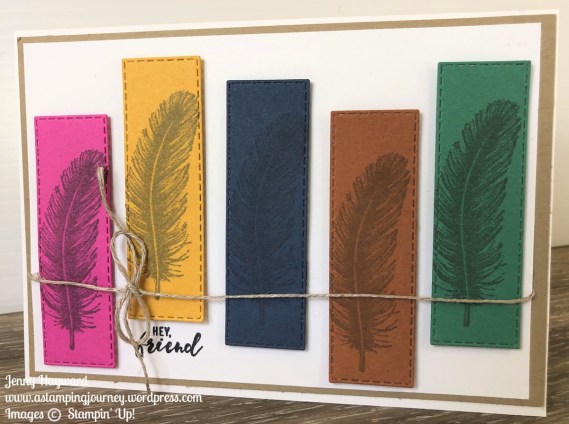
This card I am sharing today uses the 5 new colours together.

I have used the feather from the Tasteful Touches stamp set and stamped them on each In color card in Basic Gray. Then they were diecut with one of the rectangle dies in the Stitched Rectangles.  Rather than adhere them in a straight line I thought it would be fun to stagger them on the card.

The sentiment is from the Itty Bitty Greetings set.

A fun little card perhaps?? 🙂

Have a great week,

Jenny

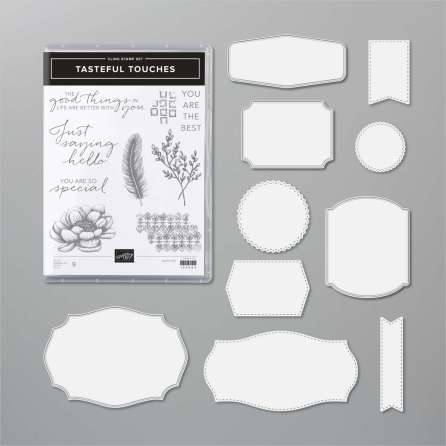
The Tasteful Touches Bundle is now available in my store now -> HERE