3D projects, Sale-A-Bration, Stampin' Up!, Tutorials

PERFECTLY ARTISTIC BAGS!

I know I told you I was going to share some more Bloomin’ Heart Thinlits cards and I will, but I HAVE to show you these bags. I realised the other day that there was less than a week left of some fantastic Sale-A-Bration products. I still had so much of the lovely ‘Perfectly Artistic’ DSP that I just HAD to use. What better way but to use it but to make some bags.

Here they are for you. I thought I would make 3 different ones. I will show you how to make them too.

5186

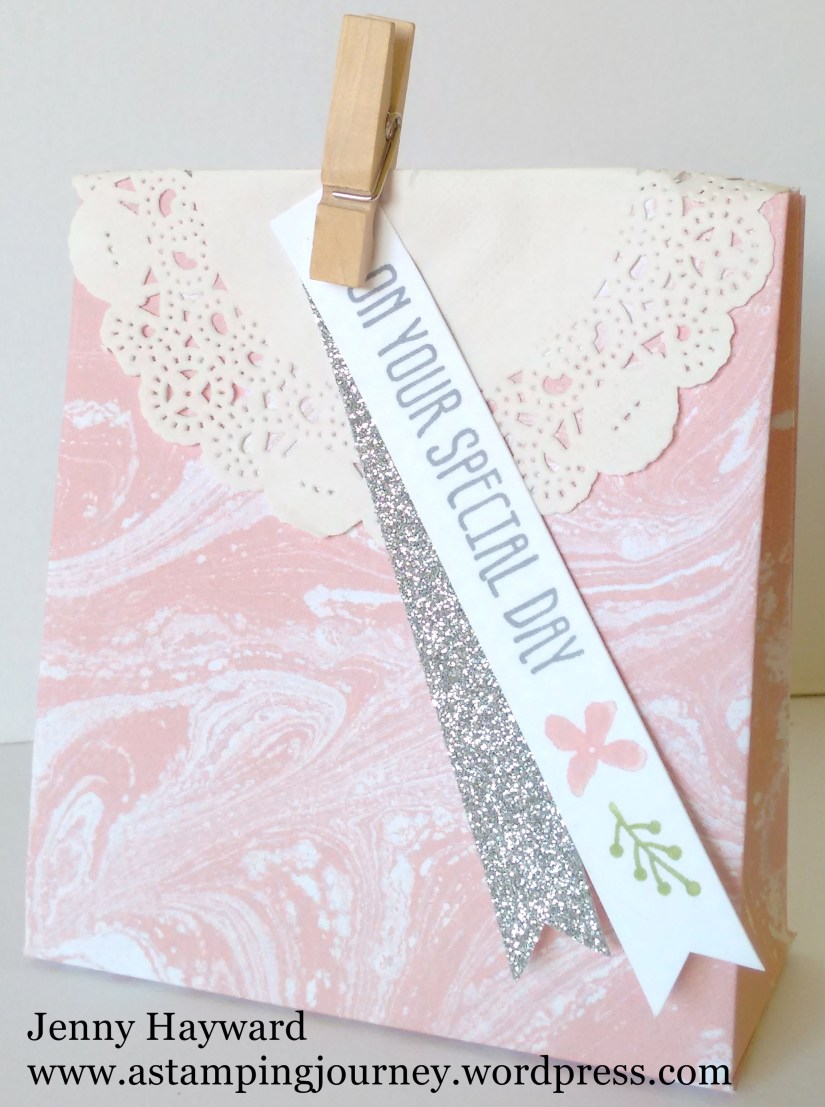
BLUSHING BRIDE MINI BAG

This cute little pink one is very simple to make. I found the idea on the internet somewhere quite some time ago but I am not sure where now – sorry 🙂

image-5196

Cut your paper to 15cm x 30cm.  (6″ x 12″)

On the 15cm (6″) side, score at 4cm. (1 1/2″)

On the 30cm (12″) side score at 10cm, 14cm, 24cm and 28cm.  (4″, 5 1/2″, 9 1/2″ and 11″)

Cut up on the score lines on the 30cm (12″) side up until it meets the other score line. Cut off the small tab at the end. Add adhesive on the small tab at the side and assemble. Add adhesive to the bottom tabs and fold up and adhere.

Decorate as you like. I have used the greeting from a Sale-A-Bration set ‘Botanicals For You’. I added a strip of Silver Glimmer Paper too for the dazzle factor. To close the bag I simply used a Wooden Clothespin over a folded Paper Doily. 
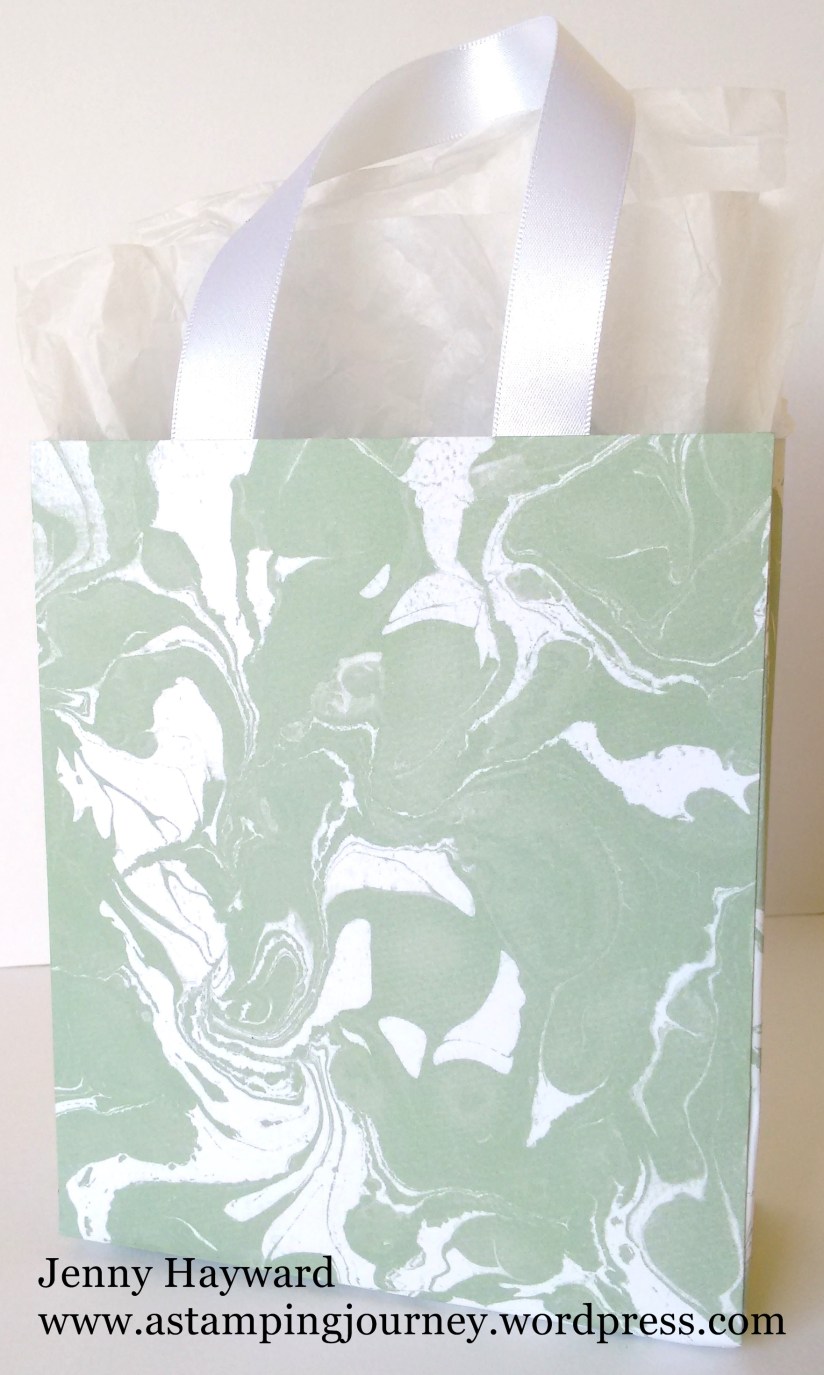
MINT MACARON BAG

5192

Here is a side view.

5203

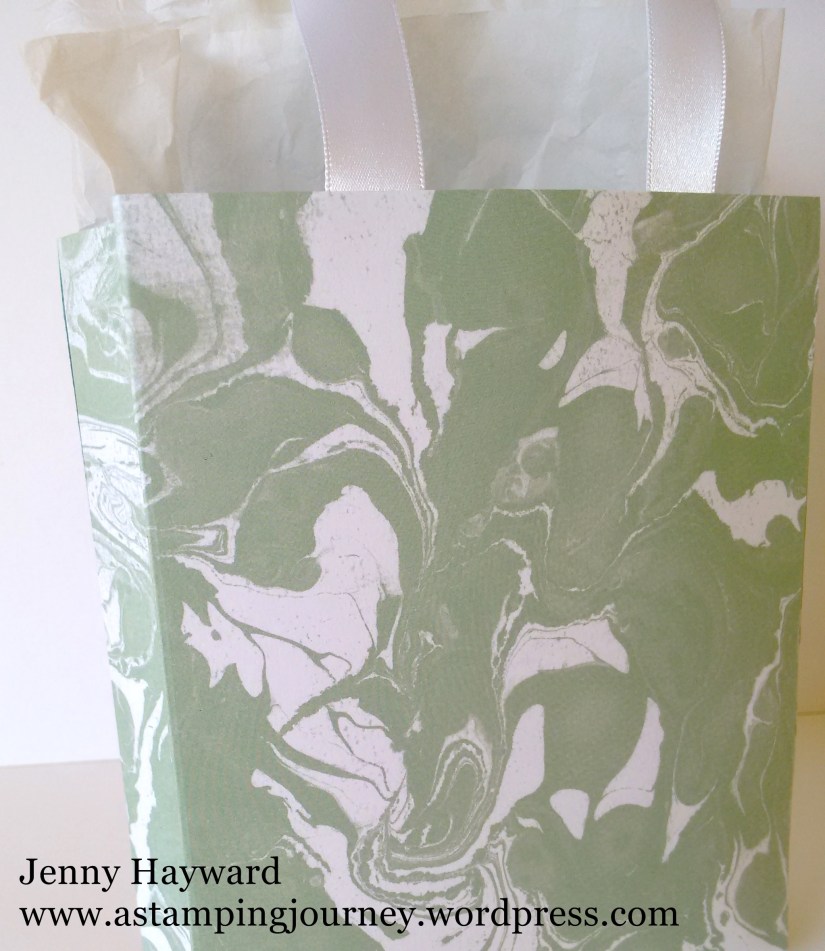
The Mint Macaron is another quick bag. You can find the tutorial to make this bag at ChicNScratch HERE.

LARGE BASIC GRAY BAG

5191

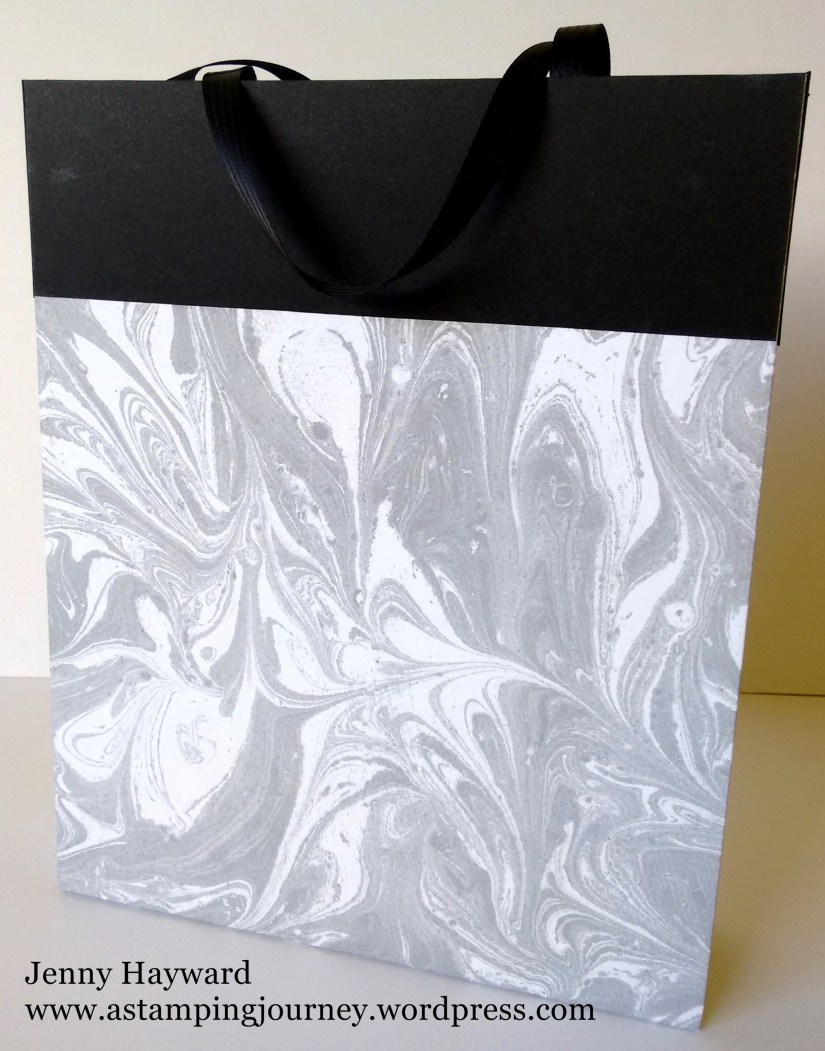
This large bag is so easy to make.  I don’t know why it has taken me so long to make one of these. You can find the instructions on a number of blogs.

For mine, I took 2 sheets of the Basic Gray pattern from the pack. On 3 sides, score at 5cm (2″). Cut up on the tabs at the bottom. Place adhesive along the bottom of one sheet and join the 2 sheets together. Place adhesive to the side tabs on one sheet and assemble together.

TIP #1 you could if you like score on the top edge as well when you are scoring and then fold that score line forward to show the inside colour on the outside, if that makes sense? I had decided that I wanted a black edge. I cut strips from black card stock approximately 5cm (2″) wide and adhered that along the top edge. I think it makes a striking contrast.

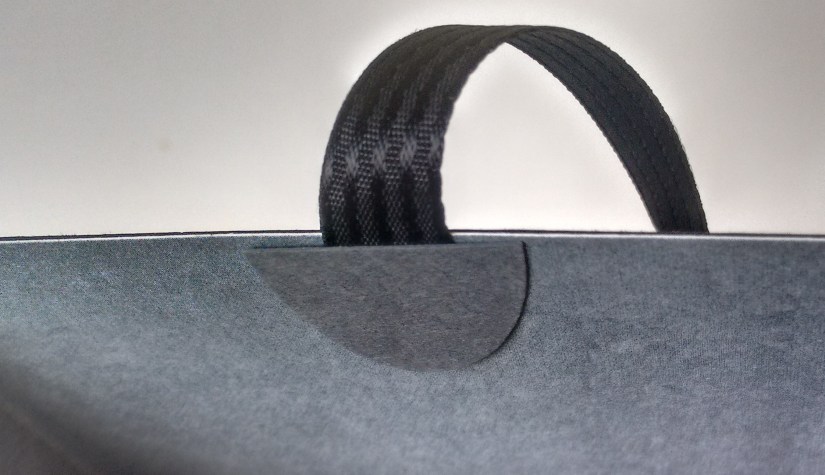
TIP #2 for your ribbon handles.  I didn’t punch holes in my bags to add the ribbon.  I added the strong Tear Tape to each end of the ribbon and adhered them to inside of the bag.  To cover the ends I punched out an oval in card and adhered this over the ends.  It gives a neater finish I think.

insdie

I hope you like these bags. They were fun and I was surprised how easy they were to make. Go and make some yourself. 🙂

Until  next time,

Jenny

3D projects, cards, Classes, Stampin' Up!

KIDS CLASS WITH PARTY WISHES!

OK Kids 6-12 years old, this one is for you.  I have 2 cool cards and matching bags for you to make in this fun class.  Come and join the fun. Bring a friend along for more fun.

This is what we will make.

144

It’s on THIS FRIDAY 22ND at 10.30am in East Corrimal.  (I will let you know the address when you book).

Please RSVP by Thursday morning. 

I can’t wait to show you how to make these.

Jenny

3D projects, cards, Classes, Stampin' Up!

SKY IS THE LIMIT 3D CARD!

I shared the Fold Flat (3D) cards the other day.  I have made one of these cards using some great Sale-A-Bration products. (Only 5 sleeps to go until Sale-A-Bration begins!).  You will love this year’s offerings for Sale-A-Bration.  There are so many fantastic products.  It will be hard to choose believe me. 🙂

Here is the card but you can see how to make them in the earlier post HERE.  

IMG_20151229_160536118

Don’t you love that swirly paper?? It makes the plane look like it is flying over the ocean!  This paper is the ‘Perfectly Artistic’ Designer Series paper and comes in 12 sheets of 12″x12″ and available in so many gorgeous colours in the pack.  This one is Tempting Turquoise.  The stamp set is ‘Sky is the Limit’  A great one for those male cards!

On the front panel I stamped the clouds on the white card and stamped the plane in Basic Gray.  I stamped the plane again on scrap white and cut it out and raised it up with Dimensionals.  The greetings which come in the set are stamped in Basic Gray on Crushed Curry card and cut with the ‘Lots of Labels’ Framelits.  They were raised up with Dimensionals too.  The little loops are from the Burlap Ribbon.  I cut off the edge of the Burlap and then pulled off a couple of threads and looped them around.  I adhered them onto the back of the label with glue dots.  These give a little wavy look rather than than using the Linen Thread this time.  I added a Turquoise Candy Dot to finish but I am still not convinced of that but it is there now. 🙂

There you have it.  Now I know you are going to want to grab this set.  This set and the paper are only available until February 15 and then some new products will be offered so be quick.

Thanks for stopping by,

Jenny

Book your Sale-A-Bration party or Private Class now.  Times are limited but contact me to book your spot.  I would love to share more creations with you and your friends!

3D projects, cards, Techniques

FOLD FLAT CARDS!

How was your Christmas??  Our’s was a little quiet on the day but then celebrating with different family members for the last 3 days.  It’s all done now for another year.  I have packed up my Christmas stamps and cards and ready to move on to some different creating.  I haven’t had a lot of chance to create with the new products from the upcoming Occasions and Sale-A-Bration so I am looking forward to getting them inky.

I have had these projects for a while now and with all the excitement of the Holiday Catalogue they got put aside so I thought it was time to share these before we move on.  These are called Fold-Flat (or 3D) Cards.  You might have seen them around blogland.

This one below uses ‘Celebrate Today’ we made this in a class a few months ago.  The original instructions were from HERE. You can follow along in that post.  They are available in English too. I have used the ‘Bohemian’ DSP.  Edited to add: The Measurements for this are just below this card.  The smaller version is further below.

P1170178

This is a side view.  This folds flat so you can post it.  I did find this quite large so later I made one smaller so it can fit in a standard size envelope.

P1170179


LARGE FOLD FLAT CARD TUTORIAL

Large back panel: 15cm x 27cm (6″ x 10 5/8″) Score on the long side at 15cm, 18cm, 23cm, 26cm. (6″, 7″, 9″ and 10″)
Front panel: 8.5cm x 15cm (3 3/8″ x 6″)  Score on the long side at 1cm and 4cm. (1/2″ and 1 1/2″).
Fold each of the pieces.  The card for the back panel is folded up into a box shape and the small tab adhered on to the card.  Check the photos if you are unsure what I mean.
The Front panel piece is folded up.  The small tab is adhered to the back panel about 1/3 of the way down.  Then adhere the larger section on to the “box” shape formed from the back panel.
Decorate as you like.  The Paper pieces are 4mm or 1/8″ smaller for that section.

This smaller one uses the set ‘Something For Baby’.

P1170183

A side-view for you.

P1170182

On the back you can adhere some Whisper White card so you can add the message.

P1170184

I will share my measurements for the smaller one.  Putting it together is the same as the large one so you can follow along in the above link.  It is very simple though.  Just a matter of folding on the scored lines and adhering.  There is a little trick to adhering the front piece so I will tell you that further down.

FOLD FLAT CARDS (Smaller version).

Base: Cut card 10.5cm x 27cm. (4 1/8″ x 10 5/8″).  Score at 15cm, 18cm, 23cm and 26cm.  (6″, 7 1/8″, 9″ and 10 1/4″).

Designer Series Paper strips.    TOP PIECE – 10.1 cm x 9.6cm (4″ x 3 3/4″)                     BOTTOM PIECE – 10.1 cm x 4.6cm (4″ x 1  7/8″)

Back: Cut Whisper White 10.1cm x 14.6cm (4″ x 5 3/4″)


Front Panel: Cut Card 7.5cm x 15cm (3″ x 6″).  Score at 1cm and 4cm.  (1/2″ x 1 9/16 – I hope that measurement is right?? It doesn’t seem right)  🙂

Card Mat: Whisper White – 7.1cm x 10.6cm (2 3/4″ x 4 3/16″).

ASSEMBLING (If you are having trouble following this, head to the link I added above for photos.  I didn’t think I would repeat the photo steps).

For the Base piece.  Add Adhesive to the smaller tab (on the back as it is lying down on the table) and fold up to adhere to the front.  (I added the DSP first so I could line up the fold just below the DSP).

Fold the front Panel on the score lines.  Add adhesive to the small scored section at the top.  Before sticking down the tab fold this under carefully and line up the second score line with the top edge of the base card and then press down on the small tab to adhere this to the base card lower down.  If you are not sure then check the tutorial link above to see the image. Add adhesive to the back of the front panel and then adhere to the folded section of the base card near the bottom.

++

I hope this all makes sense.  I loved making these and since I had the instructions out still to share these with you I decided to make one of these cards using some new Sale-A-Bration products.   I will post that card next post so come and visit again.

Jenny

3D projects, cards, Christmas, Classes

CRAFT FAIR MAKE AND TAKE!

Now that I have shared a lot of the projects that I have made for the markets and Fairs I thought I would show you the Make and Take I had at the last Craft Fair event.  It had to be quick and I hope impressive??  I made a quick tag. Of course with the very beautiful set ‘Wonderland’.

P1170790

This tag was inspired by one from my friend Vanessa.  Simply stamp the trees in Garden Green on a piece of White cardstock and stamp again to stamp a fainter impression.  Tear a piece of the Winter Wonderland Vellum Stack to adhere at the bottom.  Punch out a small star with the Gold Foil and add a Rhinestone.  At the top punch with the Scallop Tag Topper Punch and tie off some Garden Green Striped ribbon.

It was a simple one for even those who had never stamped before and they loved it. I don’t think you can make a bad project with this set really. Can you??

Did you realise that this set will not be available after January 4th?? You better grab it now. Don’t regret it.  Now how many times have you debated about a stamp set and then after it is gone you realised you REALLY SHOULD HAVE BOUGHT IT!!!! Don’t regret this one.

Order it at my Online Store NOW!  Head HERE.  Please use the Host Code: DRVPX7DB

Now before I leave you I thought I would show you my display at the last Fair.  We were all squashed in but that was OK right??  This set up was similar to most of the events I have done recently.

doll bear craft fair 2015

A close up of the shelves with the boxes and other of the gifts.  The Easel Calendars were on the shelf above which you can’t see.

image-3333

Thanks for stopping by.  See you again soon,

Jenny 🙂

3D projects, Christmas, Classes, Stampin' Up!

LAST CLASS OF THE YEAR WITH A SPECIAL LUMINARY!

It’s the last class of the year THIS FRIDAY.  We have a special project to make.  This Luminary was inspired by a few I have seen on Pinterest so I thought it would be nice to finish off the year with.  How about it?? Are you local in Wollongong?  Come and join us.  Here are the details.

Friday 4th December – 10am or 7.30pm.  End of year Christmas. 
Come along for a fun time of celebrating and stamping. We have a special project for our last class – and maybe some surprises.  Cost: $15 BYO:Scissors and adhesives.  PLEASE RSVP by Wed. 3rd December. (Thurs. am the latest).  🙂
RSVP ASAP TO RESERVE YOUR SEAT!!!
3D projects, Christmas

FAIR PROJECTS UPDATE!!

Last week was a very busy week.  I had 3 markets/fair events.  It was great seeing some familiar faces and meeting up with new people.  I thought I would share some of the projects I made for the markets.  Having 3 in the week was interesting also to see just how different things sold.  So I will let you know about that too.

A little while ago I picked up some lip balm balls and sticks reduced at a local store so I grabbed those to make some cute holders for them.

P1170781

The tutorial to make your own Lip Balm Boxes can be found HERE.  They are so quick to make.

Here are some tiny Lip Balm Purses.  Both of these created some interest.

P1170785

Here is a close-up from the side. (sorry I realised I hadn’t met the tops together neatly before I took the photo!)

P1170787

These are cute little purses. It was great to use up some retired papers too. You can make your own from the tutorial HERE. 

Now I made these fun little packs too.  There is a cute  poem on the back of them and I forgot to take a photo of these.  I will add them below.

P1170780

The Reindeer Poop was very popular at one event at a school.  It appealed to some boys sense of humour, or was it that there was no other chocolate sold there at the time?? 😉  I made some more bags up but then I didn’t sell one bag at that craft fair. You never know!

Here are the poems. I found these on Pinterest.

REINDEER FOOD

Just Sprinkle on the lawn at night,

The moon will make it sparkle bright.

As Santa’s reindeer fly and roam,

This treat will guide them to your home.


REINDEER POOP

I heard that you’ve been naughty,

So here’s the inside scoop,

All you get for Christmas,

Is this bag of Reindeer Poop!


I have more to show you but that is enough for one post.  Pop back again and I will show you some more in the next post.

Jenny

3D projects, Classes

REINDEER CLASS FOR THE KIDS!!

CALLING ALL LOCAL KIDS – Join us for some Reindeer craft.
(Suitable for kids aged 6-12years).

If you are local to Wollongong then bring your kids along for some fun Reindeer craft.
 
WHEN: Saturday 28th November 2.30pm – 4pm.

Cost: $15. 
PLEASE RSVP by THURS. 26th by commenting or emailing me. Places are limited so book your spot early.
 
Tell your friends and family. Spread the word. It will be lots of fun! Here is what we will be making. Aren’t they cute!!
reindeer
——————————

OK for the big people you won’t miss out either.

Join me for the last Christmas Stamp A Stack for the year.
 
Friday 27th November – 10am or 7.30pm. Christmas Stamp A Stack.
 
BYO: Scissors and adhesives. Cost $15
  
Please RSVP by Wednesday 25th November by commenting or emailing me.

This is one of the cards we will be making.

 
P1170777
Do join us. Classes are a lot of fun!!!  🙂
Jenny
3D projects, cards, Christmas

STAMPING WEEKEND PROJECTS!

A couple of weekends ago we had another fun stamping weekend.  These are great opportunities to get lots of stamping done PLUS lots of laughs!!! I thought I would show you some of the projects I made. I think these will be over a couple of posts so be prepared. 🙂 I realised that I hadn’t shown you all the projects from the last one so I might have to get back to that later.  For now, here is some of my creativity from the weekend.

One of my main goals for the weekend was to make some projects to sell at a few upcoming vendor fairs I am doing.  I started off making some bottle tags. These are great for the Christmas period as Wine is a popular gift to give.  Why not hang a tag off your wine gift!

P1170706

These ones are using the ‘Wondrous Wreath’ stamp set and Framelits.

P1170703

These ones I have used the ‘Cozy Christmas’ stamp set and the gorgeous ‘Home for Christmas’ paper.

These took a while but they were fun to make.  I found a few different versions and tutorials for these when I went looking.  It all depends on how you want to decorate them or whether you want them longer to fold up the card to make a pocket to tuck a treat in as well.  For mine the card measures 20cm x 6.5cm (8″ x 2 1/2″).  Score your card at 6.5 cm (2 1/2″).  I punched out the circle using the 1 3/8″ circle punch.

I have to say these were the only projects I got made for the Vendor Fairs.  I got a little distracted with some other fun stamping projects. 🙂

After making these tags I had lots of circles punched out.  What is one to do??? Not waste them now!  I used a lot of them on a card.  I had some idea in my head but wasn’t sure how it would turn out. Check it out though.

P1170668

I laid the circles out on a piece of Whisper White for the card mat.  When I was happy with the arrangement I glued them down and then ran the piece through the Big Shot with the Stars Embossing Folder.  Then I used markers on the greeting from ‘Cozy Christmas’ and cut it out using the ‘Tags and Labels’ Framelits and layered this onto a Gold Foil tag.  I wrapped around some Gold ribbon and then layered it all on to an Old Olive card mat and then a Real Red card base.

Next post I will show you some more Christmas projects I made.

Stop by again soon,

Jenny

3D projects, cards, Christmas, swaps

TEAM CHRISTMAS SWAPS!

I thought I would show you the swaps I received from last week’s team meeting.  There are some really cute ones here.  I think Tags were very common 🙂  They are great to use as tags or add them to cards.

P1170689

Sorry for the lighting.  Sigh! Must do something about this BUT you can get the idea anyway.

Now the cute little penguin card in the back does have a head.  Sorry about the photo.  The penguin is stamped on the inside of the card and a circle window is punched on the front with the hat on the front.  It is so cute.  I love all these ideas. Thank you to all the clever demonstrators in the Inky Fingers Team.  Nice to share ideas.

I will show you my swaps.  Once again – tags! Now that wasn’t the theme but funny how it works out.

P1170686

I CASED the red one from Pinterest and made up the other in Smoky Slate, Pool Party and Bermuda Bay.  These use the ‘Sleigh Ride’ Edgelits.  For the red one I punched out stars from Gold Foil using the Star Border punch.  The Smoky Slate one I have punched out one star in Silver Foil. Then I added some Dazzling Details for a sparkle but you really can’t see that well sorry.

I better get going. Our internet is being switched off soon to transfer it over to the new NBN network.  Hopefully it is not too long offline.  I think my kids are going to die!!!!! 😉

Thanks for visiting.

Jenny