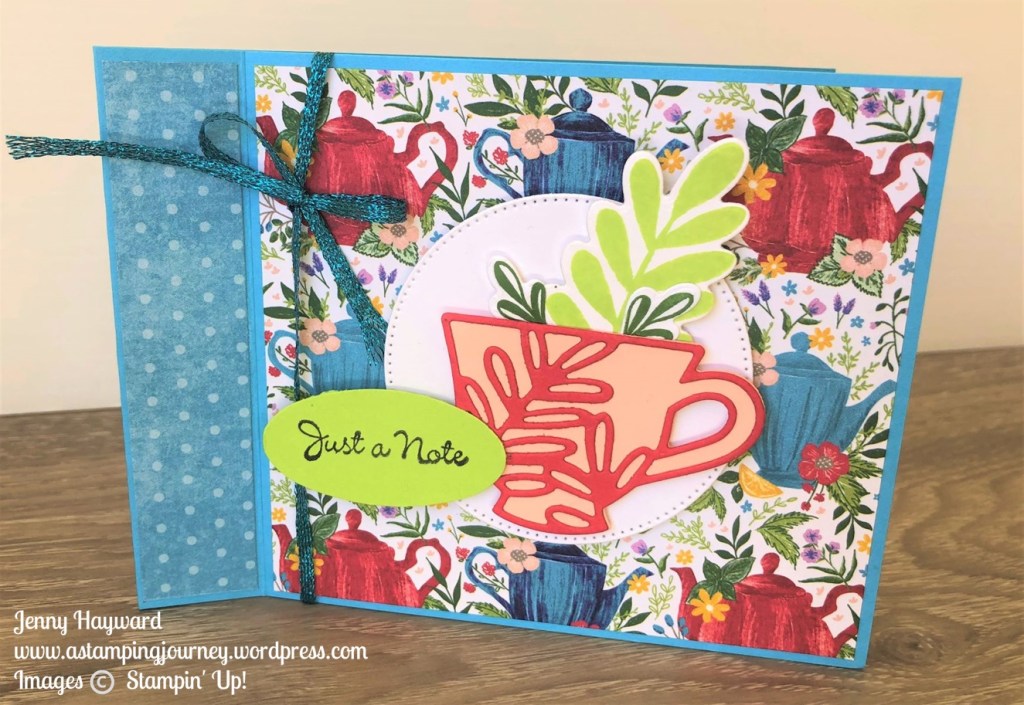
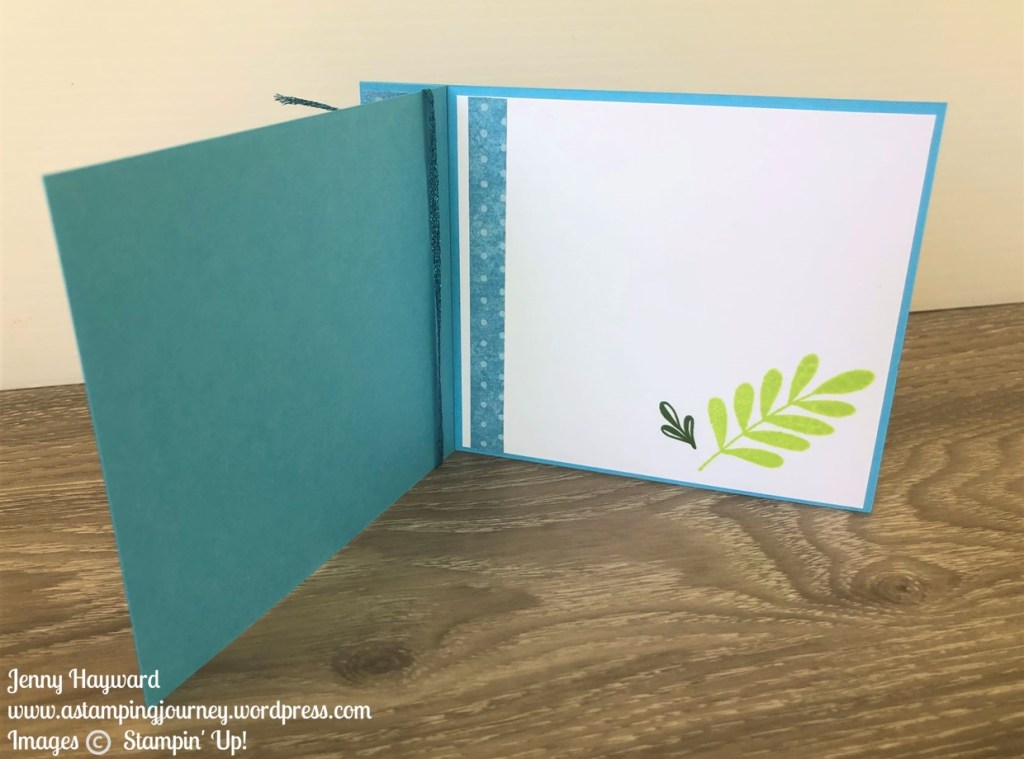
I shared a card recently with Adventurous Journey Stamp Set that was a Book Binding Fold Card. I had a lot of requests to make a video of it to share how to create one.
So I have it for you today.
This card was using the Cup of Tea Bundle and the Tea Boutique Designer Series Paper.
Below is the video that you can check out.
CREATE YOUR OWN BOOK BINDING FOLD CARD
Measurements:
Base card: 10.5cm x 28cm Score at 11.5cm and 14cm
4 1/4″ x 11″ Score at 4 1/2″ and 5 1/2″
Designer Series Paper:
2.1cm x 10.1cm 3/4″ x 4″
11.1cm x 10.1cm 4 1/4″ x 4″
White card: 11.1cm x 10.1cm 4 1/4″ x 4″
I hope you get to make one. I love hearing from people when they share their projects with me.
Are you in Australia and need supplies?
I would love to serve you.
You can shop online -> HERE. Please use the Host Code: 6PPKEPZJ Or contact me directly and I can help you out.
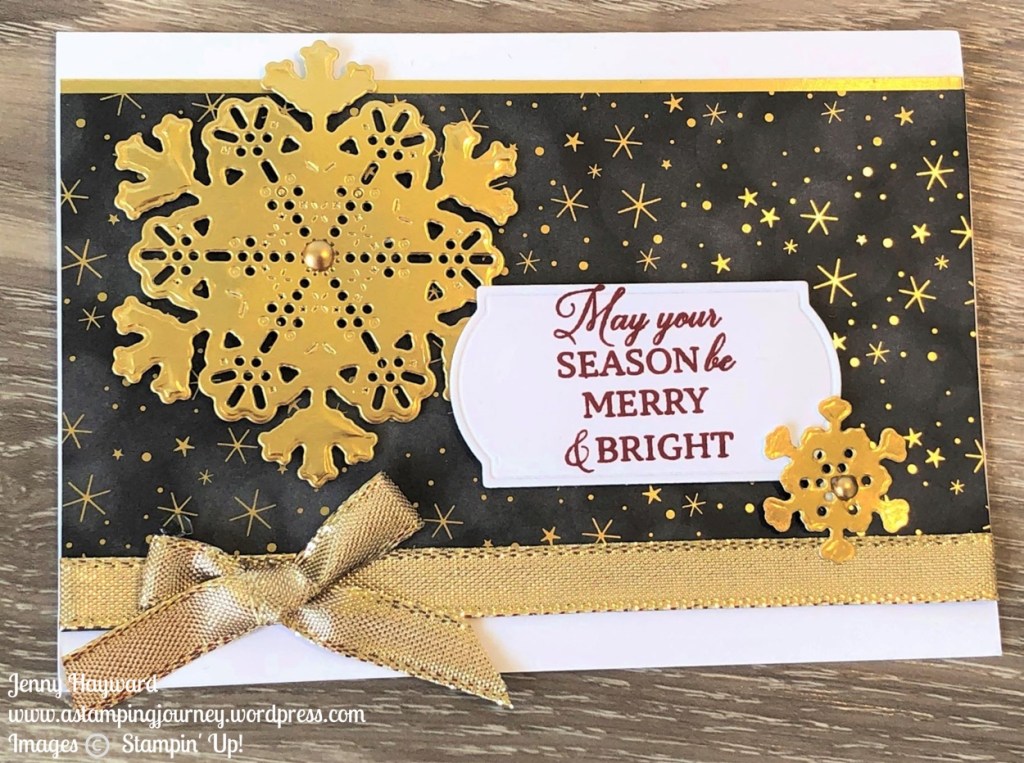
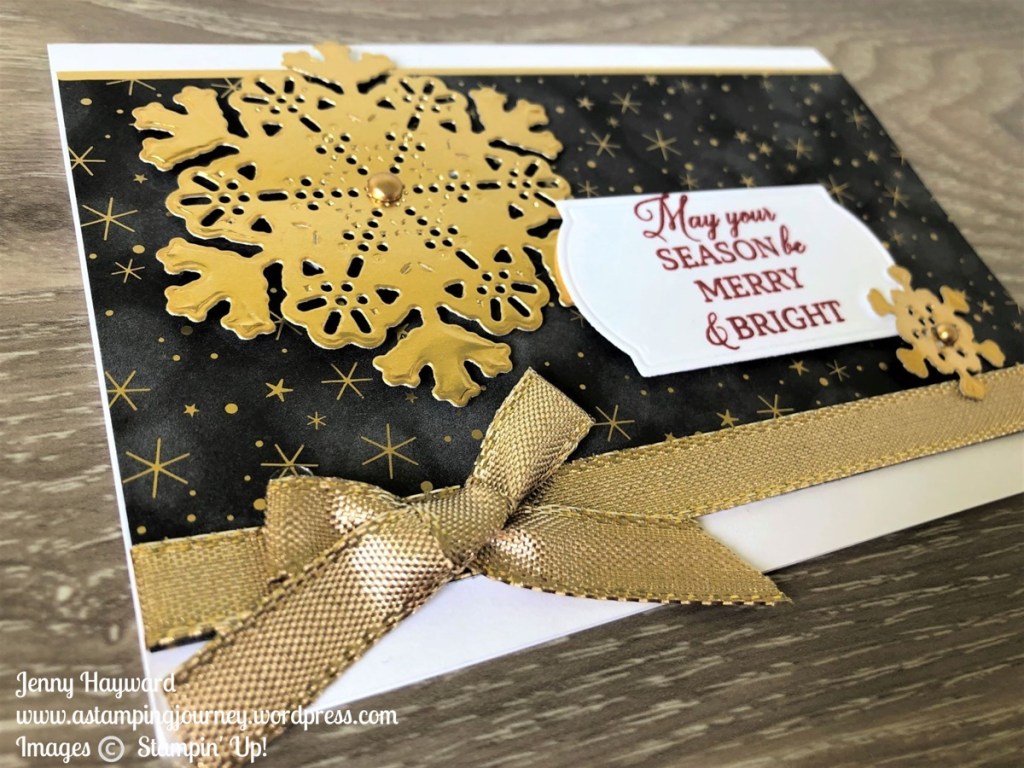
A shiny, gold Christmas card for you today. This Lights Aglow Specialty Designer Series Paper and with the Twinkling Lights Dies can make a very elegant card.
The sentiment is from the Trimming the Tree Stamp set and diecut with one of the dies from the Painted Labels Dies. And some shiny Gold Shimmer Ribbon.
In Australia and would like to order some of these awesome products for your Christmas creating?
Head to my store -> HERE. Please use the Host Code: 6PPKEPZJ
Or you can contact me anytime for me to order for you.
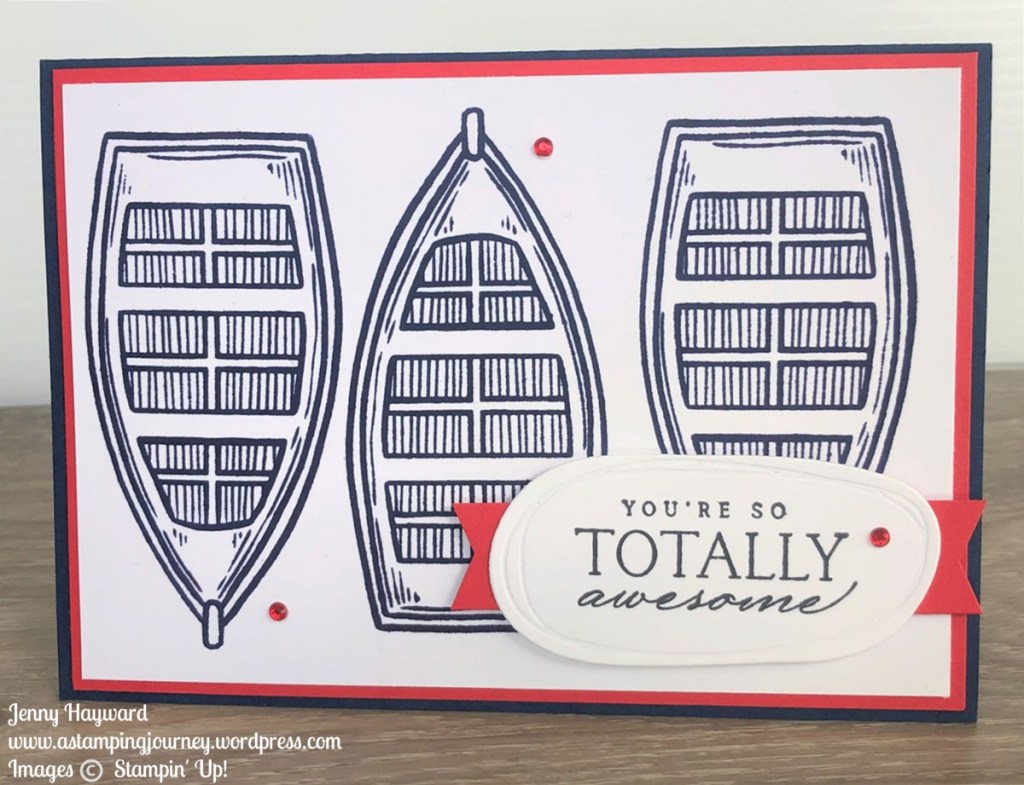
Some simple stamping for you on this Sunday. And since I have been playing a lot with the Adventurous Journey Stamp Set I thought I would keep this one simple.
Just a 3 stamped boats on a card with a sentiment.
The sentiment is from the Waves of Inspiration Stamp Set and it was diecut with the Beautiful Shapes Dies. The red banner was just a strip of Real Red card and I snipped some banner ends with scissors. Then some Red Rhinestones to finish. You can have bling on Male cards right. 🙂
Have a great Sunday.
Jenny
Need some supplies and you are in Australia?
Then stop on by my store -> HERE. Please use the Host Code: 6PPKEPZJ Or contact me directly and I can help you. I love chatting to people about their crafting.
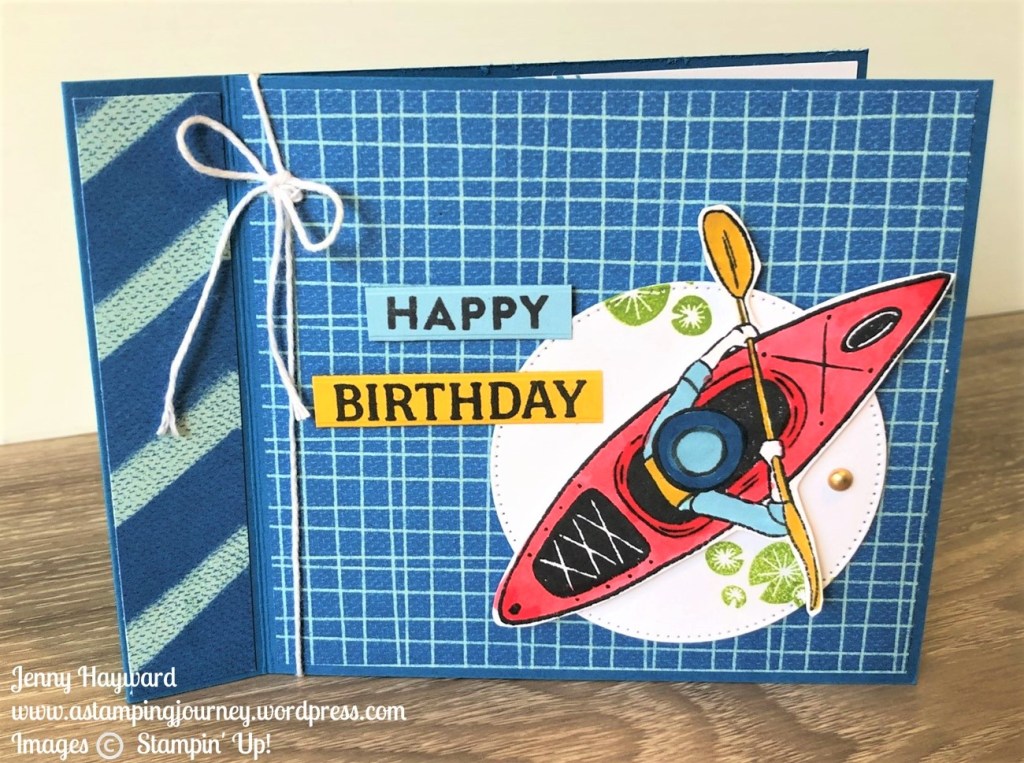
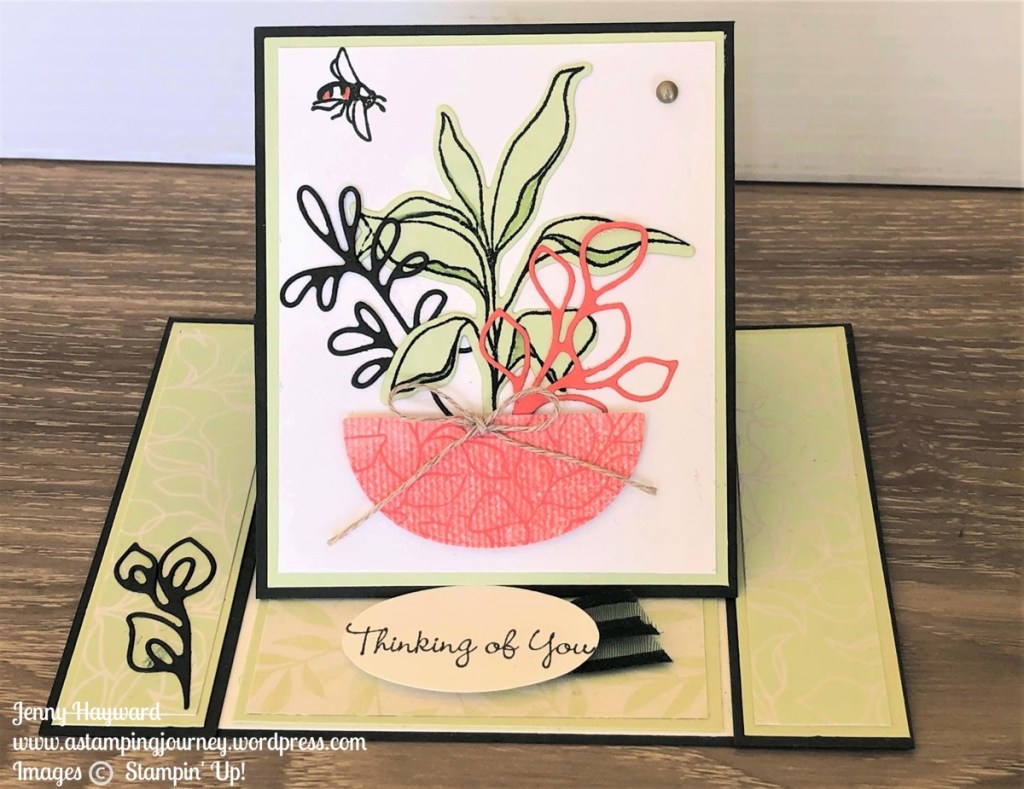
Another card with the Adventurous Journey. I have loved this stamp set. Really! It’s a great one for the boys cards – or the adventurer.
I have used the Celebrate Everything Designer Series Paper which is an awesome pack of paper. It is a Host Rewards item from the current Mini Catalogue that you can redeem with your orders. It has paper suitable for Christmas, birthdays, Halloween even but suitable for lots of occasions.
The kayaker was coloured with the Stampin’ Blends.
I have more with this set that I will share with you over time so watch out for them.
As always if you need supplies and in Australia I would love to serve you. You can pop by my store -> HERE and check it out. Please use the Host Code: 6PPKEPZJ
Or contact me directly and I can add your order for you.
Thank You for your support. Even just stopping by my blog and checking out my projects is always so nice. And you can “follow” along to be sure to get my updates if you haven’t already. Save you stopping by to see if there are posts. Just check that tab in the right hand column on my blog.
I have been playing a lot with the Adventurous Journey stamp set lately. It’s such a great one for the boys cards. It was fun to use this in class last week too.
I wanted to try something a little different. I have noticed Book Binding Fold cards around and thought that would work well.
Here is the card.
The outside.
The kayaker was coloured with the Stampin’ Blends. For the sentiment I stamped the words on the Balmy Blue card and Crushed Curry Card. Then diecut them with the long sentiment die in the Sending Dies. It was easy to just trim them down.
I find that a lot easier than trying to squeeze a sentiment on a thin strip of card.
The paper is from the Celebrate Everything Designer Series Paper pack which is a Host Reward in the Mini Catalogue. It’s great paper by the way. It has such a range of colours and prints. Why not take a closer look at it.
This is the inside.
I think I will just have to put together a video soon for it. So stay tuned on that.
If you need any supplies to create your next project I love to serve you. Head to my store -> HERE. Please use the Host Code: 6PPKEPZJ
September brings 2 exciting new promotions. We have Weekly Deals – each week for 4 weeks AND Perfect Partners. Let me tell you about them.
WEEKLY DEALS
With Weekly Deals Stampin’ Up! have a little discount on select products. There will be a new selection each week. So stay tuned each week.
WEEK 1
Quite a number of embellishments for this week. I love the Brushed Brass Butterflies. You will want to grab them. AND this is a great time to get the gorgeous Splendid Day Specialty Designer Series Paper.
Check all the deals below.
If you want to grab any of these you can head straight to my store -> HERE. Please use the Host Code: 6PPKEPZJ
OR contact me directly and I can help you out.
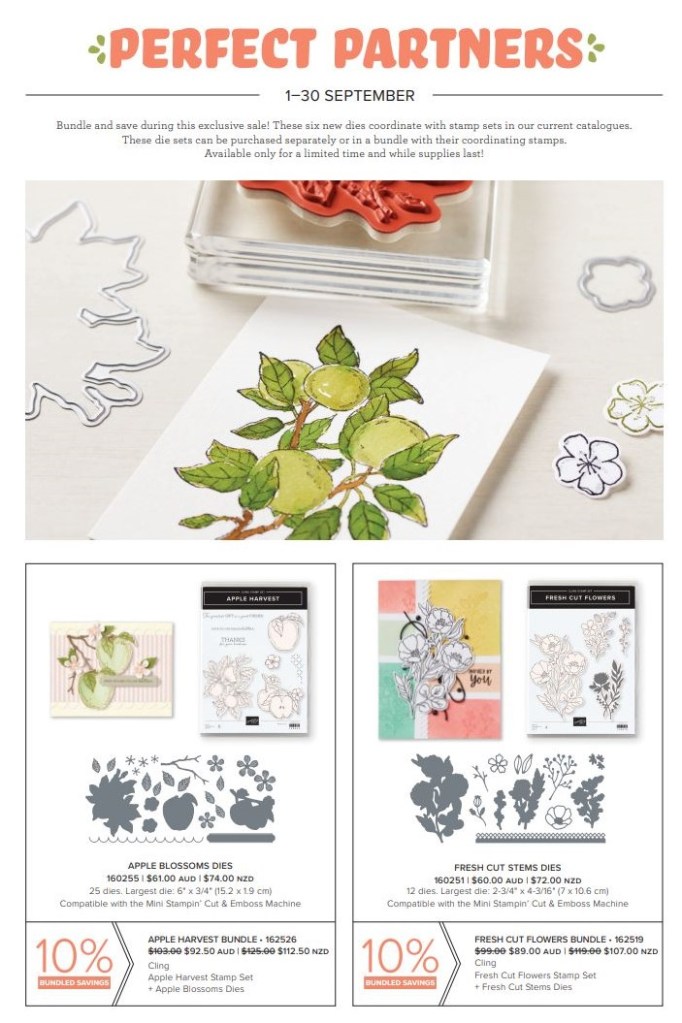
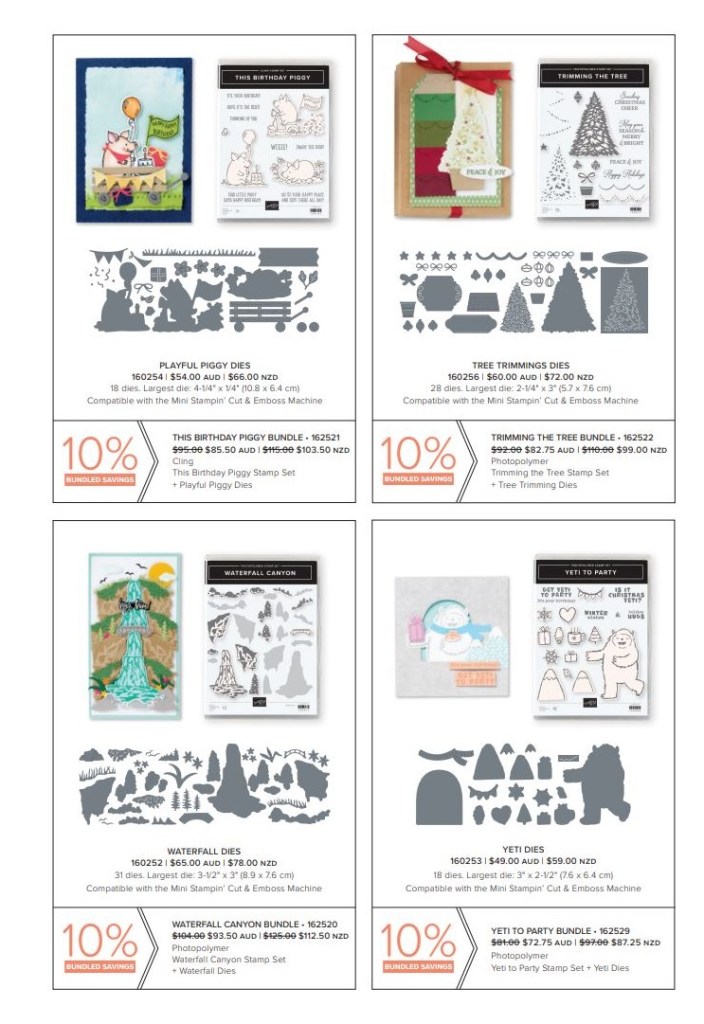
PERFECT PARTNERS
Save the scissors this month. Stampin’ Up! have released 6 dies sets to co-ordinate with 6 current Annual Catalogue Stamp Sets. Grab them now only while supplies last.
If you haven’t got the set already you can buy it as a bundle and save 10%.
Check out the selection.
Let’s just have a look at one of these projects closer.
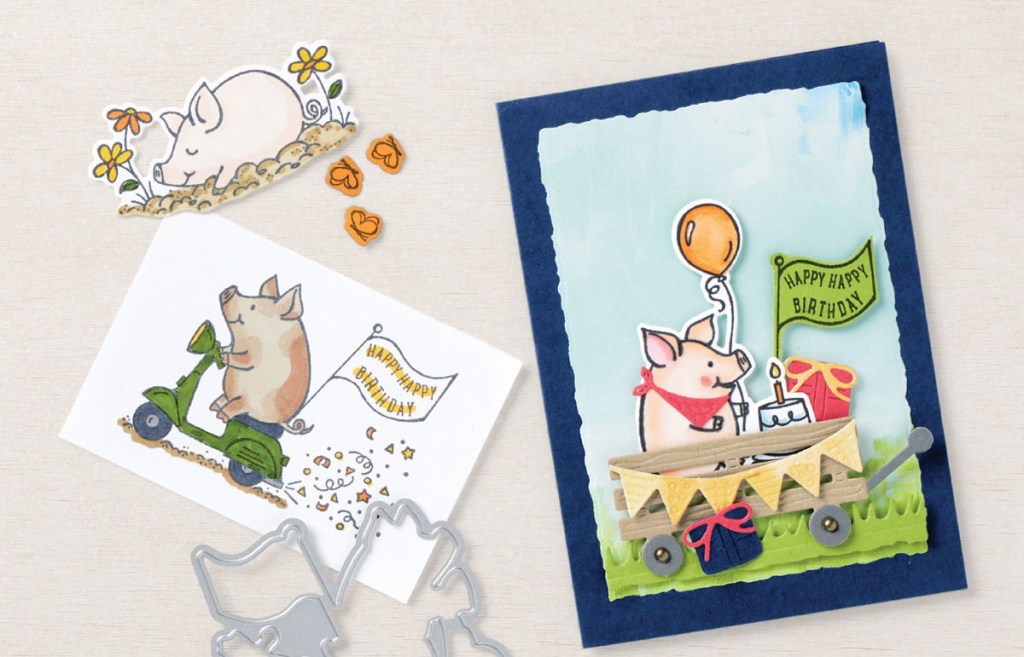
I’m kind of liking the cute Piggies.
This is the Birthday Piggies Stamp Set with the Playful Piggy Dies.
See them more in store -> HERE. If ordering in store please use the Host Code: 6PPKEPZJ Or you can contact me and I can help you out.
The Rings of Love Paper available for Sale-A-Bration is quite a surprise really. I have been playing a lot with it!
Sharing two cards with you today as we are running out of time!
Firstly with some scraps of paper I had left I put this card together. and just added a sentiment and embossed the Mint Macaron card mat with the Brick and Mortar 3D Embossing Folder.
The sentiment is from the Go To Greetings stamp set.
Now to my second card.
With my class this week with the Adventurous Journey Stamp Set I have been having lots of fun creating with it. I thought this print from the Rings of Love paper looked like a watery background. I really liked the effect of it. And no mess with creating a watercolour piece!
The sentiment is from the Painted Poppies Stamp set stamped on a diecut circle from the Beautiful Shapes Dies.
This week Sale-A-Bration all comes to an end and you won’t be able to get this paper again. Don’t miss it … 😦
I have shared a few cards with it recently so head back a few posts if you missed it.
To grab your bonus paper place an order over $90 AUD and you can pick that as your choice. Or there are lots of other great bonus products too.
In Australia? You can head over to my store -> HERE. Please use the Host Code: DK3ZG2DU
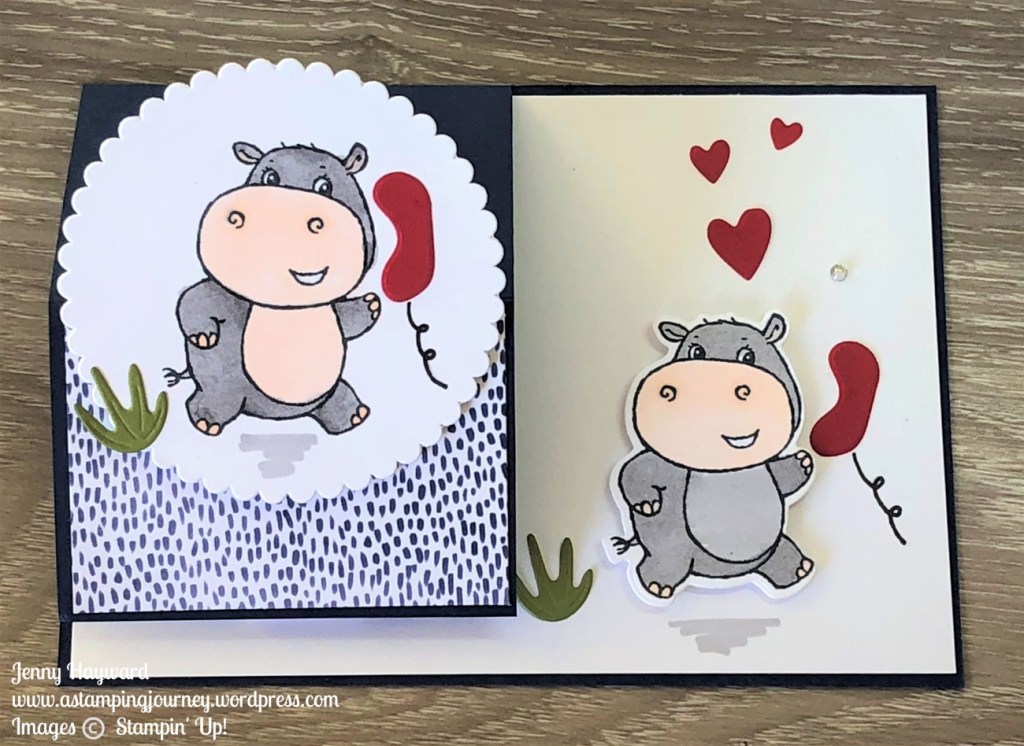
When I was playing with the Hippest Hippos stamps and dies a few weeks ago I thought the centre of the goggles looked liked the “old school” phones.
You know the ones many of us grew up with that had the cord hanging off and you couldn’t take your phone anywhere. Even having to talk to friends right in among the family …
Those were the days. Anyway I had to create these hippos with their phones.
I created a Half Fold Easel card for it. I had a lot of leftover bits too to put the card together. The sentiment is cut with one of the Beautiful Shapes Dies.
And just a note they are not outside right. How can you talk outside unless you have a long cord … (For some reason I put the plants on there but hey, they can be indoor plants). 🙂
This is it front on.
Side on so you can see the Easel part.
It folds flat easily to post out.
What do you think??
A Half Fold Easel Card is quite easy. Cut the right hand section off of the front of the card base. On the left hand section score it at half way. You can decorate as you like. Just have a piece on the left hand side at the bottom to help the easel part stand up.
Less than a week to get the Hippos and the dies for Sale-A-Bration. Have you got them yet? Don’t miss out on them.
If you are in Australia and still need to grab your Sale-A-Bration bonus gifts then I would love to serve you. Head to my store to order online -> HERE. Please use the Host Code: DK3ZG2DU
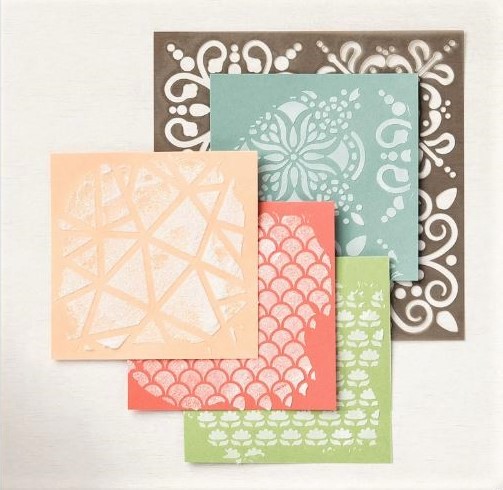
Wednesday’s WOW! #140 – Ways to use the Embossing Paste.
Have you used the Embossing Paste? I have to admit I haven’t nearly enough. If you like adding that extra texture to your projects then this paste would be just the thing.
Let’s see how to use it.
The Embossing Paste comes in little tubs. 4oz or 1.18ml. You can get it in Matte finish or Shimmery White which has a little sparkle.
With a little spatula you can scrape on your paste. Use it directly on your projects to add texture or use it through a mask for an effective pattern. There are masks available but you could also use a diecut shape on Foil Sheet or acetate to apply the paste through it.
Leave it to dry for some time before completing the project or you can use the Heat Tool gently to speed up the process.
See the effect with the different masks available. Apply it all over or just in sections for your project. Be sure to wash off your masks straight away.
Try colouring the paste.
In a small container mix together drops of reinker to a little paste. The more reinker, the more intense the colour is. Then apply the paste as you would.
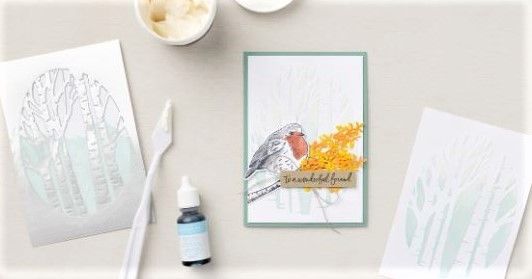
This project below uses a diecut shape using the Aspen Tree Dies. The shape was cut in Silver Foil as this is more rigid than card. Apply some Embossing Paste adding the coloured paste to the lower section and then add some plain paste to the top section. It adds some lovely texture.
It is hard to see in the photo clearly sorry. Project created by Stampin’ Up! artists.
You can find the Paste in my store.
For the Matte Embossing Paste ($14.00 AUD), See it -> HERE.
For the Shimmery Embossing Paste ($15.75 AUD), See it -> HERE.
Go and grab some and add texture to your next project.
Shop in store at the above links or contact me directly and I am happy to help you out.
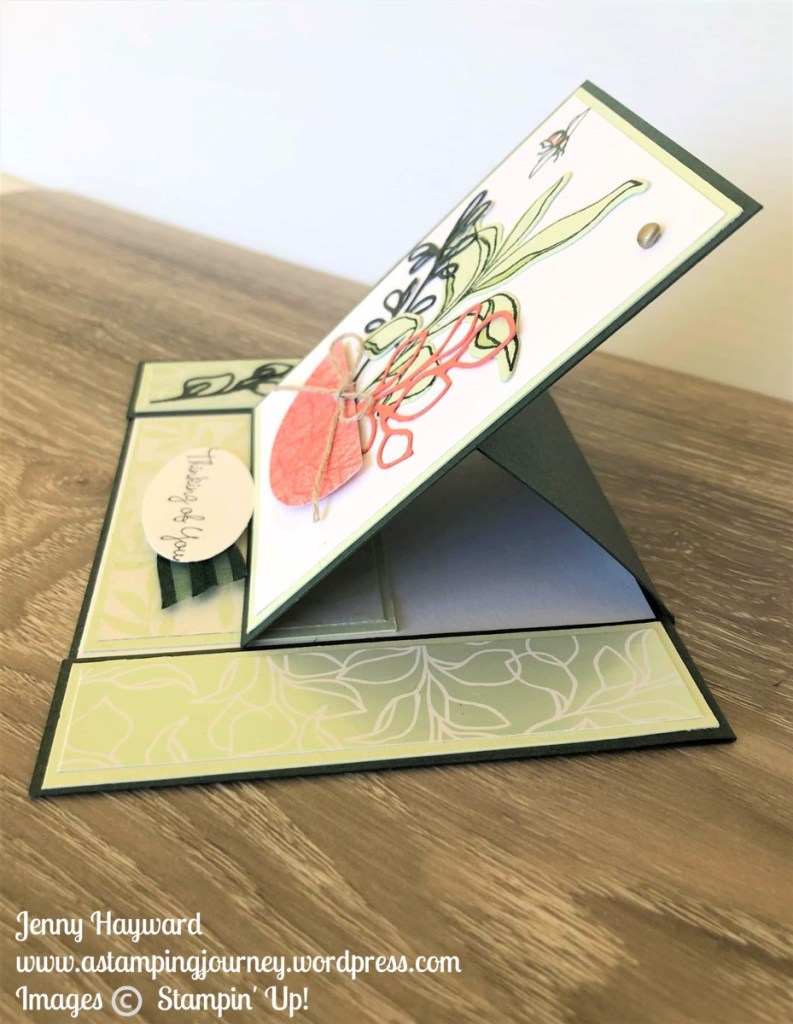
I love making Easel Cards. I love this idea too. This is a Split Easel Card. It’s very easy.
I have used the Splendid Day Suite. It’s so pretty.
We made this card in a class recently. I don’t often share my class cards here, But I thought I would share this one with you.
This is the front view of the Split Easel.
The side view. You can see how it stands up.
Inside. You can see how the sides are split and adhered down. Decorate the card as you like.
When we made the card in class I made the section in the middle inside a little smaller. I thought it looked better than this original one and it gave more room to write.
I will share the HOW-TO soon so stay tuned for that.
Happy Stamping,
Jenny
Sale-A-Bration is ending soon. Have you got your bonus gift with your orders. Don’t miss them.
In Australia and need to stock up on supplies?
You can shop in my store -> HERE. Please use the Host Code: DK3ZG2DU