cards, Catalogues, Stampin' Up!

CLOUDY LIFT ME UP!

A couple of weeks ago I played around with the Lift Me Up Bundle.  I will share the cards with you over the next few days.  To start off I went looking around Pinterest.  I was inspired by THIS card from Helen in the UK.  Here is my version.

hot-air-balloon-_-circle

TO RECREATE THIS CARD:

I cut a circle with one of the larger Circles from the Stitched Framelits out of the cool Carried Away Designer Series Paper that is available Free with Sale-A-Bration. (How cool is it that this paper co-ordinates with the Lift Me Up Bundle.  Good thinking Stampin’ Up!).  That was adhered on to the white card mat.  The sentiment is stamped in Night of Navy at the bottom and then adhered on to a Night of Navy Card mat and then the Peekaboo Peach Card base.

Stamp the small Hot Air Balloon and cut it out with the Up and Away Thinlits.  Also cut some White clouds using the cloud Framelits too.  (I think some nice Dazzling Diamonds Glimmer Ppaer clouds would look good instead of the plain white). Adhere the Hot Air Balloon and the clouds over the DSP circle piece.  I added a little White Baker’s Twine bow to finish.

Get your ‘Lift Me Up’ Bundle HERE in my store.  Clear mount $78.25 AUS.  Wood mount also available.

I will be back very soon with another Hot Air Balloon card.

Jenny

Catalogues, Stampin' Up!

LAST MONTH OF SALE-A-BRATION!

Can someone tell me what happened to February?? It seems like I blinked and it is gone.  I hope the rest of the year doesn’t go like that.

Being March it means that we are in to our last month of Sale-A-Bration. Another name for Sale-A-Bration would be FREEBIES!!!  Because you get free stuff whether you Shop, Host or Join.

I thought I would just update you on how you can.

header_sab2017_eng

shop-2

Spend $90, Pick one of the Sale-A-Bration items.  (See the Catalogue link on the right).


host-2

Still time to book your own private Stamping event with me.  I have limited dates though.  You get an extra $40 of free products when the party order exceeds $400.  That is so easy to achieve with a few guests.

join-2

This is the most exciting I think.  I have had a number of people join my little team over the last 2 months. It’s so nice to have them whether they are hobby demonstrators (just want the discount) or if they want to hold classes/parties.  You choose!

Joining Stampin’ Up! means you save money.  First with your initial kit and then a minimum 20% discount every time you order.

TO JOIN – You pay only $169 (AUS).  You get $235 worth of products for that PLUS…..
Choose an additional 2 free stamp sets up to the value of $179.  AND there is no shipping to pay on all that! That’s $20 in itself!
In total you get $414 of products, but you are only paying $169.  Fair Dinkum!  You have to love free stuff.  Have a look at your wish list.  Is it longer than $169???

love-the-products_contact

Not only will you SAVE BIG TIME though there are so many other awesome reasons too.  Like lots of new friends (from all over the world), A great community of stampers within several different online groups,  Endless inspiration provided by Stampin’  Up! and other fellow demonstrators.

Not sure?? Visit my page HERE which will answer a few questions.   If you have any more questions don’t hesitate to ask.  If you are distance from me don’t let that worry you.  With technology the distance becomes so much closer.

Look forward to welcoming you to my JEN’s Ink. team.

Jenny


cards, Catalogues, Techniques

EMERALD ENVY PAPER PIECING FOR BEAUTIFUL YOU LADY!

If you don’t like colouring too much here is a quick way to add colour. Try Paper Piecing. You can use this idea for any outline stamps.  I have done this with the Beautiful You set.

emerald-envy-lady

I CASED this card from a Demonstrator friend on a group I am on.

For the Paper Piecing technique:

Stamp your image in black onto Whisper White card.  Ink it and stamp it again onto patterned paper.  For this one I used the Emerald Envy pattern in the Playful Palette DSP stack.  Then cut your image from the patterned paper one cutting just on the outside of the black line.  Adhere this image onto your other stamped image on the White card.

To assemble the card:

On a piece of Whisper White card emboss it with the Lovely Lace Embossing Folder. Layer that on to some black card. (TIP: If you like to save on your cardstock you can just add strips of black behind the white.  That’s what I did!!). 😉  Adhere this to your Emerald Envy Card base.

Mat the stamped piece with the lady on to black card and adhere on to your card base. Stamp your sentiment onto a White card rectangle and mat this onto a black card rectangle.

There are so many ways you can use the Beautiful You set.  I hope I have inspired you.  I am sure there will be lots more to share with you later.  Next week I will be focusing on the ‘Lift Me Up’ Bundle so stop by.

Have a great weekend.  I have some serious house sorting to do.  The whole house is getting decluttered, including my craft room and studio.  So if I don’t return next week send out the search and rescue teams. 🙂

Jenny

beautiful-you

Order your ‘Beautiful You’ set in my store HERE.  for Clear Mount $49 AUS Wood mount $68. Don’t forget with Sale-A-Bration, pick up your free choice with your $90 order.

cards, Catalogues, Techniques, Tutorials

CHANGING THE DRESS LINE OF THE BEAUTIFUL YOU LADY!

I have been sharing lots of projects with the ‘Beautiful You’ set this past week.  When I first started seeing ideas with this set on Pinterest I noticed that some of the dresses were different.  I was curious and went investigating further. I thought I would share with you today how it can be done so you can create more with this set.

masking-dress-for-beautiful-you

I have put together a tutorial for you.

CHANGING THE DRESS LINE.

1. You can do either of two things. a) draw over the top part of the lady with the Black Stampin’ Write Marker or what I have done b) Place the stamp on the table top facing up. Mask the skirt area with a Post It note or piece of scrap paper. Leaving the stamp on the table ink up the stamp with the Black StazOn inkpad.  I have used StazOn as you will be watercolouring the image.

2. Stamp the image onto Thick Whisper White, Shimmery White card or Watercolor Paper as you will be watercolouring it.

3. With the Black Marker draw a skirt line that you would like.  If you prefer use a pencil and then go back over it with the Marker. You could create any style, short or long.

4. To Watercolour this I used the Real Red Watercolor Pencil, colour along the lines of the dress and the hat.  Using the Aquapainter blend over the colour.  You can build up the colour as you desire by going over the area but allow it to dry a little before adding more colour.

Assemble your card as you like.

beautiful-you_red-lady

To create this card I cut the image with the Layering Oval Framelits cutting a larger one with the Red Glimmer Paper. The sentiment was stamped in black and cut with a Framelit from the Stylish Stems.  Using the Duet Banner Punch I cut a banner from the Red Glimmer Paper and cut it down in the centre to adhere behind the sentiment.

To finish I looped around some Copper Thread and raised that off some Whisper White mat which had been embossed with the Falling Petals Embossing Folder.  Base card is Real Red.

Hope that was helpful for you.  You can use this idea to change different stamps. Go and experiment.

Jenny

Catalogues, Sale-A-Bration, Stampin' Up!

NEW SALE-A-BRATION OFFERINGS FOR YOU!

new-release-sab-copy

Have you loved Sale-A-Bration so far?  Getting those free products when you place your order.  That’s always exciting to get something free isn’t it??

Well today Stampin’ Up! have released 3 new products for you to choose from.  As if it wasn’t hard enough!

Here they are for you.

Reverse Words

reverse-words

Make a Medallion

medallion

Glimmer Paper

glimmer-paper

I just love the new sparkly Glimmer Paper. The Glimmer Paper comes in Bermuda Bay, Mint Macaron and Sweet Sugarplum.  There are 12 6″x6″ pieces.  (4 of each colour).  Just gorgeous!  Add that to your list. 🙂

Just a reminder as to how you can get these – for Free mind you!

Place a minimum $90 order and you can pick one of these or any other of the choices.  It’s really that easy.  And it is so easy to get to $90!

You can order directly from me by emailing me or Shop at my Online Store HERE. Please use the Host Code this week: S7PNC7CT

Thanks for shopping with me.

Have a great day.

Jenny


cards, Catalogues, Stampin' Up!

TRIO OF LADIES!

Another card for you today with ‘Beautiful You’.  For this one we have 3 colourful ladies.

trio-of-ladies

I stamped 3 ladies in black on to Whisper White card and cut them out with one of the Square Stitched Shapes Framelits.  The great thing with this stamp set is that if you don’t feel like colouring them they have the “scribbly” image that you can stamp over them.  So easy! I coloured their hats with the matching markers so in Melon Mambo, Bermuda Bay and Pumpkin Pie.

On a White card mat I stamped the sentiment. This is from ‘Work of Art’. This card piece was then embossed with the Stars Framelits. I placed the card in the folder to just above the sentiment though when I embossed it so it is not embossed over the sentiment. This was then adhered to a Bermuda Bay card base.  The 3 ladies were raised up off the card with Dimensionals. Each lady needed some bling with a Rhinestone to finish. 🙂

Hope you like my ladies?

Have you got this lovely Beautiful You set yet? It is “so beautiful” 😉  There are some really lovely words in the set.  Great for little “pick me up” cards. You can see and order it in my store HERE. 

Wood Mount is $68 AUS  Clear Mount $48 AUS

beautiful-you

Don’t forget with Sale-A-Bration if you order over $90 you can pick a Free item from the Sale-A-Bration choices. 

Jenny

cards, Catalogues, Classes, Stampin' Up!

BEAUTIFUL YOU IN THE MOONLIGHT!

Last Saturday I held a ‘Beautiful You’ class showing lots of techniques that could be used with the very versatile set.  It was very well received I think.  I was busy last week playing a lot with this set to create some samples.  I thought I would share some of the projects this week.

I was inspired by a card I saw on Pinterest stamping it on black card so I really wanted to give it a go.  Here is the card.

beautiful-you-moonlight

It is stamped with the White Craft Ink Pad.  I thought I might have had to heat emboss it in White but I think it turned out crisp enough.  For the moon, I punched out a circle from a Post It Note with the 2″ circle punch and laid the negative on the card in position and sponged ink over the punched circle. I then added a few highlights with the Blender Pen and ink.

The black card was adhered to Sweet Sugarplum and then to a Black card base.  I added some Rhinestones to finish it off.  I thought I would just keep it simple.

I will be back with some more cards with this great set later in the week.

Jenny x

cards, Catalogues, Classes, Stampin' Up!

A DIFFERENT WAY WITH FALLING PETALS!

Another project from my Catalogue Review last week.  I thought this needed it’s own post. 🙂

At my classes I show the cards and give everyone the same materials but I am happy for them to use their own creativity.  I always learn so much when they do too.  I thought I would share this idea with you.  It’s pretty clever – and a pretty card too.

This was made by my lovely friend Harmony who is very creative.  I love watching her work.  This is what she created with some of the card she was given – and she used the Falling Petals Embossing in a totally different way.  Check it out.

2017-02-09-08-01-40_wm

Harmony embossed the white card with the Embossing Folder.  Then with the fine tip end of the Black Marker she drew lines down from some of the petals.  I think they look like hearts a lot of them.  This created little heart petals.  Then with the Aquapainter (I didn’t have the blender pen available at the time) she very lightly coloured some of the petals with the Blushing Bride ink.  It is regular Whisper White card so you don’t want to press too heavily with the colouring using the Aquapainter.  Then she sponged the edge of the card and distressed it slightly. The sentiment is from Dragonfly Dreams.

Isn’t this so pretty?  What a great idea!  I have to try this myself sometime.  I forgot to take a photo of the other card she made.  Completely different again!

Thanks for visiting.  If you want to give her some comment love I will be sure to pass it on. 🙂

Jenny

3D projects, cards, Catalogues, Classes, Stampin' Up!

OCCASIONS AND SALE-A-BRATION SAMPLER!

Last post I shared some of the creative fun from my Catalogue Reviews held last weekend. I forgot to share one more project.  So I guess this gets it’s own little post.

With all the busyness leading up to last weekend with creating I was starting to run out of time.  So I decided to use this frame I had sitting around for a while and make little samplers of some of the products.  It is only simple but was a good way of showing them. Here it is for you to see.

occasions-and-sab-2017-sampler

I included a sample of some of the papers and the dies and then embellished them. It worked well I think???  The pieces are adhered in each box with glue dots so I can easily remove them and use them on cards.  Then I can replace them with products from later catalogues.  It’s a simple way of showing off some of the products.

What do you think??

Thanks for visiting. I have lots of samples to share that I made for my launch so I will get to share those soon.

For those on the East Coast of Australia, keep cool.  The weather is heat wave conditions at the moment.  I have lost count of how many days in a row it has been now.  It’s a bit hard to be creative in this heat I will say.

Jenny


3D projects, cards, Catalogues, Classes, Sale-A-Bration, Stampin' Up!

CATALOGUE REVIEW UPDATE!

Finally I can share some of the fun from my Catalogue Review last weekend for the Occasions and Sale-A-Bration Catalogues. I had a session on Friday night and Saturday afternoon. Lots of laughs and creativity was involved I can assure you. 🙂

Firstly, I always like to make little gift bags up for my lovely guests and spoil them with some “bits” from the new catalogue.  (Also a chocolate treat is a must in the bags!). These are the little bags this time.

2017-02-04-11-07-58_wm

These are using the Kraft Tag A Bag Gift Bags in the Annual Catalogue. You know I did mean to emboss these bags BUT …. Well that slipped my mind until afterwards.  I used a strip of the gorgeous Falling In Love DSP and flagged the end of the piece. From a square of the Sweet Sugarplum cardstock I cut the larger flower from the Stylish Stems Framelits and then layered it on some Whisper White cardstock.  I thought the centre was a bit plain so I coloured it with the Early Espresso Watercolor Pencil and lightly brushed it over with the Aquapainter. This lightened the colour a little so it matched with the Kraft bags. I went over it with the Clear Wink of Stella pen for sparkle, although you can’t see that in the photo sadly.

The sentiment is from the Dragonfly Dreams set which I had coloured the “thanks” with the black marker before stamping it. Then punched it out with the Duo Banner Punch.

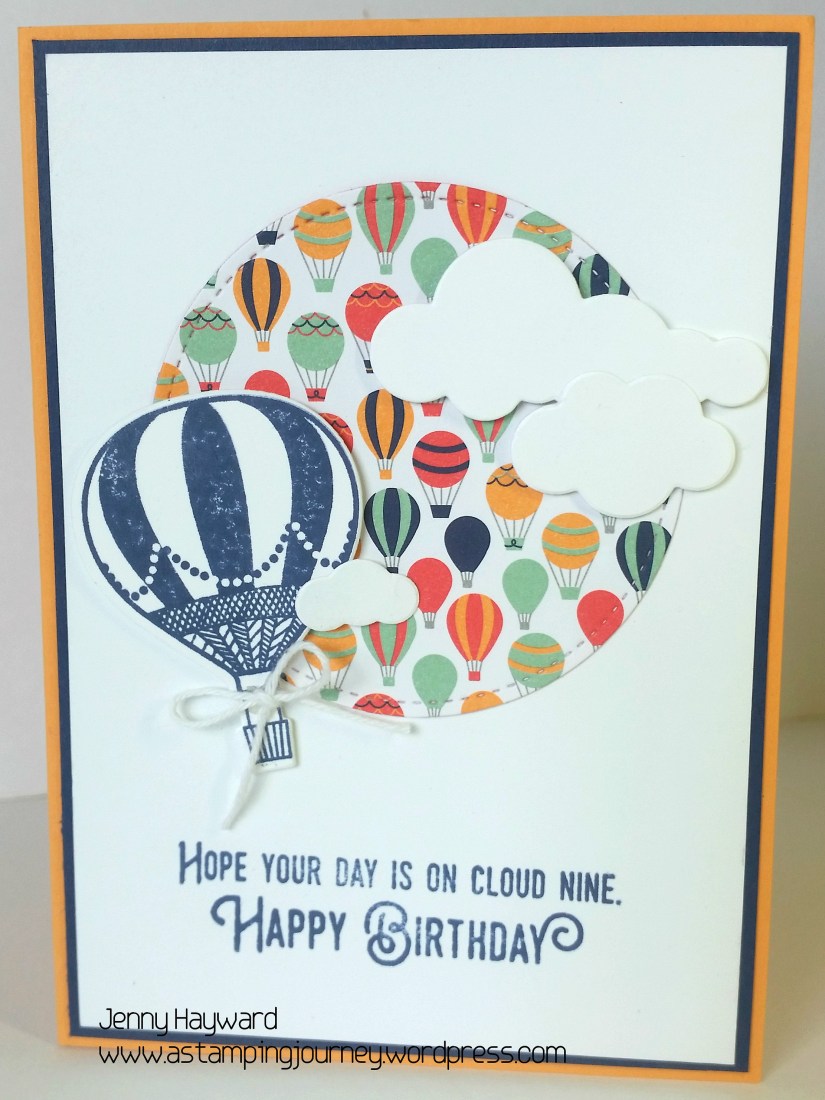
These are the cards we made.  The first one using Dragonfly Dreams Bundle and the Falling Petals Embossing Folder.  I had Cased this off Pinterest changing the Embossing Folder and adding the touch of the Paper Doily behind it.

img_20170204_190537

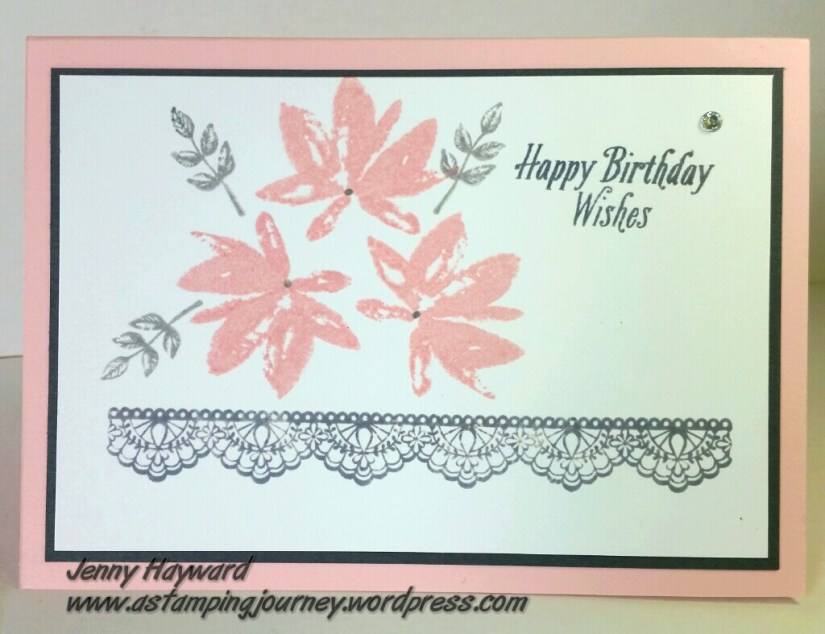
The second card was Cased off Pinterest too using the Sale-A-Bration sets Avant Garden and Delicate Details.  I LOVE both these sets!  Sadly I lost my little stamens from the Avant Garden set so we had to add a little dot in the centre of the flowers.  Some were very clever and drew stamens in with the Smoky Slate marker.

2017-02-09-08-02-38

I always forget to take a photo of the groups as it gets pretty busy. I snapped one just as we were finishing up at the Saturday session. Some people had already started to leave. (sorry!) 🙂 There was lots of creative mess happening.

20170204_161636

You might have seen the card tin in the Sale-A-Bration catalogue? I have dressed this one up. Everyone who has a party in the next month or 2 with me goes in the draw to win one.

Maybe I could just give some extras away too. Mmm? If you want a party or your own private stamping event, let me know.  I only have a few dates available so you better be quick.

2017-02-09-08-04-05_wm

There you have it. We had a product playground too for everyone to test out the pencils and a few other new products. That’s always good to test those things out.

Thanks for visiting me.  Visit again soon,

Jenny