3D projects, Christmas, Stampin' Up!, Tutorials

CHRISTMAS TREAT BOX!

In a post or 2 back I showed you a cute little Christmas Treat Box and I said then that I would show you how I made it.  I thought I would tell you about it today. It is so quick to make and seriously you can make up a number of these in no time.

Here is the box if you forgot – and to save you going back a couple of posts.  You can go back if you like to though. 🙂 You can see all the other fun projects I shared from my Holiday Catalogue Review too while you are there.

christmas-box

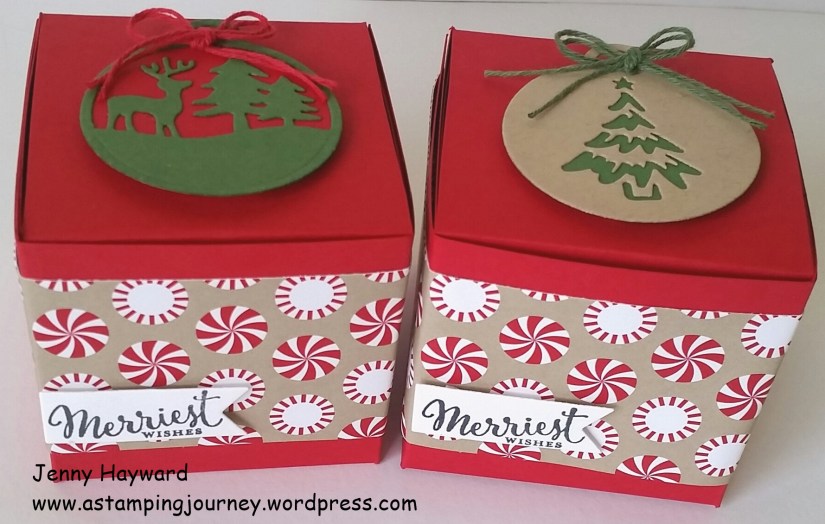
These are so Christmas-y.  These are called “SEVENS” boxes.  WHY? Well it is all in the measurements.  I have made a number of these over the years.  I like how quick they are to make and you can fit a fair amount of treats inside.

I  will tell you the measurements and then give you a link to the original creator for the assembly of the box.  On that blog post it doesn’t have Imperial measurements so I have put created one for you my lovely friends if you use Imperial Measurements. 🙂

SEVENS BOX (Metric)

Using a full sheet of A4 card, score your card.  On the short side score at 7cm and 14cm. On the long side score at 7cm, 14cm, 21cm and 28cm.

Rather than relay the cutting and assembling of the box you can refer to the original blog post which you can find HERE at Marelle’s blog.

2 AND A HALFER BOX (Imperial)

It doesn’t really have the same ring to it as a “SEVENS” box does it but it would be a bit odd to call it that!).

NB: Please try this on scrap paper first before creating it on card to see that the measurements are correct.  This will be a slightly smaller box that the “SEVENS” box but still a good size.

Cut your card to 10 3/4″ x 7 1/2″.  On the short side score at 2 1/2″ and 5″.  On the long side score at 2 1/2″, 5″, 7 1/2″ and 10″. Cut and Assemble the box as in the link in the Metric measurements above.

Once you have made one I don’t think you will stop.

Enjoy. 🙂

Jenny

Catalogues, Christmas, Classes, Stampin' Up!

PEOPLE FROM THE ‘GONG, IT’S TIME TO START YOUR CHRISTMAS CREATING!

The Stampin’ Up! Holiday Catalogue starts THIS WEEK! (THURSDAY) Exciting! This is an absolutely fantastic catalogue.  You are going to love it.  If you have already seen it you know what I am talking about.

If you are in the Wollongong area  then you can see – and play with some of the fun new products at my Holiday Catalogue Review this coming weekend.

Here are the deets.

WHEN:  Friday 2nd September 7.30pm
or
Saturday 3rd September at 2pm

WHERE: My studio, East Corrimal

COST: $10

Includes Afternoon Tea, a card or 2 to make, Giveaways and of course the Holiday Catalogue.

PLEASE RSVP: by Thursday 1st.  

Seats are filling up fast, so be quick to reply. 🙂

Holiday catalogue promo photo

Can’t make it but you would love a catalogue??

Ask me to send you one.  I can send them anywhere in Australia.

Jenny

Catalogues, Christmas, Stampin' Up!

THE WONDER OF CHRISTMAS – CHOIR OF ANGELS!

I was playing with some new products from the 2016 Holiday Catalogue  yesterday.  I even got my colouring happening!! I wanted to try this new set the ‘Wonder of Christmas’.  There is not a lot around with this set yet but I am sure there will be soon. It is really sweet and I love the words in it too. I will show you the set below.  Here is the card first.

angels singing

I had in mind to do a choir of Angels.  This is a standard size card so I could only fit 3 but I am sure there were lots more Angels around right!! 🙂 I stamped an Angel on Thick Whisper White card with StazOn and coloured it with the Aquapainter and Inkpads. I then cut it out and layed it onto a Whisper White card mat so I could see where to place the other Angels. I stamped 2 other Angels in Smoky Slate on to the Whisper White card.

The little stars in the set were stamped in Soft Sky on to the White card also.  This was adhered to a Cherry Cobbler card base.  The sentiment was stamped in Memento Black. The Angel was raised up off the card with Dimensionals.  The card was finished off with some Rhinestones and I added a little Wink of Stella on the wings but you can’t notice that too much.

What do you think?

It’s a great set.  Here is a little sneak for you.

142136S

It’s not long now until you can order from this Holiday Catalogue.  I think you are going to love it.  Don’t forget, if you still haven’t got hold of one yet and you are in Australia, let me know and I can get one sent off in the post for you.

holiday catalogue photo

Thanks for visiting.

Jenny

3D projects, cards, Catalogues, Christmas, Tutorials

COOKIE CUTTER Z-FOLD CARD!

I have a little sneak peek for you today.  Very soon the Stampin’ Up! Holiday Catalogue will be Live. September 1st to be exact.  You are going to L.O.V.E. it!  I tell you there are so many exciting new products it is going to be hard to choose.  I am having a hard time to choose myself!

Have to say though when I first saw our sneak peek I just loved the cute little gingerbread in the Cookie Cutter Christmas set.  It was the first on my list – and the first thing to play with the other day when my preorder arrived.  It has the stamp set AND the matching punch.  It makes it so easy to cut those gingerbread and the other characters out.

So here is the card I made, because I couldn’t wait until later in the month. 🙂

This is a Z-Fold card which you might have seen a bit around recently.  I have been waiting to try one of these folds and I thought the Gingerbread were just the thing to use.

Z-fold

Z-fold with Cookie Cutter

I thought the corner looked a little plain so I created a little Holly leaves and berries using the NEW Holly Berry Builder Punch.

This is the card when it is folded flat.

Z-fold card folded flat

Have you tried a Z-Fold card before?? There are a number of tutorials around the internet and some vary in size.  I based mine on Amanda’s version (craftyspa) HERE. You will find that Amanda’s tutorial makes 2 card bases from one sheet of cardstock. That’s OK if you want to do multiple cards or you are using the same colour card base for different cards. 

I adjusted the measurements a little and have them in Metric and Imperial for you if you wish to create just one card.

Square Z-Fold Card Tutorial (Based on Amanda Bates – Craftyspa)

* This makes one card.

1. Cut card t0 21cm x 13cm for your card base. (8 1/4″ x 5 1/8″)

2. On the long side score your card at 5.2cm and 10cm (2 1/16″ and 4 1/8″).

3. On the short side, cut your card at 10.5cm.  The thin strip you cut off will be your band.

*Doing it this way by cutting your card after you have scored saves you scoring the little strip. 🙂

4. Cut your Designer Series Paper  – I have used the new ‘Candy Cane Lane DSP.  You will need 2 pieces: 4.8cm x 10.1cm (1 7/8″ x 4″) and 10.1cm x 10.1cm ( 4″ x 4″)

Plus a piece of Whisper White piece: 5.1cm x 10.1cm (2″ x 4″).

5. Adhere your Designer Series Paper pieces to each end sections.  Stamp your Whisper White piece with a sentiment as you like and then adhere that to the centre section.

6. To attach your band please take note of where to place adhesive.  You don’t want to run adhesive along the whole length. Place your card base down open and flat on the tabletop. Lay down the strip on to the card halfway down the card.  Work out where you want to place your adhesive. I find it helps to mark in pencil where to place it. You will want to place adhesive on the back of your strip just where it rests on the front section not where it lays on the white section. Then on the back of the strip on the last section.  I hope that makes sense??

Hope these instructions are helpful to make your own Z-Fold card.

Why not share your version with me.

Jenny

Christmas, Stampin' Up!

CHRISTMAS IN JULY – AND IT’S ALL ONLINE!

Christmas in July 2016

Christmas in July starts tomorrow.  Here is a taster of the projects I am sharing.

collage for Christmas in July

It’s all happening online so you can join in from anywhere – and it’s free! Here are the details for you to join up.

Christmas in July runs from 19th – 22nd July. 

Each day I will be sharing a Christmas project that I hope will inspire you.  We will have time to chat if you are around via Facebook and have some fun.  I will have some great specials through the week too.

There are 2 different ways to follow along. 

1) This will run through a Facebook group.  Please Click HERE to ask to join.  Invite friends of yours to join in too.

2) Not on Facebook? You can receive the projects by email. (address in right tab bar near the top) Please email me to ask to join in and I will send you an email each day with the project and the special. You will just miss out on the chatting.

So come and join in!

Jenny

3D projects, Catalogues, Christmas, Stampin' Up!

CELEBRATE CHRISTMAS IN JULY WITH SOME STAMPING FUN!

Christmas in July 2016

We are celebrating Christmas in July next week (from 19th – 22nd July) so  come and join in the fun and see some cute projects to get you on your way for the silly season.

Each day I will be sharing a Christmas project that I hope will inspire you.  We will have time to chat and have some fun.  I will have some great specials through the week too.

There are 2 different ways to follow along. 

1) This will run through a Facebook group.  Please Click HERE to ask to join.  Invite friends of yours to join in too.

2) Not on Facebook? You can receive the projects by email. Please email me to ask to join in and I will send you an email each day with the project and the special. You will just miss out on the chatting.

The best part is – it’s all free!!! So come and join in!

Here is a sneak of one of the projects I will be sharing.  I can’t wait to share it all with you.

box front - Copy

Jenny

cards, Christmas, Classes, Stampin' Up!

FAVOURITE 5 FOR 2015!

HAPPY NEW YEAR TO YOU ALL!!!

I hope 2016 is a wonderful year for you full of great health, happiness – and I hope lots of opportunities to create. 🙂

I am looking forward to another year of stamping. It always excites me at the start of the year when I think of the new discoveries in stamping and being able to share them with my lovely customers and  you my lovely readers. 🙂  I am also excited when I think of the new people I will meet to share all this creativity with.

Before I look too far forward though I thought I would look back at this past year at some of my favourite projects from the year.  I hope you will indulge me a little and enjoy recapping these – or seeing them for the first time.

I will add the link below each project to the original post so you can read about them.

P1150801

I had fun making these Masculine cards with the ‘Adventure Bound’ Paper Stack.  See about them HERE.

P1160425

A special 21st card.  Read about it HERE.

P1150979

A fun Triangle Easel Card.  See the post HERE.

P1160636

One of the first cards I made with this gorgeous set.  See about it HERE.

P1170158

This is still one of my favourite cards. You can check it out HERE.

I had trouble limiting it to 5.  I have to throw in a Christmas card too. 🙂

P1170418

One of my favourite Christmas cards. See it HERE.

Well those are my favourites BUT what did you think?

Here are some interesting facts from WordPress that you liked this year.

The most popular post in one day was my Convention Swaps on May 9th with 486 hits.  We are always interested in swap cards I think for their inspiration.

P1160597

This is just one lot of them. You can read the full post HERE.

The most popular post continues to be my Tote bags.  These were made in 2012 but are still so popular.

P1030185

The tutorial and the link can be found HERE.

and the more recent one HERE.

Thank You for being part of my journey this year.  I love sharing what I create and I am glad you like to visit.  Feel free to drop a comment now and then.  At least I know then I am not talking to myself. 🙂

Have a great 2016,

Jenny

cards, Christmas

MORE LOTS OF JOY!

I made these cards even earlier than the one I showed last post. These are using the set ‘Lots of Joy’ again which is found in the Annual Catalogue.  I have to say I made these in a hurry. Just simple cards but they can be done quickly.

P1170116

Both are in Mint Macaron. I have used a left-over piece  of the Envelope Paper on the left one.  On the right one I embossed a piece of Mint Macaron with the Decorative Dots Embossing Folder. The tree was stamped and punched with the Tree Punch.  The white piece is layered on some Silver Foil.  I finished them off with the Organza Ribbon.  I added some Silver Ribbon to the right hand one. Simple!!

Thanks for stopping by.

Jenny

Christmas, Classes

LOTS OF JOY FOR CHRISTMAS!

I made this card a few months ago before the Holiday Catalogue came out and I was starting to plan for Christmas.  It is probably about time I showed you.  This is using one of the stamp sets in the Annual Catalogue – ‘Lots of Joy’ and using one of my “go-to” colour combinations of Island Indigo and Pool Party.

P1170120

I first stamped the angled lines in Pool Party and then stamped the baubles firstly in Smoky Slate on a piece of Whisper White and then again on scrap card in Island Indigo and Pool Party. I punched these out with the 1 1/2″ (3.8cm) Circle Punch. They were raised up off the card and I added some Adhesive Rhinestones for the bling factor.  The white card piece was matted on to some Silver Foil sheet BUT I want to show you a little trick to save your precious Silver Foil.

I cut the Silver Foil to size and then cut a rectangle in the centre.  This can then be used for a later project.  Check out the photo below.

P1170110

Thanks for visiting me today.  Have a great day 🙂

Jenny