Catalogues, Stampin' Up!

FRIDAY FAVOURITES – FLOWERS!

Today I am reflecting on a few of my favourite Flower stamp setsthat are retiring VERY soon.  So many beautiful sets.
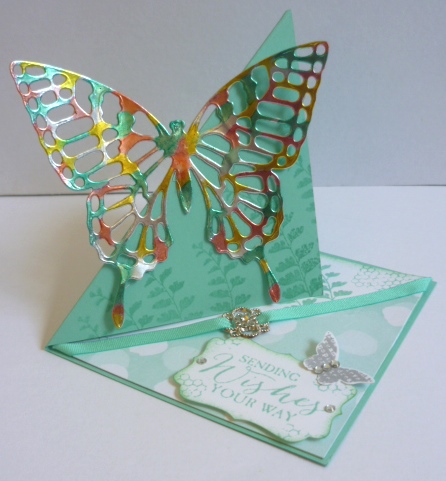
BLOOMS AND WISHES

I am late to the party with this stamp set.  It sat on my shelf uninked for nearly a year.  And now it is going.  I am sad. 😦

You can find the details for this post to make the 50th Eclipse card -> HERE.
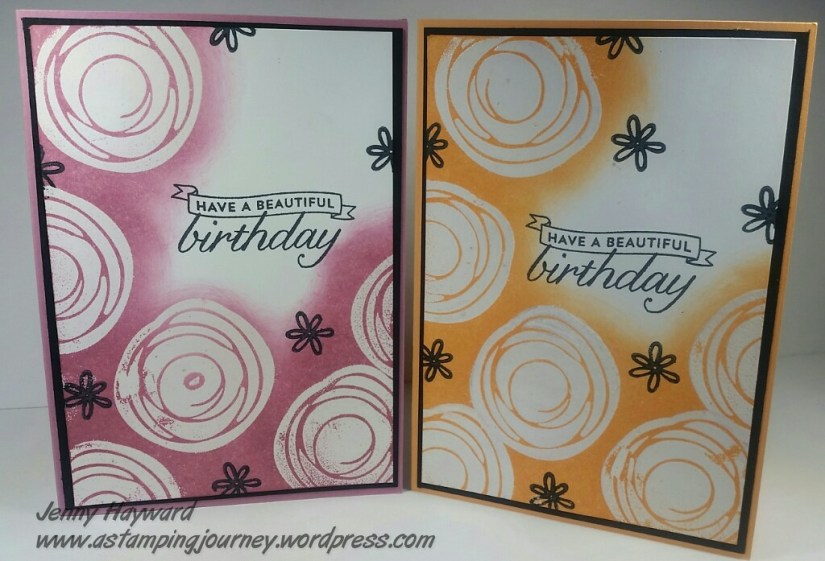
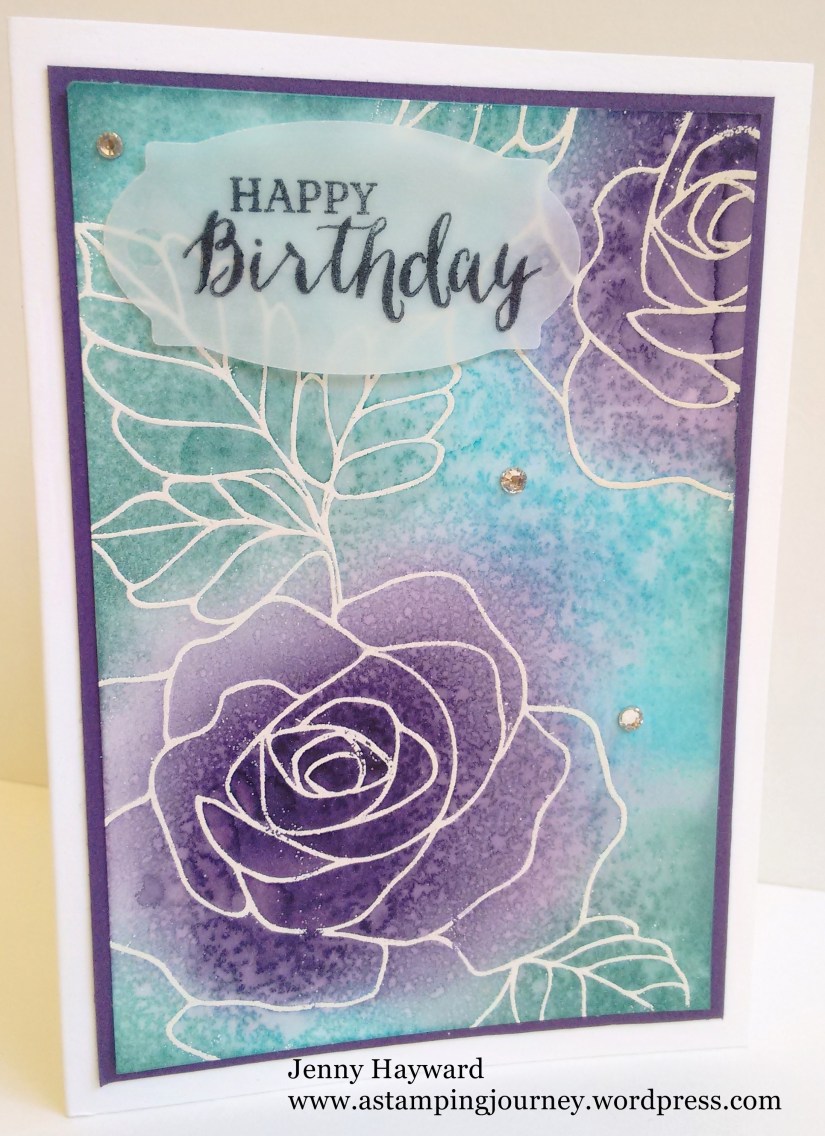
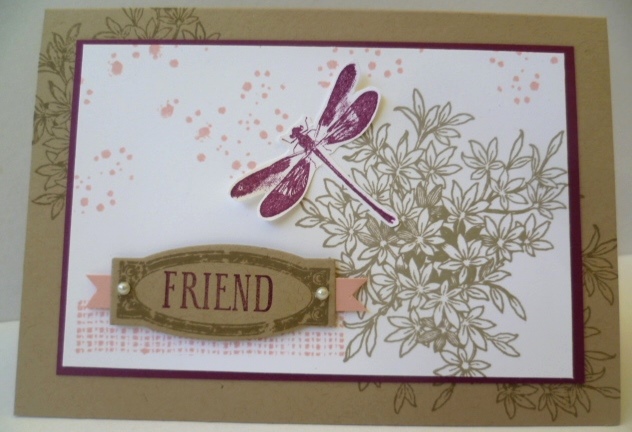
ROSE WONDER

I am sad to see this set go.  I love the bold flower. So many ways to use this set.  I love the verses too. This set is one I might have to keep in my stash.  The sentiments for Weddings and Sympathy are very special.  There is not a set like it I think.  If you haven’t got this set already then be sure to grab it.  The dies to match are beautiful too.  Really.   You have to get on to it.

These are just some of the cards I have made.
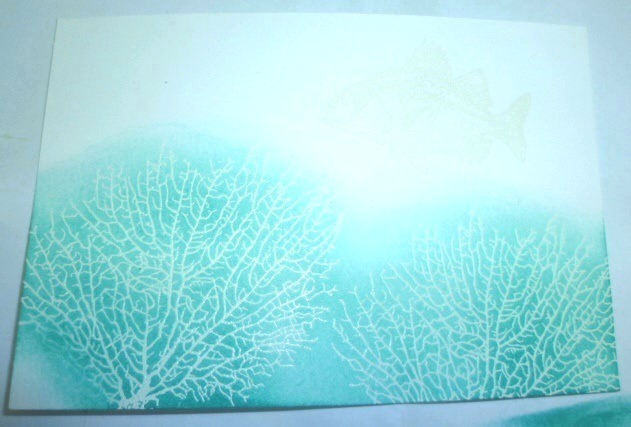
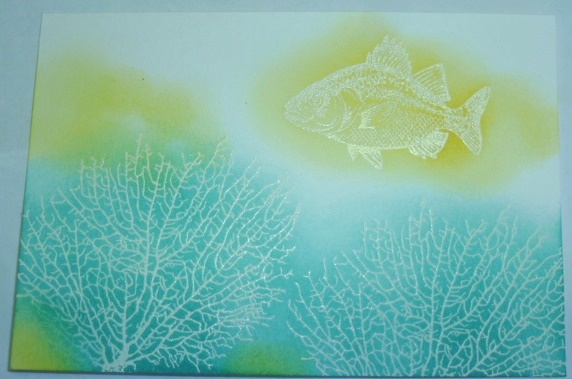
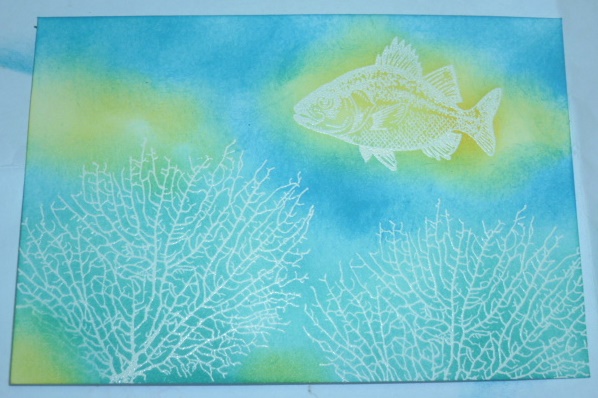
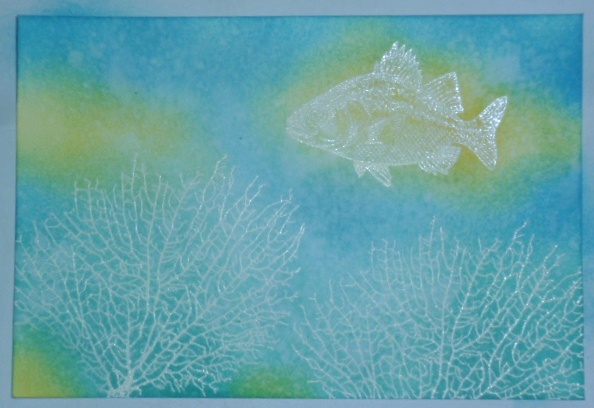
Sponged Background

This background is sponged and then lightly spritzed with water to create a mottled effect.  For the full details on how to make it then head to this post -> HERE.

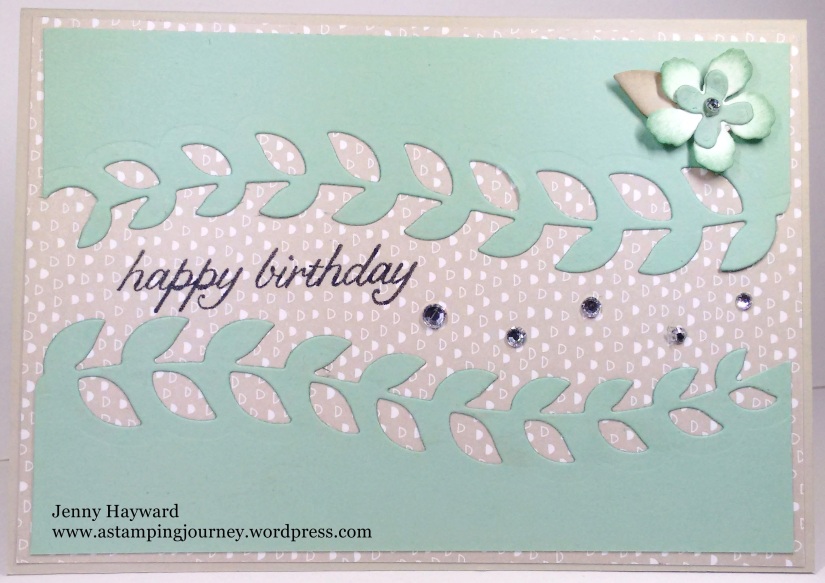
ONE DIE TWO WAYS – With just one diecut I created these 2 cards.  One (right) the diecut was placed over the white card as a mask and sponged over.  For the other card (left) I used the sponged diecut from the first card to adhere straight to a new card.  Find all the details on these cards -> HERE.
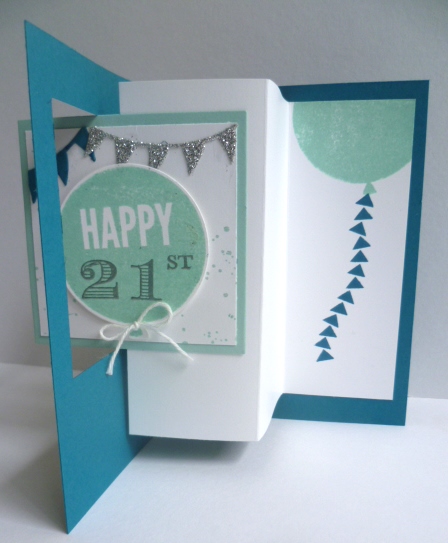
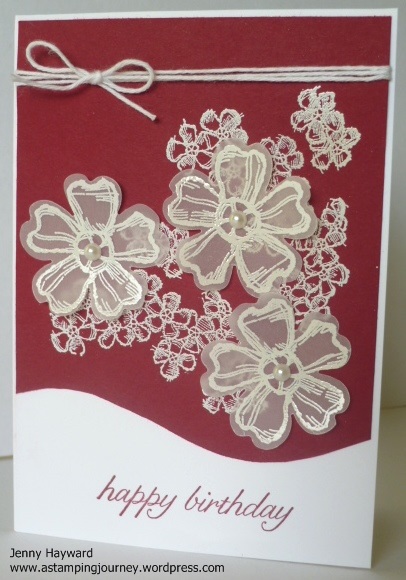
BIRTHDAY BLOSSOMS

Another beautiful set.  I heat embossed the larger flowers in white Embossing powder on vellum.  The smaller flowers were heat embossed in white on the Cherry Cobbler card.  Full details for this card can be found -> HERE.

You can find another card using this set -> HERE (the same post as the Rose Wonder spritzed card above).

Also, a Tri-Fold card with this set.  Full details -> HERE

P1170032


To see these or to see what else is retiring, head to my store -> HERE.  

You can order Online there or contact me directly.  If ordering Online please use the Host Code.

Jenny

cards, Catalogues, Techniques, Tutorials

SOMETHING QUICK WITH THE SWEET SOIREE PAPER!

OK, Let’s chat.  Do you have lots of pretty paper sitting in your craft stash??  I can guess you do.  It looks so nice sitting there but you are scared to cut in to it or you might be saving it for a “special” project?? Yes I know.  It is tough!

So a new catalogue is coming very soon and we will have more pretty paper to collect.  We need to use this paper we have now.

SO… Let’s use it.  I am going to be sharing some projects over the next days and weeks to USE THAT PAPER.  Will you join me??  I am sharing these projects on here and Facebook and Instagram and adding #usethatpaper  So you can join in with me.

Today’s project is using that gorgeous SweetSoireepaper.  It is so pretty and I was really hesitant to use it but really …

Anyway, here is the card.

Cut the Designer Series paper about 2cm (3/4″) shorter than you would usually.  Cut off 2.5cm (1″).  Adhere them to the Whisper White card with the smaller section at the bottom of the card.  Stamp your sentiment in the white space.  This is from the set Birthday Blossoms.  The leaf is from the Flourish Thinlits cut from Dazzling Diamonds Glimmer Paper although you can’t see the sparkle too well.

ok. Go and grab some pretty paper and #usethatpaper

Have a happy, crafty weekend.

Jenny

cards, Catalogues, Techniques, Tutorials

BRUSHO CRYSTALS LONG WEEKEND – DAY 2!

What did you think of yesterday’s project??  I have a another project for you today.  

We saw yesterday creating a background with the background.  They are really fun to use them that way.  This is another type of background.  I don’t have a video for this one but I will walk you through it.

CREATING A BACKGROUND WITH THE BRUSHO CRYSTAL COLOURS

On this card I have used Shimmery White card and I have added the Brusho to dry card.

On your card sprinkle over your Brusho Crystals.  I added the Brilliant Red in the right hand corner, a small amount of the Gamboge in the centre section and the Yellow on the left.  Use the Spritzer and lightly spritz the card with water. It’s always magical watching the crystals dissolve and the colour emerge.  It’s one of those moments like heat embossing.  Do you feel that?? 🙂

Take your time and just play and watch what happens.  You may want to spritz more or you may want to add more crystals.  The “speckly” effect is created by sprinkling with the Crystals and only spritzing lightly so they are more spots than actually blended if that makes sense??

Leave your card to dry.

Once dry you can assemble the card.  For this one I stamped the flowers from Birthday Blossoms in the corner and the sentiment at the top.  I was going to stamp the sentiment and raise it up and I think I should have done that but never mind it’s more to see the Brusho effect.  I love the thin White Organza ribbon.  So soft and pretty to tie.  The base card is Flirty Flamingo.  It worked out a good match for it even with using the Red on the card.  The bird from Birds and Blooms Thinlits were cut in Silver Foil.


Thanks for stopping by for this one.  Come on by tomorrow.  I think I have left my favourite until last.

3D projects, cards, Catalogues

SILVER GABLE BOXES!

Have you seen the Silver Gable Boxes in the Occasions Catalogue?  These make really quick gift boxes in no time.

I shared in the last post the boxes I made up for the Lucky Door Prize for my launch. Head back to see those.  I made a few more up to show ideas with them.  Let me show you.

Firstly, a simple one with the Hedgehugs set.  Cute!  The paper strip is from the Eastern Palace Specialty Designer Series Paper pack.  I stamped the hedgehog in Dapper Denim and coloured the centre of the flower with the Lemon Lime Twist marker.  I added a bow with Lemon Lime Twist Mini Striped ribbon with a glue dot.

Here is another Gable Box.  This time decorated with the Sweet Soiree Specialty Designer Series Paper.


The sentiment is from the Birthday Blossoms set.  I love the Metallic Edge Berry Burst Ribbon.

Here is another version of the boxes.

This time I cut off the top of the Gable Box. So the handle section along the scored line.  Then created a wrap using the Sweet Soiree Specialty DSP.  I added a strip of the Berry Burst cardstock and then tied some Lemon Lime Finely Woven Ribbon.

You can grab the boxes in store now -> HERE and decorate them how you like.  They are $14 for a 12 pack.

Grab some and give a little treat to someone to brighten their day.

Jenny

Blog Hops, cards, Catalogues, Tutorials

LATCH FOLD WITH TRANQUIL TULIPS!

Yesterday I shared a Christmas Latch Fold card.  Today I have another version using the Tranquil Tulips set.  OK, I did this card first and then realised for the Blog Hop that it was for the Holiday Catalogue.  I thought I would share it with you today and give you the tutorial for it. 🙂

I have used the Birthday Blossoms set for the front and inside.  I think it works well.  The small flower to hold the flap was punched with the 3/4″ circle and then layered on a circle punched from Cherry Cobbler with the 1″ circle punch.

Here is the inside.  I added a strip of the Old Olive paper from the Color Theory Paper Stack. 

CREATE YOUR OWN LATCH FOLD CARD

** Apologies in advance for Imperial measurements.  I am not too familiar with your standard card size so just check the measurements first for the front and inside card mats 🙂

1. From a standard size card base cut off 2.5cm (1″) off the front of the card.

2. Stamp your front image on Whisper White card. This piece was 7cm x 14.4cm.  (for Imperial, measure a piece slightly smaller than the size of your front panel).  If you like add a strip of Dazzling Diamonds Glimmer Paper. 

3. Cut a strip for your latch which measures 10.5cm x 2.5cm and score it at 8cm.  (4 1/8″ x 1″).  The white sentiment strip is 7.6cm x 2.1cm (3″x 3/4″)

4. For the inside panel cut a piece of Whisper White for the card mat slightly smaller than the inside of your card. (10.1cm x 14.4cm).  (Imperial measure approximately 1/8″ smaller than the inside of your card).  Add a strip of Designer Series Paper (14.4cm x 3cm) (Imperial 1 1/8″ x length of your card).  BEFORE you stick this down to the inside of your card adhere your latch strip by adhering the smaller section of your strip behind your white card mat.

5. Fold this over the front of the card and position your punched circle piece in place that will hold your card closed.  You can add a Dimensional to the back of the circle to raise it up but remember to ONLY ADD IT BEHIND HALF of the circle to allow you to fit the latch under it. 

Hope this makes sense.  Have fun making your Latch Fold card.

Jenny

cards, Challenges, Techniques

FALLING PETALS SPOTLIGHTING!

This weekend I have had a play at this week’s Colour Inkspirations Challenge #05.  The colours we had were Blushing Bride, Soft Sky and Sahara Sand.

They are such pretty soft colours and lend themselves to cute baby cards or soft floral or even butterflies??

Recently I shared a card with you of a different way to use the Falling Petal Embossing Folder.  You can see that post HERE if you missed it.  I have wanted to play with this idea since then and thought I would try it out with this challenge.  This is the card I ended up with.

The lighting is not very good today.  It is wet and overcast so not the best.  Actually it has been torrential rain for the past week!

To the card:  The base card is Blushing Bride and the mat is Sahara Sand.  I embossed a Whisper White card mat with the Falling Petals Embossing Folder.  Tied around some White Baker’s Twine before adhering it to the Sahara Sand card mat and card base. I cut a piece of Thick Whisper White with one of the larger Layering Circles Framelits Dies and embossed it with the Falling Petals Embossing Folder.

On this circle piece I created some little flowers with the embossed hearts/petals.  I used the Sahara Sand Marker to first draw some lines from each petal to create the flower stems.  Then coloured each flower with the Blushing Bride inkpad and Blender Pen. Then with the Aquapainter I added a light wash with the Soft Sky inkpad around the flowers. Just a note: After giving it a light wash with the Soft Sky it did wash out the Sahara Sand stems so I went over that lightly again.  I went over the petals with the clear Wink of Stella pen too to add some sparkle but it is hard to tell in the photo.

This coloured piece was then adhered on to a Blushing Bride circle a bit larger. I then adhered it to the white card mat lining it up roughly in the same place.  This created a type of spotlighting of the petals at the top of the card.

The sentiment is from Birthday Blossoms and cut with the Project Life Framelits.  I added some small adhesive pearls to the sentiment piece.  A small dragonfly was cut from the Blushing Bride Glimmer Paper to add some extra sparkle.

What do you think of this card?? I felt it was missing something?? Not sure.

Anyway, I think these challenges are good.  It makes you think a lot about your creating. It’s nice to steal away a little “me” time stamping too.

I hope you have a lot of creating opportunities this coming week.

Jenny

cards, Catalogues, Stampin' Up!

SWIRLY TIME!

Have you seen cards with the Swirly Bird stamps and the Swirly Scribbles Thinlits on your blog travels? These I think will be one of the top sellers for this catalogue.  I had a play with them the other day and thought I would share them with you.  These cards were inspired by others I had seen on Pinterest using a different stamp set.

These first 2 cards use the Emboss Resist technique.  I love the magic of heat embossing still even after all these years.  Heat Embossing was the first thing I had seen in stamping and I was just amazed.  I still love pulling out the heat tool. 🙂

Anyway, to the cards.

swirly _ emboss resist

I stamped the sentiment first in black.  This is from the set ‘Birthday Blossoms’. I then stamped the large swirl in versamark and heat embossed it.  Then sponged over the ink. The one on the left is Sweet Sugarplum. The one on the right is Peekaboo Peach.  Then I stamped the small flower in black.  The card is matted on to black card and then to the base card either Sweet Sugarplum or Peekaboo Peach.

swirly flower

This next card I was creating a flower with the swirls.  I stamped the large swirl in Sweet Sugarplum on to the Whisper White card and then cut swirls from the Sweet Sugarplum and the Emerald Envy. I added a Metal Rimmed Pearl to the centre. The sentiment on this card is from the new set ‘Mixed Borders’.

I added some strips of Emerald Envy card under the stamped white piece and then adhered it to the Sweet Sugarplum card base.

I can’t wait to play with this set some more.  Not enough hours in the day. 🙂

If you love the look of this set then you can buy your own at my store.  Buy the bundle and save 10%.  Head directly HERE.   Here is the stamp set and the thinlits for you to see.

swirly bird

Have a great weekend.  It is a long weekend here for us this weekend. Time for more creating then maybe?? I hope so.

Jenny

cards, Classes, Stampin' Up!, Techniques

WATER SPRITZING TUTORIAL!

A few weeks ago for Onstage I didn’t have an opportunity to make swaps to share with other demonstrators.  Life has been a little busy. 🙂  I did make a card for the Display boards though where you can add your swap cards or samples.  They are always so inspiring and is a big part of why I love to go.  It’s like a live Pinterest board!!!! 😉

I thought it was time to show you the card. This is a technique I have been playing around with recentlly. I don’t really know what the name of the technique is but I call it the Water Spritzed technique. I will show you how to do this below so read on.

This is my card I made for the board.

waterspritzed_Bythetide

You can see the little “splodges” in the ink where the colour has lifted. It creates a cool motley effect.  Here is how it is done.

WATER SPRITZED TECHNIQUE

1. Using Thick Whisper White or Shimmery white cardstock, heat emboss your images.  On these I embossed the coral and the fish with white Embossing powder.  I stamped the seahorse with Black Stazon.  It is important to emboss or to use the Stazon so the ink on the images don’t run when you spritz.

2. Use your first colour and sponge in patches over the card. I have used Bermuda Bay here.

P1180329

Then add your 2nd colour.  I have used Daffodil Delight.

P1180331

3. Fill in with your 3rd colour.  I have used Marina Mist I think.  It’s good to have 3 co-ordinating colours. Once you have sponged the colours on, use a tissue to wipe off the ink where the images are embossed.  This makes the embossing shine.

P1180332

4. With a spritzer with water or I use an old Stampin’ mist bottle, hold the bottle a little away and lightly spray the card.  You don’t want to soak the card just lightly mist.  You will see some of the colour start to lift.  Mist until you are happy with the coverage.  Keep the card level or you will start to have runs from the water running down. Leave the card aside on the table for a few minutes.  The longer you leave the card, the more effect you will get.  Finish off drying your card with the Heat Tool lightly.  You don’t want to melt your embossed images any more.

P1180334

You can now finish your card as you like.

Here is the first card I made using this effect. I have used Rose Wonder set. Thank you to my friend Leonie for showing me this technique.  We made this card at my last technique class too. I have heat embossed the images in white,  The inks I have used are Elegant Eggplant, Tempting Turquoise and Bermuda Bay.

image-6194

I made another card that day but I didn’t leave the water sitting on the card for long so it doesn’t have as much mottling.  I was a little disappointed with the colour combination. I used Watermelon Wonder, Mint Macaron I think and Lavender Lace. I thought I would show you the card anyway. This is using Birthday Blossoms.

image-6191

So how about you have a try at this technique.  Each time you do one it will turn out different. It’s fun.

Thanks for visiting me today.  Have a wonderful day/night.

Jenny

cards, Stampin' Up!

CREATIVE PLAY DAY WITH BOTANICAL BUILDER FRAMELITS!

I had some creative time yesterday just to play.  It was so good.  I don’t have a lot of occasions to do this for a whole day.  Good for the soul 🙂

After I made some customer Thank You cards (which I will show you next post) I could play with the Botanical Builder Framelits.  I only got the framelits recently.  I was NOT going to get these.  Nup,  I don’t need them, BUT I saw so many gorgeous things created that one day they slipped in to my order on Hostess rewards.  Just one of the many perks being a demonstrator. 😉

So I thought I would show you what I made.  I think I only touched the tip of the iceberg here.  So much to make with them.

I saw this idea on a Facebook group I am on to use the leaf border as the centre border on a card.  I thought that was clever. Have to say though it was harder to work out than it looked – and maybe cut the right side of the card!  Here is the first card.  I am still not too sure of it. I thought I would show you anyway.

image-6229

The base in Sahara Sand and the Designer Series Paper piece is from the ‘It’s my Party’ Paper Stack. I think the colour of the DSP leaves it looking a little flat. I cut a piece of Mint Macaron card slightly smaller and then cut the leaf edge from the centre.  Just check which way you need to cut it first!!!

The sentiment is from ‘Birthday Blossoms’ set stamped in Black. I added some Rhinestones but still thought it was missing something.  After I cut some flowers for another card I added a flower to the top right.  The flower is in white and I sponged the edges. I don’t know, what do you think?  Missing something?

Well after making this card I tried another one this time in Island Indigo.

image-6228

I do like this version better.  Maybe it’s a bit brighter? I added some Adhesive Pearls to this one.  The sentiment is from ‘A Dozen Thoughts’.  This might work for a wedding card?

When I made the Mint Macaron version above I first cut it wrong.  Rather than waste the piece I thought I would make another card.

image-6231

I added the strip along the bottom of a Whisper White mat which I had embossed with the ‘Softly Falling’ Embossing Folder.  The card base is Mint Macaron.  This sentiment is also from ‘Birthday Blossoms’ which I cut with an Oval Framelit.  The flowers were cut in White and then sponged with some smaller Mint Macaron ones in the centre.

I can’t wait to get back to playing with these some more to see what else I can make.  Lots of versions layering and sponging!!

Thanks for visiting.

Jenny

cards, Christmas, Classes, Stampin' Up!

FAVOURITE 5 FOR 2015!

HAPPY NEW YEAR TO YOU ALL!!!

I hope 2016 is a wonderful year for you full of great health, happiness – and I hope lots of opportunities to create. 🙂

I am looking forward to another year of stamping. It always excites me at the start of the year when I think of the new discoveries in stamping and being able to share them with my lovely customers and  you my lovely readers. 🙂  I am also excited when I think of the new people I will meet to share all this creativity with.

Before I look too far forward though I thought I would look back at this past year at some of my favourite projects from the year.  I hope you will indulge me a little and enjoy recapping these – or seeing them for the first time.

I will add the link below each project to the original post so you can read about them.

P1150801

I had fun making these Masculine cards with the ‘Adventure Bound’ Paper Stack.  See about them HERE.

P1160425

A special 21st card.  Read about it HERE.

P1150979

A fun Triangle Easel Card.  See the post HERE.

P1160636

One of the first cards I made with this gorgeous set.  See about it HERE.

P1170158

This is still one of my favourite cards. You can check it out HERE.

I had trouble limiting it to 5.  I have to throw in a Christmas card too. 🙂

P1170418

One of my favourite Christmas cards. See it HERE.

Well those are my favourites BUT what did you think?

Here are some interesting facts from WordPress that you liked this year.

The most popular post in one day was my Convention Swaps on May 9th with 486 hits.  We are always interested in swap cards I think for their inspiration.

P1160597

This is just one lot of them. You can read the full post HERE.

The most popular post continues to be my Tote bags.  These were made in 2012 but are still so popular.

P1030185

The tutorial and the link can be found HERE.

and the more recent one HERE.

Thank You for being part of my journey this year.  I love sharing what I create and I am glad you like to visit.  Feel free to drop a comment now and then.  At least I know then I am not talking to myself. 🙂

Have a great 2016,

Jenny