cards, Techniques, Tutorials, Videos

IT’S A BRUSHO CRYSTALS LONG WEEKEND – DAY 1!

We start today! I am excited to bring these projects to you for our Brusho Long Weekend.  I have been playing with these Brushos (as I commonly call them) for the past few weeks.   Each day over the next 3 days I will bring you a fun new project with a video and tips.  I hope you enjoy them.  Plus don’t miss out on the Special bonus savings this weekend if you are an Australian resident.

Warning: These Brushos are fun, addictive and at times messy.  🙂

DAY 1

My first project is creating a simple background similar to this one I have shown on this Dragonfly card.

Here is a video to create a washed out effect but I have also written a description below with a few tips.

NB. The above card was made a few weeks ago as I was still experimenting.  For the card above I used watercolour card and sprinkled over the powder with the card dry and then wet it. It does give a slightly different effect.  On watercolour card the colour doesn’t run as well. You can create a background like this or how I have in the video.

In the video: I chose to use Gloss card and wet the card with the Aquapainter before I added the Brusho Crystals as the water enables the Crystals to spread easier.

Sprinkle over some Brusho Crystals lightly on your card after you have wet the card.  I have used the Prussian Blue.  You only need a small amount and for this technique I would keep it to one colour.

Spritz the card with water. Tilting the card will help make the colour run. Spritz lightly with more water if you think it needs more or you can sprinkle over more colour if need be.   When you are happy with the effect, leave the card aside to dry.  Once dry you can assemble the card.

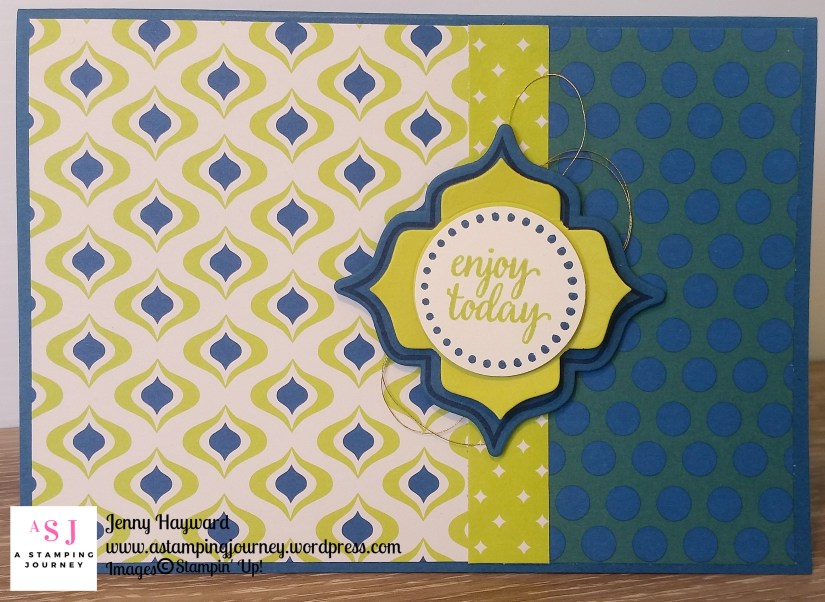
On the card above I stamped the Dapper Denim base with the dots from the Dragonfly Dreams set.  A dragonfly was cut from the Detailed Dragonfly Thinlits in Gold Foil. I stamped a few of the dots from Timeless Textures in Versamark on my coloured card piece and heat embossed them in gold.  The paper is from the Eastern Palace Specialty Designer Series Paper.

Just a note on the sentiment: I masked part of the sentiment from the Dragonfly Dreams set and inked it with versamark.  After I stamped it on the Dapper Denim card I heat embossed it in gold.  It was cut with the smallest framelits in the Lots of Labels Framelits.  I added a few loops of the Gold Thread behind the sentiment.

I hope you like this project. Each time you do it the effect will be different.

Come back tomorrow for a second project.

Grab 15% off your Brusho Crystals this weekend. (ends Sunday 11th 8pm). Details below.  Includes an information sheet on ways to use your Brusho Crystal Colours.


3D projects, cards, Catalogues

SILVER GABLE BOXES!

Have you seen the Silver Gable Boxes in the Occasions Catalogue?  These make really quick gift boxes in no time.

I shared in the last post the boxes I made up for the Lucky Door Prize for my launch. Head back to see those.  I made a few more up to show ideas with them.  Let me show you.

Firstly, a simple one with the Hedgehugs set.  Cute!  The paper strip is from the Eastern Palace Specialty Designer Series Paper pack.  I stamped the hedgehog in Dapper Denim and coloured the centre of the flower with the Lemon Lime Twist marker.  I added a bow with Lemon Lime Twist Mini Striped ribbon with a glue dot.

Here is another Gable Box.  This time decorated with the Sweet Soiree Specialty Designer Series Paper.


The sentiment is from the Birthday Blossoms set.  I love the Metallic Edge Berry Burst Ribbon.

Here is another version of the boxes.

This time I cut off the top of the Gable Box. So the handle section along the scored line.  Then created a wrap using the Sweet Soiree Specialty DSP.  I added a strip of the Berry Burst cardstock and then tied some Lemon Lime Finely Woven Ribbon.

You can grab the boxes in store now -> HERE and decorate them how you like.  They are $14 for a 12 pack.

Grab some and give a little treat to someone to brighten their day.

Jenny

3D projects, Christmas, Stampin' Up!, Tutorials

MID-SIZE GIFT TOTE FOR SECRET SANTA!

I can share this project now.  I made this Gift Tote last week with a small gift in it for our team Secret Santa.  I thought you might like to see it and if you are still in need for some Christmas packaging it might be just the size you need.  I have the tutorial below.

It was just the right size for my gift of 2 small tubes of lotion and some chocolates.

The chocolates were wrapped Hershey Nuggets. We can’t get these here in Australia but I grabbed some when I went to Hawaii recently.  Score!! I put them in a cello bag with a little topper.

I wanted to make up a little Tote but I didn’t have any Christmas paper left.  This sheet of the Gold from the Eastern Palace Specialty Designer Series Paper is kinda Christmas-sy. 🙂 Teamed with some Fresh Fig card trim and the ribbon it makes it a little classy don’t you think?

Here is a close up of the tag on the bag.

The sentiment is from the Brightly Lit set layered on a Gold Foil oval and then layered on a Fresh Fig oval cut from the Stitched Shapes Framelits.  The Gold ribbon is looped around the handle and adhered between the Fresh Fig and the Gold layer.  The label on the chocolates which you don’t see too well is also from the Brightly Lit set and cut with a circle from the Layering Circles Framelits and one from the Stitched Shapes Framelits again in Fresh Fig.

To make this I was inspired by a tutorial I had saved quite a few years ago before the days of Pinterest.  I converted it to metric and modified the instructions.

Do you want to know how to make your own Tote? I have the tutorial below for you in step-by-step instructions in both metric and in imperial.

If you like a more visual tutorial just hang tight and I will get that out to you shortly.

MID-SIZE GIFT TOTE

1. Cut Designer Series (patterned) paper to 21cm x 28cm (8 ½” x 11”).

2. On the short side score at 3.5cm (1 3/8”) on one side. Turn your paper 180 degrees and score at 3.5cm ( 1 3/8”) on the other side.

3. On the long side score the paper at 11.5cm (4.1/2”) on one end. Turn your paper 180 degrees and score at 11.5cm (4 ½”) on the other end.

4. Cut in on the middle tabs on the long side on both sides. Fold on all the scored lines.

5. Cut 2 strips of Co-ordinating card measuring 21cm x 3.5cm. (8 ½” x 1 3/8”). Score at 3.5cm (1 3/8”) in on each end on each piece. Adhere these strips along the top and bottom edge of the Designer Series Paper.  (ie the short side).

6. Add adhesive to the outside of the small centre tab on the side. Fold up one long side tab over this tab to adhere. Repeat the same on the other side.

7. Run Adhesive on the inside edge of the other long tab and fold over to adhere on to the other side tab. This forms a bag shape.

8. Punch 2 holes along the top evenly spaced. If it helps mark with pencil the points you want to punch to help you line it up.

9. Run your length of ribbon through the holes on one side and tie on the inside to secure. Repeat with ribbon on the other side.

——

If you make one do share your version with me.  I would love to see it.

Have a great day,

Jenny

cards, Stampin' Up!, Techniques

USING THAT EASTERN PALACE SPECIALTY PAPER!

Are you like me? The Eastern Palace Bundle paper came out early a few months ago, you used it and then it got stored away to be overtaken by more pretty paper???? Yes?

I dragged it out the other week and thought I would play a little.  Although this paper is not one of the Designer Series Paper packs available as the BUY ONE, GET ONE FREE promotion for this month I thought it would be fun to share it anyway.  After all you can use any paper. 🙂

This first one has a strip of the Tranquil Tide pattern in the Eastern Palace paper.  Then how fun are the Eastern Medallions Thinlits.  I cut the fancy circular diecut straight from the Very Vanilla card and layered it on the Tranquil Tide card base.  The smaller flower shape from the Eastern Beauty stamp set is stamped in Tranquil Tide on that colour card and then cut with the matching die.  No scissors required! The curvy sentiment fits nicely around the diecut shape.  Finish it off with the Gold Faceted Gems and some Gold Ribbon.  I think this is a classic style card.

This next one is totally out of my comfort zone.  Really, mixing 3 different patterns of paper!! But I think it works and I have to say I am happy with it.  I think it works as there is just one strongly patterned paper and then the other 2 are simple patterns.   It helps that the colours co-ordinate which is always a special feature of Stampin’ Up! Products.

The sentiment is stamped on white adding the “spotty” circle surrounding.  Then stamping and cutting a couple of the “flowery” shapes.  They all layer nicely together.  What more could you need to add than some loops of the Gold Thread.

What do you think?  Ready to drag out some of that Eastern Palace paper again? Maybe try the one above with some of your other paper packs and dare to mix the patterns. 🙂

Thanks for stopping by,

Jenny


There is just a short amount of time to get the BUY ONE, GET ONE FREE PAPERS.  It finishes next Tuesday.  Grab them and any of your other necessary creative products in my store now.  Just pop over to -> HERE.

Please use the HOST CODE – BRE396PY

cards, Catalogues, Challenges, Christmas, Stampin' Up!

FRESH COLOURS FOR CI17 COLOUR CHALLENGE!

I had a little play today with the Colour INKspirations Challenge (CI17).  I have missed a few rounds lately so it was good to take time out to play.  I really like to have a go at these challenges as it really extends your creativity.

The Colours for this week are: Pool Party, Lemon Lime Twist, Tempting Turquoise and Flirty Flamingo.  What fun, fresh colours!

I had in mind to use the Beachy Christmas set in the Holiday Catalogue.  I hadn’t got around to using this set yet.  And you don’t need to use this just for Christmas …

For this card I used the sketch from Freshly Made Sketches #261

I was going to watercolour the houses with just a wash but then saw the Work of Art set.  One of the larger “block” type stamps covered over it nicely.  I did do a test run on scrap card to mist the colours after I stamped but I liked it better just to leave them.

The Flirty Flamingo card mat was embossed with the Sparkle Embossing Folder.  I added a strip of the Eastern Palace DSP.  I love that Lemon Lime Twist!  The sentiment I used was from Better Together set.

The clouds were from the Lift Me Up Bundle stamped in Pool Party.  I wouldn’t have necessarily stamped them in that colour but had to add it somewhere.  I did add some sparkle with the Wink of Stella pen.  It’s a bit hard to tell though.

Now when I made this I first used the Peekaboo Peach instead of the Flirty Flamingo.  So I had to put that one aside and redo it with Flirty Flamingo. Once I had finished the card I then went back and finished this one.  I thought I would show you that one too.

I used more of the Eastern Palace DSP.  I played around with the sentiment a bit to cut angles and all kinds of things but ended up just trimming it down and adding some doily underneath.  The sentiment is from Dragonfly Dreams.

I think I like this version better.  What do you think?

Thanks for looking.  I hope your weekend has been great and you have had a chance to be creative,

Jenny

cards, Catalogues

A FUNKY ENGAGEMENT WITH LEMON LIME TWIST!

I was asked by a friend to make a Funky Engagement card.  Mmmm??  My first thought was Lemon Lime Twist.  That is a funky colour.  What else though??

As I thought about it I though the Swirly Scribbles Thinlits or the Sunshine Wishes Thinlits might work.  I did a little searching on Pinterest and found an idea there.  I changed a few things around and … Well I think the result was funky enough.  My friend was very pleased with it anyway so that is what counts.

I cut the wavy lines from the Swirly Scribbles Thinlits from the the White card and used both the waves and the outside white pieces.  Behind it I adhered a piece of the Eastern Palace Specialty DSP.  Some of the cool Lemon Lime Twist Ribbon was wrapped around the white card before adhering it to the Lemon Lime Twist card mat and then to the Dapper Denim card base.

The heart is cut from the Sunshine Wishes Thinlits in Lemon Lime Twist  and the “congrats” from Dapper Denim.  I couldn’t help myself.  I had to add a Rhinestone. 🙂

So you can make a funky engagement.

Thanks for visiting,

Jenny

cards, Catalogues, Christmas

CAROLS OF CHRISTMAS – DAY 2!

DAY 2

This card was actually the first card I made using the Carols of Christmas set. I have to be  honest though I am not too sure of it.  I didn’t want to hit you with this one first.  (you might not come back!!)  Anyway, it’s a different style for me.

I have seen a lot of the loopy ribbon and sequin trim behind a sentiment or image block.  I thought I would try that effect.  This is the retired Gold trim.  I don’t have the current mini sequin trim.  I am really not sure of this look though. What are your thoughts??

The sentiment is Heat Embossed in Gold for a little shine.  I matted it on the Gold paper from the Eastern Palace Specialty Designer Series Paper and added a little colour with the mini ornaments in Tranquil Tide, Real Red, and Dapper Denim.

CAROLS OF CHRISTMAS

Order the Carols of Christmas this week and receive double Loyalty points.  Always a great thing – and receive a small gift to say Thanks. 🙂

ORDER ONLINE HERE. (Australian residents only)  Please use the HOST CODE:  KDEM49NG

See you tomorrow,

Jenny

cards, Catalogues, Classes

LEMON LIME LABEL ME PRETTY!

I have been busy all week getting things ready for my Open House this weekend showcasing some lovely new products.  I will share some of these after the weekend but I shared this card on Instagram this afternoon so thought I would quickly post it here for you. (BTW: If you are on Instagram you can follow me.  Just do a search for Jenny Hayward). 🙂

I needed to make some cards using the new Label Me Pretty Bundle.  Now when I get a new stamp set I do a little searching online for samples using sets that are very similar.  So in this case I was looking at the old Chalk Talk set and a few “tags” type sets.  I couldn’t believe how many stamp sets that Stampin’  Up! have released with the word “tags” in the name.  Anyway, I came across a few older cards that inspired me through Google searches and on Splitcoaststampers.

I had this small strip from the Eastern Palace Specialty Designer Series Paper.  I just LOVE this Lemon Lime Twist paper in the pack and I couldn’t bare to throw this strip out. I sometimes keep small pieces but end up throwing them out at the end of the catalogue as I hadn’t got around to using them.   Not this time though … 🙂

This was the finished card I created.

I stamped one of the “label” sideways on white card to create a flourish effect in Lemon Lime. The strip was adhered to the card and then I tied around some Thick Black Baker’s Twine.  This was adhered to the Lemon Lime base card. Another label was stamped in Berry Burst on to the Berry Burst card and punched out with the Pretty Label Punch.   The sentiment is stamped in black on to white card and cut with a Layering Circles Framelit.   They were both raised up off the card with Dimensionals.  I added some Rhinestones to the card but still felt it was a bit plain so after a day of looking at it I very nervously stamped some leaves from the Colorful Seasons set.  I was so worried of messing it all up and getting ink everywhere at this point BUT it worked!! Phew!  I think it might have been good to sponge the edge of the card with Lemon Lime ink but I wasn’t going to bother with that at this point.

So a simple card but funny that the whole card was designed around this little strip of paper!

Thanks for stopping by,

Jenny

cards, Catalogues, Stampin' Up!, Tutorials

LEMON LIME MEDALLION!

I know I have been showing you cards with retiring products BUT I just wanted to interrupt that to show you this card with the Eastern Palace suite.  I kind of liked how it turned out.  🙂

I started out to Case a card by Connie Babbert. You can see that card HERE. 

Here is my version.

CREATE YOUR OWN

1. Cut card base is Tidal Tide.  On a piece of Very Vanilla Cardstock just slightly smaller than your base adhere a strip of the Eastern Palace Specialty DSP with the Tidal Tide pattern. IT measures about 5cm wide (2″). Add a little strip of the DSP in the Lemon Lime Twist colour across the middle. Don’t you love that new Lemon Lime Twist colour?? It’s so bright and fresh.

2. Add a sticker strip from the Eastern Gold Vinyl Stickers just above the DSP.  Stamp 2 of the “sprays” in the top left and top right in the Lemon Lime Twist colour.

3, Cut a medallion with the Eastern Medallion Thinlits from the Lemon Lime Twist card and a smaller one from the Tidal Tide card.  Raise that smaller one up off the Lemon Lime Twist one with Dimensionals. Stamp the sentiment on Very Vanilla card and cut it with a small circle die from the Layering Circles Thinlits. Add some loops of Gold Thread behind the sentiment and adhere that on top of the other 2 medallions with Dimensionals.   

4. Adhere this to your card with Dimensionals.  Then add two of the flower stickers from the Eastern Gold Vinyl Stickers to finish.

—————

Don’t forget there is one more week left to get your Eastern Palace Suite bundles and save.  If you want to know more about them head HERE.

If you grab your Eastern Palace Bundle Now while you can get a discount then stop by my store HERE now.  Please use the Host Code for this week: 2WNURG3N

Thanks for visiting today.

Jenny

cards, Stampin' Up!

A DAPPER DENIM/TIDAL TIDE MIX WITH THE EASTERN PALACE BUNDLE!

I have another Eastern Palace Suite card to show you today.  I created this card after I made the project for the Blog Hop while I still had everything out.  BTW: Have you checked the Blog Hop out yet with the Eastern Palace Suite?  If not head back 2 posts and start the Hop around to see some great projects with this suite. 

The card base is Dapper Denim and then a piece of the Eastern Palace Specialty Designer Series Paper is matted on to a Tidal Tide card mat.  I added one of the Eastern Gold Vinyl Stickers along the bottom edge.   For the flower I cut 2 of the shapes from the Eastern Medallions Thinlits in Tidal Tide and then 1 in Gold Foil.  I was still waiting on my Tidal Tide inkpad so I sponged the edges of the flowers with Versamark to add some depths of colour.  The flowers were layered together and then some stickers were placed on the top one.  Before adhering it to the card base I curled up the edges a little with my Bone Folder and then added some loops of the Gold Thread.  The sentiment is from the Eastern Beauty set and embossed in Gold and I added a little Gold embossed swirl as well.  This was punched out with the Classic Label punch and then adhered together with a Gold Foil one.   An adhesive Pearl was added to finish it off.

There you have it.  I hope you like it.  Until next time….

Jenny