cards, Classes, Stampin' Up!

CAROLS OF CHRISTMAS CLASS!

Card Class is on this Friday 18th August 10am and 7pm.

Come join in if you are a Wollongong local.  I have 3 great projects to share with you using the Carols of Christmas bundle.  This is one of the cards we will be making which was featured last week on my blog.

Here are the details.

COST:  $20 class only 
                      OR 

$85 which includes the Carols of Christmas bundle (in clear mount) and class greatly reduced in price at $7!!

BYO: Scissors and adhesives.

PLEASE RSVP by Wednesday 16th.

3D projects, cards, Catalogues, Christmas, Classes, Stampin' Up!, Tutorials

CAROLS OF CHRISTMAS – DAY 5!

DAY 5

Today’s project is actually a gift box.  It is always good to have little boxes to fill with chocolates or treats.  This is not a new box for me but I will give you the instructions shortly.

I created the sentiment the same way as I did on the card from yesterday.  You can go back to that post to check it out if you like.  This box was just the right size to add the die cut frame on the top of the box.  The ornaments on the side was added as an afterthought.  It needed something there.  I probably should have thought of that before I assembled the box.  So stamping on this afterwards was a little stressful.  I held a clear block to the back of the panel when I stamped – and held my breath. That is an important stamping requirement you know. 😉  It turned out well not just once but twice.  I was so lucky!!

To make the box:

I designed this box a few years ago now.  You can find the Original post with the instructions in Metric and Imperial on this post HERE. 

Here is the card and the box together to see what a great pair they make. Funky for Christmas do you think?? 🙂

CAROLS OF CHRISTMAS

Order the Carols of Christmas this week and receive double Loyalty points.  And receive a small gift to say Thanks. 🙂

ORDER ONLINE HERE. (Australian residents only)  Please use the HOST CODE:  KDEM49NG

If you would like a free copy of the upcoming Holiday catalogue mailed out to you then drop me a comment.  It will be on it’s way very soon.

————————-

So, what has been your favourite project from this week?? Here is a review to remind you.

I would love to know your thoughts.  Drop me a comment and I am going to pick a random winner for a special prize.

Thanks for visiting me all this week.  Do continue to drop by.  I love you to visit.

Jenny

cards, Catalogues, Christmas, Classes, Stampin' Up!

CAROLS OF CHRISTMAS WEEK!


I am away all next week but you won’t miss me.  I have a special week planned for you all next week sharing some fun creations that I have been working on using the newly released Carols of Christmas bundle.  I can’t wait to share them with you all.

CAROLS OF CHRISTMAS WEEK

It will run Monday 7th to Friday 11th August.  

Be sure to click on the right column to receive my blog updates by email or to follow it in your reader.

“See” you Monday,

Jenny

Christmas, Classes, Stampin' Up!

DAISY PUNCH AND OTHER NEWS!

I am interrupting our regular inspirational postings for a commercial break.  There are some important updates that I must share with you.

FIRSTLY and most excitedly,  The Daisy Punch is now available.  This punch has exceeded Stampin’ Up!’s expectations resulting it being on back order – twice.  Now it is back!

Grab the punch as a bundle with the Daisy Delight stamp set and save 10%

You can grab that in my store now HERE. 

——————————-


Only 2 days left to grab your coupons.  Every $90 order you receive a $9 rebate voucher to redeem in August.  That’s a great saving.  Grab your last minute orders now.  After you place your order you will receive an email from Stampin’ Up! with a code.  Don’t lose this email. This code you will add to redeem your savings next month.

————————————–


But do you want even more value? Why not $187 extra – Free!! 

It’s already great value when you join Stampin’ Up!-  but It’s Christmas in July and you get extra gifts.

If you are not convinced.  If you think you are going to sign up for something and never get out of it.  If you think you have to do parties and classes and sell big time then take a minute to read my page HERE.  10 Reasons why you need to be a part of the Stampin’ Up! family.  

You can join directly at my website now HERE and I will help you along the way.  Whether you plan to do classes – and it’s ok if you don’t or enjoy the discount.  Or enjoy the great value now and move on.  It’s all part of your exciting journey with Stampin’ Up! and I would love to share in it with you, wherever you are in Australia.  I look forward to welcoming you.

Thanks for visiting.  Have a great weekend,

Jenny


cards, Catalogues, Classes, Stampin' Up!, Techniques, Tutorials, Videos

STARLIGHT EMBOSS RESIST CARD!

This is the 2nd project from my Christmas in July Online event that I thought I would share with you.

This card uses the Emboss Resist Technique.  Heat embossing itself is such a magical technique but add the ink to it and you get a WOW! effect – I think anyway.

Here is the card. I have used the Star of Light Stamp set and the Starlight Thinlits. I have a video below for you to check it out yourself.

Thanks for visiting and checking it out.  Be sure to subscribe to my Youtube channel so you get regular updates as I start venturing in to this world.  I would appreciate your feedback too for this Youtube novice. 🙂

Jenny

cards, Catalogues, Christmas, Classes, Stampin' Up!, Tutorials, Videos

CHRISTMAS IN JULY IS STARTING SOON!

In just a few hours Christmas in July is starting.  This is a fun time when I am bringing YOU some Christmas projects via video. We will also have some games, chatter and giveaways along the way. 

I hope you  can check in at the time.  Wear your slippers, grab a drink and be there at 7.30pm (AEST)  Link is below.  Invite a friend to the event too so we can all have fun together.

If you can’t make it you can stop by later to catch up.

Here are the details to remind you.

——————————

Christmas in July is a great time to start getting inspired for Christmas.  You can join from anywhere in the world!

Here is a sneak peek for you of one of the projects I will share with you.  I think you will love it.

WHEN IS IT?? Monday 24th July at 7.30pm – 8.30pm (AEST).  

ARE YOU IN??  Come and join HERE through Facebook.  

Don’t have Facebook?  I might share some of the projects at a later date – but you will miss the fun.

If you have trouble joining the event through the above link please let me know. I can’t wait to share everything with you.

See you soon,

HO! HO! HO!

cards, Classes, Stampin' Up!, Workshops

SOME MORE OH! SO ECLECTIC! YES IN BERRY BURST AGAIN. :)

These cards I wanted to share with you today are using Oh! So Eclectic and well, I have used Berry Burst again.  I will use a different colour soon I promise.  But it is such a lovely colour. 🙂

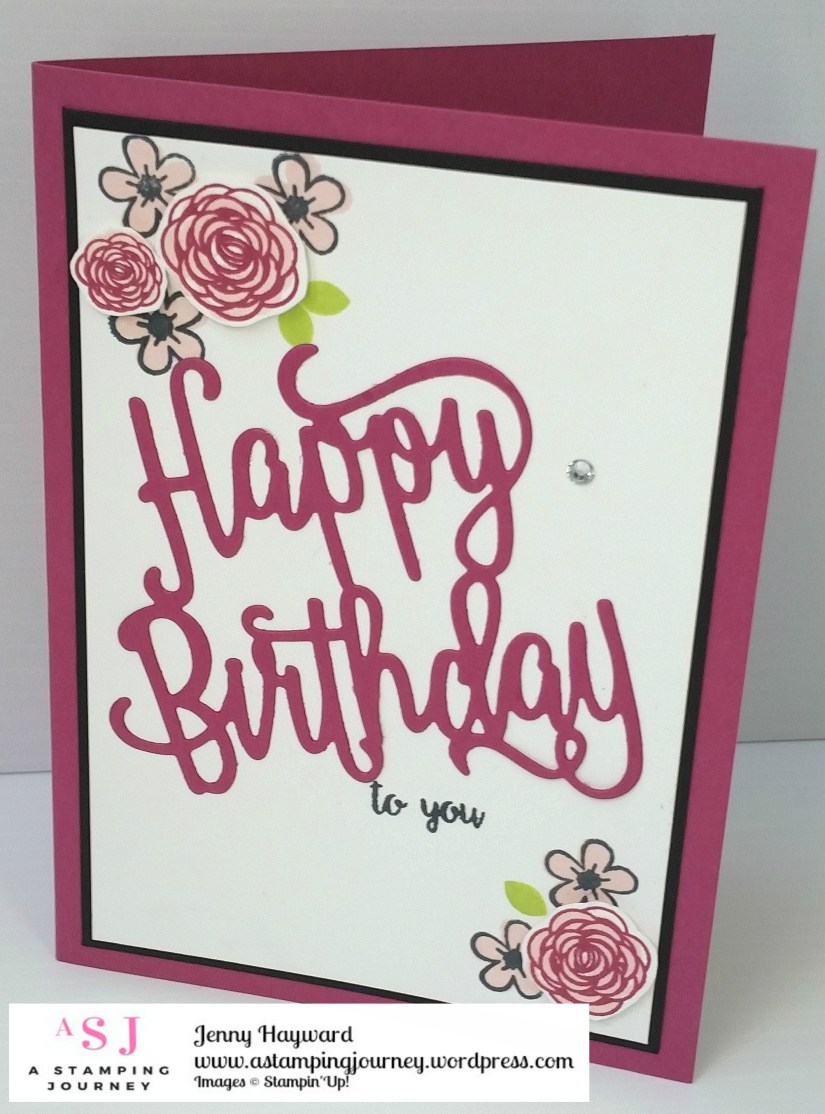
I held an event last Saturday with a group of ladies who mostly had never stamped before.  This first card I demonstrated to them to show the Big Shot.  They were so impressed – no scissors required!!

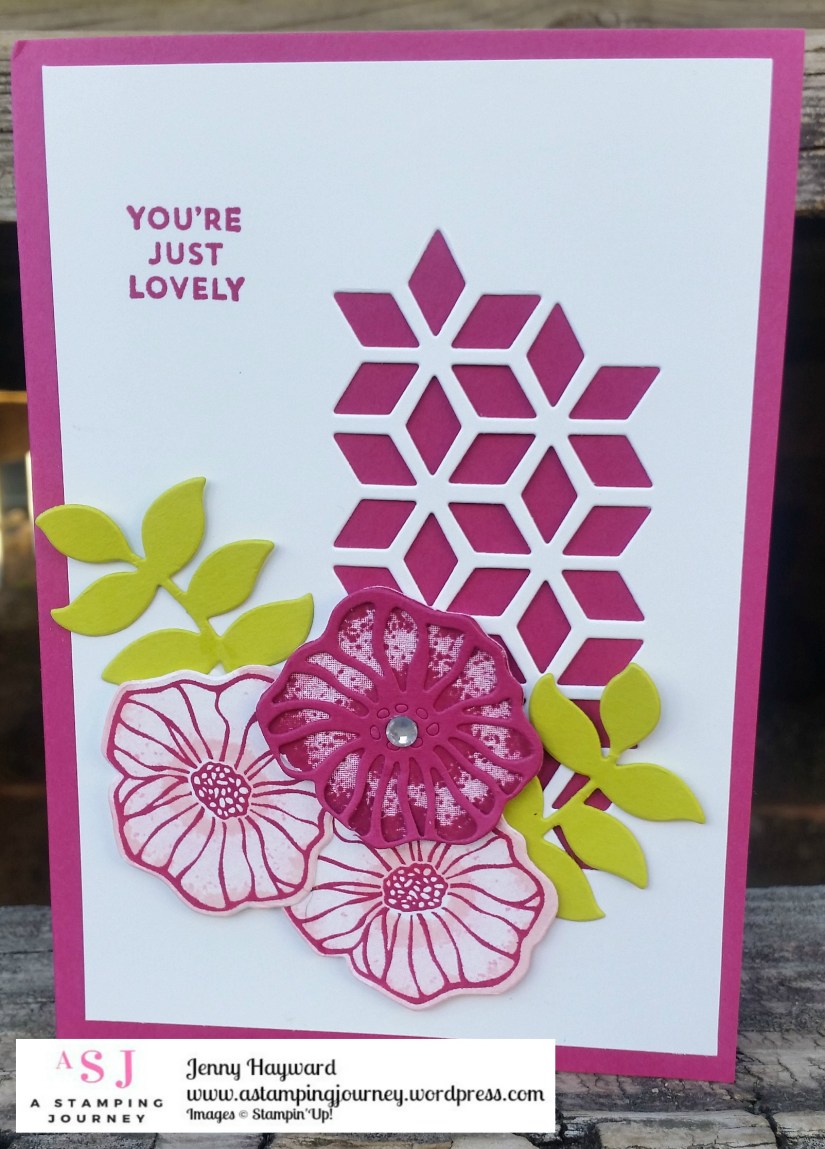
This card was inspired by one on Pinterest.  I love the Diamond pattern you can diecut in your cards.  It just adds something else to the card.

How to make it:

Firstly, stamp 2 of the detailed flowers on scrap Whisper White card in Berry Burst.  Then overstamp this with the solid full flower stamp in Powder pink.  The great thing is it doesn’t even have to be a perfect fit as it just adds a little colour.  Cut this with the flower Framelit shape in the Eclectic Layers Thinlits.

For the other flower, stamp the Solid full flower stamp in Berry Burst on scrap Whisper White and cut that with the flower Framelit.  Also cut a flower in Berry Burst with the detailed die and the flower shape die.  I run them together in the Big Shot.  It is much easier doing it that way. You will also need to cut 2 leaves from Lemon Lime Twist Card.

Then it’s a matter of assembling it all together. You can raise the flowers up with Dimensionals. Don’t forget the bling. 🙂

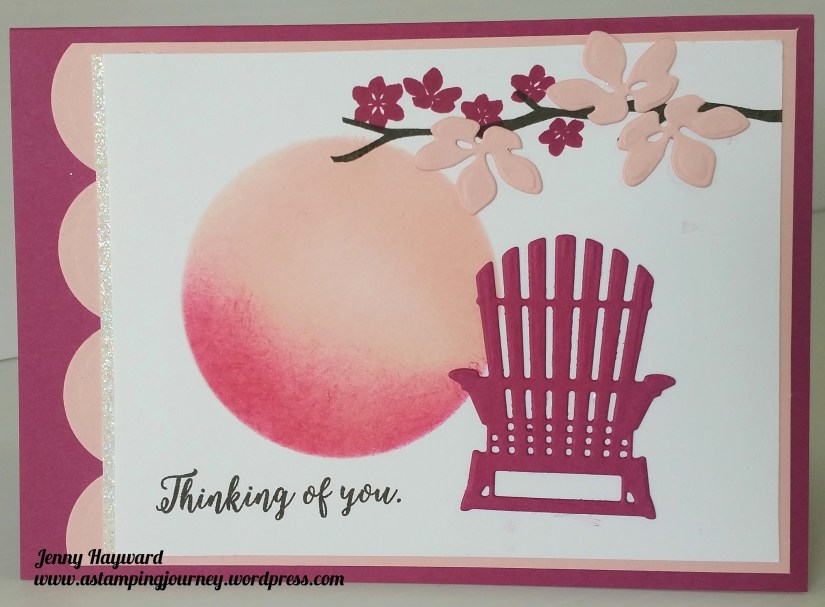
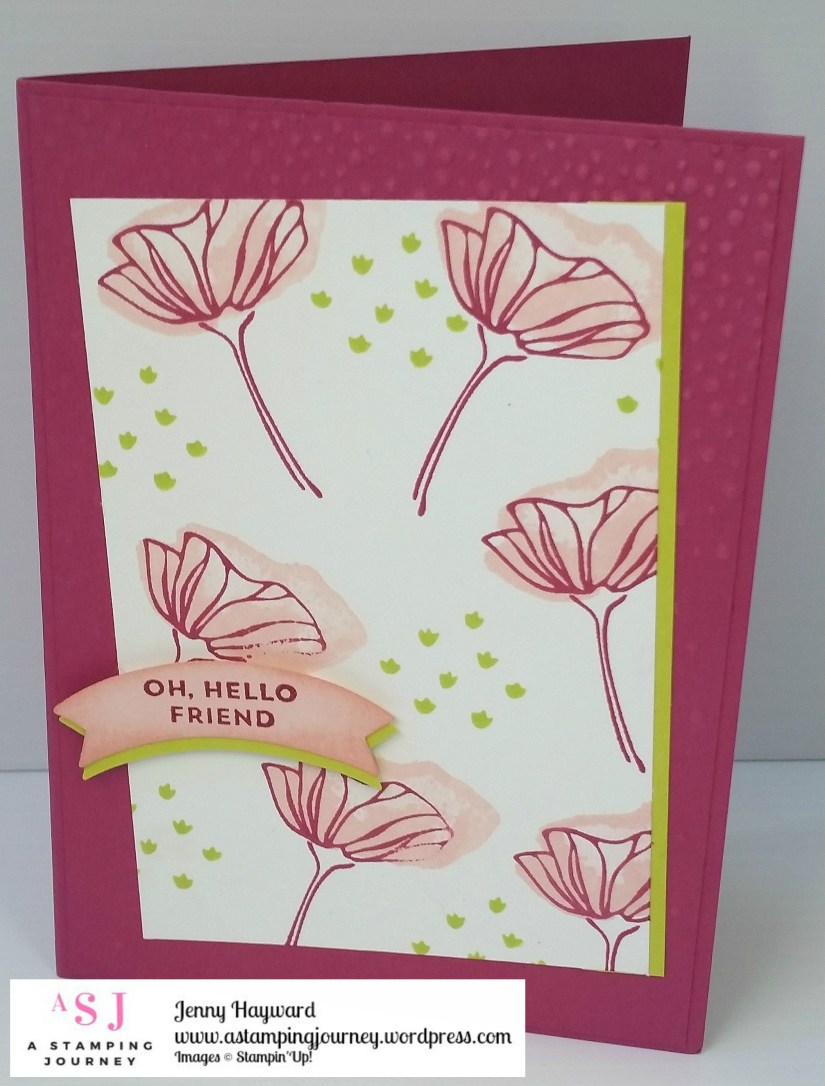
This next card was the Make and Take card they all made.  There needed to be some gentle encouragement for some to make it as they were a little intimidated but they were so proud of themselves when it was done.

How to make it: 

On a piece of Berry Burst card slightly smaller than your base card run it through your Big Shot with the Softly Falling Embossing Folder. This adds some lovely texture to your card.

On a piece of Whisper White, stamp the detailed flower stem stamp several times in Berry Burst. Then with the solid flower top stamp it in Powder Pink over the flowers.  Fill in some of the spaces on the white card with the little flowers stamped in Lemon Lime Twist.

When assembling the card, adhere a thin strip of Lemon Lime Twist under the right side edge of the White card.  Stamp the sentiment on to Powder Pink card and punch it out with the Duet Banner Punch. Sponged a little ink around the edge of the banner. Punch a second banner from Lemon Lime Twist card.  Adhere these together by off-setting them slightly.

Would you like to make these cards with me? If you’re local, let’s plan a date for us to share them with your friends. It would be a great excuse for you all to get together. Drop me an email or a comment.

Be back again soon,

Jenny


cards, Catalogues, Classes, Stampin' Up!

A BERRY HAPPY BIRTHDAY!

I thought I would show you one of the cards we made at Card Class last week.  I have been playing with the Happy Birthday Thinlits and Happy Birthday Gorgeous.

This card was CASED from Mary’s blog HERE.  I just didn’t add the DSP layer and kept it a little simpler.

I am loving the new Incolors.  I have used Berry Burst, Powder Pink and Lemon Lime Twist.

Thanks for visiting,

Jenny

cards, Classes, Stampin' Up!, Techniques

BERRY BURST COLORFUL SEASONS WITH SPONGED MOON!

I wanted to show you the card everyone got to make at my Open House events last weekend.  I think everyone was happy with their results.

I wanted to showcase the Colorful Seasons Bundle as I had been playing a bit with it lately.

This card was inspired by a card by Patty Bennett.  You can see her card HERE.  I loved the idea of the sponged moon effect.

The card base was the lovely new Incolor Berry Burst with the Powder Pink.  Instead of the ribbon that Patty used I added a scallop edge in Powder Pink using the Scallop Thinlit in the set.  I added a little sparkle with a strip of the Dazzling Diamonds Glimmer Paper.

To create the Sponged moon effect.  Take a piece of copy paper cut to the size of the Whisper White card.  Cut a circle using the Layering Circles Framelits to the left of the copy paper piece.

Place the piece of paper over the Whisper White card and carefully start sponging the Powder Pink ink inside the circle. Gradually making your way in to the centre of the circle. It is good to leave the centre a little lighter.  TIP: If you haven’t used any removable adhesive on your paper then you need to hold the paper in place carefully with your fingers at the circle edge.  Sponge in to the circle. Slowly move your fingers as you work around the circle to hold the paper down.  If that makes sense??

Then take the Berry Burst inkpad and sponge a small section in the lower left corner.  Then you can remove the piece of copy paper, stamp your sentiment and tree branch in Early Espresso and some flowers in Berry Burst.  Assemble your card together, then cut a chair (love that chair!) in Berry Burst and some small flowers in Powder Pink.

Thanks for stopping by today.  Have a super stampy day/night wherever you are.  Don’t forget to stop by and say HI.  Tell me where you are from.  I love to read how far this travels.

Jenny

cards, Catalogues, Classes

LEMON LIME LABEL ME PRETTY!

I have been busy all week getting things ready for my Open House this weekend showcasing some lovely new products.  I will share some of these after the weekend but I shared this card on Instagram this afternoon so thought I would quickly post it here for you. (BTW: If you are on Instagram you can follow me.  Just do a search for Jenny Hayward). 🙂

I needed to make some cards using the new Label Me Pretty Bundle.  Now when I get a new stamp set I do a little searching online for samples using sets that are very similar.  So in this case I was looking at the old Chalk Talk set and a few “tags” type sets.  I couldn’t believe how many stamp sets that Stampin’  Up! have released with the word “tags” in the name.  Anyway, I came across a few older cards that inspired me through Google searches and on Splitcoaststampers.

I had this small strip from the Eastern Palace Specialty Designer Series Paper.  I just LOVE this Lemon Lime Twist paper in the pack and I couldn’t bare to throw this strip out. I sometimes keep small pieces but end up throwing them out at the end of the catalogue as I hadn’t got around to using them.   Not this time though … 🙂

This was the finished card I created.

I stamped one of the “label” sideways on white card to create a flourish effect in Lemon Lime. The strip was adhered to the card and then I tied around some Thick Black Baker’s Twine.  This was adhered to the Lemon Lime base card. Another label was stamped in Berry Burst on to the Berry Burst card and punched out with the Pretty Label Punch.   The sentiment is stamped in black on to white card and cut with a Layering Circles Framelit.   They were both raised up off the card with Dimensionals.  I added some Rhinestones to the card but still felt it was a bit plain so after a day of looking at it I very nervously stamped some leaves from the Colorful Seasons set.  I was so worried of messing it all up and getting ink everywhere at this point BUT it worked!! Phew!  I think it might have been good to sponge the edge of the card with Lemon Lime ink but I wasn’t going to bother with that at this point.

So a simple card but funny that the whole card was designed around this little strip of paper!

Thanks for stopping by,

Jenny