cards

COLOURED CHRISTMAS CUTIES!

I shared my cute angel card a few posts back.  If you missed that you can head to that post HERE. The day I made that one I coloured a few images from this ‘Christmas Cuties’ stamp set.  I was in the mood for colouring!  I am not a colourer usually (is that even a word??) but sometimes it’s relaxing just colouring away. That must be why colouring books are such the rage now. Anyway, back to these cards. Firstly I will show you the images as I coloured each one with a different medium.  Then I will show you the cards.

P1170427

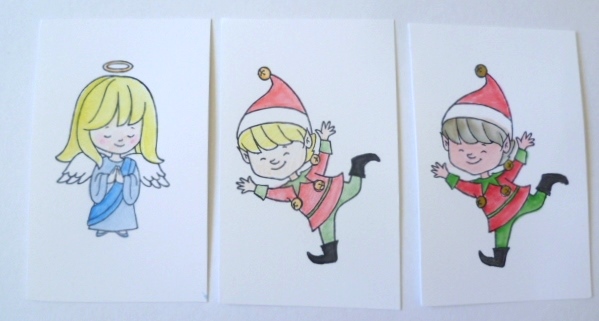
The angel (the one shared in a previous post) is coloured with watercolour pencils.  The middle elf is coloured with watercoloured pencils.  The next elf is coloured with the aquapainter and inkpads.(Don’t look too closely at the colouring!). As you can see though you end up with a different intensity of colour.  I will show you the finished cards now and I will show you one coloured with the Stampin’ Write markers too.

The watercoloured pencil elf.

P1170557

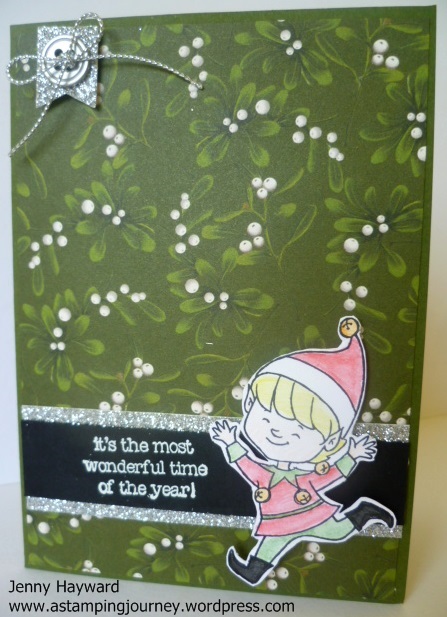
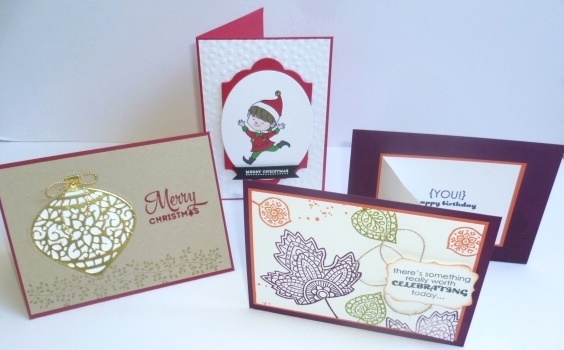
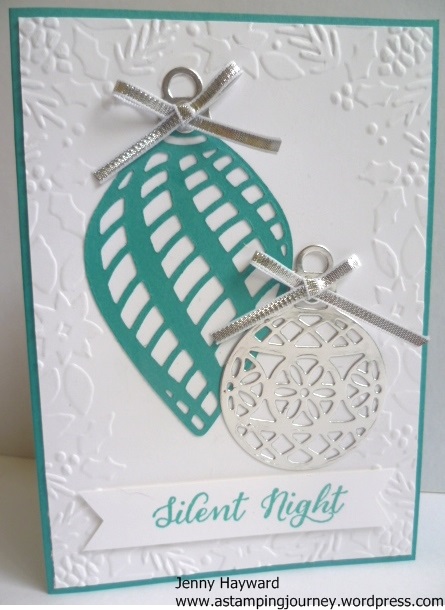
The base card is Mossy Meadow and I have adhered a piece of ‘Home for Christmas’ DSP to the base.  The rest of the card was made up of “bits” left lying on my table. The greeting I decided not to use on a previous project. I had heat embossed it in White Embossing Powder.  I added some Silver Glimmer Paper behind it.  Then I raised up my little elf on this.  It was a bit plain at the top so I punched out a scrap of Silver Glimmer Paper with the little Banner punch.  I added a silver metal button and some silver cord.  I kinda liked this cute card. 🙂

The next one coloured with the Aquapainter and inkpads.

P1170559

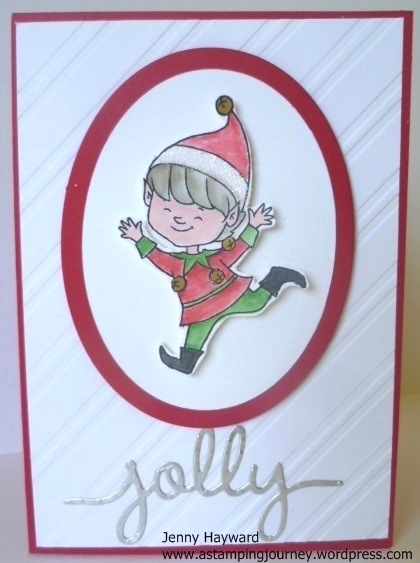
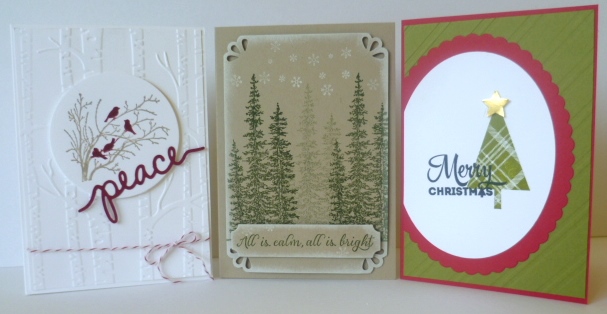
I embossed a piece of white card with the Stylish Stripes Embossing Folder and added this to a Real Red Card base. Then I simply layered a red and a white oval and raised up my little elf with dimensionals.  The greeting is cut from silver foil sheets from the ‘Christmas Greetings’ Thinlets. What a happy chappy he is!  I thought I would add a little dazzle and add some Dazzling Diamonds to his hat.

P1170561

Now I will show you another card I made a bit earlier than these cards.  This card was made for a recent Stamp A Stack and was inspired by one on Pinterest.  On this elf I coloured him with the Markers. The colour is a bit more intense.

P1170439

That’s all for my little Christmas cuties.  Check out these cute images. They are available for $40 wood or $30 clear mount.  You can order them directly through me or at my store HERE.

cuties

Thanks for visiting today.  I hope you can have some fun colouring soon too.

Stop by and visit again soon,

Jenny

cards, Classes, Stampin' Up!

GET YOUR CHRISTMAS CARDS HAPPENING!!

Here are the details for this week’s Christmas Stamp A Stack.  If you are in the Wollongong area do join us.  It is a fun time. I would love to see more people along to my classes 🙂

WHEN: Friday 23rd October at 10am or 7.30pm

COST: $20 for 6 cards (2 each of 3 designs)

BYO: Scissors and Adhesives

PLEASE RSVP BY WEDNESDAY 21ST BY EMAILING ME OR LEAVING A COMMENT.

These are the cards we will make. I think you will love them!

SAS

I look forward to seeing you.

Jenny

Catalogues, Christmas, Stampin' Up!

POINSETTIA SPARKLE!

Today’s card I want to share is using the great bundle ‘Reason For The Season’ stamp set and Festive Flower Builder Punch.  I love how this card came together.

P1170552

The base card is Real Red.  That seems to be the colour card I have used most with these recent Christmas cards!  I embossed some Whisper White cardstock with the Decorative Dots Embossing Folder.  The flower is so easy to put together.  Stamp out all your petals and leaves, I have used Real Red on Whisper White and Mossy Meadow ink on the cardstock.  I punched out a circle with the 1 3/8″ circle punch in scrap white card and built up the flower on this.  I have used the Multipurpose adhesive to adhere it all together. The centre is punched out with Gold Foil and I added a Real Red Brights Candy Dot to the centre.  The “merry” cut from Gold Foil is from the Christmas Greetings Thinlets.

I would really recommend this Bundle.  You can find it on p31 of the Holiday Catalogue.  In Australia it is $57.75. Save 15% as a Bundle. Gotta love that!  You can order this through my Online Store HERE or by phoning/emailing me.

Here are these great products.

reason for season                    festive flower punch

Thanks for stopping by today.

Jenny

3D projects, Stampin' Up!, Tutorials

THANK YOU TREAT HOLDERS!

A few posts back I showed you some cute tea bag holders I made.  You can see that post HERE. Based on these holders I made up some little Thank You Treat Holders for some special people this week.  Here is one of them to show you.

P1170515

I have used the ‘Bohemian Designer Series Paper’ on the front flap.  I embossed the front panel with the ‘Boho Chic’ Embossing Folder. The greeting is from the Hostess set ‘You’re A Whole Lot of Lovely’.  This was punched out with the 2 1/2″ (6.4cm) Circle Punch.  The flap can be tucked in behind the circle to enclose it.  Some I added a little glue dot underneath the flap to hold it down as some kept popping up.  I added some little flowers punched from the ‘Itty Bitty Accents’ Pack and added little dots for the centres with white gel pen.  I added some loops of Gold Cord behind the circle before I adhered the circle down with dimensionals.

This Treat Holder was the perfect size for a little chocolate treat.  I added a glue dot to the back of the Chocolate to keep it in place.

P1170513

To make them I used the same directions for the Tea Bag Treat Holder that you will find in the above post link except I only scored the card (7 cm x 25cm) at 9cm, 11.5cm and 21cm.  ** If you would like the imperial measurements for these, then check at the above link for the tea bag Holders. Just don’t add the 4″ score line).

These were well received today I think 🙂

Thanks for stopping by,

Jenny

cards, Christmas

CHRISTMAS CUTIES ANGEL!

I wanted to colour the other day.  I haven’t done a lot of colouring especially that Blendabilities aren’t around. I pulled out the ‘Christmas Cuties’ stamp set that is available in the Holiday Catalogue.  There are some really cute images in this set and I played around with different mediums. I will show you these over the next week or so.

Now I did say I haven’t done a lot of colouring!  I wanted to pull out my watercolour pencils that have sat dormant for so many years.  I hadn’t played with them a lot before that anyway.  SO, here is the end result with them.  I put together this card.  I am not completely happy with the colouring BUT I like the card. The layout is based on the CAS challenges (Colour and Sketch for Clean and Simple cards).  You can find the blog post Here.

IMG_20151005_111721972

Isn’t this angel sweet??  I stamped this on the Thick Whisper White Cardstock and it was then matted on Smoky Slate card. The base card is Marina Mist. The greeting and the “splodges” (from ‘Gorgeous Grunge’) are heat embossed with silver Embossing Powder.  It is hard to tell though.  I finished it off with a silver doily and Silver cord.

There you have it.  A little play with my watercoloured pencils again.

Thanks for visiting,

Jenny

Catalogues, Classes, Stampin' Up!

CLASSY CARDS CLASS WITH THE HOLIDAY CATALOGUE!

Do you live in the Wollongong area?? Why not join us for a ‘Classy Cards Class’.  Here are the details and the fun projects we will be making.

CLASSY CARDS ON FRIDAY OCTOBER 9TH.  10AM or 7.3oPM.

What to Bring: Adhesives and Scissors.
Cost: $20 or Free with a minimum order.

Please reserve your seat by Wednesday 7th October by emailing me or leaving a comment.

Here are the cards.

P1170437

Hope you can join in the fun.

Jenny

3D projects, Tutorials

TEA BAG HOLDERS FOR A CAUSE!!

I can finally share this project I have been working on the last 2 weeks.  They are all now sent off and reached their destination.  On a Facebook group I am on the call went out for help for a Fundraiser.  I offered to make some little gifts for the goodie bags they would have.  Then the realisation hit – What was I going to do?? I needed 65!!!  After a little pondering I decided to make some little Tea Bag Holders.  I had an abundance of teabags – and lots of retired paper. 🙂

Here is just a sample of some of them.

four

I used the set ‘Garden in Bloom’ for the little labels on the front.  I thought it was very appropriate for such an event.

Here is just one of them. I will share the ‘how to’ further below.

closed

Opened out I could fit a tea bag, a cute tea verse (see below) and my business card.

IMG_20150928_100753384

Here is the verse I put inside.  I found this on Pinterest.

“When  your  day  seems  topsy  turvy,

And as stormy  as  can  be.

There  is  nothing  quite as  tranquil,

As a nice hot  cup  of tea.”

**

So here they are all 65 of them packed and ready to go.

box

So here are the details if you would like to make your own.  There are a few different versions around the internet but these were inspired by a Convention swap I received some years ago.  I adjusted the size so I could fit my business card in and just made them a little differently.  I could get 4 to a 12″x 12″ sheet of Designer Series Paper.

TEA BAG HOLDER

Cut your paper to 7.5 cm x 25 cm     (3″ x 9 7/8″)

Score your paper at 9 cm, 10.2 cm, 11.5 cm and 21 cm.    (3 1/2″, 4″, 4 1/2″ and 8 1/4″).

Fold on your score lines creating a “W” shape. (I hope that makes sense??).  The end with the narrowest scored piece is the front flap. Corner punch the corners on this flap.  I used the new Curvy Corner Trio Punch for most of them or else I used the regular Corner punch.  Add a bow to the front flap.

Stamp your greeting and punch out with the 1 3/4″ Circle Punch.  Add Dimensionals on the back just on the lower section.  Add to the front of your holder.  You can tuck the flap under the top of the punched circle to hold it together.

I hope you like these.  They are very quick to make once you get going.

Thanks for stopping by,

Jenny

cards, Catalogues, Christmas, Classes

DELICATE ORNAMENTS ON BERRIES AND BOUGHS!

I was playing around with some left-over Stamp A Stack kits the other week.  I just made a quick card up with one of the kits left.  I thought you might like to see it.

P1170418

The card base and the large ornament is in Bermuda Bay. I embossed the white card with the ‘Boughs and Berries’ Embossing Folder. On this card I added another ornament from the ‘Delicate Ornaments’ Thinlets cut from the Silver Foil Sheets to give a little sparkle.  The greeting is from the ‘Wonderland’ stamp set. A little Silver Ribbon finishes it off.

Thanks for visiting today.  I hope you have a wonderful day,

Jenny

cards, Personal Ramblings

DOGGIE THANKS!!

Just a quick one today.  A few of you who know me or who follow me on Facebook know that a few weeks ago my gorgeous dog was attacked in a brutal dog attack.  It was pretty distressing and I am not going to go in to the details again here.  I still shudder thinking about it and I get all teary.  I wanted to show you the cards I made for some wonderful neighbours who helped me out on the day in so many ways.  They were just so wonderful.  I have to say it is one way to get to know the neighbours 😉

These were just simple little cards measuring 10cmx10cm (4″x4″).  I wanted to say THANKS for their help.

P1170323

I have used Lost Lagoon and Hello Honey for the colours.  I used the ‘Work of Art’ stamp set.  The little paw prints are from the retired set ‘D is for Dog’.  That is one retired stamp set that I have kept. I thought it was a cute little touch.  I stamped the inside of the card with some paw prints too.  After all it was from Scooby and I.  One I added Gold sequins and the other I added Rhinestones.

Thankfully I can say that Scooby has made a full recovery after a little stay at the Vet and lots of extra TLC.  He doesn’t seem too troubled by his experience thankfully. Here is my gorgeous boy. I wanted to spare you the gruesome photos.  This is a cute photo of him taken a few months ago.

Sccoby and I

Thanks for stopping by and allowing me to share my little story today.

Have a wonderful day wherever you may be.

Jenny 

cards, Catalogues

JINGLE ALL THE WAY FOR CHRISTMAS!

When I received my preorder of Holiday Catalogue goodies a month or 2 ago this was the first card I made.  I went searching on Pinterest for some inspiration.  This card was almost CASED from shawnstamps.com.  I have just discovered his blog.  I like his style.  Take a minute to pop on over and check out his clever creations.

Anyway, back to the card.  I liked the colours he used and the way he used the ‘Sleigh Ride’ Edgelits Dies. I teamed my card with the ‘Jingle All the Way’ set.

P1170193

I have used Pool Party, Bermuda Bay and Smoky Slate.  The card base is Smoky Slate.  I added some Silver Ribbon on my card and stamped some stars from the ‘jingle All the Way’ set in Bermuda Bay in the sky. The greeting was stamped on some scrap white card.  I really should have flagged the end.  I had stuck it down by the time I realised.  I did try and lift it but……. Best to leave it alone I think.  The little embellishment was made with the Festive Flower Punch.  I had just received that punch and was playing around with it.  It was sitting on my desk so I just grabbed it and made it.   Not sure whether it was meant to be a flower or a snowflake.  Anyway,  it filled the spot.  I added a Rhinestone to the centre.  It looks OK.  What do you think???

You can get the stamp set and the Edgelits Dies as a Bundle and save 15%.  Gotta love that!   Wood – $59.50 AUS   Clear – $51.75 AUS.

Here is the stamp set.  It has a quite a few cute little images with 4 greetings.

jingle

Have a good week.  I am in the middle of a big project.  I might share it later.

Until next time.

Jenny