cards, Classes, Techniques

GLITTER WINDOW CLASS!

This month’s Technique class we are going to make ‘Glitter Window’ cards.  Lots of sparkle with this technique and it can be used for any occasion.

Come and try it.

WHEN: Saturday 14th March at 2pm.

WHERE: My place, East Corrimal.

COST: $15 or Free with a minimum order.

BYO: Adhesives and Scissors.

PLEASE RSVP BY THURSDAY 12TH BY EMAIL OR COMMENT HERE.


Here are the cards we will make plus a sample for you to keep.

P1160217

Look forward to seeing you.  🙂


3D projects, Masculine, Stampin' Up!

FACETED BOX FOR THE MENFOLK!!

A few weeks ago I saw a cute Faceted box on a Facebook group I am on.  Of course, one must have a go at one of these!  I thought I would show you my version.  Then I will show you where to go to make your own.

I thought for this it would be good to make a male version.

P1160084            P1160082

I have used Night of Navy and Crumb Cake cardstock and used a new stamp set from the Occasions Catalogue ‘Guy Greetings’. This is a good one to tuck some chocolates in for the males in your family.  They are always the ones that are hard to make for aren’t they!

What do you think??  I thought at first it would be really hard to make with all those angled sides, but it was really easy once you got the scoring and cutting right.

Do you want to make your own?? My lovely friend Sam created this box {waving HI SAM] 🙂 Here is the You tube link for you to make it.  Really it is not hard so don’t be scared off by all those angled sides.

Now the funny thing after Sam posted this tutorial things went a little crazy and little Faceted boxes were streaming onto our group page.  So fun to see all the versions.  You can check them out on Sam’s page.  She posted them to show how crazy things were. HERE THEY ARE!

So now go and check the Youtube video out and make your own version.  Why not send me a photo of your version and I can share it with Sam.  🙂

Happy Stamping,

Jenny

Uncategorized

MORE SALE-A-BRATION CHOICES!

Can you believe it??? We have 1 month to go for Sale-A-Bration and Stampin’ Up! have announced 4 new Sale-A-Bration choices AND they are awesome!!!

Check them out here.

new Sab 1


new sab 2


Which one do you like the best?  I must say the patterned vellum is gorgeous (and it is a paper stack!!!)  but I do love the ‘Nature’s Perfection’ too.

So there is one month left. Still time for you to …….

SAB shop

Spend $90 and pick any one of our great Sale-A-Bration products including these 4 new ones.  Contact me for your order or Shop Online HERE.

SAB Host

Party with me and let me show you and your friends some fun projects, have your own private class with your friends OR pass the catalogues around to your friends and collect their orders.  You receive the Hostess Rewards to spend on what you like.  Dates are limited so let’s get a time booked in for you and your friends quickly.

SAB Join

Do you have a looooong wish list??? Of course you do.  Pick out $235 of products on your list.  Pay only $169 and you don’t pay shipping.  Plus with Sale-A-Bration you can get extra bonuses in your kit. Get discounts any time your order.  Stay in the Stampin’ Up! family for as long as you like or as short a time as you like.  Your choice! I welcome you to my Jen’s INK. team no matter where you are in Australia.  Ask me for more information OR to find out more check out my ’10 Reasons why you NEED to be a part of the Stampin’ Up! family’ on my post HERE.

So don’t delay with your Sale-A-Bration choices.  Contact me ASAP.

Jenny

3D projects, Stampin' Up!

PAINTED BLOOMS MINI TREAT BAG!

I am sure you have seen the little treat bags around the internet made with the Mini Treat Bag Thinlets.  Now I will be honest, I wasn’t going to get this framelite set.  I can make up little bags myself- can’t I??? But I saw lots of cute versions and realised you get so many cute little “bits”.  How cool! So OK, I had to get it 🙂

Here is my cute little bag I made a couple of weeks ago.  I made a cute envelope using the bag die from the gorgeous Painted Blooms DSP.  This is such BEAUTIFUL paper.  Have you got it yet? I made a tag to fit inside it. The sentiment used here is from the Sale-A-Bration set ‘Simply Wonderful’.  I coloured the flower from the set using the Markers.  Wouldn’t this be lovely to give to someone special! I love that Blackberry Bliss colour.

P1150937

Now this die set is not just limited to little gift bags.  You can enlarge it and make larger bags or make gift boxes.  I have played around a little doing this so I will have to show you soon.

Here is the Thinlet set for you to see all the “bits”.

mini treat bag

Mini Treat Bag Thinlets (137547) $67.95.

If you want to find out more about this fun little die set you can check out the Stampin’ Up! video here.

Thanks for looking.  Stop by and visit me again soon.

Jenny

cards, Classes

BOKEH TAGS!

Last week at my Bokeh Technique class we made these tags.  I thought I would show you.

P1160030

We started off with a piece of Whisper White cardstock 10.1 cm x 14.4cm) to create the sponged Bokeh effect.  This was cut in half.  One half they could keep as a sample of the technique with the instructions and the other half we made the tag from.  That was by simply punching the top with the Scalloped Tag Topper Punch and threading some ribbon and twine through.  The flower was stamped using the Flower Shop stamp set and then punched out and then another flower punched with the flower punch. I added a little flower with the Petite Petals stamps set. I added some Linen Thread loops.  These flowers and loopy Linen thread was inspired by my lovely friend Sam (Thanks Sam).  If you haven’t checked Sam’s blog out yet, then make sure you do.  She has some amazing creations. 🙂

I made a number of these for our team swaps last week too.  I think everyone is loving the Bokeh technique at the moment and if you haven’t tried it yet then you have to give it a go. There are a number of tutorials on line with a few different ways of doing them. On mine I didn’t go the spraying with reinkers, I sponged the colours and the white circles.

I realised I hadn’t shown you the card we made too.  Here is the card.

P1150930

Thanks for looking in today.  Have a wonderful day wherever you may be.

Jenny

Stampin' Up!

SALE-A-BRATION IS A TIME TO JOIN STAMPIN’ UP!

Of course any time is a great time to join Stampin’ Up! but there are extra bonuses when you join during Sale-A-Bration. I’ve mentioned these extra bonuses AND I’ve mentioned all the reasons why it would be great for you to join.  Not sure you can read this post HERE. 

Are you still thinking about it??

Why not come to an Information Session this Saturday 21st Feb. 2pm in my studio East Corrimal. There is no obligation but it might give you some answers.

Cost: Free. Receive a little gift for coming. We will chat over a cuppa and also get to make a card.  Please let me know by Thursday. If you have had any thoughts about it this will be the place to have those questions asked. If you can’t come then ask me for an information pack. (only Australian residents).

What are you waiting for??

I would love to welcome new members to my growing team.  I am here to help you on your way whether you are a hobby demonstrator or you are going to share with others.  To help you get started I give you a Welcome gift and during February it’s an extra special one just for you.  Ask me about it.

INSPIRE       CREATE        SHARE

Blog Hops, cards

ESAD 2015 OCCASIONS AND SALE-A-BRATION BLOG HOP!

OCC SAB 2015 ESAD BLOG HOP-001

Welcome to the 2015 ESAD Occasions and Sale-A-Bration Blog Hop.  You might be starting here or you have come from Leonie Schroder’s blog.  Either way I hope you have a cuppa in hand and ready to take the journey to a number of blogs showcasing projects from the Occasions and Sale-A-Bration Catalogues.  Now before I share my project I must share with you what ‘ESAD’ is.

ESAD stands for “Extra Special Australasian Demonstrators” and is a facebook group just for Australian and New Zealand Independent Stampin’ Up! demonstrators.

 We love what we do & love to share with our customers, friends and blog visitors. We also share what we love in our ESAD Demonstrator community, through swaps, challenges, sharing knowledge, ideas& friendship and we’re always there to help and support each other.

So if you are a Stampin’ Up! demonstrator located in Australia or New Zealand then please feel free to leave me a comment with your email address then I’ll contact you with information on how to join our group.”

**

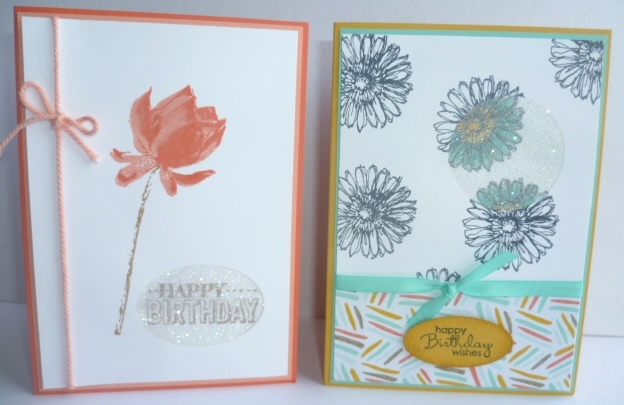
Now for my project.  I chose to use the Butterfly Dies from the Occasions catalogue.  I am sure you have seen many projects around using these dies and the matching stamp set ‘Butterfly Basics.

P1150973            P1150979

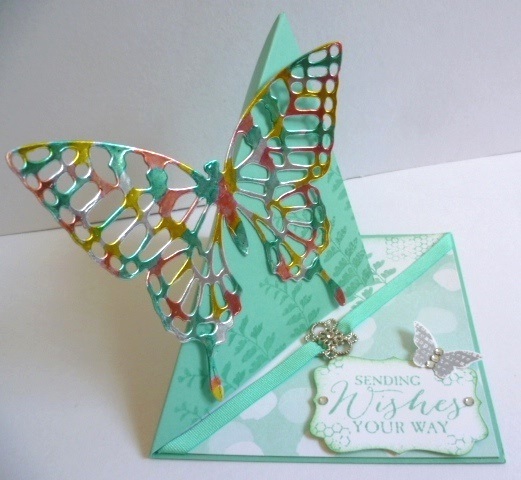
I wanted to create something a little different with these dies and stamp set.  I found this Triangle Easel card in an older issue of Stamping and Papercraft Magazine but if you have a look on the internet you will see some different versions. Sometimes known as Twisted Easel card.  I will show you how to create one below.  I will also show you how I did the butterfly too.

TRIANGLE EASEL CARD

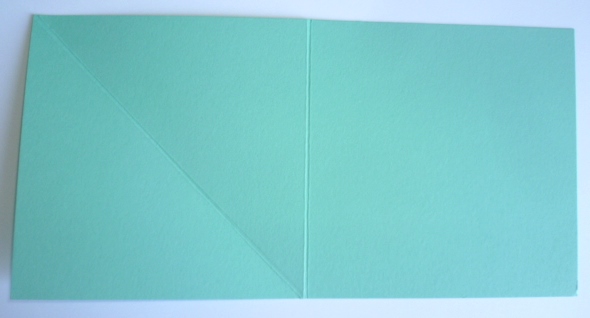
1. Cut your card 10.5cm x 21cm.  (I have used Coastal Cabana). Score at 10.5cm.  (4 1/4″ x 8 1/2″ score at 4 1/4″).  You can make these any size you like just see that the length is twice the width.

2. Score diagonally from the bottom right at the score line (ie on the left hand side section) to the top left of the card.  Fold in on the centre score line and open it again.  Then fold in on the angled score line. See the photo below.

P1150962

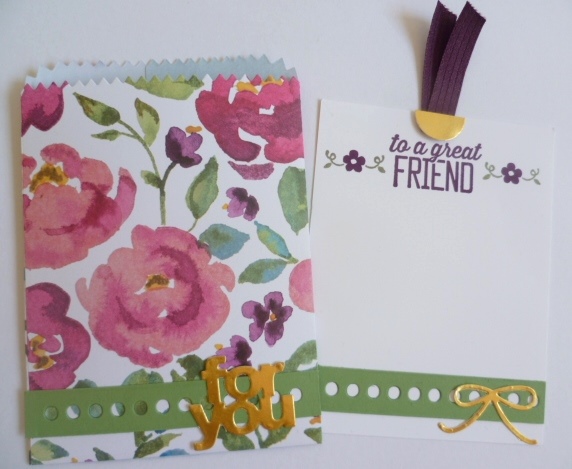
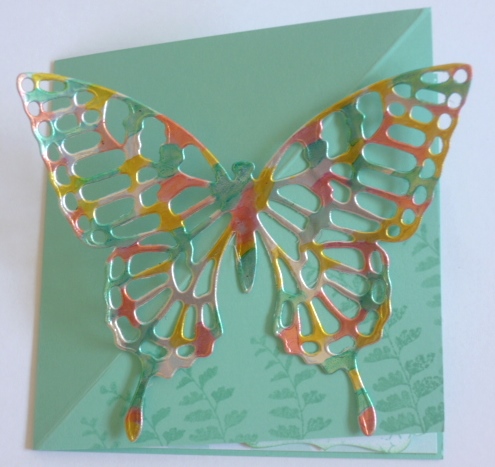
You can decorate this as you like.  Place something at the centre of the piece on the right which will anchor your folded triangle.  You can see what I have done below.  It could be a button or other embellishment or a label or punched image. I have used one of the ‘Something Borrowed’ Embellishments from the Occasions Catalogue.

P1150983

Just to give you some dimensions for the pieces on this part of the card.  The Whisper White piece measured 10.1cm x 10.1cm. (4 1/8″ x 4 1/8″). Cut your Designer Series Paper to 10.1cm x 10.1cm (4 1/8″ x 4 1/8″) and then cut it diagonally in half.  I used the Butterfly Basics stamp set to decorate the card.
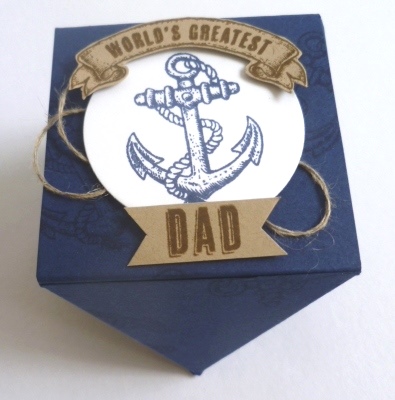
Here is a close-up.

P1150987

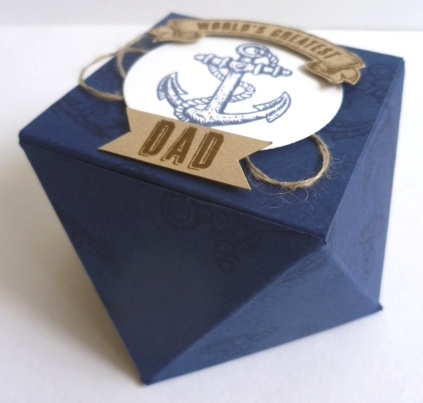
Here is the front of the card as it would be to fold and send.  (Maybe it needs more stamping at the back now that I see it like this.  You could do that). You could make an envelope to fit using your Envelope Punch Board. 🙂

P1150990

Now for the butterfly.

If you have a close look at the butterfly you can see it is shiny.  I found this idea firstly on Barb’s blog HERE.  I have used the Silver Foil sheets to cut the butterfly from.  Once cut I then coloured the butterfly with Blendabilities (the Calypso Coral, Coastal Cabana and Daffodil Delight sets).  You can colour parts randomly but leave some parts silver.

P1150965

I hope you can make a Triangle/Twisted Easel card soon.

Thanks for visiting.  Don’t forget to leave a comment as you visit each blog.  It is nice to have the little encouragement. 🙂

Now to continue your Blog Hop you are off to Tamsin’s blog HERE.   (Click “HERE” not the next blog button. Thanks.)


Blog Hop Next Button-001

 Here is a list of blogs for you to visit today if you get lost along the way.

1. Libby Dyson – http://www.libbystampz.com

2. Narelle Hoggard – http://www.handmadebynarelle.wordpress.com

3. Leonie Schroder – http://www.stamp-a-latte.com

4. Jenny Hayward – http://www.astampingjourney.wordpress.com

5. Tamsin Adams – http://tamsinadams.blogspot.com.au

6. Helen Williams – http://craftyhelen.blogspot.com

7. Pauline Bennetts – http://www.paulinebennetts.com/stampede

8. Monique Fielder – http://stamping-with-moni-q.blogspot.com.au

9. Nicole Wilson – http://nicolejuliewilson.blogspot.com/2015/02/esad-occasions-saleabration-2015-hop.html

10. Keryn Campbell – http://kerynscards.com

11. Clare Mcilhatton – http://www.crafty-cow.com

12. Ria Kaire – http://www.stampinup.net/esuite/home/qraftyqueen/blog

13. Kathryn Ruddick – http://www.katlodesigns.com/

14. Sally Williams – http://sallystampingdelights.blogspot.co.nz/

15. Tricia Raineri – http://www.thespeckledsparrow.blogspot.com.au

16. Nerida Carter – http://www.stampingjoy.blogspot.com

17. Mel Pagano – http://createwithmel.blogspot.com.au

18. Rachael Lewsley – http://www.mystampinhaven.com.au

19. Amity Knight – http://www.stampinamity.com.au/ESAD-blog-hop-project-life

20. Kelly Kent – http://mypapercraftjourney.com

21. Norelle Targato – http://rellspaperink.wordpress.com

cards

HAPPY (VALENTINE’S) BIRTHDAY!!!

It’s Valentine’s Day tomorrow. You probably realised that!! We don’t celebrate Valentine’s Day that much in Australia.  Maybe a small treat for a special someone.  So I don’t normally buy Valentine’s stamp sets.  When I saw this set in the Occasions Catalogue though it was just the cutest AND doesn’t have to be used for Valentine’s Day.  These cute images are great for the young ones in your life.  What little boy or girl doesn’t like pretending to be a pirate!  I have a few Great nephews that I am sure this will be used for.  On the stamp set I cut the sentiments off a few of the stamps to make them more versatile.   On to the card.

P1150911

I coloured the little pirate with the Blendabilities.  The sentiment is from ‘Amazing Birthday’.  I stamped it in black on the white card.  Then I stamped again in Real Red and Crushed Curry on scrap white and cut each of the “Happy” words out and adhered them straight over the top of the black ones. The Real Red base card was stamped with the blotches from ‘Gorgeous Grunge’.  I finished the card off with some Black Taffeta ribbon and some gold sequins.

So, me hearties have a Happy Valentine’s Day however you spend it.

Jenny ❤

cards, Catalogues, Stampin' Up!

OCCASIONS AND SALE-A-BRATION LAUNCH 2015!

Last Saturday I had my Occasions and Sale-A-Bration Catalogue Launch.  It was a great time with 2 different times scheduled.  I think we all had a great time.  Why wouldn’t we?? We are creating and having a few laughs (always good for the soul!!).  I thought I would show you the projects we did.

Firstly, this card uses the new Chalkboard cardstock and chalk inks. (p 25 of the Occasions Catalogue). The chalk inks come in 3 colours at the moment – Aquarmarine (green), Rose Coral (pink) and Yellow Citrus (yellow). This card was CASED from Pinterest.  I have used the Sale-A-Bration paper ‘Best Year Ever’. The chalk inks match nicely with this paper.  I used the ‘Big Day’ stamp set. Another Sale-A-Bration Free choice!

P1150954

To give an idea how the Chalkboard cardstock looks I stamped the images on different card for comparison.  You might get some idea from the photos but I have to say it is much better in real life. 🙂

I used the same chalk ink on each of these cards – the Rose Coral chalk ink pad. The first one on the left the image is stamped on regular Basic Black cardstock, the middle one is stamped on the chalkboard paper on the rough side.  The one on the right ( I know I didn’t write on this one.  I thought I could use it on a card later), is stamped on the shiny, smooth side of the Chalkboard paper.  This is important.  You will notice the 2 different surfaces to the card. You must stamp on the smoother side. You get a much more crisper image.

P1150777

This card was CASED from Pinterest also and is using ‘Crazy About You’ stamp set.  This is stamped in Strawberry Slush and Pistachio Pudding.  The greeting is in Smoky Slate and the “you” is from the ‘Hello There’ Thinlets from the Silver Foil.

P1150857

Of course, we can’t forget the Goodie Bags I gave to all the guests.  These were inspired by a project on Pinterest.  I used regular brown lunch paper bags and decorated them with the ‘Butterfly Basics’ stamp set and the Butterfly Dies.  The sentiment is from the Sale-A-Bration set ‘Simply Wonderful’.  I coloured part of the “THANKS” with the blender pen and inkpads.  The Designer Series Paper is from the Painted Blooms DSP.  Absolutely gorgeous paper! The tags were attached with a cute little peg.

P1150926

P1150928

So I bet you wish you could have joined us!! If you are local you will have to make sure you are here next time 🙂  It was great fun.

If you haven’t seen the Occasions or Sale-A-Bration Catalogues yet then there is a link in the right hand column that will take you there.  If you would like your own copy (and you are in Australia), then let me know and I can send one your way.

Thanks for stopping by today,

Jenny

cards

LOTUS BLOSSOM THINKING OF YOU!

I can show you this card now.  I made this last week for one of my customers who are going through a hard time at the moment.  I just wanted to let her know I was thinking of her.

P1150842


The layout was inspired by a card on Pinterest.  I used the Free Sale-A-Bration set ‘Lotus Blossom’ that you have probably seen everywhere on the internet.  This is a 3 step stamp set. I have used Lost Lagoon for the first 2 stamps in the set and then Pool Party for the 3rd stamp. The stem and greeting are stamped in Baked Brown Sugar.The greeting is from the ‘Wetlands’ set.  I then cut the piece with one of the Oval Framelits. A sheet from the Moonlight paper stack was cut with the Hexagon Hive Framelit.  The card base is Lost Lagoon.  When it was assembled I thought it lacked something even after adding a White Baker’s Twine bow.  I flagged the end of a little of the Burlap ribbon and tucked it under the oval.  That just seemed to “pop” the card then.

I think she might have liked it.  🙂

Thanks for stopping by to visit me.

Jenny