3D projects, Catalogues, Onstage, Stampin' Up!

WEDNESDAY’S WOW! #91 – CUTE APRON GIFT BOX!

Today’s Wednesday’s WOW!#91 I have a special project for you.  It’s an apron gift box. 

I shared this project at my Onstage presentation back in November.  I was honoured to present the Best Dressed Bundle in Sydney.  I will be sharing other projects with this bundle in the coming weeks but thought you might like to see this project.

It might be fun to make up a little gift box for someone.  If you are a Demonstrator it might be great as you start planning your Catalogue Launches in January.  I have made it in to a little Stampin’ Up! apron which is quite a novelty but you could use other card or paper and make a really pretty box.  I am sharing the template and the details below.

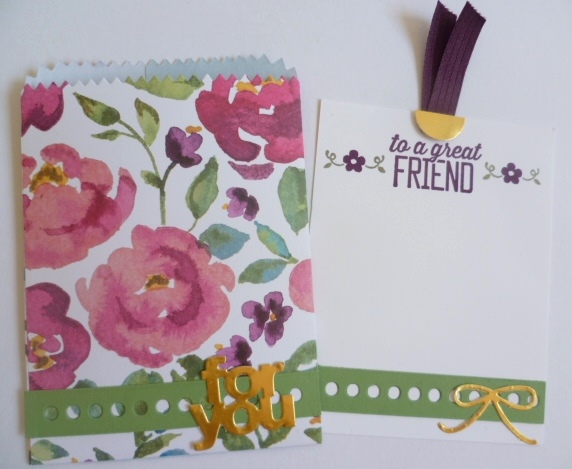
So many people loved this cute little bag at Onstage and also when I have shared it on some Facebook groups I am on.  Now here it is for you.

This is made with the All Dressed Up Dies.

Cut one bag front from black card.  Trim the side off the diecut bag and also the bottom tab so you are left with an apron shape.  Also cut 2 of the stitched strips from black card to use as the straps.

Here is the back of the bag.  I created a little box so you can fill it with small treats  It’s a very simple box.  I will share the template below.  The straps are attached at the top of the apron, crossed over and attached inside of the box at the back.

BOX TEMPLATE

Below is the template to create the box.  Cut your card 10.5cm x 12cm (4 1/8″x 4 3/4″).

Score on the short side at 4cm, 6.5cm (1 1/2″, 2 5/8″). Score on the long side at 2.5cm, 9.5cm (1″, 3 3/4″).

Cut up on the tabs on the short sides.  Fold on all the score lines.

Add adhesive to the outside of the small centre tabs on the short side.  Fold up to form a box.  Add more adhesive on the tabs as needed.  Adhere all together.

Place adhesive on the back of one side of the box.  Line up the bottom edge of the box with the bottom edge of the apron at the back to be sure it is straight. Adhere the straps on the apron and box.

I cut the small stitched sentiment shape to create the apron at the front and added a small logo from the Follow Your Art Washi Tape.

I hope you like the cute box/bag.  It’s a lot of fun to create.

This will be the last Wednesday’s WOW! for 2019.  We will have a couple of week’s break over Christmas and New Year and be back in 2020.  I look forward to sharing more with you in the new year.

If you have any suggestions of what you would like to see for future Wednesday’s WOW! then drop me a comment.

Happy creating,

Jenny


3D projects, cards, Stampin' Up!

YOU’RE SO SWEET TREAT BAG AND CARD!

Recently I showed you a card made with the ‘You’re So sweet’ set.  If you missed that just pop back 2 posts.  Today I have a gift bag and card I made with the set.

P1160816

I saw the Treat Bag on Pinterest initially and just changed it a little.  The paper is from the paper stack ‘Cherry On Top’.  I made the bag with the Mini Treat Bag Thinlets.  The little star is in the set which I could cut inside the stamped star.  How neat!!  I just added a star strip cut with the star die in the set in Crushed Curry and a DSP banner.  The greeting label is cut with of the little dies in the Thinlets set too.

Then I made a card. Using some more of the ‘Cherry On Top’ Paper Stack I added a strip down the side of the Cucumber Crush base card.  I stamped the greeting banner from the ‘You’re So Sweet’ set first on Crushed Curry in Crushed Curry and then on Whisper White in Bermuda Bay.  I cut the white one out with the banner framelit in the Treat Bag Thinlets and cut the Crushed Curry one out by hand.  It needed something else under the banner so I cut a strip of Watermelon Wonder card and flagged the ends.

P1160817

See the cute balloons?? I made them with the 1″ circle punch and the owl punch.  I punched out the bottom part of the owl and trimmed it and adhered that piece under the punched circle.  I added some White Baker’s Twine underneath.  Cute hey!! Sorry I think so anyway 🙂

I think they  make a cute gift set what do you reckon?

P1160818

Here is the Mini Treat Bag Thinlets.  I like all the “extra bits” that come in the set.  They are so versatile.

mini treat bag

…and the cute ‘You’re So Sweet’ set.

     youre so sweet

Thanks for visiting my world today.  I hope your day is super awesome because you deserve it to be.  🙂

3D projects, Stampin' Up!

PAINTED BLOOMS MINI TREAT BAG!

I am sure you have seen the little treat bags around the internet made with the Mini Treat Bag Thinlets.  Now I will be honest, I wasn’t going to get this framelite set.  I can make up little bags myself- can’t I??? But I saw lots of cute versions and realised you get so many cute little “bits”.  How cool! So OK, I had to get it 🙂

Here is my cute little bag I made a couple of weeks ago.  I made a cute envelope using the bag die from the gorgeous Painted Blooms DSP.  This is such BEAUTIFUL paper.  Have you got it yet? I made a tag to fit inside it. The sentiment used here is from the Sale-A-Bration set ‘Simply Wonderful’.  I coloured the flower from the set using the Markers.  Wouldn’t this be lovely to give to someone special! I love that Blackberry Bliss colour.

P1150937

Now this die set is not just limited to little gift bags.  You can enlarge it and make larger bags or make gift boxes.  I have played around a little doing this so I will have to show you soon.

Here is the Thinlet set for you to see all the “bits”.

mini treat bag

Mini Treat Bag Thinlets (137547) $67.95.

If you want to find out more about this fun little die set you can check out the Stampin’ Up! video here.

Thanks for looking.  Stop by and visit me again soon.

Jenny