3D projects, Christmas

12 DAYS OF CHRISTMAS – DAY 8 – RINGED WITH NATURE CANDLE CENTREPIECE

Day 8 of our 12 Days of Christmas projects. Can you believe we are over half way already!

Our project today created by Donna is a Candle Table Centrepiece with the Ringed with Nature.

Isn’t it just exquisite! Recreate it as it is, simplify it or adapt it. It would look stunning on a shelf or a table. This is using the Ringed with Nature Bundle available in the Mini Catalogue.

You can find the full instructions -> HERE.

Looking for some supplies to get you creating and you are in Australia?

You can stop by my store -> HERE Please use the Host Code: JCBE3B2U

Or

Contact me directly. I would love to serve you.

3D projects, Catalogues, Christmas

12 DAYS OF CHRISTMAS – DAY 7 – SNOWMAN MAGIC SHAKER TREAT BOX

For Day 7 of our 12 Days of Christmas it’s a fun Shaker Treat Box with Snowman Magic.

How cool is this to give to someone for Christmas? Fill it with treats or money or small gift and they get the fun of shaking it.

Here is the top view.

The box used is the Scalloped Kraft Treat Boxes.

You can find the full Tutorial -> HERE.

Looking for some supplies to get you creating and you are in Australia?

You can stop by my store -> HERE Please use the Host Code: JCBE3B2U

Or

Contact me directly. I would love to serve you.

Happy Crafting,

Jenny

Catalogues, Christmas, Stampin' Up!

12 DAYS OF CHRISTMAS – DAY 1 – MERRIEST MOMENTS CANDLE

Each day for the next 12 days I’m bringing you some special Christmas projects for our 12 Days of Christmas. I hope they might inspire you with your Christmas creating.

These projects are a collaboration from some Demonstrators from around the world so you are in for a treat.

Today I’m kicking off with a project I created. I couldn’t wait to share it with you.

I have used the Merriest Moments Stamp Set and the Merriest Frames Hybrid Embossing Folder.

This would look lovely as a centrepiece for your Christmas table or sitting on a shelf. What do you think?

You can find the full tutorial -> HERE.

Stop by tomorrow for Day 2.

Jenny

Need some crafty Christmas supplies and you are in Australia? I would love to serve you.

Head to my store -> HERE. Please use the Host Code: JCBE3B2U

Or contact me directly.

Thank You for your order.

cards, Classes, Stampin' Up!

SPLENDID DAY SPLIT EASEL CARD!

I love making Easel Cards. I love this idea too. This is a Split Easel Card. It’s very easy.

I have used the Splendid Day Suite. It’s so pretty.

We made this card in a class recently. I don’t often share my class cards here, But I thought I would share this one with you.

This is the front view of the Split Easel.

The side view. You can see how it stands up.

Inside. You can see how the sides are split and adhered down. Decorate the card as you like.

When we made the card in class I made the section in the middle inside a little smaller. I thought it looked better than this original one and it gave more room to write.

I will share the HOW-TO soon so stay tuned for that.

Happy Stamping,

Jenny

Sale-A-Bration is ending soon. Have you got your bonus gift with your orders. Don’t miss them.

In Australia and need to stock up on supplies?

You can shop in my store -> HERE. Please use the Host Code: DK3ZG2DU

Or Contact me directly.

3D projects, cards, Christmas, Videos

A MERRY LITTLE CHRISTMAS SERIES – WEEK 6 – GIFT CARD ACCORDION WALLET!

Week 6 (our last week) of A Merry Little Christmas Series. These weeks have flown! This week’s project is a Gift Card/Chocolate Treat Accordion Wallet.

If you give out Gift Cards at Christmas or even other occasions this would be great for you to make. You can add a few little Chocolate treats to go in with it.

I used the Painted Christmas Designer Series Paper for this Accordion Wallet.

Watch the video how to make it below. If you receive this blog update via email the video may not show so head to the blog and catch it there.

As with other weeks, place an order over $50 in the next week and receive the card kit to make this. Also go in the draw to win a Gift Card for $20 from me.

Create your own Gift Card Accordion Wallet

Accordion paper strip: 30.5cm x 10.1cm 12″ x 4″

Scored on the short side at 2.5cm or 1″

Scored on the long side at 7.6cm x 15.2cm and 22.8cm or 3″, 6″, 9″

Card Folder: 18.5cm x 10cm Scored at 9cm and 9.5cm

7 1/4″ x 4″ Scored at 3 1/2″ and 3 3/4″

Card Mat for front: 8cm x 9cm (@2 pieces – one for the back) 3 1/4″ x 3 3/4″

Paper piece: 5cm x 8.6cm 2″ x 3 1/2″

Have fun creating this,

Happy Creating,

Jenny

3D projects, Christmas

A MERRY LITTLE CHRISTMAS – WEEK 3 – STAR TABLE FAVOUR!

The Week 3 project for our “A Merry Little Christmas” Series is a sweet Star Table Favour that I think will look lovely on the Christmas table this Christmas. They are very easy to make so you can whip up a few in no time.

These have been inspired by a project I saw by Deb Valder from Stampladee some time ago. I adapted it for the Table favour. The measurements are available in Metric and Imperial further below.

Here is the Star Table Favour for you. It is made with the Stitched Stars Dies.

Catch the video below.

Make your own Star Table Favours.

For Box: Evening Evergreen Card –

Metric: 10.8cm x 10.8cm

On one side score at 4.1cm and 6.7cm. Turn 1/4 turn score at 2.5cm and 8.3cm

Imperial: 4 1/4″ x 4 1/4″

On one side score at 1 5/8″ and 2 5/8″. Turn 1/4 turn score at 1″ and 3 1/4″

You will also need: Evening Evergreen card, patterned paper (I used Tidings of Christmas DSP) and Gold Foil to diecut stars. Dies used are the Stitched Stars Dies.

I hope you get to make one,

Have a great day,

Jenny

3D projects, cards, Personal Ramblings

POCKET CONCERTINA BOOKLET WITH YOU’RE A PEACH PAPER!

Yesterday I shared the Concertina Card that I made for my daughter’s 21st. Today I wanted to share with you this special little booklet I made. Of course using the You’re A Peach Designer Series Paper.

It was just a little booklet with some inspirational sentiments for her.

It’s small in size and tied up with some Pale Papaya ribbon. The peach is cut from the You’re A Peach paper.

When you open it there is a little concertina piece. I have held it down here in the photo with the Bone Folder so I could take the photo.

Folding out the strip of card there is a special sentiment on each section. I used a number of different stamp sets for the sentiments and for the images.

This was really fun to create (and made from the heart to my gorgeous girl).

I will share the dimensions for it another time. I only have them in metric at the moment.

Hope you like it.

Hope your week is going ok wherever you are in the world. Thanks for visiting me and take care.

Jenny

3D projects, Catalogues

ALL DRESSED UP BACKPACK!

Have you seen these cutie bags around the internet?  They are made with the All Dressed Up Dies from the Best Dressed Suite.  So sweet. ❤

This is one I made for my presentation at Onstage.  By changing the handles you can make it in to a backpack.

I kept it simple and didn’t add a tag on this one but it is easy to do.  You don’t need too much with this gorgeous paper from the Best Dressed Designer Series paper. 

Cut the buckle out using the die and add that to the strip before adhering the handle to the bag. To add the handle, adhere one end of the strip inside the front of the bag.  The other end, fold over the end a little and then adhere this to the back of the bag checking the position of the handle so you have a little curve happening.

A few people have commented about cutting the paper with these dies that they tend to be “cutting” rather than “scoring” on the bag.  I would suggest play around with the layers on your diecutting machine. You may need a shim on the top of your plates.  Alternatively, if you have a soft mat place that as your top cutting plate making sure the die is facing down as you don’t want to cut the mat. 🙂

Others have asked how tall these bags are. They are tiny.  It stands at the height of the Tombow multipurpose adhesive.  If fits the small notecards in which is about 7cm (3″) high.

Happy playing.

Jenny

3D projects, cards, Stampin' Up!

DAISY LANE GIFT CARD HOLDER!

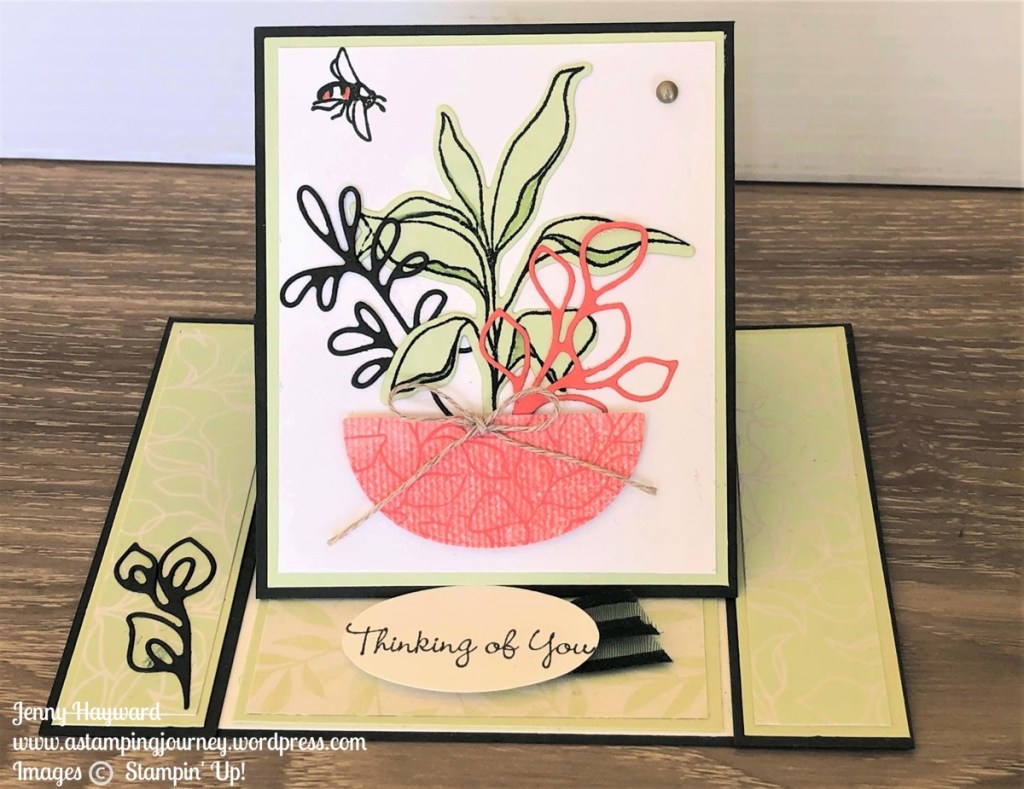
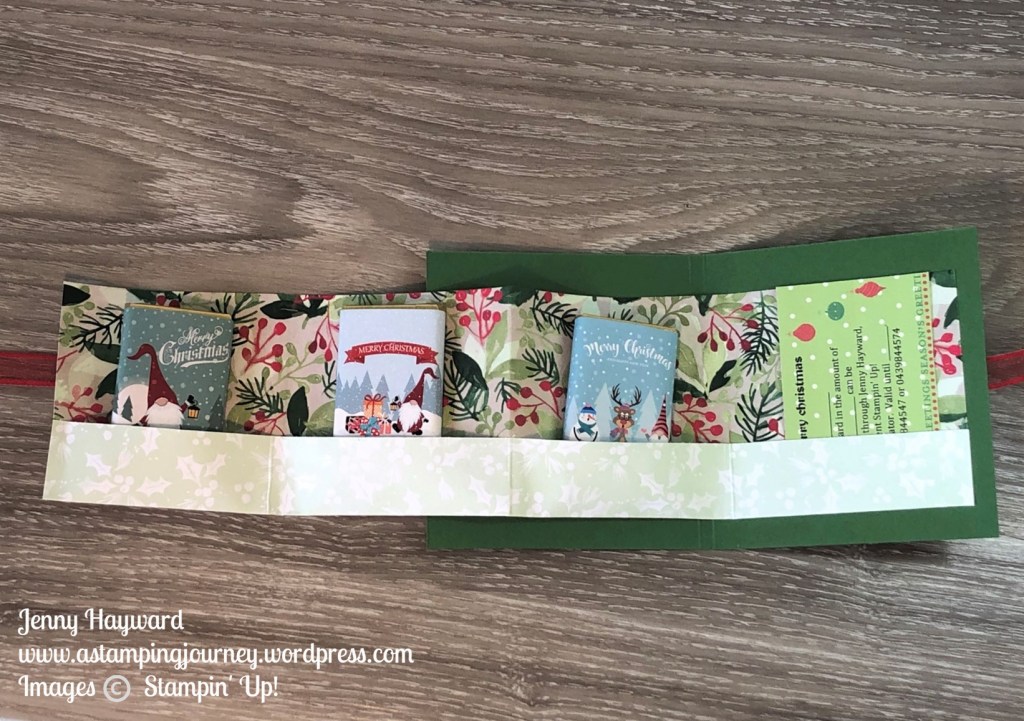
I can now share this project with you as I know it has been delivered.  I recently had a request for a Gift Card for one of my customers.  It was ordered by her Sister In Law who contacted me.  Of course one doesn’t provide just a Gift Card.  It must be dressed up.  So here is the Gift Card packaging.

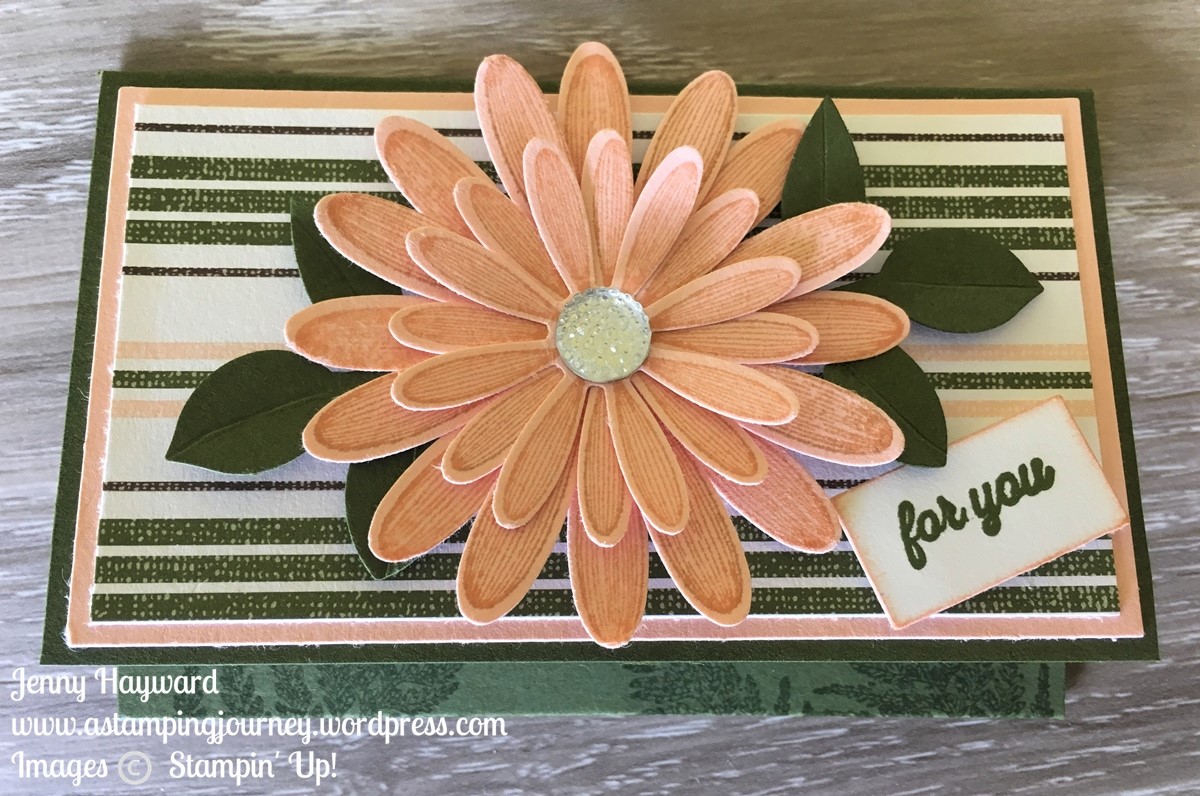
It’s just a simple style.  I will share more about that further below.  The front is decorated with daisies.  2 large Daisies were stamped and punched with the Daisy Punch.  2 smaller Daisies were stamped and punched with the Medium Daisy Punch.  They were all layered together and curled up a little.  A Clear Gem was added in the centre.

The leaves were punched with the Leaf Punch.  See the leaf?  I ran a score line down the centre of the leaf and folded it slightly.  This adds a little dimension to your leaf.

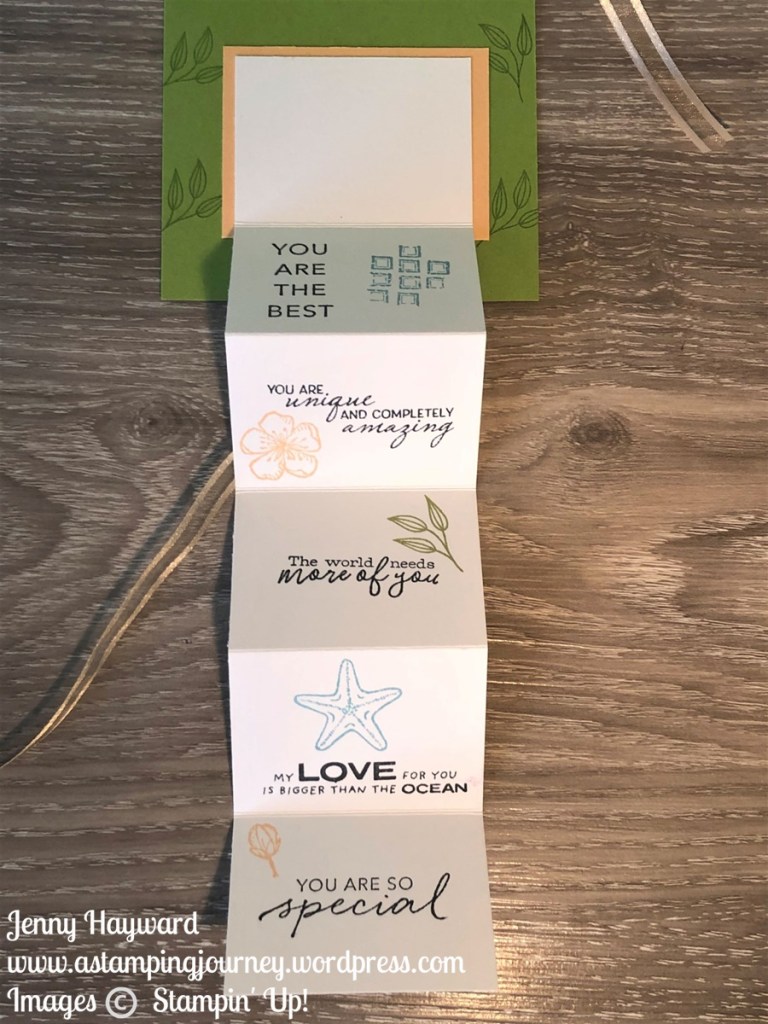
The Sentiment is from the Itty Bitty Greetings.  I stamped it on a little strip of white card and sponged the edges with the Petal Pink ink.

The paper is from the Magnolia Lane Designer Series Paper.

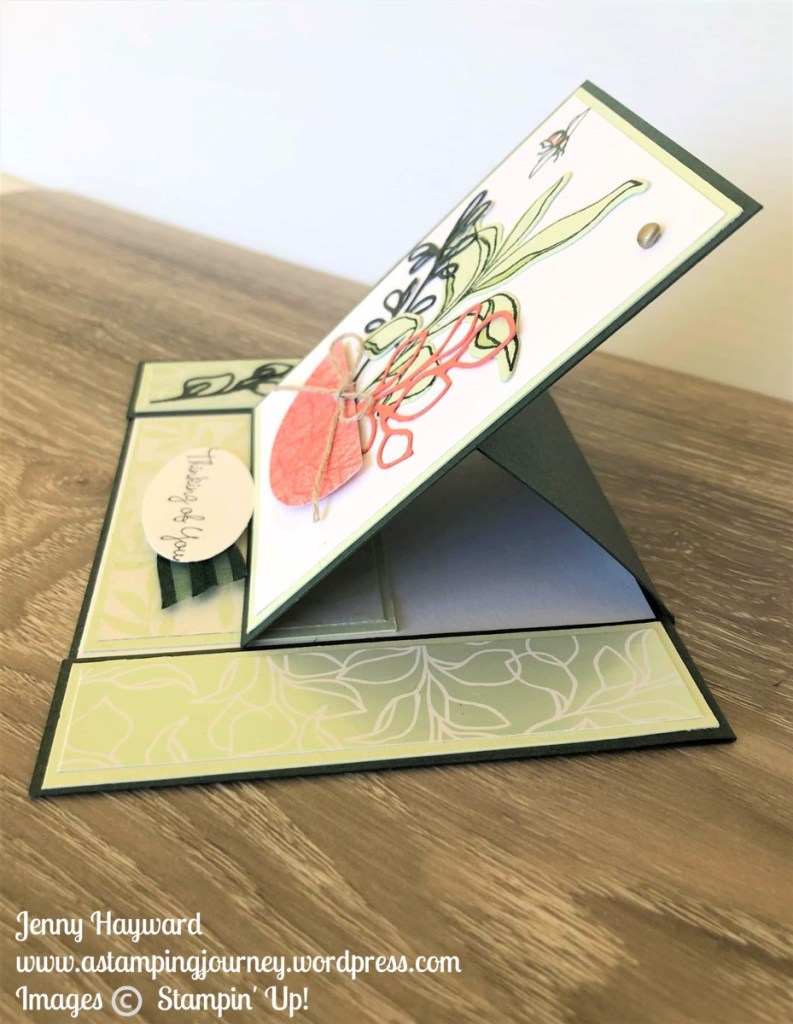
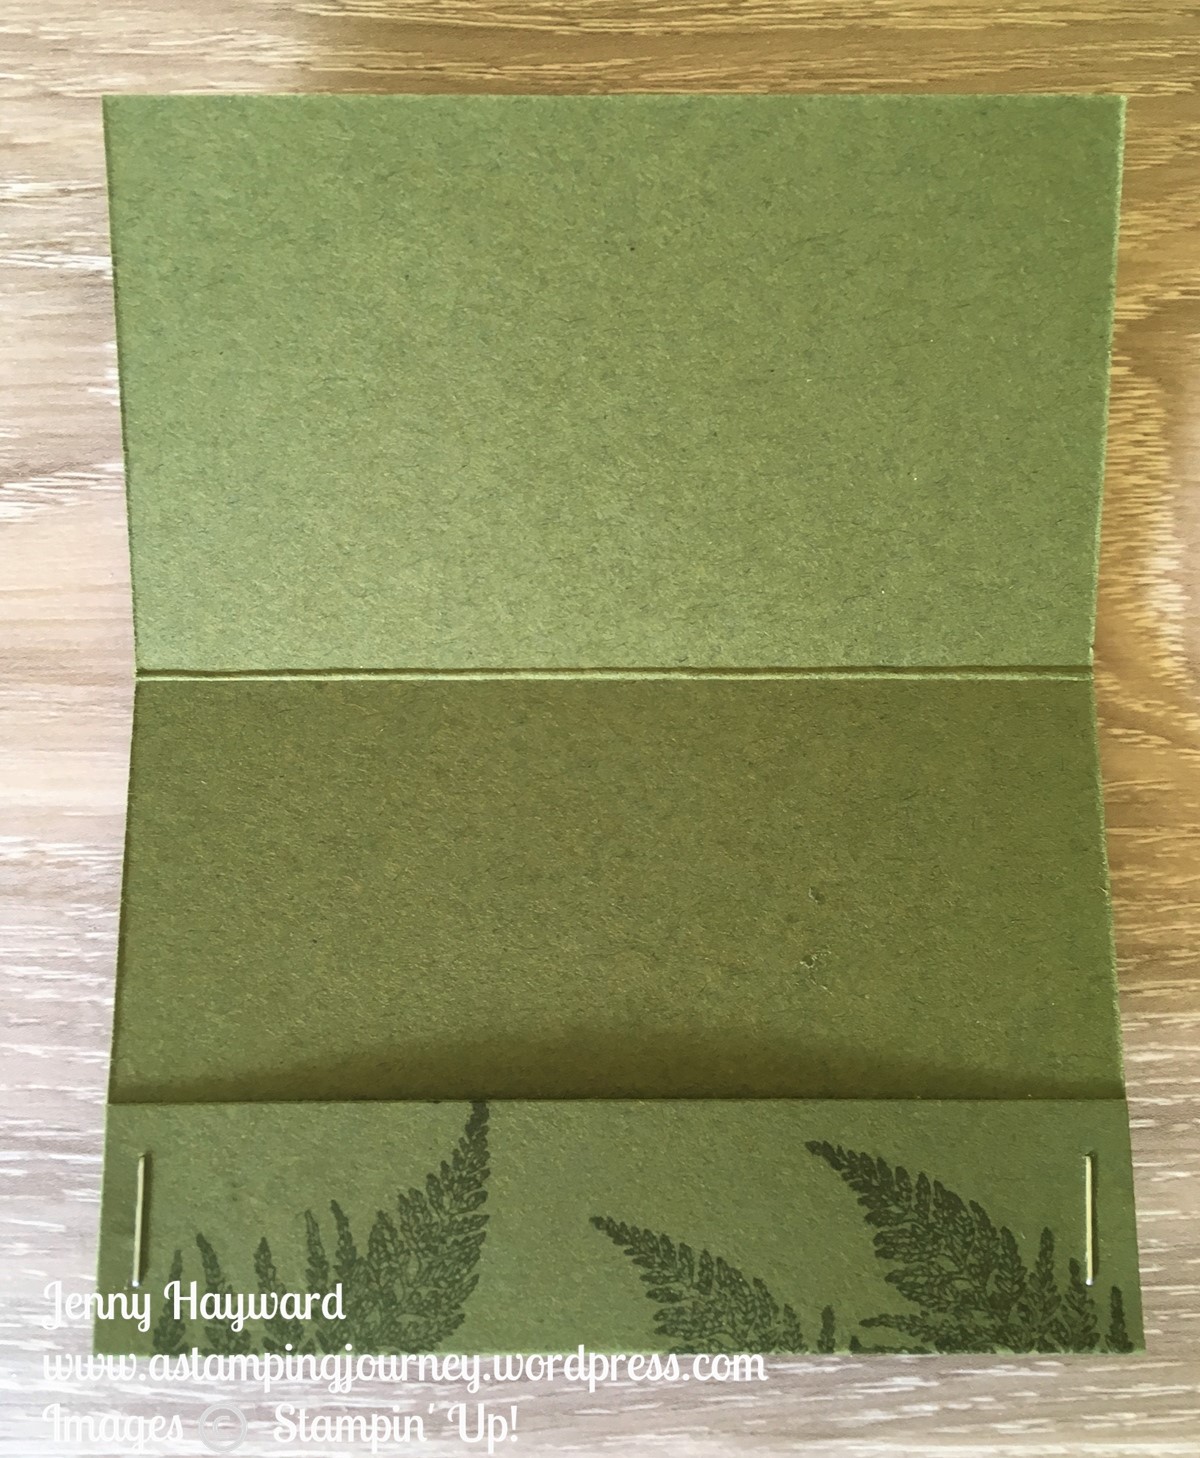
This is the inside of the holder.  I stamped some of the fern leaves inside.

The colours look very different in the photos to each other. I can say they are both the same one but the lighting changed effecting the colour of the holder.

To make your own:

Cut your card to 10.5cm x 15.5cm.  Score at 6cm and 13cm.

4 1/8″ x 6 1/8″.  Score at 2 3/8″ x 5 1/8″

I stapled the small flap down but you could adhere it with strong tape.  Be sure the tape is not too wide so you have enough room for the card to fit. Decorate it as you like.  Card mat for the front  and paper piece is slightly smaller on each layer (4mm or 1/8″).

Hope that helps.

Are you in need of a Gift Card?  Maybe for yourself (because it is the perfect gift for you) or it is for a friend or family.  You can order it to any value.  I have Christmas Gift Cards too so keep that in mind as Christmas approaches.

Thanks for visiting,

Jenny

3D projects, cards, Catalogues, Stampin' Up!, Tutorials, Videos

WEDNESDAY’S WOW! #70 – CREATING THE PAPER MAGNOLIA FLOWER!

Wednesday’s WOW! #70 today.  I could tell you so many things today with all the exciting new products just released, but for today I have a special project.  You have probably admired the gorgeous Magnolia flowers in the 2019 Stampin’ Up! Catalogue. They are even all over the front cover. You might have even seen them online. Well today I am going to share with you how to create your own Paper Magnolia Flowers.

You just need a few supplies – The Good Morning Magnolia bundle and the Hot Air Balloon Punch.  Check out the easy to follow steps in this video.

Very simple and very gorgeous.  I like that you can make the smaller flowers too.  Ok.  Are you off to make some Magnolia Flowers now?

If you need any supplies to make this project then you can head to my store online -> HERE.

Please use the Host Code: EUEAGC3N

OR

You can contact me directly.

Orders over $78 AUS receive an exclusive 12 project Tutorial Bundle free.  Or you can purchase the Tutorial Bundle for $20


SOMETHING TO CONSIDER:

The Good Morning Magnolia Bundle is $111.50 AUS.  The Hot Air Balloon Punch is $31 AUS.  TOTAL $142.50  If there are a couple more items you like you would be better off joining Stampin’ Up! and pay $169, but you get $235 of products in total of your choice which could include these items.  That makes it so much more affordable AND can check items off your LONG wish list.  Ask me more about it.

Thanks for visiting today,

Jenny