3D projects, Stampin' Up!

NEW YEAR CREATING WITH BUTTERFLY BASICS!

Happy New Year to you all.  I hope you have had a lovely Christmas and New Year celebrations. We had a really nice family time.  I love these special moments.  I have been in my craft room the past week though.  I can’t keep away.  I have a number of projects to share with you over the next week. It has been so nice to ink up some new stamps.  Today I thought I would show you a little gift box I have just made.  This is using the new Bundle ‘Butterfly Basics’.

P1150789       P1150788


I have used Coastal Cabana.  I cut a butterfly from the butterfly Dies from Whisper White and one from the silver foil sheets.  (Read below for some tips for cutting out these little intricate dies). I sponged around the edge of the white butterfly in Coastal Cabana.  The strip under the butterfly is vellum which I have embossed with the Perfect Polka Dots Embossing Folder and then flagged the ends.  The little postage stamp is heat embossed with silver embossing powder.  I added a strip of Rhinestones to the centre of the butterflies for some bling.

For the box I recreated the little box I showed in a post some time back.  You can find all the details HERE.

BUTTERFLY DIES CUTTING TIPS

These butterfly dies are very intricate and like similar ones you might have a few problems cutting them out.  I thought I would share my tips in cutting them to have a nice clean cut.

1. Use baking paper between your die and cardstock. You may have to also add a scrap piece of copy paper to aid the cutting further. So lay your card down on the bottom Big Shot cutting plate, place a piece of baking paper over the card, top with your die face down then add the scrap piece of copy paper. Place the top cutting plate over it.

2.  When running through your Big Shot you might want to run back and forth a few times.  I found I needed to run it through about 6 times.

I had several attempts playing around with this die to cut well.  After some frustrations (and maybe some mumblings under my breath!), I found this to be the best result.  The butterfly lifted almost cleanly off the die.  I just used the Paper Piercer to start popping it in the holes and lift it slightly and then it would lift off quite easily.  See how you go trying this but do persevere as it is such a beautiful die and combines so lovely with the Butterfly Basics stamp set.

I look forward to sharing more projects with you so stop by again soon,

Jenny

3D projects, Christmas

12 WEEKS OF CHRISTMAS REVIEW!

Did you enjoy the recent 12 Weeks of Christmas projects?? There were a lot of awesome projects by the team. What was your favourite project do you think???  I would love to hear what you thought.

I was looking at my projects the other day and noticed a theme.  I didn’t plan it like this though. These are my projects I created over the 12 Weeks.  Do you notice anything???

P1150540

I seemed to have a theme of using the Nordic Noel DSP and different Gift Packaging that Stampin’ Up! has available.  I have to say it is so great that there are so many different sizes and types available.  These do make dressing up gifts and treats quick and easy.  For these projects I used the Tiny Treat Boxes (only available now until January 5th), the Kraft Gift boxes and the Tag a Bag Boxes.

If you missed these posts you can find them all here.

Tiny Treat Holder

Clear Ornaments and Gift Box

Tag a Bag Box Treats and matching card.

If you want to check all the projects from our 12 Weeks of Christmas then just click on the tag below of “12 Weeks of Christmas” and all the posts should come up.

It might be a bit late to make any of these projects for this Christmas but maybe they will be useful for next Christmas or another occasion.

Have a wonderful Christmas surrounded by the ones you love and may you take some time to reflect on the Greatest Gift we have been given.

I am taking a break from blogging for a week so I will see you with more creative projects in 2015. Thanks for being part of my journey this year. 🙂

Jenny x

Merry Christmas manger

3D projects, Christmas

12 WEEKS OF CHRISTMAS – WEEK 12!!

Latte 12 weeks Header

Can you believe it.  It’s Week 12!! Where have those weeks gone??  They have certainly flown by. Today’s project is brought to you by Libby.  She has some quick and easy gift giving ideas.  They are so cute. 🙂

Christmas is only one week away and if you are looking for some quick stocking stuffers these projects will fit the requirements.

All you really need for these projects is the Envelope Punch Board and a few punches including the Scallop Tag Topper Punch.

Project 1 – Candy Cane Treat Box

candy cane treat

These little pouches are quick and easy to make with the Scallop Tag Topper Punch, some Jiggle Eyes, ribbon, Blendabilities ( to colour the Rhinestones) and some Candy Canes of course. They easily fit 2 Candy Canes inside and could fit more if you wanted or some other treats. If you don’t want to give sweets, it would fit some coloured pencils inside or other small gifts.

Project 2 – Reindeer Poop (M & Ms Peanuts)

reindeer poop

This little treat is made using the Envelope Punch Board, some Jiggle Eyes, the Bird Builder Punch, ½” Circle Punch and the White Signo Uni-Ball Gel Pen for highlights.

reindeer poop close-up

It fits 1 small packet of M & Ms inside quite neatly and on the back I have adhered the Reindeer Poop Poem (available in the pdf).

Project 3 –Maltesers Pouch

Malteaser pouch

This treat uses the Envelope Punch Board again. It’s a pouch with a Belly Band and fits 1 of the Merryteasers in it. It would also fit individual chocolates such as Freddo Frogs, Caramello Bears, and Santas etc.

malteaser pouch - single


Of course we have a bundle for you.

Latte Girls Week 12 Bundle –

Just $90 plus postage. (RRP $101.85 + postage). Save over $10!

Bundle 1

Or Upsize your bundle and get the Santa & Co DSP as well for the special Latte Girls price of $105 + postage (RRP $120.80 + postage).

Bundle 2

Remember you will need to contact me to get this bundle at these prices as it’s exclusive to the Latte Girls 12 Weeks of Christmas Design Team! 

Do you want the written tutorial? No worries – simply comment here with your email address and I’ll send you a copy!

Thanks for stopping by today.  Enjoy creating these cute treat pouches.

Jenny


3D projects, Christmas

12 WEEKS OF CHRISTMAS – WEEK 11!!

Latte 12 weeks Header

Another fantastic project for you in our 12 Weeks of Christmas series.  Today Narelle brings you this great Table Decoration.  Doesn’t this look cool??  Your very own Christmas Tree made out of paper that can adorn the centre of your table this Christmas.

IMG_2241

Narelle said it was so much fun to make and really didn’t take long either.

She added some sparkle by using the Silver Sparkle Dazzling Details and some scattered gold sequins from the Gold Sequin Trim.

PC102073

Then she made a star for the top using the Star Framelits and the Bright and Beautiful Stamp Set.
PC102074
PC102072
If you want to make one for your Christmas table, then be sure to email me or drop me a comment for the instructions.
 
The complete supply list to make your own is in the instructions, but as always we have a bundle deal for you.
Purchase these.
products in bundle
and get this FREE!
products in bundle - Copy
This deal is only available by contacting me, and is not available in my online store. So make sure you contact me soon.
Have fun creating these. 
Jenny


3D projects, Christmas

12 WEEKS OF CHRISTMAS – WEEK 8!

Latte 12 weeks Header

We are now up to Week 8!!! Today’s project is brought to you by Libby.  This is very cute!  Libby has made a bag with a shaker frame on the front, a Star Gift Box and two cards to pop inside the bag.This would make a lovely gift to give someone before Christmas. 

12WeeksChristmas_Week8

Here is a closer look at the bag.  What a great idea having the Shaker Star on the front!

Wk8_12Weeks2014_22.jpg _ bag

The shaker frame is made using the Stars Framelit Dies, ‘Many Merry Stars’ Photopolymer Stamp Set, Confetti Stars Punch with Red Glimmer Paper and Frosted Sequins.

Wk8_12Weeks2014_18.jpg _ Shaker frame

The bag itself is made using the ‘Under the Tree’ Speciality Designer Series Paper from the Holiday Catalogue.

The Star Gift Box has a small Kit Kat Chocolate inside it and would be great as a stocking filler or a teacher gift, teamed with a bottle of wine or a coffee voucher etc.

12WeeksChristmas_Week8_8.jpg _ star

The two cards also use the ‘Many Merry Stars’ Photopolymer Stamp Set and the Stars Framelit Dies with the Big Shot.

This card uses layering of stars and Dimensionals to give depth and dimension. Both cards are stamped inside and the envelopes are also stamped.

12WeeksChristmas_Week8_9.jpg _ card

The last card uses the nesting of the Stars Framelit Dies again to make a frame of Gold Glimmer Paper which adds some sparkle to this card along with the Frosted Sequins.

12WeeksChristmas_Week8_10.jpg _ Card 2


If you would like the full instructions for this set of projects then drop me an email or a comment. 


THIS WEEK’S SPECIAL BUNDLE

Now you can order this bundle through me personally at this special price

$65 + Shipping.

Many Merry Stars Photopolymer Stamp Set

Confetti Star Punch

++
Thanks for stopping by.  I hope you’re getting your Christmas crafting on this weekend 🙂
Jenny
3D projects, Christmas

CURVY KEEPSAKES HANDBAG!!

I am sure you have seen all the amazing creations around using the Curvy Keepsakes Framelits. They are so clever.  I have been making some projects myself with them and I will show you these another time.  When I first saw the Framelits I thought it would make a cute little handbag. Recently I have seen some floating around the internet.  I thought I would show you my Christmas version – and it uses the set ‘December Wonder’ that I have been focusing on this past week.

P1140939

I am sorry I didn’t take a side-on view.  It would give you a better idea how it looks.  I will try and update this later. To create the bag I have used some of the Nordic Noel DSP.  I just cut the paper to size to fit half of the Framelit, the section with the curvy handle.  I cut 2 of these out.  Where the base is I trimmed off about 2cm (3/4″).  I added Sticky Strip to one of the bases and assembled the two together.  You can add some little chocolate treats and tie around some ribbon and add a tag.  For this tag I stamped the “Very Merry” in Garden Green and punched it out with the 1″ circle punch.  I cut one of the Oval tags that come with the Curvy Keepsakes framelits from the Gold Foil Sheets and layered them together with a little Real Red banner cut from the Bitty Banners Framelits.  I added 3 small pearls on the tag to finish and hung that from the ribbon with Whisper White Baker’s Twine. A cute treat bag in no time!!

I hope you enjoyed the projects this past week with the ‘December Wonder’ stamp set.  It is a fun set.  This is available in the Holiday Supplement Catalogue but these products are only available stocks are limited.  So get in soon for any of these items.  You can order directly from me or from my store HERE.

I hope you can join me again this week.  I will be away on a Family Holiday but I have some posts scheduled so don’t forget to stop by,

Jenny 

Uncategorized

12 WEEKS OF CHRISTMAS – WEEK 7!

Latte 12 weeks Header

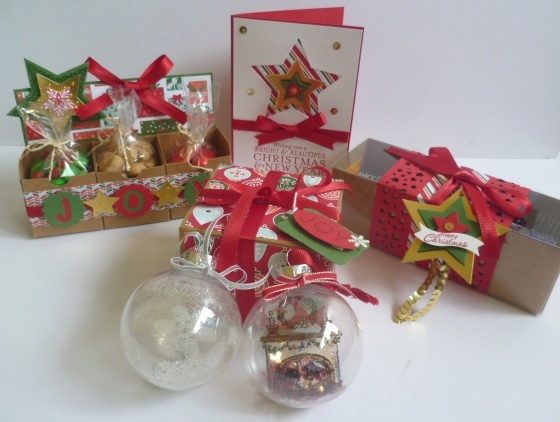
It is my week this week to bring you the 12 Weeks of Christmas project.  I am excited to share this project with you.  Today I have made some Christmas Ornaments that you can make to hang on your Christmas Tree this year, or to give as a gift to someone special.

P1140933                P1140754

These were really hard to take photos of and I apologise for the reflection.  I would have spent an hour and a half taking photos inside and out trying to get the best ones.  These turned out the best and I liked them being outside hanging off our bushes as I hadn’t got our Christmas tree up yet – and didn’t want to do that just yet!!! 🙂

I have been looking out for these clear Ornaments for  the past few years but never able to find them but I came across these a few weeks ago. (Thanks Lynda for the tip!)  For locals these were from RIOT Arts and Crafts.  For other people you might be able to get them from your local craft store.

I discovered how to create these from a little blog surfing getting ideas from a few different blogs so today I thought I would show you.

CREATING YOUR CLEAR CHRISTMAS ORNAMENTS

1. On a piece of Acetate draw a circle in NON-PERMANENT MARKER. (This is really important so you can wipe this off afterwards).  Add a little square tab piece at the top.  The size of your circle will depend on the size of your ornamment.  These ornaments were about 7cm (just a little less than 3 inches).  The circle I drew was about 6cm (just over 2 inches).  To draw your circle you can trace around a circular object or a circle die.  I used the base of a container.

P1140730

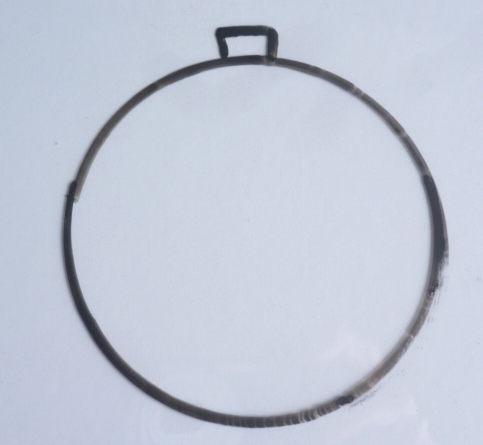
2. Once you have drawn your circle you can cut it out and then wipe off the marked circle with a tissue.

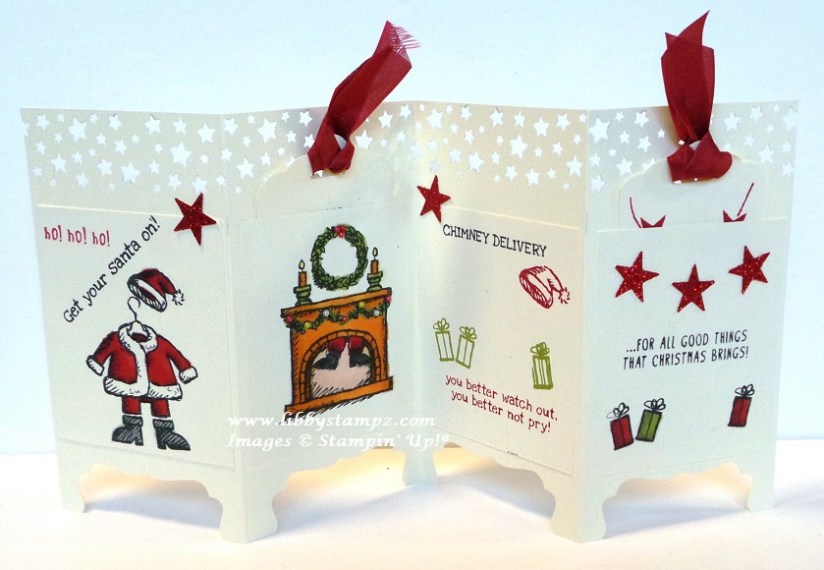
3. Stamp your image in Staz On on the acetate circle.  This image is from ‘Get your Santa On’.   Now you can’t colour this on this surface with the Blendabilities as it reacts with the Staz On.  Turn over your circle and colour your image from the back with your Blendabilities.  You might be able to see too on my image I added some dots of Cherry Cobbler Dazzling Details on the wreath circle and hanging wreath on the chimney to add some sparkle.  This was added on the front of the circle.

P1140696

For the snowflake Ornament I stamped the image in White Staz On.  This snowflake is from the stamp set ‘December Wonder’ from the Holiday Supplement.  (It is marked as a Project Life set but don’t just dismiss these if you don’t do Project Life.  There can still be some great images in these sets).

4. To insert the acetate piece in to your Ornament you need to roll up the piece in to a tight roll and squeeze it in through the top.  Be sure to have the tab piece at the top and hold that as it gets further in to the ornament.  This piece will sit in the top of the ornament to keep the piece in place.  As the circle unrolls you many need to give it a little spin around or you may have to get a pen or the Paper piercer down to jiggle it around in place.

P1140735

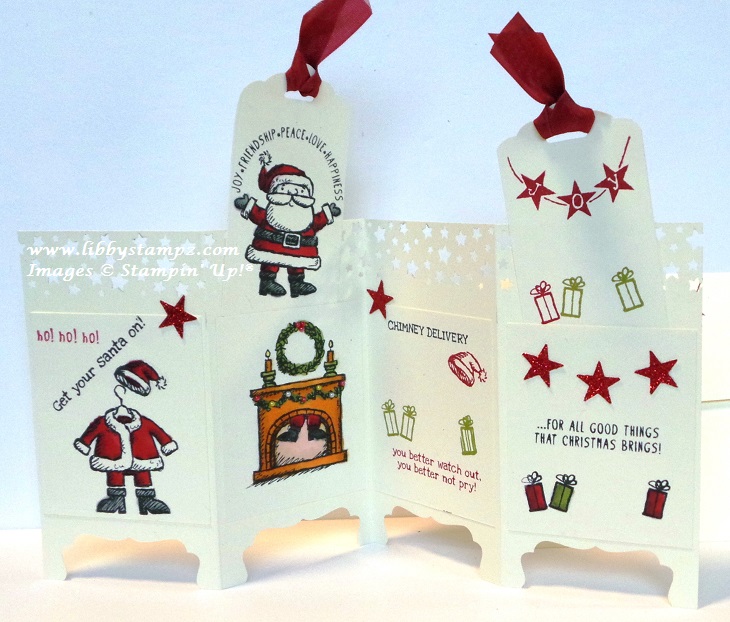
You can add some little embellishments in the Ornament as well.  For the Santa one I punched some stars with the Confetti Stars punch from Real Red and Gold cardstock.  For the Snowflake one I added some sequins (snowflakes and silver sequins) from the Frosted Sequins Embellishment pack in the Holiday Catalogue (p 22).  I also added some Dazzling Diamonds Glitter and shook that around in the ornament.  This stuck to the sides of the Ornaments giving it a “snowy” effect I guess.  Then you can replace the cap and tie some ribbon around the top and a ribbon loop for them to hang off your tree.

Now if you are giving this as a gift to someone it would be nice to dress it up a little, so I have a Gift Box for you.  This is using the Kraft Gift Boxes in the Annual Catalogue (p 200).  These Ornaments fit just nicely in them.  You would need to check the size of the Ornaments you are using though.

P1140809

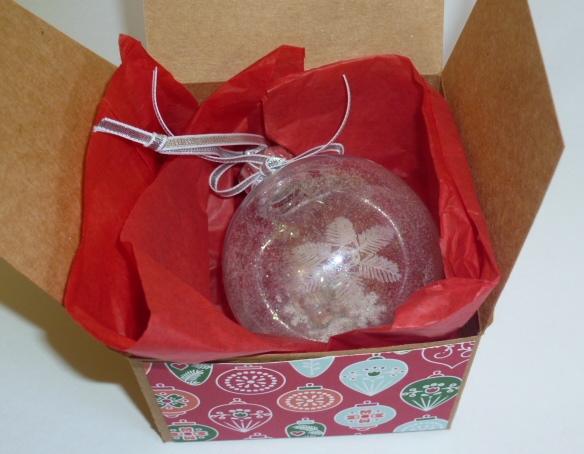
I decorated the sides and top with Designer Series Paper. This is from the Nordic Noel DSP pack from the Holiday Catalogue.

P1140815

Finish this off with some Red Satin Ribbon and a tag.  This makes a nice gift to give someone.

P1140823

Here is a close-up of the tag.  I used ‘December Wonder’ stamp set again.  The JOY is punched with the oval punch on Real Red.  I cut a label in Garden Green cardstock from the Chalk Talk Dies and then ran that through the Big Shot with the Perfect Polka Dots Embossing Folder. Then I layered these together. I finished it off with a Frosted Sequin snowflake and a Rhinestone.

P1140821

I hope you like these and can get hold of some ornaments to create your own.  Now as with our other projects I have put together a Bundle for you. (Not available to order as a Bundle through my Online Store).

This weeks Bundle includes: 

December Wonder Stamp set (Photopolymer)        136562      $27.95

Kraft Gift Boxes                 124106       $5.95

Confetti Stars Punch        135861        $37.95

Frosted Sequins                135835        $8.95

Total  $80.80.  Receive just over 10%  off = $70.00 + SHIPPING.

 —
If you would like to order this Bundle or any other Stampin’ Up! Products then please message me or drop me a comment.
Let me know what you think of this week’s project too.
Thanks for visiting,
Jenny
3D projects, cards, Christmas

12 WEEKS OF CHRISTMAS – BONUS!!!

Latte 12 weeks Header

Have you been enjoying the 12 Weeks of Christmas projects the last few weeks.  Well, today I have a bonus project for you from the very clever Libby. This bonus project is a bit of fun and you could use the tags to write recipients names on them or use the back of the screen to write your personal message.

GetYourSantaOn13.jpg screen divider

HERE IS WHAT YOU NEED TO RECREATE THIS CUTE PROJECT.

  • Stamp Set – Get Your Santa On
  • Card – Very Vanilla, Red Glimmer Paper
  • Ink – Tuxedo Black Memento Black; Cherry Cobbler; Old Olive
  • Punches – Itty Bitty Accents Punch Pack; Decorative Label; Scallop Tag Topper; Confetti Stars Punch
  • Ribbon – ½” Cherry Cobbler Seam Binding
  • Adhesive – Liquid Multipurpose Glue
  • Blendabilities – Cherry Cobbler; Old Olive; Pumpkin Pie; Smoky Slate; Skin Tone; Colour Lifter; Daffodil Delight
  • Other – Basic Jewels Pearls; Stampin’ Trimmer; Simply Scored; Bone Folder; Acrylic Blocks; Stampin’ Mist; Stampin’ Scrub


GetYourSantaOn18.jpg screen divider

This card opens so you can create your own scene using all or most of the stamps from Get Your Santa On and it has little tags inserted so you can add some little surprise messages or images. This particular one will fold down to fit into a C6 sized envelope.  

If you would like a detailed PDF tutorial to create this card then drop me a message or email and I will get one sent your way. 

As we have done with our other 12 Weeks of Christmas project, we have a special bundle for you. Now this bundle is only available if you order through me and not through my online store.

SPECIAL BUNDLE OFFER

Get your Santa On $27.95

Confetti Stars Punch $37.95

P & P $5.95

TOTAL = $71.85 get a free Tuxedo Black Memento Ink worth $9.95

Contact me today to order this special bundle just for Australian Residents.

Thanks for stopping by today.

Have a great weekend,

Jenny

3D projects, Christmas

12 WEEKS OF CHRISTMAS – WEEK 3!

Latte 12 weeks Header

We have another project in our 12 Weeks of Christmas series today. This project is brought to you by Narelle.   Check this project out for your Christmas entertaining.  This is a lovely Table Setting.

christmas setting

This table setting consists of a cutlery bag, a bonbon and a name place card.  I think these would really dress up your Christmas table and make it something special.
Here are some photos of the individual items and also some videos showing how to make the key components. For full instructions and a complete list of supplies, please email me for a detailed pdf.

CUTLERY BAG

cutlery bag

I just love this Cutlery Bag. I know you could just put the cutlery on the table next to the plates, but that would be boring, right ? Making this bag gives you a reason to create and show off a little to your guests. I am sure they will be appreciative of the effort you went to and the table will look so festive and special.

Here are a couple of videos showing you how to make the rosettes.

BON BON

bon bon

Bon Bons are a fun thing to have at Christmas time aren’t they?? The cute hat and funny jokes and the little novelty inside. But once they are pulled apart they are thrown away. With these Bon Bons not only are they a lot of fun but they will look pretty having them on the table. The bonus of these is that you can fill them with wrapped chocolates or something as an extra treat, and the guests get to keep them as a memento of a wonderful gathering with family and friends.

Here is a video how you can make them.

NAME PLACE CARD

name place card

Can you see this on your Christmas Table this year?? It would make all your guests feel pretty special.

The full materials you need for these projects are in the PDF that I can send you but here is some special products put together for the Bundle this week.

products _ table setting

We have these 4 products on offer in our Latte Girls’ 12 Week of Christmas Bundle Three(3). You can get all these products for the fantastic price of $77. That’s a saving of 10% . Gotta love that !

Contact me with  your order. This deal is not available online.

Don’t forget if you want the detailed instructions and a complete list of supplies used, please email me to get the pdf.

You can purchase everything you need to make these items and more, from my online shop.

I hope this helps you with your Christmas preparations.

Thanks for dropping by today.

3D projects

12 WEEKS OF CHRISTMAS – WEEK 2!


Latte 12 weeks Header

It’s Thursday and today I bring you the second week of our “12 Weeks of Christmas”.  Today it is Virginia’s turn to bring you the project that I am sharing.  Check this out!

Box

It is a cute little Christmas Village scene in a Card in a Box.  How sweet is it??? These are great too as they fold flat to fit in a standard size envelope.

Virginia has used Basic Black and Very Vanilla A4  cardstock. The Designer Series Paper used is the ‘Typeset’ pack from the Annual Catalogue.  The cute houses are from the set ‘Holiday Home’ from the Holiday Catalogue.  They have been stamped in Memento Tuxedo Black Ink and coloured with Blendabilities. The gold stars have been punched from Gold Glimmer Paper and some have been ‘suspended’ by gluing them to strips of the Window Sheet.  The Christmas trees are from the same Holiday Home stamp set, stamped in Mossy Meadow while the brown trees were double stamped in Baked Brown Sugar and Crumb Cake inks.  Virginia added some accents on the trees by dabbing on Versamark ink and sprinkling Iridescent Ice Embossing Powder and heat setting with a heat gun. Here is a close-up so you can see them.

10660138_10153300088546494_739784900140170368_n

You can create any scene in these little “Card in a Box” type cards.

Now how would you like to get all the goodies to make this card in a box and pay a special Latte Girls 12 Weeks of Christmas Bundle price?  Here’s what you’ll get …

Latte Girl’s 12 Weeks of Christmas Bundle Two (2)
Purchase this bundle for $85.90 and you will get the Glimmer paper for Free!

You can drop me an email (or add a comment and I will get back to you) with your order OR shop Online at my store HERE.

Want to know how I made the base for this?  You can get the instructions by dropping me an email or a comment.

Thanks for stopping by to see this week’s project.