cards, Catalogues, Classes

IT’S TIME TO PARTY. COME AND PLAY!

I am officially kicking off the stamping year this weekend with my Catalogue Launch.   By now you would have seen it??? Or have you been hiding under a rock this past month. 🙂 So if you are local in Wollongong come by and try out some of the fun new products and get to make a card and chat and have a great time.  That’s what it is all about really, hey!

Here are the details.

OCCASIONS AND SALE-A-BRATION CATALOGUE LAUNCH!

WHEN: Saturday 30th January at 2pm


COST: $10 which includes catalogues, make and take,
Product playground, Thank You gift and Afternoon Tea.

** RSVP: Thursday 28th January. Message me or leave a comment to reply.

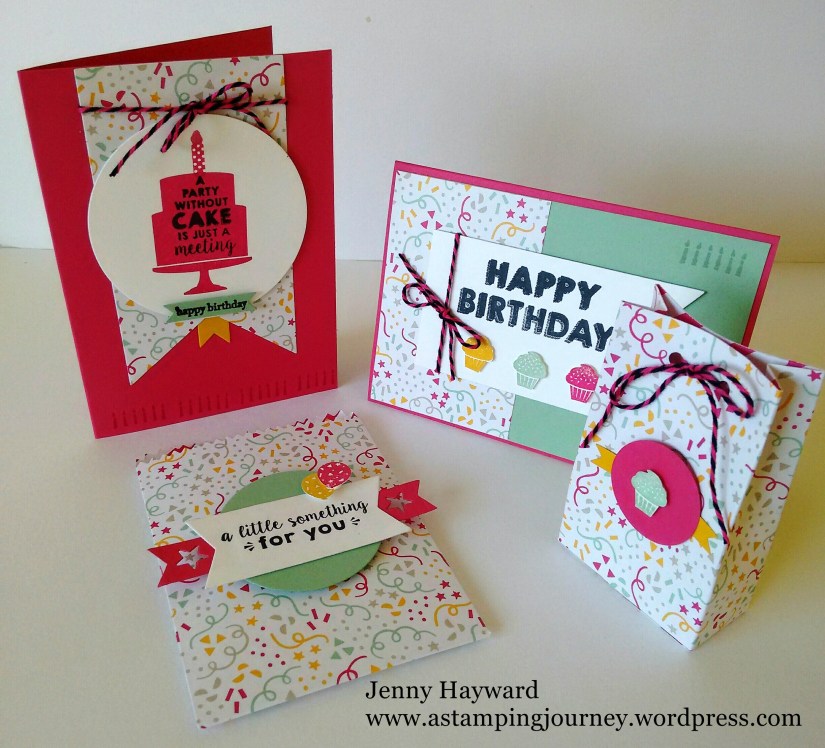
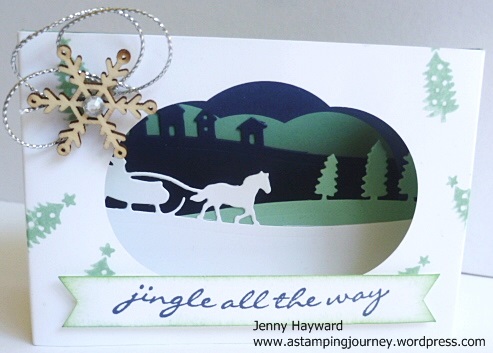
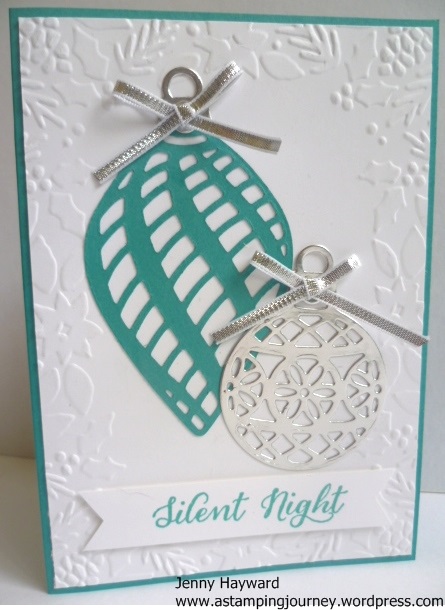
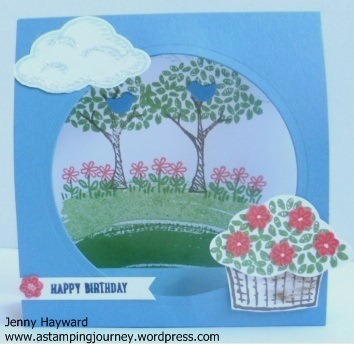
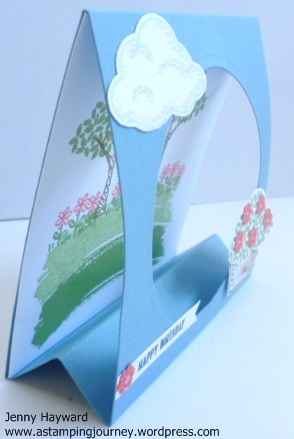
Here is a sneaky peek of what we will be making,
so make sure you join us. 

sponged rose - Copy (2)

So what do you think?  Come on and join us.  We don’t bite and we don’t have 2 heads really. 😉  So if you haven’t been before you will be fine.

Jenny

Classes, Personal Ramblings, Stampin' Up!, Workshops

TIME FOR A CHANGE!

under maintenance

They say a change is as good as a holiday, right?? I thought it was time to freshen up my blog and update it. I spent a few hours last night and today changing the look and updating all the information.  It is still a work in progress but it is a good feeling.  Maybe this is following my decluttering of the house. 🙂

If you receive my blog posts as an email or in your reader you wouldn’t notice any changes. Maybe stop by occasionally.  It is always surprising when I visit blogs that I get through email.

You will now find the Page Tabs at the top.  I have a page there for my tutorial posts which is updated often.  There is also pages there on Stampin’ Up! specials and Joining and Party information Plus my Class Schedule.  So stop a while and visit. I always like a comment now and then too.  So don’t forget to say ‘HI’ once in a while. It’s nice to know I am not talking to myself. I do that enough 😉

I am going to be reorganising my Pinterest boards next and update my newsletters. So watch out!!! Have you subscribed to my newsletter? There is a link in the right hand side bar to do just that.

Thanks for stopping by.  Grab a cuppa and have a look around.  I will be back soon with some more inspiration.

Jenny

INSPIRE, CREATE, SHARE.

3D projects, cards, Classes, Stampin' Up!

KIDS CLASS WITH PARTY WISHES!

OK Kids 6-12 years old, this one is for you.  I have 2 cool cards and matching bags for you to make in this fun class.  Come and join the fun. Bring a friend along for more fun.

This is what we will make.

144

It’s on THIS FRIDAY 22ND at 10.30am in East Corrimal.  (I will let you know the address when you book).

Please RSVP by Thursday morning. 

I can’t wait to show you how to make these.

Jenny

cards, Catalogues, Stampin' Up!

TIMELESS TEXTURES IN SUEDE!

I had overlooked the ‘Timeless Textures’ stamp set in the Occasions Catalogue.  I really couldn’t see how I would use it but then at our Team Stamping Day last weekend I saw a card that my friend Leonie made and I wanted to CASE it.  I soon discovered what a great set it was.  Lots of little elements that could be used on their own or to create backgrounds with other stamps.  It’s a great alternative to ‘Gorgeous Grunge’. So since then I may have purchased this set myself. 😉

Here is the card.  This was originally CASED from Pinterest.  I made mine in Soft Suede.  I am keen to try this in other colours to see how it would look.

P1180229

I used Crumb cake for the “speckly” edge and for some of the “dots”. The rest of the images were stamped in Soft Suede. The greeting is from ‘Rose Wonder’ set and cut with the matching framelits.

Here is a tip to create a mat for the framelit from my friend Leonie.  Trace around the outside edge of the framelit with pencil on to some scrap card.  Then cut it out with scissors and rub out the pencil marks.  Clever idea!!  I added some Linen Thread loops behind the greeting too. This might be good for a masculine card??

This is the inside.

P1180235

So I think this is a good addition to your stamps.  Here is the set so you can see all the different elements.

 timeless textures

It is $49 for Wood mount and $35 for Clear mount.  I think you will find this set very useful.  Stay tuned for some more projects with this set.

Jenny

cards, Stampin' Up!

BEFORE THE BIG SHOT!!!

Sometimes at classes when we are talking about the Big Shot we wonder what we did before we had the Big Shot.  I love the Big Shot and everyone who sees it loves it too – and wants one!!! Isn’t that right?  I was sorting through one of my big boxes of cards today and I came across some very early cards I had made.  I don’t have many left but sometimes it is good to look back at them.  I thought you might be interested.  Now I am a little embarrassed to share these but well, we have to start from somewhere don’t we.  I made these cards back in late 2008 and in 2009 in my very early days as a Demonstrator.  I remember being so proud of these at the time.  I had never done any stamping until just before I joined.  So I share these with you.  You can laugh, you can cringe or you can just ignore them completely BUT here they are for the blog world to see ……………..

This was one of my very early cards.  This was the first stamp set I bought with Stampin’ Up! that came with my Starter Kit and I must admit the first stamp set I ever owned.  This was a favourite set though ‘Baroque Motifs’.

P1180198

I hardly every use Chocolate Chip now.  This is teamed with Certainly Celery.  I even added a little dazzle with Dazzling Diamonds.  No Rhinestones back then. 🙂

P1180200

I don’t mind this card really but well I didn’t even own any ribbon.  I just used a thin strip of cardstock tied in to a bow.  This card was for a workshop a long time back showing the Rock and Roll Technique.  Once again using Certainly Celery. I used a lot of that colour back then.  It’s not available now and no that is not Bermuda Bay it is with.  This is Taken with Teal (retired). My first inkpad I bought.  The light flowers were stamped in Versamark onto the base card.  I had used Regal Rose (not available now) and Rose Red.

P1180202

I still love the layout of this card.  I think I will have to try this one again with some new stamps. 🙂  I think I CASED this from the Stampin’ Up! Catalogue at the time??? There was no Pinterest back then either.   I used Pink Passion (no not available now either) and Elegant Eggplant.  I don’t think I have used that colour combination since.  The greeting was from ‘Sincere Salutations’ (retired).

As I think on these cards and other earlier ones I realised that I used more stamping techniques where now I rely on the Big Shot to cut and add texture.  I think I need to get back to some more stamping techniques.

But enjoy your chuckle as you look at these.  We shall move on now to new products and new catalogues.

Only 2 more sleeps until the new catalogues begin.  I am excited about this. 

See you again very soon.

Jenny

3D projects, Christmas, Classes, Stampin' Up!

LAST CLASS OF THE YEAR WITH A SPECIAL LUMINARY!

It’s the last class of the year THIS FRIDAY.  We have a special project to make.  This Luminary was inspired by a few I have seen on Pinterest so I thought it would be nice to finish off the year with.  How about it?? Are you local in Wollongong?  Come and join us.  Here are the details.

Friday 4th December – 10am or 7.30pm.  End of year Christmas. 
Come along for a fun time of celebrating and stamping. We have a special project for our last class – and maybe some surprises.  Cost: $15 BYO:Scissors and adhesives.  PLEASE RSVP by Wed. 3rd December. (Thurs. am the latest).  🙂
RSVP ASAP TO RESERVE YOUR SEAT!!!
cards, Techniques

SLEIGH RIDE DIORAMA CARD!

In a previous post I showed you the swaps I received from last week’s team meeting.  I thought I would show you the project we all made.  Vanessa showed us how to make this.  It is so cute! It is a Diorama card using the Sleigh Ride Edgelits and the ‘Jingle All the Way’ stamp set.

P1170665

This is only small.  I should have take a side view photo perhaps.  It is box-like and inside you have different layers creating the scene. I have used Pool Party and Night of Navy.  I finished it off with a Snowflake Element and some Silver cord.  I can’t share the exact dimensions as Vanessa has used this in a class and it was kind of her to share it with us.   I have found one on Splitcoaststampers Here which is very similar so you can make your own.

Thanks for visiting.

Enjoy your day,

Jenny 🙂

cards, Catalogues, Christmas, Classes

DELICATE ORNAMENTS ON BERRIES AND BOUGHS!

I was playing around with some left-over Stamp A Stack kits the other week.  I just made a quick card up with one of the kits left.  I thought you might like to see it.

P1170418

The card base and the large ornament is in Bermuda Bay. I embossed the white card with the ‘Boughs and Berries’ Embossing Folder. On this card I added another ornament from the ‘Delicate Ornaments’ Thinlets cut from the Silver Foil Sheets to give a little sparkle.  The greeting is from the ‘Wonderland’ stamp set. A little Silver Ribbon finishes it off.

Thanks for visiting today.  I hope you have a wonderful day,

Jenny

cards

SPRINKLES OF LIFE TENT CARD!!

Are you ready for another Sprinkles of Life card?? I hope you are not getting sick of them yet.  Here is another fun card I made yesterday. (lighting is not the best – sorry!)

P1170148

P1170150

This is called a Tent card.  I will explain how to make it below.  I found the original idea of the card on Stampin’ Connection which is a Demonstrator site and has THOUSANDS of samples (and I am not lying about that!!).  I don’t visit it often but it is always full of inspirational ideas.  Anyway, this style of card was on there that I found a couple of years ago I think and I filed it away. I thought it would be great to try it out with this stamp set.

The base is Marina Mist (lighting is not the best).  Inside the card I created a sweet scene using a number of images in the set. Then I added the basket and a cloud on the front. You have to have sparkle on that cloud!

P1170152

So how do you make it??

Here are the instructions for you to make your own TENT CARD.

1. Cut your base card to measure 10.5cm x 29.5cm.    (4 1/4″ x 11 5/8″)

2. Score on the long side at 2.5cm, 5cm, 7.5cm, 18.5cm. (1″, 2″, 3″, 7 1/4″).  Fold on the score lines.

3. Cut your window from the front using your Framelit of your choice.

4. Add adhesive onto the small tab and adhere to the inside of your folded card at the back. (Just fold up the card first to work out the best place for your adhesive).  I had the tab to attach to the back of the card so you can’t see it inside the front).

5. Cut a piece of Whisper White 11cm x 10.5cm. (4 1/4″ x 4  5/16″).  Decorate this piece as you like. Adhere to the back of the card on the inside.

I hope these measurements make sense???  🙂

Enjoy making one of these.  What stamp sets can you make this with??

Have a good day,

Jenny


cards

BLACKBERRY BOUNTIFUL BORDER

At our South Pacific Convention back in May I had a play with this set ‘Bountiful Border’ in our Product Playground Area.  Now I will say I think this set can get overlooked in the Catalogue (p120 $30). I think it is a bit hard to work out all the parts of the stamps.  I had a play and stamped the images and brought the piece home – and then it sat on my table. I finally put it together last week and thought I would show you.

P1160927

I first stamped the stem in Mossy Meadow and then inked up the petals in Blackberry Bliss.  Being a photopolymer set you can easily see to line up the petals on to the stem.  It might take a little playing around to get used to it.  When inking the dots in the set I found it easier to leave the stamp on the desk face up and very lightly touch the stamp with the inkpad.  I gently stamped it off first before stamping on the card.  I repeated this a couple of times around the flower stem.  I added some Burlap Ribbon and the Razzleberry Cotton Ribbon.  It matches in quite well I think.  The greeting is from ‘Wetlands’ and was punched out with the Large Oval punch.  I added some gold sequins around the card to finish.  I find glue dots the easiest way to adhere these to card.

So what do you think??  I am pleased with the final result.

Thanks for stopping by.

I am getting excited. I am going away for the weekend for some fun stamping time with my buddies.  Stamping 24/7!!! Well maybe we have to have a “little” sleep and there will be lots of chatter.  I can’t wait to show you some of the projects we made next week.

Have a great weekend.

Jenny