Catalogues, Classes, Stampin' Up!

BOGO SALE ON THIS COMING WEEKEND. BUY ONE, GET ONE FREE!

The BOGO Sale Days have been popular the past few years and it is on again. Why wouldn’t it be when you get brand new Stampin’ Up! products free for the value of the retired products you buy.  I need to clear out loads of retired products.

WHEN:

Saturday 9th – Any time between 2pm – 3.30pm
and
Sunday 10th between 2.30pm – 3.30pm.

Can’t make these times.  Contact me and I can arrange a time for you to come after these dates.

WHERE: 

My studio in East Corrimal.  Contact me for address.

HOW DOES IT WORK:  

All my retired products are priced near Catalogue price. (Previous years products have been reduced further). Add up  your total order that you purchase on the day and pay for that total. For every $1 you spend you choose up to that total from the new Catalogue (Annual, Holiday and Clearance Rack) and get these items FREE!  WIN! WIN!  

I look forward to seeing you there and grabbing some bargains.

Jenny

Catalogues, Christmas, Stampin' Up!

A NEW CATALOGUE IS HERE. GET READY FOR CHRISTMAS!

September 1st always brings excitement.  The start of Spring. YES!  Although it has been a mild winter really.  What I am really excited about also is …

THE  HOLIDAY CATALOGUE IS LIVE AND YOU CAN NOW ORDER AND IT IS ALL GORGEOUS AND WONDERFUL AND BEAUTIFUL!!!   🙂

I have mailed some catalogues out recently but if you still haven’t got one, drop me a comment or email and I will get one to you ASAP,  because you just have to see it for yourself.

I have picked a few favourites from the catalogue.  

This was one of my first choices.  I think because it is just a bit different.

Brightly Lit Bundle  $72

You don’t need to add much to a card with the gorgeous Thinlits in the set.

Night In Bethlehem Bundle  W $95.25    C $83.50

A great one for Aussie Christmas cards. Beachy Little Christmas   W $49   C $35


Are you a cat person or a dog person?? I am a dog person. I know a few people who will love this punch. I think it will be very popular.

Cat Punch $31


I am interested to try these Foil Sheets. How gorgeous!  Maybe some elegant Christmas boxes??  Champagne Foil Sheets $7


View these and many more gorgeous products in the catalogue now.  View it online -> HERE

To order:

Contact me directly by email or phone

OR 

Order online -> HERE   Please use the Host Code: HSVFAXRX

Visit tomorrow when I have some sweet cards to show you,

Jenny


cards, Stampin' Up!, Techniques, Tutorials, Videos

WATCH IT WEDNESDAY STARTS TODAY!

Starting today I have a new segment on my blog:  Watch It Wednesday!

Each Wednesday I am going to bring you a video.  It might be of a cool stamping technique, a new card or helpful tips on Stampin’ Up! Products.  They might be from Stampin’ Up! or myself or ones I have seen on my blog travels that I thought I would share with you.  So watch out each Wednesday.  Be sure to subscribe to my blog so you don’t miss any.  You can find the link in the right side bar.

Today’s first edition of Watch It Wednesday.

I have been having a play with watercolouring lately And I have to say I am not all that great.  I came across this video from Stampin’ Up! which I found helpful.  Check out the video below on watercolouring. (NB: If you receive these blog updates via email you may need to click on the blog title and go directly to my blog to view it). 🙂


What do you think?? What that helpful?

Join me again next week for Watch it Wednesday,

Jenny

Catalogues, Christmas, Stampin' Up!

TIME TO GET YOUR 2017 STAMPIN’ UP! HOLIDAY CATALOGUE!

In just a few weeks the 2017 Holiday Catalogue begins.  It has so much gorgeousness – really it does!  Every page you turn is just beautiful.  You just feel like you want to reach out and touch the beautiful projects and the texture.

Do you want to see it?  Of course you will be able to view it online but that’s really not the same.  You want to be able to turn the pages and stick those post-it notes in.

Let me send you one for Free (Australian residents only).

Drop a comment or email me at jghayward@yahoo.com

Jenny

cards, Catalogues, Masculine

DAPPER HAPPY BIRTHDAY!

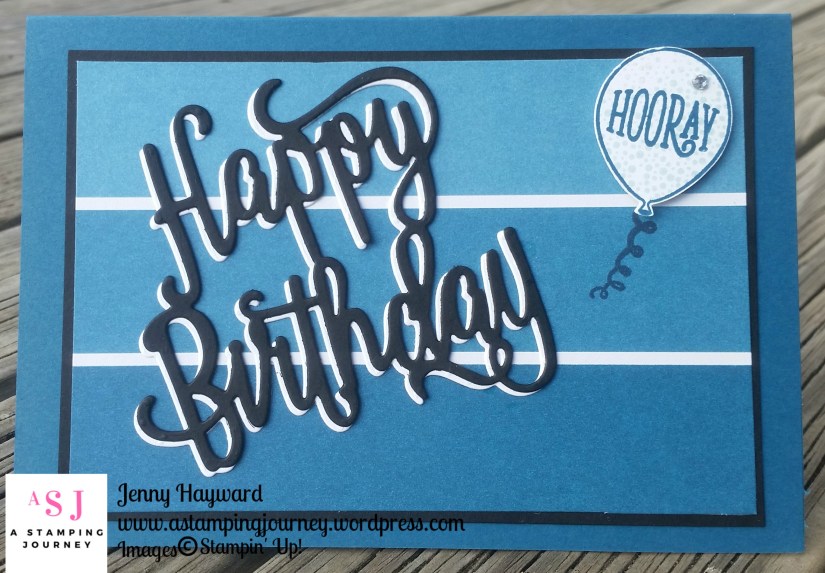
I know I have been sharing lots of Christmas cards recently but there is still so much gorgeous-ness in the Annual Catalogue.  This card I made a few months ago and  I realised I hadn’t shared it with you yet.  I get lots of comments at my classes about this card.

This card uses the Happy Birthday Thinlits with the Color Theory Paper Stack.  You really don’t need much more.

I cut the Happy Birthday out from Black card and also Whisper White.  Then adhered them together and slightly off-set them so you see the white from behind.  I think the white gives it a little extra POP!.

I adhered the piece from the Color Theory Paper stack to a black mat and then adhered it to the Dapper Denim card base.  I stamped the balloon from the Happy Birthday Gorgeous set straight on to the DSP in Dapper Denim. That’s always nerve wracking! Stamp it before you assemble the card in case you make a little mistake. 🙂  Then stamp the balloon again on to scrap White card.  The centre “dots” on the balloon were stamped in Soft Sky.  The balloon was punched out with the Balloon Bouquet Punch and raised up with Dimensionals.   I added a Rhinestone too.  Couldn’t resist. 🙂

This would make a good masculine card I think.  It is not too tizzy even with the bling.

Thanks for visiting.  “See” you again soon,

Jenny


cards, Catalogues, Christmas

CAROLS OF CHRISTMAS – DAY 4!

DAY 4

Nearly at the end of the week.  Can you believe that?? How have you liked this week showcasing the Carols of Christmas bundle??  So many different looks you can achieve just with the one stamp set and Thinlits.

I have to say this card today is probably my favourite.  It is so funky and fresh.  Totally not your traditional Christmas colours.

It is in Lemon Lime Twist and Dapper Denim.  What do you reckon?? Perhaps I should have had a warning to wear your sunglasses. 🙂

For the sentiment on this one I inked up the top half of the sentiment in Lemon Lime Twist ink by dabbing the inkpad on to the top half of the stamp.  Then I used the Dapper Denim inkpad and dabbed on the ink to the bottom half of the stamp.  Then I stamped it on to a piece of Whisper White card. I love the two-tone effect.  I thought for a little more retro fun I would add an Incolor Bitty Bow.

Tomorrow’s project actually co-ordinates with this one.  Make sure you stop by.

CAROLS OF CHRISTMAS

Order the Carols of Christmas this week and receive double Loyalty points.  And receive a small gift to say Thanks. 🙂

ORDER ONLINE HERE. (Australian residents only)  Please use the HOST CODE:  KDEM49NG

If you would like a free copy of the upcoming Holiday catalogue mailed out to you then drop me a comment.  It will be on it’s way very soon.

See you tomorrow,

Jenny

Uncategorized

CAROLS OF CHRISTMAS – DAY 3!


DAY 3

This card was inspired by a card I saw on Pinterest using a different Christmas set.  I like the idea of the “negative” cut trees.  Check this out!!! The Designer Series Paper is from the Delightful Daisy DSP.  It’s not even a Christmas paper!  It looks like falling snow though doesn’t it.  🙂  The other trees are cut from the Dazzling Diamonds Glimmer Paper.

The sentiment on this card is from the Holly, Berry Happiness set.  Such a nice sentiment.  It is stamped in Smoky Slate.  Sometimes I like stamping in the grey.  It is just a little softer.

CAROLS OF CHRISTMAS

Order the Carols of Christmas this week and receive double Loyalty points – and receive a small gift to say Thanks too. 🙂

ORDER ONLINE HERE. (Australian residents only)  Please use the HOST CODE:  KDEM49NG

See you tomorrow,

Jenny


cards, Catalogues, Christmas, Stampin' Up!

CAROLS OF CHRISTMAS WEEK – DAY 1!


DAY 1

My first card for you uses the new Incolor Fresh Fig.  When I first started creating this card I felt the Fresh Fig was a big heavy but adding it to a Thick Whisper White base it lightened it slightly.

The sentiment is layered on to a Copper Foil Sheet mat cut with one of the large Scallop Square Dies from the Layering Square Framelits.  Before I adhered it to the Fresh Fig mat I wrapped around some Copper Thread around the card.  It is just a soft touch. 🙂  I also added some Copper Foil behind the Fresh Fig card at the top to see the Copper through the little cut outs of the moon and stars. 

A tree was cut from the Copper Foil too and raised up with Dimensionals.

CAROLS OF CHRISTMAS

Order the Carols of Christmas this week and receive double Loyalty points.  Always a great thing – and receive a small gift to say Thanks. 🙂

ORDER ONLINE HERE. (Australian residents only)  Please use the HOST CODE:  KDEM49NG

See you tomorrow,

Jenny


cards, Catalogues, Christmas, Classes, Stampin' Up!

CAROLS OF CHRISTMAS WEEK!


I am away all next week but you won’t miss me.  I have a special week planned for you all next week sharing some fun creations that I have been working on using the newly released Carols of Christmas bundle.  I can’t wait to share them with you all.

CAROLS OF CHRISTMAS WEEK

It will run Monday 7th to Friday 11th August.  

Be sure to click on the right column to receive my blog updates by email or to follow it in your reader.

“See” you Monday,

Jenny

3D projects, Stampin' Up!, Techniques, Tutorials

MORE 6″x6″ TREAT HOLDERS!

Yesterday I showed you some more Z-fold cards and they had little treat holders.  I thought I would share with you how to make those particular ones.

Firstly, the Dapper Denim Napkin fold.
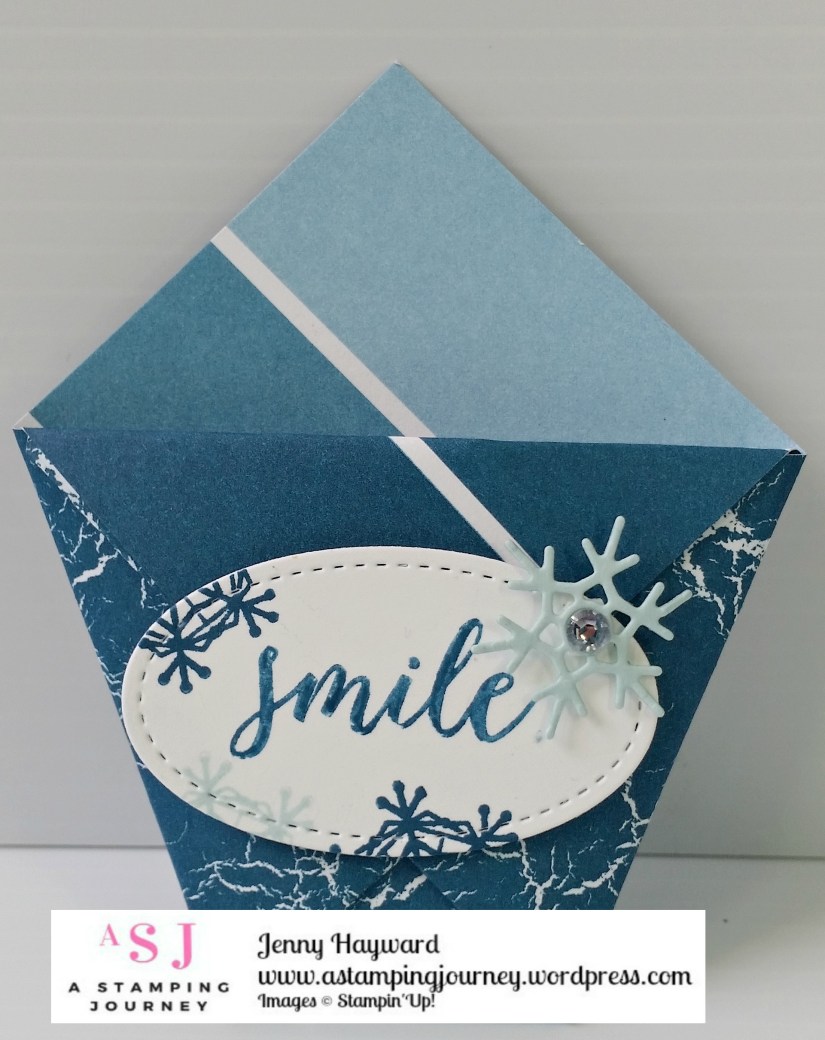
These are one of the easiest, quickest treat holder you could possibly make.  I used to make them a lot when I was younger but had forgotten about them until recently.  They are a good size to fit a small chocolate treat in.  Here is how to make them.

Of course, you can make these any size you like.  The principal is the same.  Just be sure that your paper is square.

For this particular version I used the Color Theory paper stack in which the piece measures 6″x6″ (15.2cm x 15.2cm).

NAPKIN FOLD TREAT HOLDER

1. Fold your paper piece in half diagonally.
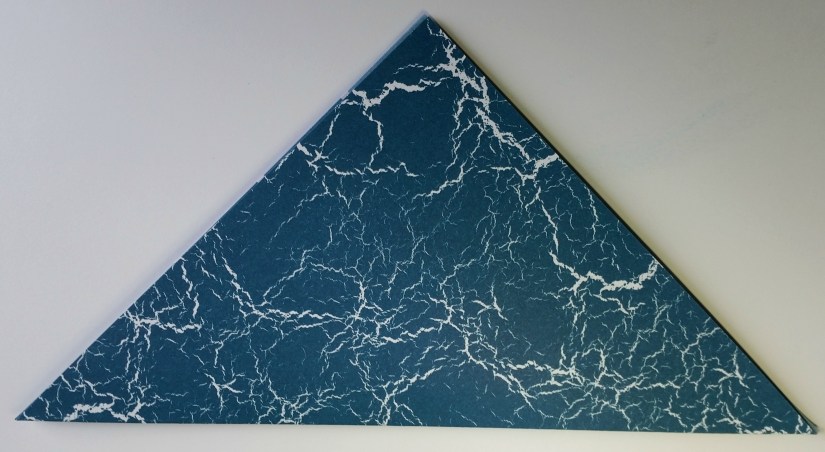
2.  With the fold towards you, take the left hand corner and fold it to about the mid point on the paper on the opposite side.  See the photo below to see what I mean.
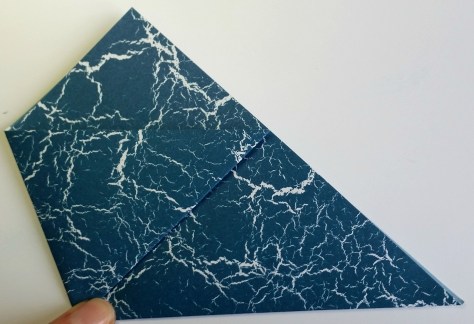
3. Fold the right hand corner so it overlaps the last fold and for the point to reach the mid point on the opposite side.  Place a little adhesive behind the folds to help it stay closed.
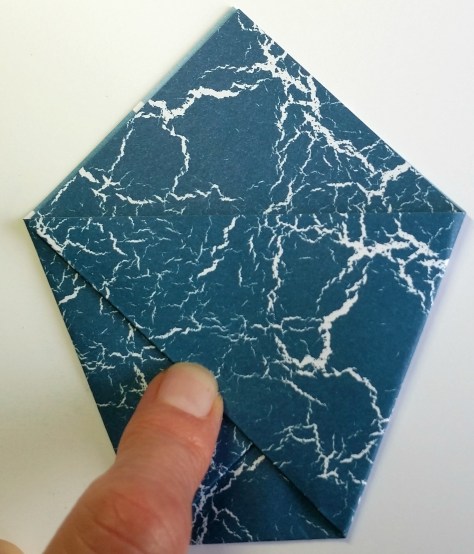
4. Take the top point and fold just one layer down over the 2 folds. Place adhesive behind it to keep it closed.
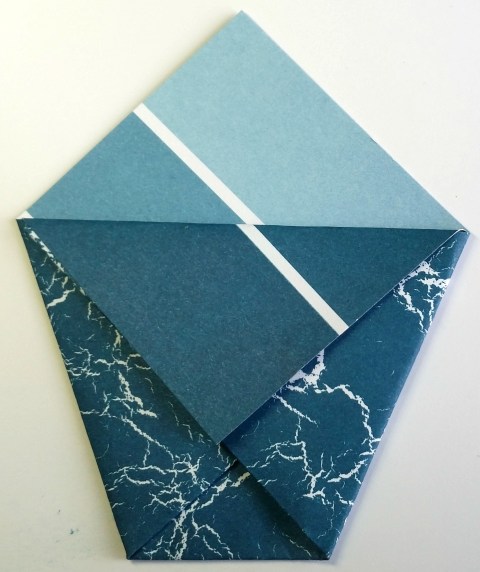
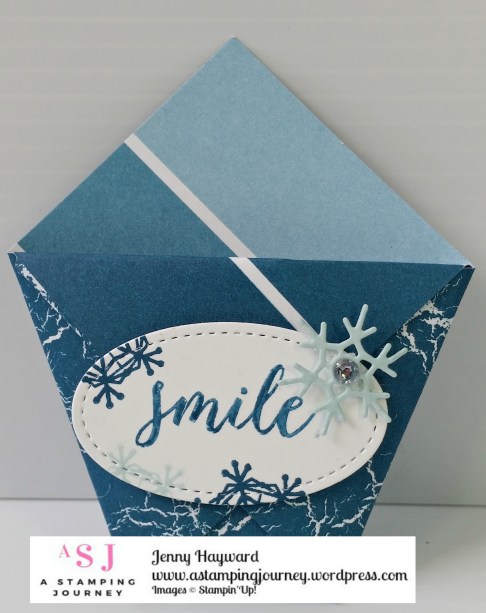
Add a tag or embellishment as you like.  For this version, I used the Dapper Denim marker over just the “smile” word in one of the sentiments from the Colorful Seasons set.  Cut that with the Stitched Oval Framelits.  I stamped a few snowflakes on to the piece too and finished it off by cutting some “snowflake” embellishments from the Layered Seasons Thinlits.
OLD OLIVE MINI BOX
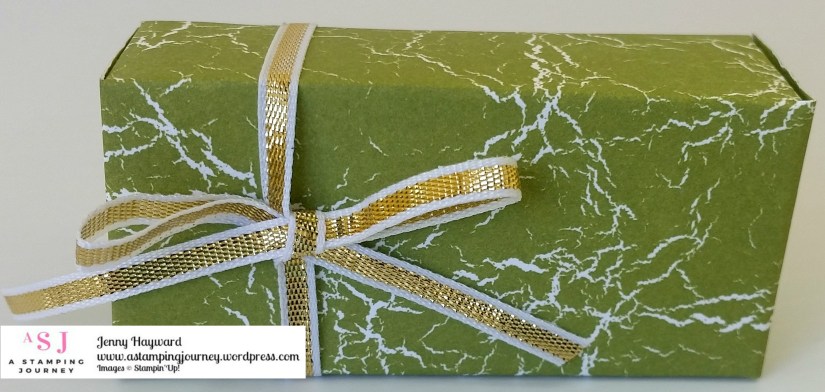
This little mini box is so cute.  You could fit a lipstick or lip balm in it or a small chocolate.  The finished size measures 7cm Wide (2 3/4″),  3.2cm Deep (1 1/4″) and 2.2cm Height (7/8″).

This was made with the Envelope Punch Board.  When I went back to find the tutorial for this I couldn’t seem to find it.  I am sure I used the one by my lovely friend Tanya HERE.  When I made it up again though it was slightly longer.  The tutorial at that link is a paid Tutorial for lots of different sized boxes with the Envelope Punch Board, but for $2 it is not a bad purchase. 🙂  Have a look on Pinterest though for a few other versions.  There are larger ones but I was in keeping with the 6″x6″ paper.

So here are the 4 little treat holders made just with a piece of 6″x6″ paper.  There are so many others too but it is amazing what you can make with such a small piece.
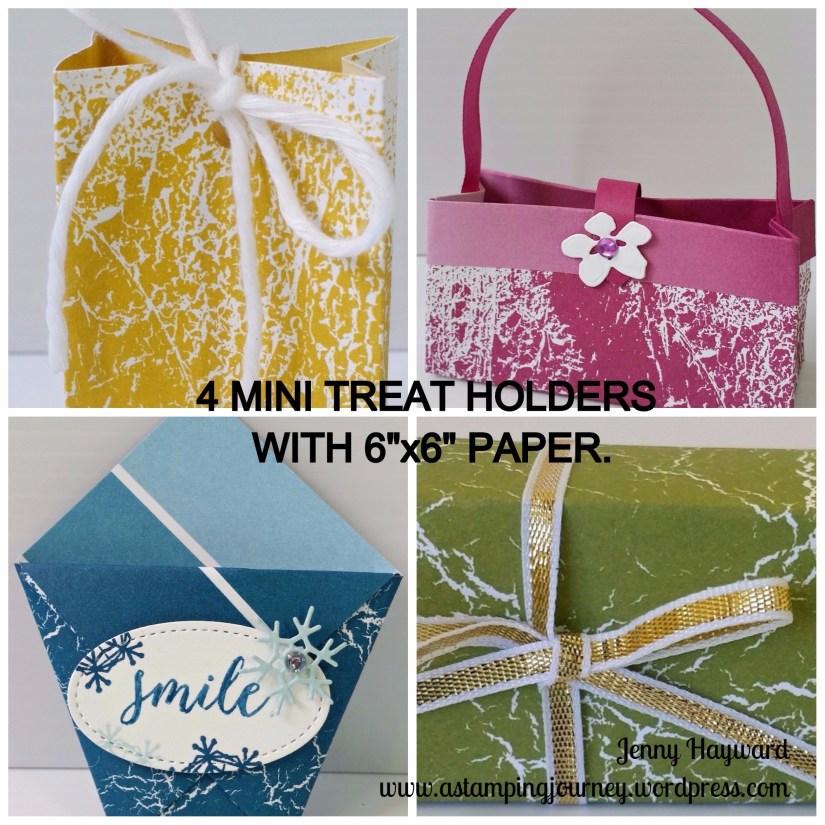
JUST A NOTE: If you want to see the tutorials for the Daffodil Delight bag Head -> HERE (Pootles blog) and for the Berry Burst Bag Head -> HERE.

Enjoy,

Jenny