I have had a number of people asking me recently which ink should they use when they are doing some of the different techniques. I was putting together a chart to share with them. Then this chart appeared in our Stampin’ Up! emails just today so I adapted it to share with them – and to you too as I am sure you ask yourself that same question.
So for Wednesday’s WOW! #58 today let’s look at the basic inks and see what inks to use.
TIP: If you are on your phone or even on a Tablet this table might be hard to read. Save it to your device and then you can expand it.
In Australia?You can get any of these inks and more at my store -> HERE. Please use the HOST CODE: TTBQMGUT
Thank you for choosing me to order from. Be sure to mark your address down so I can send you out a card and small gift.
So I hope that is helpful for you. PIN the table so you can refer back to it time and time again.
Thanks for visiting me today for another Wednesday’s WOW!
I have a fun card for you today for Wednesday’s WOW! #56. I want to show you how to make this cute card with the So Hoppy Together set using the masking technique.
For the card I have used Lemon Lime Twist base with the Gingham Gala paper stack. The frogs were stamped in Black Memento ink and coloured with the Granny Apple Green Stampin’ Blends.
Do you want to know how I stamped the frogs?? I used the masking technique. Let me show you how it is done.
MASKING TECHNIQUE WITH THE FROG
You can use this technique with any stamps. The idea is to create a mask on a piece of sticky note paper.
1.First stamp your image on to a piece of sticky note being sure to stamp where the sticky part is underneath. Fussy cut around this image.
2. Stamp your image again onto your white card towards the left hand side of your card in the position you would like it to be. Place your “mask” piece that you had created in Step 1 directly on to that stamped image.
3. Stamp your image again to the right next to your stamped and masked image where you would like it to be. See the photo below if you are unsure.
4. Remove your mask and place it over the 2nd stamped image to mask this one. Stamp your image again to the right of this. See the photo below.
I hope this helps you. What stamps could you use for this fun technique??
Don’t forget to grab your So Hoppy Together set Free with orders over $90 during Sale-A-Bration. Or you could choose another option. There is so many lovely products to choose from and who doesn’t like free. 🙂 🙂 🙂
If you are in Australia you can order -> HERE. Don’t forget to use the Host Code this week. Q6XB6QR6
AND, orders over $78 AUS will receive the Free Tutorial Bundle for this month to create 10 fun projects.
For Wednesday’s WOW! #55 today I thought I would look at the Florentine Filigree Bundlein the 2019 Occasions Catalogue. I have been fascinated with it every time I see it in the catalogue.
The Florentine Filigree Thinlits die is quite fancy and the Florentine Filigreestamp set has a number of different medallion style stamps.
When I looked at the samples though I was quite fascinated with them. On the one on the left those flourish style images were stamped in the little gaps in the diecut . How can you get them so lined up and so neat?
The smaller card on the right looked like it had Texture Pasteused with the diecut.
I came across a video with some great tips and it shows you how to easily create these cards. I thought you might like to see the video.
Here are you are below.
What do you think? Are you going to add this bundle to your wish list now? It’s a gorgeous one isn’t it.
You can shop for this in my store now -> HERE. Please use the Host Code: Q6XB6QR6 It is $69.25 AUS
Add a little more to bump your order up to over $90 and you can choose a Sale-A-Bration item too AS WELL as receive my Tutorial Bundle for 10 exclusive projects.
If you are using the Standard Metric card bases you might be facing a problem. Today for Wednesday’s WOW! #54 I want to solve that problem for you. I have to say this is not my original idea. I think I saw it on a Facebook group I am on but not sure where or who by now. Perhaps you haven’t seen it though so I thought I would share it with you.
The metric size card bases are just slightly different to the US size so the largest Rectangle Stitched Framelitsdoesn’t sit quite right for some people. It’s not evenly spaced around each side when you cut the card mat. To some that doesn’t matter but you might like the even space. Here is a solution for you.
EXTENDING THE RECTANGLE STITCHED FRAMELITS
Cut your card with the Largest Rectangle Stitched Framelit. On your card piece, cut off a section at the bottom. This could be any amount you like to work with your card design. I cut this one at about 3 1/2 cm.
Once you have stamped your piece of card how you like, adhere that to the card base. Add a strip of card (or even wide ribbon) across the join of the card. The card strip could be where you stamp your sentiment. Nobody would even know there is a gap there. 🙂
Here is a Pinterest graphic that you can PIN for your later use.
Wednesday’s WOW!are back for 2019. Today we have episode #51. You might know by now that Cling Stamps have arrived to Stampin’ Up!. Cling Stamps are super sticky so they don’t fall off. YAY! Because they are super sticky though there are a few tips you might want to know about using them. I put together a video for you to let you know about them. Check it below.
I hope the video helps you with them. Just be sure to ‘gently’ peel them off the block, but isn’t it nice that you can have confidence that they will stay on.
For Week 9 of our 12 Weeks of Christmasseries I am giving the Snowflake Showcaseone last hoorah! It is such a nice suite. So sad that it is going. So for today’s project I wanted to give embossing the snowflake dies a whirl. I have seen a few cards with this idea recently.
On this card I thought I would emboss the snowflakes on Vellum cardstock.
I like how this turned out. How great is it that you can emboss with your dies. It gives the cards a whole different effect.
Have you tried embossing with your dies yet? I did do it some weeks back and shared how to do it. You can see that post -> HERE.
Just to remind you the layers when embossing I have added a graphic here for you to PIN. I know I always forget and I have to look it up.
With vellum you need to be careful it doesn’t tear. If you have a problem with that you can add a piece of scrap paper in between the card and the die.
The paper on the card above is from Under The Mistletoe Designer Series Paper.
I love that you can stamp the snowflakes from the Snow is Glisteningstamp set and cut them with the Framelit dies from the Snowfall Thinlitsor you can diecut the very detailed snowflakes straight from card or the Foil Sheets. It’s very versatile.
I hope that you have got hold of this suite now as it ends today. If you need to still grab it you have just a few hours left to grab it in my store ->HERE.
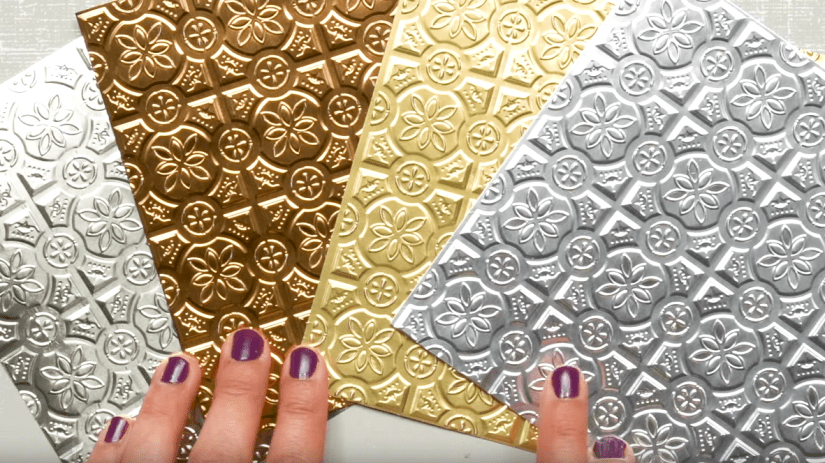
I have been using the Tin Tile Embossing Folder a lot lately. This Embossing Folder is so popular every time I use it in class too. Everyone loves it. You don’t have to just run it through the Big Shotwith a piece of card in the folder, Why not try some other cool ways to use it.
I found this video from Stampin’ Up! with a great tip for getting the best impression on your card but also some other fun ways to take your embossed card that extra step. So today for Wednesday’s WOW! #48 we are looking at ways you can use the Tin Tile Embossing Folder. I have a card below that I had actually used this idea on it before I even saw this video so be sure to look below.
I have to say I have yet to try embossing the Foil Sheets but don’t they look just gorgeous. (adding to my list to do …) And they looked so spectacular lightly sanding them and inking over them in parts as it showed in the video.
I like the card inked too after it has been embossed with the folder, but sponging over it with the Shimmer Paint does take the card to the next level. I shared that video a few weeks ago of how to do that. You can see that video -> HERE.
I will share the shimmered card piece again for you here below.
Using the idea of adding the Shimmer Paint to your embossed card we used that on one of our cards for the Shimmer Classlast week. Everyone just loved this too and we dragged out the good and faithful set Lovely As A Tree. It’s been a while since we have used this set but it never gets dated. It lends itself to so many occasions and techniques. NOTE: If you don’t have this set yet do yourself a favour and grab it. You can order it in my store now ->HERE.
Here is the card we made. Using the Copper ShimmerPaint we lightly daubered over the embossed card in places to add some shine. Just a note too. For the tree we daubered over some Copper Shimmerdirectly on the stamp. We also did that with the Sentiment which is from the Host Set Hung With Care.
So now you have some important items you need to be sure to get:
Tin Tile Embossing Folder, Shimmer Paint, Lovely As A Tree.Head to me store now to grab them. (link above)
This weekend is my Shimmer Paint Technique class. I have been having lots of fun sponging and spraying this stuff around. For our Wednesday’s WOW! #47 I thought I would share with you how to make the Shimmer Sprayup. Also, I will show you one of the cards we will make in class using this spray.
MAKE YOUR SHIMMER PAINT SPRAY
Add a small amount of the Shimmer Paint in a Stampin’ Spritzerbottle. I added about 1cm, or approximately 1/2″. The more paint the more intense the spray will be. Then top up the bottle with Rubbing Alcohol. The Rubbing Alcohol can be picked up at most Chemists (or Drug Stores). You can add water instead of alcohol but it doesn’t dry as quickly. Give it a good shake to mix them together. Before you use this each time if it has sat for a while then be sure to shake it. That’s all there is to it.
TIP:When you are spraying your card check which direction the nozzle is as to where it will spray … You might like to spray inside a box or cover the table to avoid any random spraying.
The further away you hold the spritzer the finer the mist will be. Bring the Spritzer in closer and it will be more heavier.
This is the card we will be creating on the weekend. (By the way there are still spaces if you are a Wollongong local and want to join us. Check the previous post for class details).
I have used the Southern Serenade stamp set and stamped it on to Shimmery White cardstock. That gives extra sparkle but also is good for the liquid used. I stamped the images in Black Stazon and coloured them with the Watercolor Pencils. After it was finished I spritzed the card. This spray is using the Vegas Gold Shimmer Paint.
You can see the Shimmer Paintson page 38 of the Holiday catalogue or view them in store ->HERE. Scroll down the page to see each one. There are 4 colours: Vegas Gold, Bright Copper, Champagne Mist (which is a silver) and Frost White.
Get your Free Sponge Dauber for each pot of Shimmer Paint you order from me this week. Each pot is $14.
TO ORDER:Contact me Directly
OR
ORDER ONLINE ->HERE. Please use the Host Code:KGQKCBA4
For local Wollongong Peeps we are getting your shimmer on this week. You will learn how to use the Shimmer Paintin different ways while creating some gorgeous cards. These paints are so fun to use and you can achieve some great effects with them.
Here are the details.
Friday 23rd November 10am and 7pm in East Corrimal.
COST: $20 ($5 extra to use my adhesives). ** Receive a Free Sponge Dauber for each bottle of Shimmer Paint you purchase.
PLEASE RSVP:Thursday 22nd. Earlier to reserve your seat.
Here are the cards we will be making.
Come and have some shimmery fun. You need time out for yourself. Let me know ASAP. 🙂
As a bonus, invite a friend with you that I haven’t met to receive a special gift for the both of you.
This is a different type of post today. I am considering classes and my direction for next year. Videos and tutorials are becoming a big part of the way we share stamping techniques and projects with each other. Is that how you want to see them??
I would love your views and have put together a very short survey. It is 2 very quick questions. Would you mind taking about 20 seconds out of your day to answer the 2 questions please??
That would be really great. I love to hear your ideas.