cards, Catalogues, Christmas, Stampin' Up!, Techniques, Videos

SNOWFLAKE SHOWCASE WEEK – DAY 3 – AND A VIDEO FOR WEDNESDAY’S WOW!

Day 3 of our Snowflake Showcase Week.  Half-way through.  Today’s card is simple really but I think effective – and they can turn out differently each time.

The background for this card is a Watercolour wash.  I have used Bermuda Bay and of course the Snow is Glistening stamp set and Snowfall Thinlits.

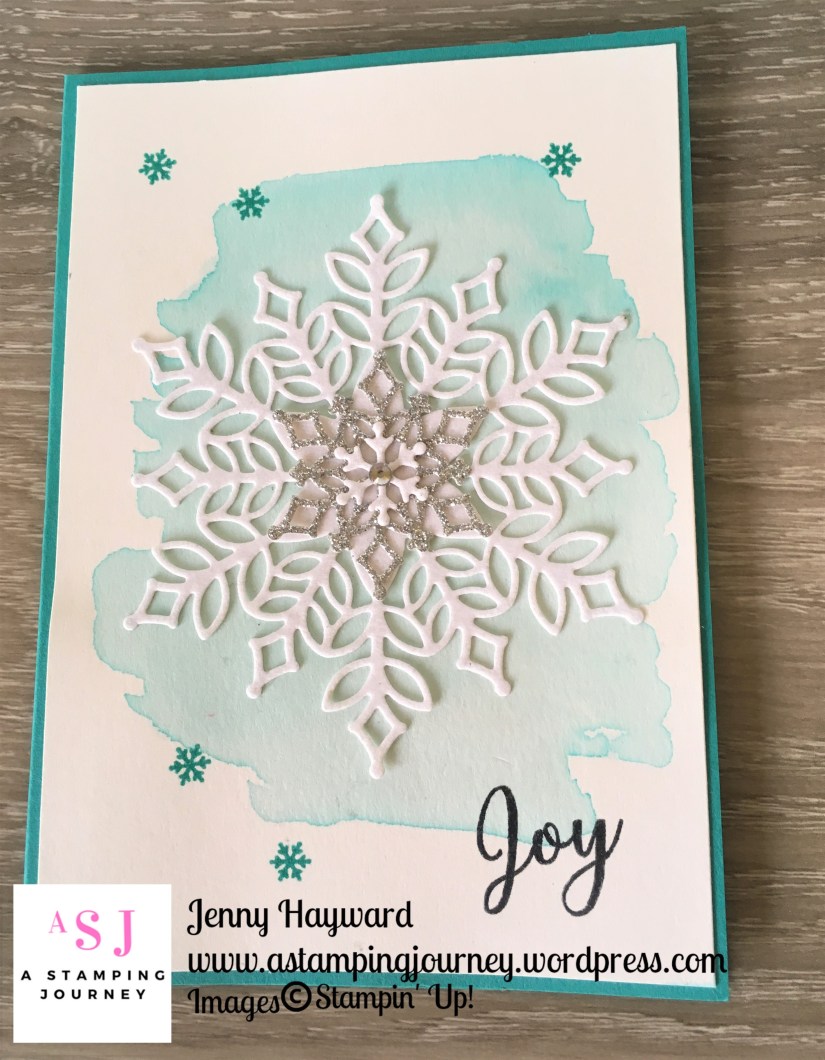
The large snowflake is cut from the White Velvet Paper. Have I told you how soft and furry it is?  So nice and adds such a lovely texture to your projects.  I have also used the Silver Glimmer Paper and the tiny snowflake is from the White Velvet Paper too.

Do you want to see how I have done the Watercolour Wash background?  Since it is a Wednesday and time for Wednesday’s WOW! #45 I thought I would combine the two.  How about that. 🙂

You can see the video below. (NB: If you receive the blog updates by email and the video hasn’t shown then click on the title at the top to go to the blog post and watch it there). 

I am just starting out more with videos.  They are not easy let me say … 🙂 I would love to know your thoughts and if you have any suggestions to improve them, please drop a comment and let me know.

How are you liking the Snowflake Showcase products?  Have you bought any yet?

Just a reminder what these products are as you couldn’t see them well in the video.

If you are in Australia you can order these now from me.  Remember these are only available in November AND only while supplies last, so don’t delay with them.

Order in store -> HERE.  Please use the Host Code: KGQKCBA4

OR email me to arrange an order.

Thanks for watching.  Now go and try that wash technique.

Jenny

cards, Catalogues, Stampin' Up!, Techniques

WEDNESDAY’S WOW! #42 – COLOURING – WHAT PAPER, WHAT INK??

Wednesday’s come around so quickly but I love sharing little tips and videos with you on Wednesday’s.  Do you like them?

Today’s Wednesday’s WOW! #42 is what I hope will be a helpful little chart.  Which Ink and which paper to use when you are colouring.  I often get asked this question in classes so maybe you are wondering too.

I think the chart is self-explanatory but it goes through different colouring mediums – the Aquapainter or Blender Pens with the Inkpads,  Watercolour Pencils and Stampin’ Blends and which ink and paper to use with these.  It really makes a difference to the finished result with what you use.  Next time you come to watercolour I hope that you find this useful to refer to.

Hope that is helpful.

Jenny

cards, Techniques, Videos

WEDNESDAY’S WOW! #41 – USING THE SHIMMER PAINT – PART 1!

Today for Wednesday’s WOW! #41 I have a super quick tip for you when you are using the Shimmer Paint.  At this stage I am not showing you particular techniques necessarily.  That will come at a later date.  I just wanted to show you a quick easy way of using it.  Maybe you know it already. 🙂

You will see.  Here is the video below. It is only a very quick one I took as I was making the card so apologies for the quality.

Did you find that helpful??

I will show you the finished card tomorrow so be sure to stop by.

Jenny

Blog Hops, cards, Techniques, Tutorials

STAMPIN’ DREAMS BLOG HOP – FAVOURITE TECHNIQUE – SALT BACKGROUND!

I am joining in with the Stampin’ Dreams Blog Hop this month and we are sharing Favourite Techniques.  I always love to try different techniques.  Before we start you might be starting here or you have just come from Jenny Hall’s Blog -> HERE.

As for my Favourite Technique.  That’s a hard one to choose one.  What I am sharing though today is a technique that I have wanted to try for a very long time so it was a good chance to play with it to create some, hopefully fun cards with you.

The technique I am sharing with you is the Salt Background Technique.  Have you tried this before?

Using the salt on a wet background creates a type of “bleaching” of dots on your card as the card dries.  I will show you the cards and then show you how to create your own.  (You might want to continue to Blog Hop and stop by again later to take in all the details).

HOW TO CREATE YOUR OWN SALT BACKGROUND

For this technique you can use any type of salt but the result will differ.  The larger Rock Salt will result in larger “bleached” patterns (like the first example above) whereas the regular fine Table Salt will give a speckled type of “bleached” pattern, (like the 2nd example).

As you need to add water to your card you will need a good quality card to take the water. Either the Stampin’ Up! Watercolour Paper or the Shimmer Paper works very well.

NB: The steps below are for the first card sample above.

1. Wash over your card with the Aquapainter and water.  Add drops of chosen reinker colour(s) over your card.

For this sample below I added drops of Pumpkin Pie Reinker first over different areas on the card.

I added other colours too.  Daffodil Delight and Bermuda Bay.

2. Using the Aquapainter wash over the colours to spread it over the card.  Try not to mix the colours too much though. It does look a bit messy.  The colours lighten as they dry too. Each time you do it, it will work out different.  You can just use one colour reinker too as I did in the Night of Navy card.

While the card is still wet sprinkle over your salt.  I forgot to take a photo of this sample with the salt on it but I will show a different card below.

3.  Allow the card to dry. You could use the Heat Tool but I found it just spread the colours more which I didn’t want so leave the card for several hours or even overnight.

Once it is dried lightly brush off the salt.  You will see little “bleached” spots where the salt was.  It is a great effect and you can use that directly on your cards.

Here is a different sample in Rich Razzleberry showing the salt over the card.  I will share the finished card for this one at a later time.  For these cards I used the Rock Salt which are larger grains of salt.

For this Night Of Navy one below I used the finer Table Salt. Which I didn’t take a photo of at the time. I did add a lot more salt to the card too. I like this effect how it turned out.

I will say my hands were very inky by the time I finished with all the different colours.  But that’s part of the fun. 🙂

Thanks for stopping by.  Now you are off on the next blog and can see what technique they have to share with you today.

Click on the ‘NEXT’ image below to head to Narelle’s Blog.

Jenny

cards, Techniques, Tutorials

WEDNESDAY’S WOW! #40 – DOUBLE EMBOSSING YOUR CARD!

Wednesday’s WOW! #40 today.  Who knew there were so many tips and tricks to share with you.

Today’s WOW! is something I came across in my blog travels recently.  I read it on Pinterest but didn’t save the idea.  Only stored it in my head as something to try so it is not my original idea but I think it is certainly worthwhile sharing with you.

It’s a cool technique that really adds to your embossing on your cards.  It is double embossing, using 2 Embossing Folders to create great texture on your card.

See it here.

For this technique it works with one Embossing Folder that is a little more finer detail.  The Subtle Embossing Folder or even the Softly Falling one works well.  The second Embossing Folder needs to have a little more open design.  The Tufted Embossing Folder works great.

The first example above I used the Subtle Embossing Folder and the Petal Burst Embossing Folder.

The second example I used the Subtle Embossing Folder and the Tufted Embossing Folder.

This one below I tried 2 different folders.

Softly Falling Embossing Folder with the Petal Bust Folder on the left and the Swirls and Curls Embossing Folder.

THE HOW-TO

For this to work well firstly emboss the card with the finer detail one, then emboss the card with your second more open design folder.  If you emboss it the other way around you will find that the embossing with the more open design is squashed when you emboss it with the finer one.

Here are the finished cards with the 2 samples.

Hope you find this helpful and try it on your projects.

Jenny


Catalogues, Stampin' Up!

WEDNESDAY’S WOW! #39 – TAKE YOUR PICK TOOL!

It’s Wednesday! And we have another edition of Wednesday’s WOW! #39 for you today I thought it would be good to check out this new little gadget in the catalogue – The Take your Pick Tool.  I keep calling it the Pick It tool because I can never remember the name. LOL!

This neat little Multi-purpose pick-up tool makes picking up sequins and other smaller embellishments so much easier.  It contains putty in the end and this is used to pick up the item and place it on your project.  BUT, there is more to this tool.  It has some handy-dandy little tool attachments to use in other areas of your creating.  Check out the video to see.

Pretty clever hey!  What about those neat little attachments?  You can get replacement putty too when you are out of it.

This Take Your Pick tool can be found on p30 of the Holiday catalogue OR you can see it in my store now -> HERE – and throw one in with your next order.

If you choose to order through me this week please use the HOST CODE: ME4VSE3W     I appreciate your orders and I usually send a little Thanks out your way so please be sure not to mark your details as ‘anonymous’ to the order otherwise I won’t know where to send a gift to you. 

Thanks for visiting me today,

Jenny

cards, Stampin' Up!, Techniques

ACCENTED BLOOMS WITH WATERCOLOUR PENCILS!

Yesterday I showed you a card with the Accented Blooms set with the flower image coloured with the Stampin’ Blends.  Pop back a post if you missed that one.  Today I have another one similar but this time I have coloured it with the Watercolour Pencils and gone over it lightly with the Aquapainter to blend the colours.

This time the image was stamped with Stazon on to Shimmery White card.  This card is thicker than regular Whisper White and will take the water.  There is only a very little amount of water used with this so you could possibly use the Thick Whisper White but I rather keep it to the Shimmery White.  Also, it’s nice getting the little sparkle from the paper.  Once the image was dry from watercolouring it was adhered to a piece of Rich Razzleberry card that had been embossed with the Layered Leaves Embossing Folder.  Then this was adhered to the Thick Whisper White card base.

The sentiment was stamped in Pumpkin Pie and punched out with the Tailored Tag Punch then raised up with Dimensionals.

What do you think of this version?  I will show you some completely different cards with this set next.

Thanks for stopping by today.

Jenny

cards, Stampin' Up!, Techniques, Videos

WEDNESDAY’S WOW #37 – COLOURING WITH THE STAMPIN’ BLENDS!

Today’s Wednesday’s WOW! #37 we are looking at some tips with colouring with the Stampin’ Blends.  I realise I talk a lot about colouring, and sharing videos and tips on colouring.  I hope you are not sick of this.  I think it is good considering there are so many stamp sets in the Catalogue that require colouring.  Plus, I think personally I need to get all the help I can with colouring because I am not great at it and I am always searching out for help. 🙂

I discovered you can create a great watercolour wash effect using the Stampin’ Blends shown in the card below.  I love the effect of the contrasting colours.  The images really “POP” when you heat emboss the image with white Embossing Powder after you colour the card.  This card uses the set You’re Inspiring but you could use any images.

Check out how to create this background effect in the video below but also in this video you can see how you can blend different coloured Stampin’ Blends together when colouring images.


What do you think? Why don’t you give this effect a try.  I think I will have to give it a try for sure.

Thanks for stopping by,

Jenny

cards, Stampin' Up!, Techniques, Videos

WEDNESDAY’S WOW! #36 – WATERCOLOUR LIFTING!

I just discovered a fun new technique and I thought I would share it with you for this Wednesday’s WOW! Can you believe we are up to #36??  There are so many exciting techniques and projects to share with you each week.

This week I wanted to share with you the Watercolour Lift Technique. 

Here is a card from Stampin’ Up! to show you the technique. How pretty is it?

Basically, it is washing your Shimmer White cardstock with a wash of ink using the Aquapainter.  Let it dry. Then stamp your images in Versamark over the area.  Solid images work better.  Then clear emboss them.  After that, wash over the card with a clean Aquapainter to lift some of the ink.  It lightens it revealing the images.  How cool!

I have a video to show you how it is done.

What do you think?  Now I am going to have to go off and try this ASAP.  Share your samples with me too I would love to see them.

Thanks for visiting me today for another episode of Wednesday’s WOW! 

Jenny

cards, Catalogues, Challenges, Tutorials

ACCENTED BLOOMS FOR #CI38!

I had a little time yesterday to play along with the Colour Inkspirations Challenge for this week.

#CI38 colours were Powder Pink, Berry Burst, Gray Granite, Whisper White and Basic Black.

I had been using the Accented Blooms stamp set the last few days, which I will show you those cards later on. Since that set was out I thought I would use that.  I think the soft muted colours would work well with a little watercolouring on flowers.

Here is my card.

I came to the conclusion this week that I am not a fan of colouring.  So to colour this for the challenge was a little surprise.  But I think a little freestyle watercolouring can work well.  It doesn’t matter if you go out of the lines. 🙂

I used the Aquapainter and Inkpads to watercolour this. TIP: To watercolour any image I suggest several washes of colour if you want to build up the colour. Then allowing it to dry in between.  For this card I lightly washed sections with the Powder Pink and then allowed it to dry.  It only takes a few minutes.  Wash over the areas with the Gray Granite.  Then wash over again in the areas with the Powder Pink.  I did that 3 times with the Powder Pink as it is such a pale colour.  When it was all dry I washed over the centres of the flowers with the Berry Burst ink.  I allowed it to dry before washing again with the Berry Burst.  It is a time consuming process but I think worth it.

The lovely delicate edge is cut from the Delicate Lace Edgelits.

The sentiment is stamped in Black and punched with the Tailor Tag Punch.  I punched another piece from Berry Burst card.  Cut that piece in half horizontally then could layer it underneath the stamped piece so you see the little pink edge peeking out.  I finished with some Artisan Pearls and some Silver Thread wrapped around a few times.

Now to get this in to the Facebook group before the time is up tonight.  You can head over to the group -> HERE and join in on the challenges.  It’s a great way to extend your creativity.

Thanks for stopping by,

Jenny