Blog Hops, cards, Catalogues, Stampin' Up!

ESAD MAY 2020 – SEE YA LATER FAVOURITES BLOG HOP!


Welcome to the ESAD See Ya Later Favourites Blog Hop. You have come from HERE with the gorgeous creations of Bronwyn, or you are starting on my Blog.

Our Blog Hop today is to feature one of our favourites products. I have chosen the Love What You Do Stamp Set.

I used this set a lot when it first came out and I have to say it got pushed aside with all the other lovelies arriving. When I pulled my retiring products off the shelf this week this one made me sad. So I thought it was time to ink it up again.

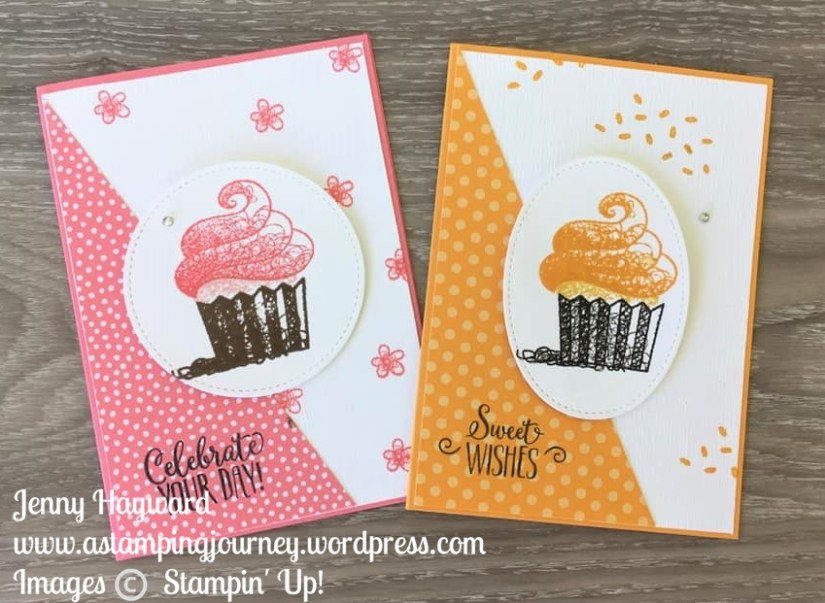
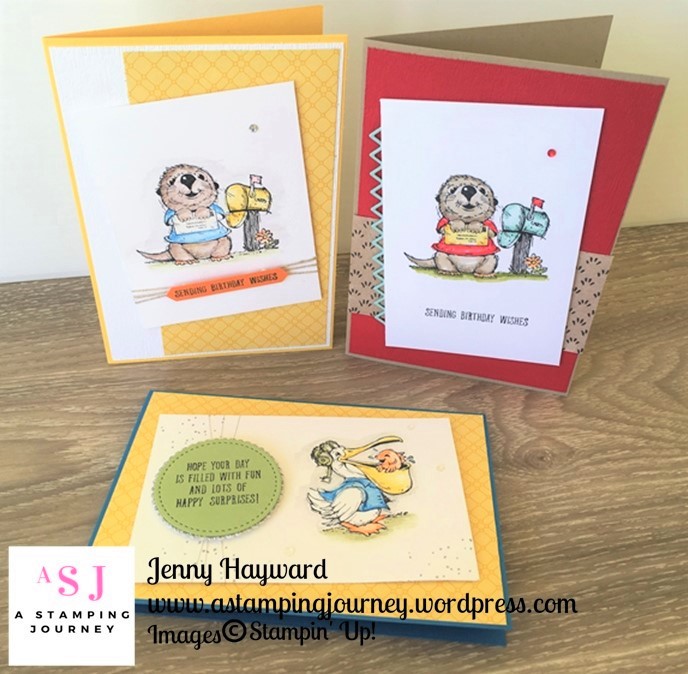
I have made a set of 3 simple cards for you today.

We have 3 different colours – Flirty Flamingo, Highland Heather and Granny Apple Green/Old Olive.

On the white card mat on each one I embossed the card with Subtle Embossing Folder.

On the Flirty Flamingo card above the flowers were coloured with the Light and Dark Flirty Flamingo Stampin’ Blends.

The Highland Heather card above was stamped with the Highland Heather inkpad and using the “splodge” stamp in the set.

For this card above I stamped the leaves in Old Olive and Granny Apple Green.

Now you can continue on your Way. You are off to Mandy’s blog now. Just click on the NEXT arrow below or click on the list.

If you get lost you can follow along with the list below.

Blog participant list

  1. Kelly Kent
  2. Nicole Wilson
  3. Denise Buetler
  4. Sue Vine
  5. Melissa Gifford
  6. Mae Collins
  7. Sharni Haines
  8. Lou Kitzelman
  9. Rebecca Scurr
  10. Libby Dyson
  11. Narelle Fasulo
  12. Cathy Pinchbeck
  13. Lynsey McCord
  14. Bronwyn Eastley
  15. Jenny Hayward
  16. Mandy Depiazzi

Happy Hopping,

Jenny

cards, Catalogues

BEAUTIFUL MOMENTS WEEK – DAY 5 – PAPER PIECED GIRLS!

I have been sharing projects all this week featuring the Beautiful Moments stamp set.  Today I have 2 classes using this set.  I thought for Day 5 of the Showcase I would share with you one of the cards we will be making.

This card was inspired by Su Mohr.  I changed it a little.  I liked the idea that you don’t have to colour it with Blends or inks or other mediums but by using patterned paper you can add colour to the images.  This Technique is known as Paper Piecing.

I have used the Best Dressed Designer Series Paper.  To create this first stamp your image in Black Memento on to white card.  This card was cut with the Nature’s Thoughts Dies.  I love this dotted pattern around the edge.

After diecutting the piece then stamp your images on your chosen pieces of Designer Series Paper.  Cut around the outside of the lines on these images.  Then adhere these to the stamped image.  It’s a bit like playing with Paper dolls when we were younger.  Do you remember that? That was such fun.

For the rest of the card I stamped the palm tree in Old Olive ink on to Crumb Cake and then embossed the card with the Subtle Embossing Folder. This was adhered to a Thick Whisper White card base.

Before adhering the stamped white card I looped around some Linen Thread.  Then the piece was raised up off the card with Dimensionals.

For the sentiment it was stamped on Purple Posy card and then cut with a small Stitched Rectangles Die.  The left hand end was trimmed to fit on to the card but it makes a different look for the sentiment block too. The card was finished with a Pearl.

I hope you have liked the projects this week.  It has been fun creating with this sweet set.

I do hope you add it to your collection.  You can grab it in store now -> HERE.

Thanks for stopping by today and taking the time to visit my corner of blog land,

Happy Stamping,

Jenny

cards, Catalogues

GORGEOUS GRAPE WITH STAMPIN’ UP! TO A WILD ROSE!

I have another card for you with the To A Wild Rose set.  Yesterday was Calypso Coral and Petal Pink.  Today it is Gorgeous Grape and Highland Heather.

Stampin' Up! To A Wild Rose

This time I stamped the outline of the rose in Gorgeous Grape,  The less detailed centre in Gorgeous Grape and the filler in the rose in Highland Heather.  I like this version.

The leaves were stamped in Granny Apple Green for the outline and Pear Pizzazz for the centre.  I like you that don’t have to watercolour these.

If you see the white background I first stamped the sentiment on the white card and then ran it through your diecut machine with the Subtle Embossing Folder.  You can then add the little decorative strip on the side which was cut with the fancy border die in the Wild Rose Dies.

I do love this set.  Have you got this one in your collection yet??

In Australia? Order it -> HERE.  Receive a pack of the Noble Peacock Rhinestones as your gift this week for ordering.  Please use the Host Code: HCCFFCSU

Qualifying orders (over $78) will also receive the 12 project Tutorial Bundle.  This is emailed out after your order is received.

Thanks for your order.

Thanks for visiting me today.  Enjoy your day whatever corner of the world you are from.

Jenny

cards, Catalogues, Stampin' Up!

CALYPSO CORAL ROSE WITH TO A WILD ROSE!

I have shared a few projects with the To A Wild Rose Bundle recently.  I have another one for you.  This one was actually the first card I made with this set.

Stampin' Up! To A Wild Rose

I played around with a few colour combinations with it and also working out how the 3 flower stamps work together.  I settled on this combination in the end. I used Calypso Coral for the outline image, Calypso Coral for the less detailed flower and Petal Pink for the full inside flower. Then simply cut the flower out with the Wild Rose Dies.

The leaves are stamped with Granny Apple Green for the outline and Pear Pizzazz for the inside of the leaf.

Notice on the whisper white card mat, I embossed the card with the Subtle Embossing Folder just to give it a little texture. Then this was adhered to the Calypso Coral base.  The sentiment was stamped in Memento and cut with the gorgeous frame from the Wild Rose Dies. I just think  this sentiment is so beautiful. It is so special to have a true friend.  One who is there for you any time and cares for you with the good, the bad and the ugly.  I am blessed with a number of special, true friends.

Back to finishing the card, all the pieces were raised up off the card and of course a Pearl to finish.

Thanks for visiting me today. I have another version I will show you next post so be sure to stop by.

Jenny


In Australia? Shop in store now -> HERE for your Stampin’ Up! supplies.  Receive a 12 project Tutorial Bundle as a Thank You. (not all the projects are with the To A Wild Rose) – and also a pack of Noble Peacock Rhinestones.  Got to love that bling!

Please use the Host Code: HCCFFCSU

This week since I will be away I have a special gift for you too.  Receive a pack of Noble Peacock Rhinestones Free as a Thanks.

Bonus Days are still on and ends soon at the end of the month.  Receive a $9 voucher to use in August when you order over $90 in July.

Do you have a LONG wish list? Over $170?  Why not join the Stampin’ Up! family.  Receive $280 of your choice of products for only $169 – and no shipping costs.  You can leave Stampin’ Up! anytime. 


cards, Catalogues, Stampin' Up!, Techniques

SUNSET WITH THE 2019 STAMPIN’ UP! INCOLORS!

Ok, maybe this is a bit of a loose title but hey sometimes it’s hard to be creative with blogging. 🙂

I have been playing with the new 2019 Incolors lately.  I will say when I first saw them I was a bit blah! BUT now I have been playing with them a bit I am really warming to them.  I will talk to you more about them in a later post but I thought we would start with this card today.  I wanted to use all the Incolors together.

I thought this reminded me of a sunset over the ocean.  That’s what it is like where I live anyway.  We have Pretty Peacock at the bottom for the grass under the lighthouse, Seaside Spray for the water, Purple Posy as the sky is changing, a little more pink with Rococo Rose and the orange with the Terracotta Tile.  Can you see it now??

Here is my inspiration.  This is our local lighthouse in Wollongong.  The sky wasn’t that orange this night unfortunately but it can get quite intense.  You just have to imagine it.

To create the card I cut equal strips of the Incolors then adhered them to a piece of Whisper White card.  This was a lot easier to line them up.  Also since I was embossing it with the Subtle Embossing Folder it made it easier to run through the machine.

I used the new Sail Away stamp set which is a really cool one. Watch out for more with this.

Stay tuned for more creating with the Incolors too.  Have a great day,

Jenny


cards, Catalogues, Sale-A-Bration, Stampin' Up!

FAVOURITES FOR SALE-A-BRATION 2019!

I have loved many of the products from Sale-A-Bration.  I can’t believe that it is coming to an end.  I have made lots of projects.  Some you don’t get to see here unless you come to classes or they are for the exclusive Tutorial Projects.

I thought I would share some of my favourites though from the past 3 months.  You can click on the link on the project to take you to the original post with more details on the project.

MANGO MELODY CUPCAKE

I shared this card in the previous post too but see this original post HERE.

BY THE BAY 

This was a fun Smooshing technique.  See the post HERE.

This By The Bay was stamped on the Grapefruit Grove Foil Sheets.  See the post HERE.

SO HOPPY TOGETHER

This is a bright, cheery froggy card.  I called it a Half-Fold card but it’s not quite half. You can see it in this post HERE.

BOTANICAL BUTTERFLIES PAPER

We had a week of lots of butterflies just last week.  I shared lots of projects.  You can go back over the posts to see them all.  This was ONE of my favourites.  You can see it HERE.

What has been your favourite?  I would be interested to know.

Hope you have enjoyed this Sale-A-Bration.  You only have ONE DAY LEFT. 

Have you been contemplating?  There is not much time to contemplate any longer.  Shop and grab your Free Sale-A-Bration choice whether it be frogs, butterflies or flowers. Or maybe even one of the other choices.  With orders over $90 AUS you can receive your choice.

OR …

Maybe you have been contemplating joining.  What is your delay? Scared of signing your life away? maybe worried of not making your minimums?  Really, you can drop anytime.  What do you get? Apart from great value when you join with getting up to $146 of free products. You get discounts on all your later purchase.  Best of all you get to be with ME in my team.  OK, Maybe I don’t want to put you off with that.  But it’s lots of fun with lots of special friends.

See it all HERE but don’t delay. If you are in Australia come and join my JEN’s INK team.

Jenny

cards, Catalogues, Sale-A-Bration

A FLIRTY CUPCAKE!

A couple of months ago I shared a project with the Hello Cupcake Sale-A-Bration set. You can see that post -> HERE. You can see it below too. It was an angled piece of the Mango Melody from the Brights paper stack.   BUT I have been amazed how popular it has been on Pinterest especially since I realised I hadn’t pinned it yet!

This is the Mango Melody one.

I loved the card too and since I had some more angled scraps I made up another version.  This time in Flirty Flamingo.  The angle pieces were left over from when I made a banner.

This version is just a little different in that I cut the cupcake from a Stitched Circle rather than the oval and stamped the flowers in the background white card before I embossed it with the Subtle Embossing Folder although that is a little hard to see.

These are lovely summery colours don’t you think?

One 2 days left to get your Hello Cupcake set during Sale-A-Bration.  You don’t want to miss out on them.  You can purchase the Call Me Cupcake Framelits also for $47 AUS.

Grab them -> HERE in my store. When your order is over $90 then choose the Hello Cupcake set or any of the other Sale-A-Bration choices.

Don’t forget the Host Code: JQGFKFT9

You will also receive the Free Tutorial Bundle of 12 exclusive projects for orders over $78.  These are all fantastic projects that I think you will love.

Jenny

cards, Classes, Stampin' Up!

BIRTHDAY CHEER WITH THE STAMPIN’ BLENDS!

I have another card for you using the Birthday Cheer Bundle.  This was another card we made at class last week.

Some tips to make your own.

Firstly, cut the White card piece with the Rectangle Stitched Framelits die before you stamp. Then you know where to stamp your images.

The images need to be stamped in Memento Black ink so it can be coloured with the Stampin’ Blends.  The smaller sentiment is stamped on  a strip of Mint Macaron.  Rather than flag the ends of the strip or punch it with a Banner punch or a die I decided to keep it straight and wrap some of the Nature’s Twine around it.

On the Rich Razzleberry card mat first stamp your images in Razzleberry ink on the card and then run it through the Big Shot with the Subtle Embossing Folder.  It adds just a little texture to the card.  I really love this folder for creating the light texture. I think it gets missed in the catalogue.

The Birthday Cheer Bundle and the Subtle Embossing Folder are now available in my store now -> HERE.  Please use the Host Code: Q6XB6QR6  OR you can contact me directly.

Thanks for your order.  I appreciate each and every one of them.  Be sure not to mark your order anonymous or I won’t be able to send you out  your small gift.

Thanks for visiting.  I am off this weekend to the huge Craft Alive show. I am holding a booth there with 3 other wonderful demonstrator friends. It has been months  and months of planning and work.  I am exhausted already to be honest but I hope it goes well.

I will tell you more about it next week.

Have a great weekend,

Jenny


cards, Catalogues

POSTCARDS PALS TRIO!

I have been wanting to share these cards with you for a few weeks.  I coloured them a couple of months ago and posted the images on Instagram and Facebook but only recently assembled them on to a card.  These cards use the very cute Postcard Pals set.  I have to say I was a little hesitant getting the stamp set as I am not very good at colouring.  I am working on it.  I saw such cute cards with them though and it may have just slipped in with an order one time. 😉

Here are the 3 cards.  My daughter did point out to me that I hadn’t coloured the Platypus dude.  I will do him shortly.  I can’t miss him out. 🙂

Here they are close-up for you.

For this one below I have stamped the image in Black Stazon on Shimmery White card and coloured it with the Watercolour Pencils.  The base card is Crushed Curry and the paper is from the Country Lane Designer Series Paper.  I went around lightly in Basic Gray pencil and washed it over to add dimension to the image.

This next card is stamped on to Thick Whisper White card and coloured with the Stampin’ Blends.  Isn’t this beaver such a happy chappy.  The Real Red card is embossed with the Subtle Embossing Folder and a strip of paper from the Share What You Love Specialty Designer Series Paper.  The card needed something else.  Rather than a card mat I thought a decorative strip.  I pulled out the Delicate Lace Edgelits and cut the “triangular” edge one from Pool Party card.

Now we have a happy Pelican.  This one was stamped on Shimmery White and coloured with Watercolour Pencils.  The sentiment was stamped on Pear Pizzazz and cut with the Stitched Shaped Framelits.  I also cut a scalloped circle from the Layering Circles Framelits from Silver Glimmer Paper to adhere underneath this one.  The white card was a bit plain so I added some “spots” from the Farmhouse Christmas set that I had out on my desk still.

I hope you like these trio.  They make me smile whenever I look at them.

Have a happy day,

Jenny