cards, Catalogues, Stampin' Up!

COLOR ME HAPPY WITH THE BLENDS!

A bonus of being a demonstrator is that we get to order the products way before customers can.  It gives us much more time to play with them.  When I first got my Stampin’ Blends a couple of weeks ago I also ordered this new set Color Me Happy.  It’s such a sweet set.  I shared these cards on Instagram and Facebook but hadn’t got to share them with you as yet.  So it seems a good time now to show you what I have been doing.

What do you think of this Color Me Happy Set.  Very cute??  This set is $47 W or $33 C.

There is also the Color Me Happy Card Kit. This kit includes card stock and all embellishments to make 16 cards. Cost is $41 which is not bad for $2.60 per card.  You would need to buy the stamp set separately to use with this set. 


TO ORDER:

Whether you are wanting to order the Blends, the stamps or any other products you can shop now.

Order directly by contacting me

OR

Order Online HERE.  Please use the Host Code: MX3UA64N

Thank you. 🙂

Jenny


Catalogues, Stampin' Up!, Techniques, Videos

THE STAMPIN’ BLENDS ARE HERE!! WATCH THEM NOW! WHY NOT JOIN THE BLENDS CLUB TOO!

The day has finally arrived.  The Stampin’ Blends are here now for you to order.  I think you will love them.  They are so easy to use and to blend.  You will feel like an artist!!

Just a few features of them:

  • There are 12 colours of Markers available.
  • In each colour there are 2 colour shades – a Dark and a Light colour.  They are available as single pens or as a Combo pack with the 2 colour shades.
  • Colours available are Bermuda Bay, Calypso Coral, Cherry Cobbler, Crumb Cake, Daffodil Delight, Night of Navy, Old Olive, Pink Pirouette, Pool Party, Pumpkin Pie, Rich Razzleberry, Smoky Slate.
  • In addition there is a Bronze marker, Ivory marker and also the Color Lifter.
  • Each marker has a Brush tip end and a Bullet tip end.  These are marked on the outside of the barrel.
  • These markers are not refillable.
  • Stamp the images you intend to colour with Memento Black Ink.

For an individual marker they are $7.75 AUS.  For the Combo pack they are $15.50 AUS.

The Collection of 26 colours – Dark and Light of the 12 colours, plus the Bronze and Ivory plus the Color Lifter is $209.75 AUS.  **This month receive 2 Clear Cases with inserts to hold them FREE to store your markers in when you buy the full Collection. (see the cases down below).

Do you want to see how they work??  This is very timely for a Wednesday and so it is this week’s WATCH IT WEDNESDAY #9. Let’s have a close up look at the Stampin’ Blends.

NB: If you get this post via email updates and the video is not showing, please head to my blog and view it there.

So what do you think?  Can you wait to get these?? They are available in my store now -> HERE  Please use the Host Code this week: EJJVSDME

OR you can order them by contacting me directly.

OR Why not join my BLENDS CLUB!

Here are the details.

Each month for 3 months receive 4 Combo Colour Markers and 1 Single Marker (either the Ivory, Bronze, or Color Lifter).

**Receive 2 Clear Cases with inserts in to hold them Free the first month to store your Markers.             

Total Includes Shipping and Handling      $73.25 (Local)  or  $75.70 (Non-Local)

The Clear Cases include and insert and front cover to store your Markers securely.


Jenny


3D projects, Blog Hops, cards, Stampin' Up!, Techniques, Tutorials

STAMPIN’ DREAMS BLOG HOP – BLACK, WHITE AND 1 OTHER COLOUR!

Today I am joining in with the Stampin’ Dreams Blog Hop.  You might have just come from Jenny Hall’s blog HERE.  This month’s theme for the Stampin’ Dreams Blog Hop is Black, White + One.  Any colour you choose.  There are so many options really.  What to choose??  I really wasn’t sure what to go with until I sat down and started making the card.  My +1 for this Blog Hop is BERRY BURST!  Such a fun colour and I think it really “pops” when added to black.

Here is the card I created.  It’s a Triangle Pocket card using the Merry Little Christmas Designer Series Paper.  Don’t think of this paper just for Christmas!

I found the original card inspiration HERE.  I changed the measurements a bit and also how I made it so I will add the tutorial below for you.

You can continue on your Blog Hop now and then come back to see how you make themNow head off to Sharon’s blog -> HERE. 

———————–

CREATE YOUR OWN TRIANGLE POCKET CARD

You will need:

Base card – Basic Black 13cm x 10.5cm (5 1/8″ x 4 1/8″)

Inside card (I used as the inside lining) – Basic Black 12cm x 10cm ( 4 3/4″ x 4″)

Whisper White card  12cm x 10cm (4 3/4″ x 4″)

2 x Designer Series paper (DSP) squares 10cm x 10cm (4″ x 4″)

scrap card for embellishing.

1. Take your 2 Designer Series Paper squares.

2. Turn the papers so that the pattern that you want on the outside is faced down.

On each square fold the top edge in to 2 triangles.  Be sure that both triangles on the piece match.  I found it helped to just hold the mid point on the edge of the square with your finger or the bone folder as I folded it in. Fold up the straight edge over the triangles.  I actually placed the paper on my paper trimmer and scored a straight line just under the triangles to give a crisper fold.


Open up the straight edge fold again. Place adhesive behind the triangles to adhere them down.

3. Place adhesive on the back of the patterned paper along the straight edge and adhere them down to the back of your card lining piece. (for this I used Black card).  I added this step as I liked to hide the edge of the triangles to make it look neater especially as it is a colour I didn’t want showing.

4. Place adhesive on the back of the card lining piece and adhere that to your card base with the triangles sticking out.

5. The triangle pieces don’t meet in the middle but that’s OK.  You can embellish the front.  I added some diecut circles (one in black and one in vellum) and a diecut dragonfly from the Detailed Dragonfly Thinlits.  On the dragonfly I sponged in places with the Berry Burst Ink.  I also went over just the “friend” word from the Dragonfly Dreams set with a Berry Burst Marker and it was then cut with the smallest of the Lots of Labels Framelits. 

6. On the inside white card insert I stamped the sentiment and the spots from the Dragonfly Dreams in Berry Burst and added just a little sponging around the edge.

What do you think?  I think I want to make more of them that’s for sure. 🙂

Jenny


Stampin' Up!, Techniques, Videos

WATCH IT WEDNESDAY #8 – WHO KNEW YOU COULD EMBOSS WITH WATER!

I have been heat embossing today.   I always love heat embossing.  It’s what first drew me in to stamping.  I love the magic as the powder melts and sets.

I came across this video today from Stampin’ Up!.  I was so surprised that you can actually use water when you heat emboss.  It looks so cool! You will have to check the video out.  There are some other cool tips in the video too so be sure to watch it.

WATCH IT WEDNESDAY #8 – HEAT EMBOSSING WITH A DIFFERENCE.

Now when I spill water on my card I can just heat emboss them right!   🙂 🙂 🙂

I hope you enjoyed these tips. I thought they were so cool and I just had to share them with you.

Thanks for stopping by.

Why not drop a comment and tell me what you think of these videos I am sharing and maybe some suggestions of what you would like to see.

Have a great day,

Jenny

cards, Catalogues, Classes, Stampin' Up!

CUT THAT PAPER ON AN ANGLE!

Do you hoard that precious paper away?  Occasionally pulling it out and admiring it and stroking it.  Maybe just maybe you might cut it.  Oh boy that’s tough isn’t it!

This week it’s all about paper.  We are going to cut that paper that you have piling up.  You know if you use it then you can go and buy more of the pretty stuff. 🙂

Today’s card is getting that angle on your paper.  I normally don’t do angles.  They don’t sit well with me.  Everything has to sit straight and even.  I am trying to let go a bit  more and throw caution to the wind – and angle things up.

So let’s check out this gorgeous paper Whole Lot of Lovely Designer Series Paper and cut it on an angle.  I did give a sneak of these cards last week but I will tell you about them now.

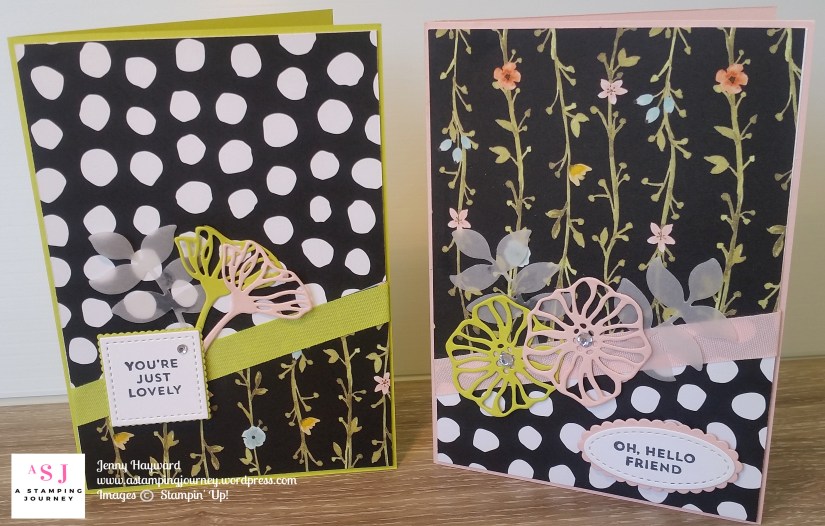
Whether you use this gorgeous paper or another of the gorgeous papers Stampin’ Up! has, the idea is the same.  You don’t need a lot of stamping with these cards as you can let the paper be the star.

Another great benefit to creating this type of card is that you get to make 2 cards at the one time.

TO CREATE YOUR ANGLE 

1. From your 12″x 12″ piece of Designer Series Paper you will cut a strip of paper.  Which way you cut will depend on which way the pattern lies on the paper but for the most part you will cut it vertically but just check first.  The width you cut will be just slightly smaller than your card base.  For metric you will cut your paper 10.1cm wide.  For the US I think your card base is slightly wider at 4 1/4″ x 5 1/2″. You just want a small margin around each side so cut your paper to this size, (4″ but just double check).

2. Then from this long strip of paper, cut 2 pieces at 14.4cm (approx. 5 1/4″).

3.  With these 2 pieces you have cut, flip one over and put them together.  You can cut them both at the same time which will mean you get the same angle making it so much easier.

4. To cut the pieces put them together and place them on your paper trimmer with the long side along the top and the left hand end at approximately the 3 cm mark (1 1/4″).  Tilt your paper to angle it slightly. The angle is really up to you.  When you are happy with the angle then cut the papers.

5.  You can now separate the papers.  You will have 2 large sections which will be for the top.  Take the 2 narrow bottom angled pieces and swap them over to mix them with the tops.

6. Assemble your cards as you like.  I have added a strip of ribbon with the gorgeous Lemon Lime Twist and the Powder Pink Finely Woven Ribbon.  I have then finished the cards with the sentiments from Oh! So Eclectic cut with the Stitched Shapes Framelits and the Ovals and Squares Framelits.  I also added some diecuts with the Eclectic Layers Thinlits.

—————————–

This gorgeous Whole Lot of Lovely DSP is one of the packs available this month for the Buy 3, Get One Free!  There are some beautiful prints in this pack.  Well really all of them. 🙂

It’s only a couple of weeks left for this promotion to get your free paper.


Stop by again and we will see some more fun ways of using that paper.

Jenny


cards, Christmas, Classes, Stampin' Up!

MERRY PATTERNS HALF FOLD CARD!

I have had a couple of great classes yesterday and today.  Lots of fun and chatter and creating.  We have a good time at class.  If you are local you will just have to come sometime.

These are the cards we made.  Creating an Eclipse Christmas card with Carols of Christmas, a sweet one with Brightly Lit and a fun Half-Fold card with Merry Patterns. Everyone loved them. 🙂

I don’t often show the “how-to” of my class cards on my blog but I wanted to show you this one.   I have seen a few Half Fold cards on Pinterest lately and wanted to try this card AND as we only have a couple of weeks left for the Merry Patterns I thought it would be good to give this an ink.

So for you to make your own here are the details.  Of course, you could substitute any stamps and paper.

CREATING A HALF FOLD CARD

1. Whether you are using the Metric or imperial measurements it doesn’t matter the idea is the same.  Take your standard base card (for this one I used Old Olive) and score at the half way mark on the long side.  (For metric the base card is 14.8cm x 21cm.  Score on the long side at 10.5).

2. On your score line cut down half way.  Then cut across on the front of the card base from where you finished your cut on the score line to the edge of the card.

3. The piece that you have cut off becomes your card mat for the front image.  Cut a piece of Whisper White just slightly smaller than the card mat. (For metric that measures 10.1cm x 7cm).

4. Cut a piece of Whisper White for the inside of your card just slightly smaller than the inside card base.

5. Stamp and Decorate your card as you like. The Designer Series Paper for this card is from the Merry Little Christmas pack.

I hope this makes sense.  Please ask if you are unsure.

Jenny

PS. Only 2 weeks left to get your Merry Patterns set with qualifying parties/orders of a minimum of $450.  Be sure to book your event soon or place your order so you can grab your set.

cards, Christmas, Techniques, Tutorials

CHRISTMAS PINES ECLIPSE CARD!

I have been playing with the Eclipse technique recently.  You can see one of them a couple of posts back I made for a colour challenge.  This one is a Christmas one using the Christmas Pines stamp set.

The base card is Cherry Cobbler and the card mat is Crumb Cake.  The pine leaves are stamped in Garden Green. The Gold Foil bow is cut from the Pretty Pines Thinlits.

Have you tried the Eclipse Technique yet.  SO easy but so effective.

Create the Eclipse Technique.

The Eclipse Technique is cutting the words or shapes directly from a stamped card piece and raising them off the card

1. Stamp your card with your chosen images.  You can use a piece of Designer Series paper (patterned paper) too as an alternative.

2. For this card I used the Large Letters Framelits to cut the word out of the white card.  You can use any dies though to cut other shapes from the stamped white card or paper mat.

3. Adhere the stamped white card mat or patterned paper piece directly on to your Crumb Cake card mat and then adhere both to the Cherry Cobbler card base.

4. Raise each letter up off the card in its place with Dimensionals.

NB: I have seen on some tutorials that the letters were cut several times from white card.  Then the cut letter was stacked up and adhered together and then the stamped letter was adhered on top of that stack.  I don’t think that is necessary.  Raising up the letter with Dimensionals is quite adequate.

————————-

Now you can go and create your own Eclipse card.

Thanks for looking today.   I hope your day is going OK??

Jenny 

Catalogues, Stampin' Up!, Videos

WATCH IT WEDNESDAY #7 – I’M EXCITED TO SHOW YOU THESE!

I have something exciting to share with you today for WATCH IT WEDNESDAY #7.  I was going to hold off for a couple of weeks before I shared it …but I can’t wait!!!

There is something new coming to Stampin’ Up! and Demonstrators can now buy them.  I received them yesterday and unpacked them.  So I had to take a video as I unveiled them.  So today we meet the Stampin’ Blends. 

In the video I said I used paper but it was actually Whisper White cardstock.  Just remember to use Memento Black ink when using these markers as they are alcohol based markers. Also, to have some scrap paper underneath your work as the ink does bleed through to the back but that’s ok.

I was very impressed with them when I played with them – and kind of excited if you could gather that. At the moment there is no official date for them to be available for customers.  So you will need to sit tight and wait.  I will let you know when I know.   As demonstrators we can order them until October 15th.  Just a tip:  If you are impatient to wait, then you can get them as part of your kit when you join the family until October 15.  Something to think about… Ask me for more info.

I hope you enjoyed this WATCH IT WEDNESDAY episode.  I have been playing around with them this afternoon so hopefully I will actually show you some finished  projects soon.

Have a great day.

Jenny


cards, Challenges, Techniques

ECLIPSE TOUCHES OF TEXTURE FOR CI18!

It’s another Colour Challenge at Colour INKspirations group –  Colour INKspirations #18

The colours this round are so pretty. Powder Pink, Basic Gray, Sahara Sand and Sweet Sugarplum.

So of course the card had to be pretty right?  I hope my card is anyway.

I have been playing around with the Eclipse Technique lately.  You might have seen that around your blog travels.  To do the Eclipse technique: You stamp over your white card mat (or you could use a piece of Designer Series Paper).  Then cut your letters or shapes out from the piece.  Once the card (or Paper) is adhered to your card mat, the letters are then adhered back on to your card mat raised up with Dimensionals giving a 3D look.

This is my card I created using the colours and using the set Touches of Texture.

The “Just For” is stamped in Basic Gray from the Work of Art stamp set.  Check the dragonfly.  I stamped it on Vellum and coloured it in on the back with markers. Then went over it with the Wink of Stella pen.

You still have time to have a play.  Head -> HERE to join the Facebook group if you are not already a member there.  Challenges are great to take part in.

EDITED TO ADD:  I was picked in the TOP 5 at Colour Inkspirations challenge for this card.  So that is very exciting! 🙂

Thanks for looking.  Have a great day,

Jenny


cards, Techniques, Tutorials

BUBBLES AND BALLOONS FOR A BIRTHDAY BOY!

I was asked by a friend to make a special birthday card for her 1 year old grandson.  The birthday theme was Red, White, and Blue and bubbles and balloons and if I could incorporate those.  Or at least either the balloons or the bubbles with the colours.  My mind started ticking over.  What to do???

So here is the card that I made.

What do you think??  

The colours were Real Red, Pacific Point and Whisper White.

The Balloons were stamped with the Balloon Celebration set and punched with the co-ordinating Balloon Punch. The number 1 is cut with the small letters alphabet dies which is now retired but they are a useful size when you need small numbers.  I added some Snail Adhesive behind  the balloons, then added a length of White Baker’s Twine.  The three strands were then adhered down near the bottom of the card and then the sentiment was added over it.

The sentiment was from the Lift Me Up set.  I went over the “Happy Birthday” with the black marker and then stamped it on to white card.  It was then cut with the Bunch of Banners Framelits.

For the bubbles effect I used the Bokeh Technique.  Have you tried that technique before?  It has been a while since I have done it.   You can find other samples HERE. with this technique. I thought I added a tutorial back then but hadn’t.  So I will add a quick one below.  There are a number of different tutorials on the internet but to be honest I find them messy.  I am so not a messy stamper.  Maybe occasionally a little inky techniques but usually I need quick and clean – and done!!

So here is a non-messy Bokeh Technique Tutorial for you.  Hopefully soon I will create a video to share with you.

Firstly, You need a piece of acetate the size of your card front and cut 3 circles of different sizes over the card.  This creates a mask for the sponging.

On a piece of Whisper White card the size of your card mat, (This piece was 10.1 cm x 14.4 cm) sponge your chosen ink colours randomly over the card.  For this I used Real Red and Pacific Point. Sometimes it can look pretty ordinary at this point but persevere.

Once your card is covered with ink then place your acetate template over the card.  Sponge Whisper White craft ink over the circles.  You will want to dab or pounce the white ink on DO NOT RUB THE INK. Move your acetate template, if you are using a smaller piece over the card to different places to sponge more circles on. If you like, overlap some circles and have some going off the edge of the card for a good effect.   Let the card dry before you finish off the card.

Thanks for visiting me.  I love that you stop by.  I see lots of people stop by from all over the world so don’t be shy.  Do say HI. 🙂

Jenny