cards, Challenges, Personal Ramblings, Techniques

BUTTERFLY FOR FRESHLY MADE SKETCHES #257

Today I indulged and made a card just because I wanted to.  Well it was my birthday so I thought I could …..

I saw the Freshly Made Sketches for this week so wanted to try something out for that. Firstly here is the sketch.
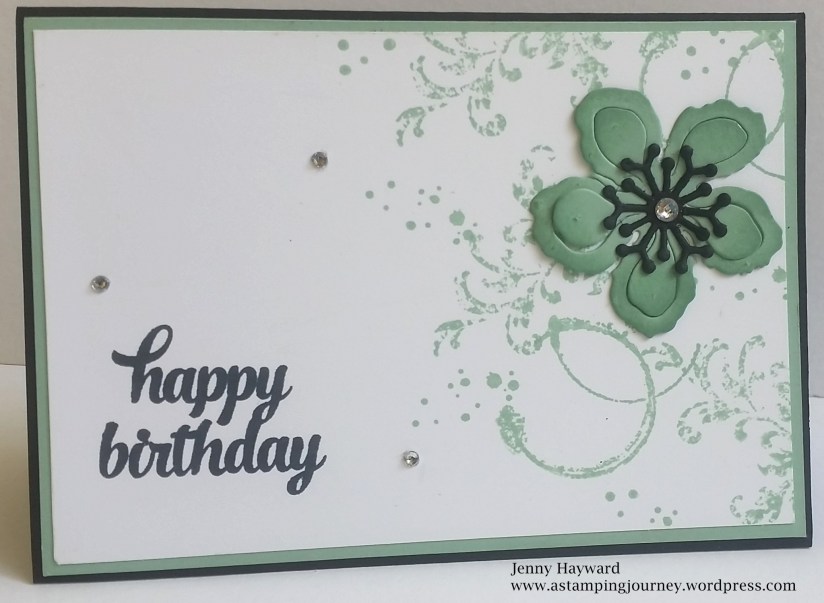
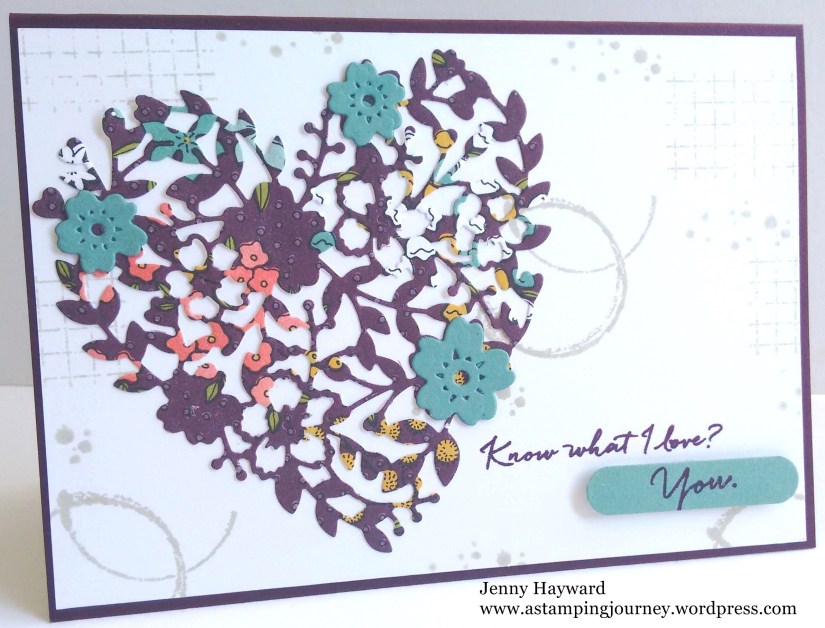
fms-final-257-001

Here is my card.

butterfly-for-fms

Let me tell you how I made it:

Butterfly – To create the butterfly I firstly washed over some Shimmery White card with the Aquapainter and water.  Then using the Aquapainter I picked up some ink from the ink pad and brushed over the card in patches.  The first colour was Watermelon Wonder. Here it is to show you.

butterfly-_-colouring

Wipe off your Aquapainter on scrap paper before picking up the next colour and brush over in patches again.  I have used Cucumber Crush.  The third colour was Delightful Dijon. You can fill in areas at the end with any of the colours or go over some.  See how it looks.  Well what you have at the end really is …… a mess!!! It is pretty ugly isn’t it? But don’t despair.  Something beautiful will emerge. 🙂

butterfly-_-colouring-2

From this I cut the large Butterfly Thinlits.

Just as an aside; When I cut the butterfly and rolled over the back of the die with the Die Brush, this is what was left when I lifted the die.  I thought it looked really pretty.  Just had to show you. 🙂

20161007_113755

This was the finished butterfly.  See persevere with the ugly mess and it is pretty.

butterfly-_-coloured

Now for the card: On a piece of the Moroccan DSP I stamped the fern leaf from the Butterfly Basics set and the “splodges” are from Timeless Textures. I sponged around the edges of the paper. This piece was adhered to some Copper Foil sheet and adhered to a Crumb Cake base. What you might not be able to see in the  photo is the sparkle from the Wink of Stella.  It does sparkle really!

The sentiment is from Badges and Banners.  I finished off the card with some pearls.

That was lengthy.  Sorry about that.  Thanks for visiting though. You can visit the Freshly Made Sketches blog HERE and play along.

See you again soon,

Jenny

cards, Catalogues, Stampin' Up!

STAMPIN’ UP! CATALOGUE LAUNCH – PART 2!

I have some more of the fun from my Catalogue Launch for you.  If you missed out on the first part then head back to the last post I did.  Today I want to share with you some of the stamping fun we had.

The table all set up ready to go.  I was pretty excited with the Pom Pom Flowers I found that was a fairly close match to some of the new Incolors.

Table

This was a sample of some of the new products and some cards.  I had other new products in the Product Playground that I showed in the last post.

sample table

I had some Swirly Bird card samples to share.  I have a class this coming Saturday just with the Swirly Bird stamps and the Scribbles Thinlits.  That should be a lot of fun.

Swirly Board

This was the first Make and Take using the new Flourish Thinlits.  I love the delicateness of these dies.  I found they cut surprisingly easy even with just the regular platform.  I used the new ‘Playful Palette’ DSP stack too.  The sentiment is from the new set ‘Best Birds’.

Flourish _ Peekaboo Peach

The other Make and Take was using the new Dapper Denim Incolor.  I have used the ‘Thoughful Banners’ stamp set. These banners are so easy to punch with the Duet Banner Punch.   I stamped a background on the base card with the Timeless Textures stamp set. The colours of the stripes were from the top – Night of Navy, Dapper Denim, Island Indigo, Marina Mist and Soft Sky.  I cut a scallop square mat for the white stamped card piece with the new Layering Square Framelits.  It just gives a subtle peek of the silver Foil. This card was inspired by a card I saw on a Facebook group I am on.

Dapper Denim thoughful banners

So lots of fun was had by all my lovely ladies who came.  I appreciate each and every one of them.  If you are local make sure you come along to my next launch or class to enjoy the fun.

Thanks for stopping by,

Jenny

cards, Stampin' Up!, swaps

BOTANICALS AND TIMELESS TEXTURES!

I made this card a couple of weeks ago for our team swaps. It was a really busy time but I was determined to make some. A number of the lovely people in our team had given me swaps at the previous meeting and at Onstage and I didn’t have any so I really had to make up for it.  Although I still don’t think I made up for the lovely cards I received. 🙂

This card was CASED from a card on a Facebook group I am on.  Yes, I was in a hurry and didn’t have time to think for myself.  I loved the idea though of teaming two of my favourite products and with one of my favourite colours.

?

I have used Timeless Textures and the greeting is from ‘Tin of Cards’.  I am having a great time with the Botanical Builders Thinlits. I cut a Mint Macaron flower with them and then sponged some Mint Macaron ink on the edges. I added a black centre to the flower.  I think it just “pops” it a little.  A little bling with the Rhinestone is good for the sparkle factor.

Thanks for visiting me.  Do stop by again.  Drop a comment and say Hi too.  I love to hear how you are and where you are from.

Jenny

cards, Classes, Sale-A-Bration, Stampin' Up!

KNOW WHAT I LOVE??

This was another of the cards I made a couple of weeks ago when I was playing with the Bloomin’ Heart Thinlits.  I had cut the heart from the Sale-A-Bration paper ‘Wildflower Fields’ DSP.  This was one of the activities everyone got to do at my Launch at the Product Playground but I hadn’t got around to actually making a card from it at that time.

I wasn’t sure how to put it together but I teamed it with a few of my new Favourites the ‘Timeless Textures’ stamp set which I stamped in Sahara Sand and the greeting from one of the Sale-A-Bration sets ‘What I Love’.

5153

The card base is Blackberry Bliss to match the DSP and the flowers were cut from Lost Lagoon.  Simple but hey that’s me!! 🙂

Hope you like it.

See you soon,

Jenny

cards, Stampin' Up!

A BLOOMIN’ HEART!

I have had the ‘Bloomin’ Heart’ Thinlits Die for a  little while now but only managed to make some cards with it last week.  I have to say I was a little intimidated by the delicateness of it. It was going to be fiddly pushing out those extra little bits that you don’t want. I braved it though and had a go.  Now I had my new Die Brush to use too.

I cut the heart from the ‘It’s My Party’ DSP stack and using the Die Brush and the foam pad that comes with it I gave it a few rolls over the back of the die and Voila! out popped the heart with very little effort.  I don’t think I minded this Heart die now.

I thought I would show you the card that I made with the pretty little heart.

heart card

I stamped the flourish from ‘Timeless Textures’ on Sahara Sand card.  Then matted that on to Whisper White and then adhered that to a Thick Whisper White Card base.  I cut some flowers from Pool Party using the little flowers in the ‘Bloomin’ Heart’ Thinlits and adhered those on.  Some Adhesive Pearls adds a little Elegance.

The greeting is from  the Sale-A-Bration set ‘Sky is the Limit’. Have you got this set yet from Sale-A-Bration?  There is less than a week left to grab it and then it is gone.  Some new sets are being added after the 15th.  I cut the greeting with the ‘Project Life’ Framelits and added Pearls to finish.

 I have now made a few cards with the ‘Bloomin’ Heart’ Thinlits so I will show you those over the next few days.

Have a Happy Day,

Jenny

cards, Catalogues, Classes, Stampin' Up!, Workshops

LAUNCHING THE NEW OCCASIONS CATALOGUE!

On Saturday I had my Occasions and Sale-A-Bration Launch.  I know that the catalogue has been around for nearly a month but with our School Holidays on it is a bit hard to get people together.  So it was Launch day on Saturday.  It was fun!  Thanks to all the lovely ladies who came and it was nice to see some new faces and some regular ladies too.

So what did we do?? Well, it was a party of course.  With all the fun party products in the catalogue, why wouldn’t we.  There was balloons and cake and treat bags for everyone. You know I got so busy and I forgot to take photos of everything. 😦  I will share what we did though.

I can show you the Treat Bags I made.  I was inspired by a couple of projects I had seen recently on Pinterest and shared by Stampin’ Up! too.

treat bags

These are 2 versions of them.  I have used some lunch bags and cut part way down the front and folded down the flap.  I added a strip of the ‘It’s My Party’ DSP and then cut a strip of card with the star Thinlets from the Mini Treat Bags.  The cake from ‘Party Wishes’ was stamped on white card and then it was cut with a mid-size Circle Thinlets. I added a punched flower from the Itty Bitty Accents Punch pack, a Dot from the ‘It’s My Party’ Enamel Dots pack and finished off with a bow from either the Melon Mambo or Mint Macaron Baker’s Twine.  The greeting from ‘Party Wishes’ was stamped down the bottom of the bag.

I filled the bag with some 6″x6″ pieces of the ‘It’s My Party’ DSP stack and a square of the Blushing Bride Glimmer Paper.  Of course there may have been some chocolate and other treats in there too. 😉

I had some different products set up to have a test run like the ‘Bloomin’ Heart Thinlets Die and Die Brush and the Confetti Embossing Folder and ‘Wink of Stella’ Brush. All good fun too.

Now for the Make and Take. I can’t take credit for these cards.  I CASED them from Janet HERE.  I loved how you can use the Rose Garden Thinlets as a mask. Everyone loved the idea too and started thinking of other dies that they could do this with.

sponged rose

For this card we cut the rose and leaves out from some Whisper White card. Then placing it on to a Whisper White card mat carefully sponge the Watermelon Wonder ink over the rose adding more ink to the centre.  Sponge the leaves with Mint Macaron. It doesn’t matter if the ink merges with each other or goes out of the lines.  It’s all part of the effect. We then embossed some dots in gold from ‘Timeless Textures’ and heat embossed the greeting from ‘Rose Wonder’ in gold too. The card piece was adhered to a Mint Macaron card base and the greeting was raised up with dimensionals.

I showed everyone then how to use the mask you have sponged. Don’t waste it, you can create another card. I have used ‘Timeless Textures’ again stamping in Sahara Sand on white card.  The greeting was stamped in black, cut with the framelit and sponged around the edge. This was all adhered to a card base in Watermelon Wonder.

sponged offcut

Here they are together.  A nice matching pair.

two cards

If you would like me to come and share some fun, creative ideas with you and your friends then let me know.  OK maybe not my international visitors. 🙂 With Sale-A-Bration there are lots of extra free products you can receive. Let’s fix a date now!

Thanks for visiting me today.  Visit again soon,

Jenny

cards, Catalogues, Stampin' Up!

TIMELESS TEXTURES IN SUEDE!

I had overlooked the ‘Timeless Textures’ stamp set in the Occasions Catalogue.  I really couldn’t see how I would use it but then at our Team Stamping Day last weekend I saw a card that my friend Leonie made and I wanted to CASE it.  I soon discovered what a great set it was.  Lots of little elements that could be used on their own or to create backgrounds with other stamps.  It’s a great alternative to ‘Gorgeous Grunge’. So since then I may have purchased this set myself. 😉

Here is the card.  This was originally CASED from Pinterest.  I made mine in Soft Suede.  I am keen to try this in other colours to see how it would look.

P1180229

I used Crumb cake for the “speckly” edge and for some of the “dots”. The rest of the images were stamped in Soft Suede. The greeting is from ‘Rose Wonder’ set and cut with the matching framelits.

Here is a tip to create a mat for the framelit from my friend Leonie.  Trace around the outside edge of the framelit with pencil on to some scrap card.  Then cut it out with scissors and rub out the pencil marks.  Clever idea!!  I added some Linen Thread loops behind the greeting too. This might be good for a masculine card??

This is the inside.

P1180235

So I think this is a good addition to your stamps.  Here is the set so you can see all the different elements.

 timeless textures

It is $49 for Wood mount and $35 for Clear mount.  I think you will find this set very useful.  Stay tuned for some more projects with this set.

Jenny