cards, Catalogues, Stampin' Up!

EVERYTHING IS ROSY FOR THE BOYS!

The Everything is Rosy might be lots of flowers and pink but you can still create some cool cards for the boys in your life.  These 2 cards I think would be suitable perhaps.

Do you think these are “manly” enough?

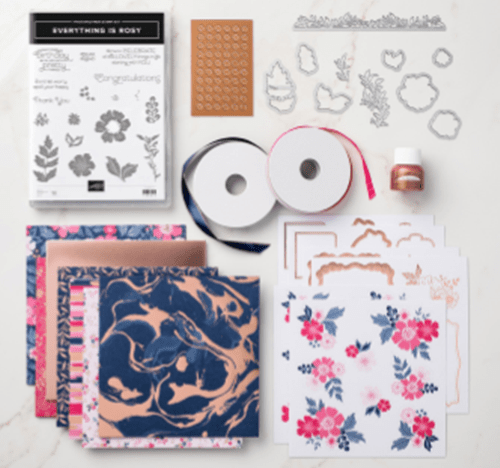
The Everything is Rosy papers are just gorgeous with Rose Gold Embossed patterns and there is also the lovely delicate Rose Gold diecuts. The Night of Navy ribbon is beautiful with the Rose Gold edging.

You can still get your Everything is Rosy Medley of gorgeous products.  You won’t regret it.  I know it is a big outlay but the value is well over the amount.  The stamp set is so versatile too for many occasions.

Shop in store now -> HERE to pick up your gorgeous Everything is Rosy products.  $139 AUS  Australian residents only.  Please use the Host Code: HQX47XHJ

Receive a roll of Rose Gold Metallic Thread Free. Sent out to you separately after you order.

Receive a Product Tutorial Bundle of 12 exclusive projects as a Thank You. (NB: Projects are not using the Everything is Rosy Bundle).

Thanks for your visiting and I hope these inspire you.

Jenny

cards, Classes, Stampin' Up!

TEA TOGETHER HAPPY MOTHER’S DAY!

I shared this card on my Facebook page the other day along with some other co-ordinating projects.  These were the projects we made at our Mother’s Day class this weekend.  I thought that I would show you a closer photo of the card.  You can’t beat Gingham.  It’s quite popular at the moment.  This was a popular card too.

This card is using the Tea Together stamp set with the Tea Time Dies.

For this card we used the sweet sentiment from the stamp set but there was the option for the Mother’s Day sentiment too.

A frame was cut on the Gingham Gala paper with the Rectangle Stitched Dies. The Balmy Blue stamped card was also cut with one of the other smaller Rectangle Stitched Dies.  The teapot and cup and saucer were stamped in Memento Black ink and coloured with the Stampin’ Blends.  We just did the edge with the light Smoky Slate.  You can’t tell but the flowers had Wink of Stella washed over them so they were quite sparkly.

For the class each person could choose the colours they wanted to from the Gingham Gala paper.  The Highland Heather looked gorgeous as was the Grapefruit Grove.  I should have taken photos of them.

Hope you like them.  Happy Mother’s Day to you wherever you are whether you are a Mum to humans or to animal babies.  Have a lovely day.  Hugs to you if you are missing your Mum or struggle with not being a “mum”.  It can be a hard day.  xx

Thanks for visiting.  See you again soon.

Jenny

cards, Stampin' Up!, Videos

THE EVERYTHING IS ROSY MEDLEY WITH ROSE GOLD STREAKS!

I have just received the Everything is Rosy suite of products.  Let me tell you it is more gorgeous in real life.  I shared the video unveiling it on my Facebook page the other day but maybe you would like to see it here.

This was my first play with it.  I have to say it is so easy to put cards together with all these products.  Stamp a few images or you can use the diecut images in the set and cut some of that gorgeous paper.  Yes cut it – don’t just stroke it and then store it away. 😉

For this card below I stamped the leaves and a flower and diecut them out with the lovely dies. I added one of the Rose Gold embellishments for the centre of the flower. They are sticky back so you just peel it off the sheet and stick it on.  It has a clear coating on the top so you need to peel that off too. The Thank You was stamped in the diecut banners that is included in the set.

Just to remind  you what you get in this bundle of products.  There is a lot!  Another demonstrator added it up and there was over $180 in value.  There is nothing like this paper.  Have I said that already?? 🙂

Purchase in my store now -> HERE. (Australian residents only). Please use the Host Code: HQX47XHJ

Once you place your order I will email you a Tutorial Bundle of 12 exclusive projects (these are not using the Everything is Rosy Medley) but just as a Thank You for your order.

You will also receive a roll of Rose Gold Metallic Thread Free which will work beautifully with this medley of products.

Thanks for your order and Thanks for stopping by,

Have a great day,

Jenny

cards, Personal Ramblings, Stampin' Up!, Techniques, Tutorials

WEDNESDAY’S WOW! #67 – USE THE LINE!

Wednesday’s come around quickly.  I have another Wednesday’s WOW! for you.  It was a recent revelation to me.  (OK, I am slow!).  This little tip might be a revelation to you too.  Although you are probably more cleverer than me. 😉

Wednesday’s WOW! #67 – Use the line on your Embossing Folder to keep your card straight.

Let me show you.

That black line on the Embossing Folder is not just a detail on the folder to go with the Logo. 🙂 It serves a purpose.  Use that line as a guide to see that your card is straight in the Embossing Folder.  The card might be longer than the line but you can still use that to see that the edge of the card is parallel with it.  These lines are on the more recent folders.

TIP: If you have some older folders that don’t have the line.  Draw one in with a ruler and black permanent marker.

On another note – when using folders you don’t want to position your card right up in to the top of the folder on the fold line.  You will get an edge on your card when you emboss it as the pattern doesn’t quite go right up to the top.

Hope that is helpful, or just confirming what you already knew.

Have a great day,

Jenny

Grab the Everything is Rosy Product Medley in store now.  Receive a pack of Rose Gold Metallic Thread Free and receive this month’s Tutorial Project Bundle of 12 exclusive projects Free.

Shop -> HERE now.  Please use the Host Code: HQX47XHJ


cards, Catalogues, Classes, Stampin' Up!

TIME FOR TEA CARD CLASS!


Join me for Tea (or coffee or water) for a fun class with the Tea Together stamp set. We will be making some cute projects just in time for Mother’s Day or to give to a lovely friend in your life.

The class includes a sweet card, Tea box (provide your own teabags) and a small chocolate box.  A Ferrero Rocher Chocolate is included.

WHEN: Friday 10th May at 10am or Saturday 11th 2pm.

COST: $20 (extra $5 to use my adhesives) – includes a Ferrero Rocher Chocolate
Colours and patterns may vary.  Advise me of your colour preference when you reply.

RSVP: By Thursday 9th – ASAP to reserve your seat. More details of the projects will be given shortly.

cards, Catalogues, Onstage, Stampin' Up!, Techniques

GINGHAM BUTTERFLY ONSTAGE SWAPS!

Last week I shared one of my Onstage Swaps.  You can head back a few posts if you missed that.  Today I thought I would share my second swap.  It is good to have 2 different ones.  It gets a bit tedious making so many of one card.

For my second swap card I used the Butterfly Duet Punch with the Gingham Gala Designer Series Paper. 

I made some in each of the colours in the Gingham Gala Designer Series Paper.

The card layout was similar to a card we made for Craft Alive a few months ago.

Here is a close-up for you of a couple of the cards.

Firstly Highland Heather and then Lemon Lime Twist.  The sentiment is from Colorful Seasons.

Check the butterflies though.  I saw the idea for this on Pinterest.  I thought I saved it and now can’t find it.  I will find it later I am sure

What I did though was sponge ink on strips of Shimmery White card so you get a little sparkle with it too.  Simply sponge 2 colours of ink in lines along the strip. See this below.  This was just a selection of the strips.  I did lots of sponged strips.

Once done punch the large and small buttefly using the Butterfly Duet Punch.  There were lots of pretty butterflies.  I did have fun making them.

Hope you like the cards. Thanks for visiting.

Jenny


cards, Catalogues, Stampin' Up!, Tutorials, Videos

WEDNESDAY’S WOW! #66 – EVERYTHING IS ROSY!

There is a very special product out just for this month.  So for Wednesday’s WOW! #66 today I thought we should take a close look at it.

Everything is Rosy.  What a beautiful product suite this is.  Check it out.

This is all that you get in the Suite.  Lots and lots.

The Suite includes:

Everything Is Rosy Photopolymer Stamp Set – 18 stamps;

Everything Is Rosy Dies—10 dies; largest die 2-7/8″ x 1″ (7.3 x 2.5 cm)

6″ x 6″ (15.2 x 15.2 CM) Designer Series Paper Stack— 48 sheets; 8 each of 6 double-sided designs

6″ x 6″ (15.2 x 15.2 CM) rose gold foil paper—8 sheets

Printed die cuts—2 sheets

Rose gold die cuts—4 sheets; 2 each of 2 designs

Rose gold adhesive backed mirror embellishments— 60 embellishments; 1/4″ (6.4 mm)

Melon Mambo 1/4″ (6.4 mm) Ruched Ribbon— 10 yards (9.1 m)

Night of Navy/Rose Gold 3/8″ (1 cm) Metallic –Edge Ribbon— 10 yards (9.1 m)

Rose Gold Shimmer Paint—1/2 oz. (15 ml)

****

A close-up of the Everything is Rosy stamp set.  What lovely sentiments they are and really cool font.  Lot’s of occasions you can use this set for.

Check them more closely in this video.

Here are some ideas for you just to get you started.  These cards are created by Stampin’ Up! artists.

Pretty paper and pretty diecuts make for a pretty card with a sewn edge.  Gorgeous!

Such prettiness.  I love this one and the copper flower just adds some pizzazz!

Easy gift.  Wrap a strip of the pretty paper around a Pizza Gift Box.

So yes or No?  What do you this of this gorgeous bundle.

TO ORDER

You can order it right now in my store -> HERE (Australian Residents only)  Everything is Rosy Bundle $139 AUS   Please use the the Host Code: HQX47XHJ  

This suite is only available during May BUT –  WHILE SUPPLIES LAST.

For your order receive a Free Tutorial Bundle of 12 projects (these projects are not using the Everything is Rosy Bundle)   Also, receive a roll of Rose Metallic Thread FREE with your Everything is Rosy Purchase.

Stay tuned for more projects with this gorgeous bundle.

Jenny

cards, Onstage, Personal Ramblings, Stampin' Up!, swaps

ONSTAGE LIVE APRIL 2019 SWAPS!

Today I wanted to share all the great Swap cards I received at the recent Onstage Live event.  Swapping is such a great way of seeing new ideas, colours and techniques.  It’s a fun way to meet other demonstrators too.

I have put together a video that I have below so you can see each one in more detail and see the sparkle and maybe learn how some of the cards were created.  So I hope you take a little time to watch it.  (It does go for about 24 minutes).  Be sure to watch until the end so you can see how you can be in the Giveaway to receive one of these card of your choice.

Here are some photos of the cards so you can save them for later reference.

Birds and Sentiments

Butterflies

Flowers

The card on the bottom left on this lot above was actually a card given to me by Kylie Bertucci which was really lovely.  I am part of her Demonstrator Training Group and she gave each of us a special card. How nice was that. 🙂

Cute

For the Boys

Australia V New Zealand

3D – Pockets and Folders

So what do you think? Lots of beautiful inspiration isn’t there.

If there is one that you would like a single photo of or see closer then let me know.

Thanks for visiting me and checking these out.

Don’t forget to leave a comment and I will be drawing someone at random on Monday to receive a card of their choice.

Jenny

Catalogues, Stampin' Up!, Techniques

WEDNESDAY’S WOW! #65 – EXTEND THE LIFE OF YOUR TRIMMER BLADES!

I often have people telling me about problems when cutting with the Stampin’ Up! Paper Trimmer.  The blades don’t seem to last long and they get furry edges when trimming. I have that problem too. Add to that now the Trimmer is being retired and there won’t be any more Trimmer blades available.

So I have a solution today for you for Wednesday’s WOW! #65 I think you will find very useful if you experience some of these problems.  How to extend the life of your blades to avoid those furry edges.  And also so you don’t have to replace your blade so quickly. 🙂

When you cut your card place a piece of scrap paper or copy paper in between the Trimmer and the card you are cutting.  You will get a crisper cut edge when you cut.  This will help you make those blades last longer before you have to replace them.

Of course you end up with shreds of paper but that’s ok.  Just recycle them.  I will say it can be tedious if you have to cut a lot of card but for a few quick cuts it is great. I have used this for some time now and I don’t have to replace my blades too frequently.

Hope this is helpful.  Share it around as it might help some of your cardmaking friends. 🙂

Thanks for visiting me and don’t forget to subscribe to my blog to get updates – or sign up for my newsletter.  See the right hand column on my blog.

Jenny

cards, Catalogues, Stampin' Up!

CLEARANCE RACK UPDATED!

The Clearance Rack has been updated in the store.  Some of these items are reduced up to 60% off.  Crazy! 

Here is just some examples of the listed items.

See these and more in store.  And you can shop there directly or contact me. 

Head ->HERE. Don’t forget to check the Retiring List out too. 

Shopping? Please use the Host Code: HQX47XHJ

Thanks for shopping with me.

Jenny