cards, Classes, Stampin' Up!

BIRTHDAY CHEER WITH THE STAMPIN’ BLENDS!

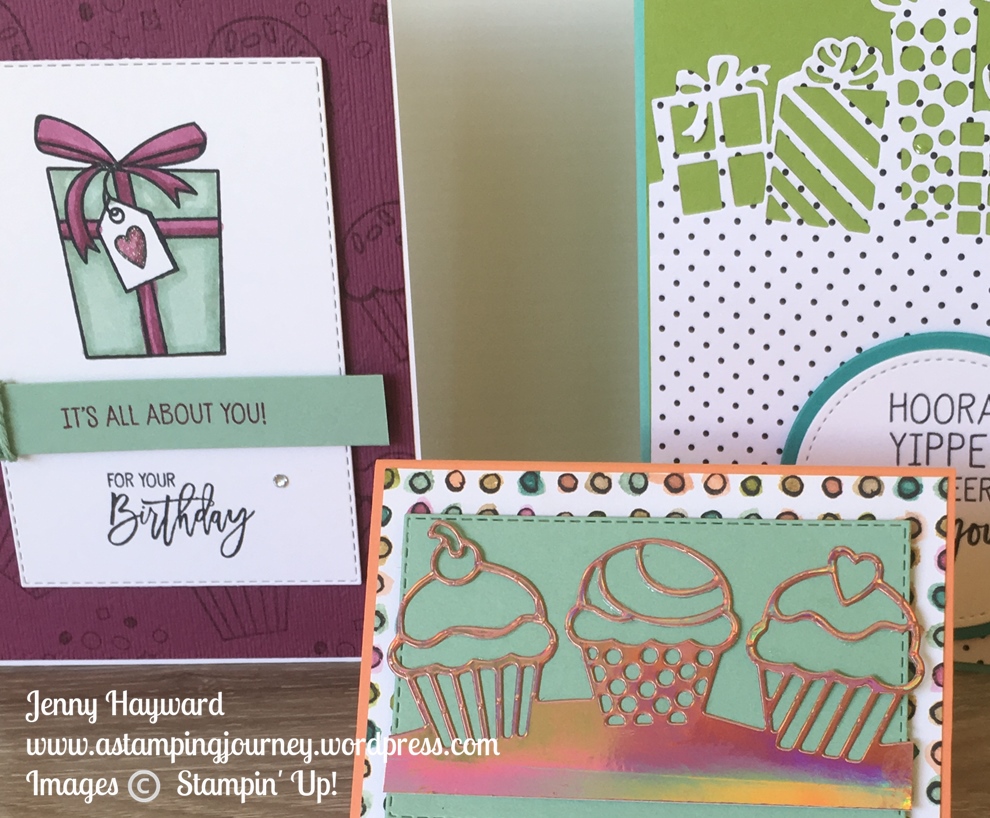
I have another card for you using the Birthday Cheer Bundle.  This was another card we made at class last week.

Some tips to make your own.

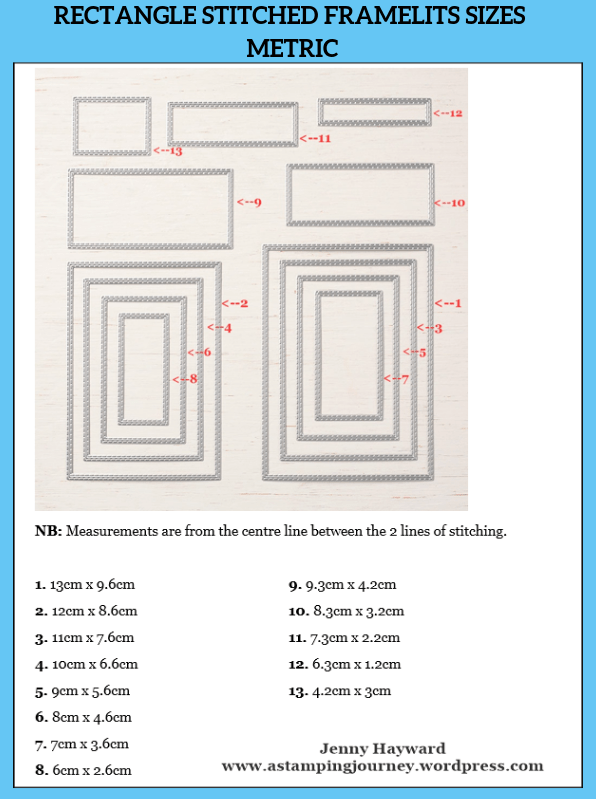
Firstly, cut the White card piece with the Rectangle Stitched Framelits die before you stamp. Then you know where to stamp your images.

The images need to be stamped in Memento Black ink so it can be coloured with the Stampin’ Blends.  The smaller sentiment is stamped on  a strip of Mint Macaron.  Rather than flag the ends of the strip or punch it with a Banner punch or a die I decided to keep it straight and wrap some of the Nature’s Twine around it.

On the Rich Razzleberry card mat first stamp your images in Razzleberry ink on the card and then run it through the Big Shot with the Subtle Embossing Folder.  It adds just a little texture to the card.  I really love this folder for creating the light texture. I think it gets missed in the catalogue.

The Birthday Cheer Bundle and the Subtle Embossing Folder are now available in my store now -> HERE.  Please use the Host Code: Q6XB6QR6  OR you can contact me directly.

Thanks for your order.  I appreciate each and every one of them.  Be sure not to mark your order anonymous or I won’t be able to send you out  your small gift.

Thanks for visiting.  I am off this weekend to the huge Craft Alive show. I am holding a booth there with 3 other wonderful demonstrator friends. It has been months  and months of planning and work.  I am exhausted already to be honest but I hope it goes well.

I will tell you more about it next week.

Have a great weekend,

Jenny


Catalogues, Stampin' Up!, Techniques, Videos

WEDNESDAY’S WOW! #55 – TIPS WITH THE FLORENTINE FILIGREE BUNDLE!

For Wednesday’s WOW! #55 today I thought I would look at the Florentine Filigree Bundle in the 2019 Occasions Catalogue.  I have been fascinated with it every time I see it in the catalogue.

The Florentine Filigree Thinlits die is quite fancy and the Florentine Filigree stamp set has a number of different medallion style stamps.

When I looked at the samples though I was quite fascinated with them.  On the one on the left those flourish style images were stamped in the little gaps in the diecut .  How can you get them so lined up and so neat?

The smaller card on the right looked like it had Texture Paste used with the diecut.

I came across a video with some great tips and it shows you how to easily create these cards.  I thought you might like to see the video.

Here are you are below.

What do you think? Are you going to add this bundle to your wish list now? It’s a gorgeous one isn’t it.

You can shop for this in my store now -> HERE. Please use the Host Code: Q6XB6QR6  It is $69.25 AUS 

Add a little more to bump your order up to over $90 and you can choose a Sale-A-Bration item too AS WELL as receive my Tutorial Bundle for 10 exclusive projects.

Thanks for visiting me today.

Jenny

3D projects, cards, Classes, Stampin' Up!

BIRTHDAY CHEER EASEL CARD!

I held a Birthday Cheer class on the weekend.  It was showcasing the great Birthday Cheer Bundle from the Occasions Catalogue and making some fun cards with it.  I don’t often share my class cards with you but I thought I would share with you about this.

One of the cards I made was an Easel card.  This card was inspired by one I saw on Pinterest.

This first card was the card I made to share at the class. Everyone thought it was nice.  It was using the gorgeous Grapefruit Grove Foil Sheets from Sale-A-Bration. (On a side note did you know that this foil is nearly sold out?? You might want to grab this as your next free choice for Sale-A-Bration). It is so shiny.

The single cupcake is stamped in Stazon and watercoloured with the inkpads. There is a die to cut it too.

The Easel card is very easy to make.

To make one: Take a standard sheet of card. Cut it in half vertically. Take one of those halves and score it in half and then score one of those sections in half again.  Then fold up to create an easel.

With any type of Easel card you need something on the base as a stopper to hold up the Easel.  For this one I used the Oval sentiment piece.

While I made this card and used this for the class I had a different idea in my head but it wasn’t working before the class.

During the class when I was demonstrating this I played around with it and created this version below.  Everyone loved this idea even more and made this one instead for their card.  So I thought you might like to see it then.

I created the Easel card the same with the cutting and scoring.  This time though I rearranged the pieces.  So simple really but so much more effective.  Adhere your diecut cupcake border behind the Mint Marcaron card piece.  For the stopper on this I used the cupcake.

Doesn’t that create a bit more of a WOW??

Why not create your own.

Thanks for stopping by,

Jenny

cards, Catalogues, Stampin' Up!, Tutorials

FEBRUARY TUTORIAL BUNDLES ARE NOW HERE!

New tutorials are available for February.  You are going to LOVE these ones. They are gorgeous.  These are just the sneak peeks above. Wait until you see the full cards.

How can YOU get them?

1) Orders over $78 AUS will receive them free.  (Australian residents only). They will be emailed to you after you order. You can order directly to me or online in my store -> HERE. Please use this week’s HOST CODE: Q6XB6QR6

OR 

2) Purchase the tutorials. (Wherever you are in the world).  Cost is $20 AUS through bank deposit or Paypal.  Details given after you contact me.

OR

3) They are shared with my JEN’s INK team members Free. (so just another reason to join Stampin’ Up! and my team).

Thanks for visiting me today.  Have a great day.

Jenny


cards, Catalogues, Stampin' Up!

BOKEH BEAUTY ABOUNDS!

I shared a pair of cards recently using the Beauty Abounds set.  (If you missed them you can see them -> HERE)

I realised I hadn’t come back and shared another pair of cards I made with this set. I needed to make some more quick cards up.

Here they are for you.

Both are similar in design in Gorgeous Grape and Mango Melody.  The Butterflies are coloured with the Stampin’ Blends.  There isn’t a Gorgeous Grape Blends but I used the Highland Heather which works just as well.  You can’t see it but I added some Wink of Stella on the butterflies to make them sparkle.

I am really loving the Black/Silver Striped Metallic Ribbon.  It works with so many different colours and projects.

The “You are Amazing” sentiment comes from the Amazing Life set.  The “hello” from the Beauty Abounds set.

These cards were sent out to some special people.

Thanks for stopping by.

Jenny.

cards, Catalogues, Stampin' Up!, Techniques

WEDNESDAY’S WOW! #54 – EXTENDING THE LARGE RECTANGLE STITCHED FRAMELIT!

If you are using the Standard Metric card bases you might be facing a problem. Today for Wednesday’s WOW! #54 I want to solve that problem for you.  I have to say this is not my original idea. I think I saw it on a Facebook group I am on but not sure where or who by now.  Perhaps you haven’t seen it though so I thought I would share it with you.

The metric size card bases are just slightly different to the US size so the largest Rectangle Stitched Framelits doesn’t sit quite right for some people. It’s not evenly spaced around each side when you cut the card mat.  To some that doesn’t matter but you might like the even space.  Here is a solution for you.

EXTENDING THE RECTANGLE STITCHED FRAMELITS

Cut your card with the Largest Rectangle Stitched Framelit.  On your card piece, cut off a section at the bottom.  This could be any amount you like to work with your card design.  I cut this one at about 3 1/2 cm.

Once you have stamped your piece of card how you like, adhere that to the card base. Add a strip of card (or even wide ribbon) across the join of the card.  The card strip could be where you stamp your sentiment. Nobody would even know there is a gap there. 🙂

Here is a Pinterest graphic that you can PIN for your later use.

Thanks for stopping today.

Jenny

cards, Cards by Mail, Classes, Stamp At Home Kits, Stampin' Up!

BIRTHDAY CHEER FOR THE NEW YEAR CLASS OR GRAB IT TO GO!

We all need birthday cards.  At this week’s class we will create some special cards for upcoming birthdays with the Birthday Cheer Bundle.  This is a fun new product in the Occasions Catalogue.

If you are a Wollongong local, come along.

Can’t make the class?? Grab the Class-To-Go card kit. See it below.

BIRTHDAY CHEER FOR THE NEW YEAR CLASS

WHEN: Friday 1st February 10am and Saturday 2nd 2pm.

COST:  Check the option that suits you.

1) Class only includes 3 special cards – $20 (Extra $5 to use my adhesives)
2) Free Class with Birthday Cheer bundle purchase** –  $81 with free Grapefruit Grove and Lovely Lipstick Foil Sheets sampler.
3) Class to Go – $20.
Includes all card and materials with instructions to make the cards at your leisure at home. (does not include stamped image. You can purchase the Birthday Cheer bundle separately and receive the Class to go kit Free**

** In addition with the purchase you will receive this month’s Tutorial bundle for free containing tutorials for 10 exclusive projects.

BYO: Scissors and Adhesives.

RSVP: Thursday 31st Jan

I look forward to seeing you,

Jenny

Catalogues, Stampin' Up!

PUNCHES AND RIBBON ON LOW INVENTORY!

URGENT NEWS!

Stampin’ Up! have just announced low inventory on some products and you need to know about them.  These products have exceeded expectations so supply is very, very low and will be out of stock in weeks.

BUTTERFLY DUET PUNCH OR CAKE BUILDER PUNCH

Both these punches have been extremely popular.  There are only supplies for perhaps 2 weeks left.  More are on order but they may not arrive until March.  If you want them now – GRAB THEM NOW!! 

They come as a bundle with the co-ordinating stamp set or individually.

Orders to me directly or Online.  

Order the Butterfly Duet Punch -> HERE    Cake Builder Punch -> HERE.

Please use the Host Code: Q6XB6QR6

ORGANDY RIBBON COMBO PACK

The Sale-A-Bration Organdy Ribbon Combo Pack is in very low supplies.  Everyone loves this ribbon as their free choice.  Such gorgeous colours and such soft ribbon to tie with too.  Unfortunately when this supply is out it is done.  You need this ribbon. So you better get your order in and grab this as your free choice urgently.  This is a free choice with orders over $90.

Place your orders online -> HERE (Host code above) and then you can select your choice.

Thanks for your orders but I can’t stress enough how quick you need to be.  You can order wherever you are in Australia and it will be shipped directly to your door.

Thank You.

Jenny

3D projects, cards, Catalogues, Stampin' Up!

WELL WRITTEN FRAMELITS MAKES QUICK TAGS!

I needed to make some quick tags last week.  There was not a lot of time before I had to get them out in the post.  What to do??? …

I found the Well Written Framelits Dies that I had recently ordered.  Quick tags in minutes with these little beauties.

The white card measures approximately 5cm x 10.5cm (2″x 4″).  I punched the end with the Scallop Tag Topper Punch and added a small strip of the Gingham Gala paper stack.  Using the Framelits I cut the “hooray”in black and the little flower stem in Lemon Lime Twist and a flower in Calypso Coral.  Finished off with a little ribbon from the Organdy Ribbon Combo pack. Very quick and easy to put together.

The Well Written Framelits are very useful.  They are $70 AUS in store -> HERE.

You can use them on their own or team them with the Well Said stamp set as a bundle. $132.25 AUS Grab the bundle in store -> HERE. 

You can make these quick tags for any occasion.  Dress them up more if you like.

Thanks for stopping by,

Jenny

Catalogues, Stampin' Up!

WEDNESDAY’S WOW! #53 – RECTANGLE STITCHED FRAMELITS SIZES!

Wednesday’s WOW! #53 – Let’s talk about those cool Rectangle Stitched Framelits.  Have you seen them in the Catalogue? I LOVE them.

I have seen a few posts around with the Imperial measurements so I thought I would work out the Metric sizes for those of you who use metric measurements.  This might help you when you are choosing which Framelits to use and how they might layer together.

Here you go.  I hope it is a ready reference for you.

I have to say it’s a cool pattern with the measurements isn’t it?

I will talk more about ways to use them in later posts but for now I hope this is useful.

You NEED these Framelits in your collection.  I tell you they won’t leave your craft desk.  There are so many uses for them.

For now, grab them in my store -> HERE.  They are $61 Aus  Please use the Host Code: Q6XB6QR6

Thanks for stopping by,

Jenny