cards, Catalogues, Sale-A-Bration, Stampin' Up!

TODAY IS THE DAY FOR OCCASIONS AND SALE-A-BRATION TO BEGIN!

It is an exciting time on the Stampin’ Up! Calendar! The 2018 Occasions Catalogue starts today along with Sale-A-Bration.  So many wonderful, gorgeous new products.  I am still having trouble deciding on what some of my favourite products are but I will share a few with you.

In no particular order:

– Petal Passion Suite: This is an absolutely gorgeous suite.  (It might even be my Number 1!).

The Designer Series Paper is gorgeous.  It might be all black and white prints but it is all very striking – and you can colour it with sponges and ink or with the markers if you get bored with that.

The Stamp set and dies are beautiful.  Really.  I think a must have! Whether it’s the whole suite or pick out the stamps and dies bundle or the paper.

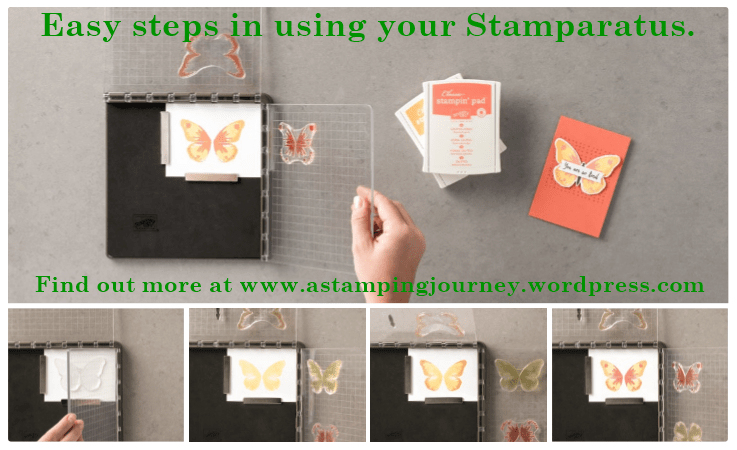
– Beautiful Day set.  Ok maybe this is Number #2.  I LOVE THIS! I can’t wait to play with it.  It has a striking butterfly stamp and flower stamp. Plus, you can team it with the new Brusho Crystal Colour powders for some fun colouring effects.


– Charming Cafe Bundle.  The stamps and dies work together to make some fun cards.  They work great to make Tri-fold cards.  I have been playing with this bundle lately so I will show you them soon.

– Cake Soiree  So many Options with this bundle for weddings or birthdays.  I love the intricate dies.

– Birthday Wit. What a fun set this is.


– Berry Burst Metallic Edge ribbon

– Whisper White Organza Ribbon.  So soft and easy to tie bows with.

You can now view the catalogues online – and order!!! 

Remember, It’s Sale-A-Bration time too so you can pick something Free for every $90 order. I will tell you more about that tomorrow.  For now go and see the Catalogues.

For the Occasions Catalogue Head to my store -> HERE.

For Sale-A-Bration Head to my store -> HERE.

Ordering Online?? Please use the Host Code: 3CH4MBHU       Thank you kindly. 🙂

Happy Shopping,

Jenny

3D projects, cards, Catalogues, Christmas, Classes, Masculine, Stampin' Up!, Techniques

SOME FAVOURITE CARDS FROM 2017!

It’s the end of another year.  I have to say I have really enjoyed my stamping this year.  I have tried some new techniques and got involved in some challenges.  It’s been fun!

I thought I would look back at some of my favourite projects from this past year.  Now I did think I would pick one from each month but it was getting too hard.  So I have just picked a few.  If you click on the title you can see more details of the project.

** Apologies in advance: lots of photos. 🙂

Delicate Details Dragonfly

I think the Delicate Details stamp set was my favourite for Sale-A-Bration for 2017.

Multi Stamping for the boys cards

The Nailed It set was great for the boys cards earlier this year.

Carousel Birthday Bendi Card

I have wanted to make a Bendi for a long time so it was great to finally make one.  I must make another one again soon.

Flower Box 

This was the most popular class for the year.

Meeting the 2017 Incolors 

I am still loving Lemon Lime Twist but I seem to use Berry Burst a lot.

Baby Card in a Box

I love making Card in a Box type cards.

A 90th with Oh! So Eclectic

Oh! So Eclectic

Be sure to check the post after this particular post too for more cards with Oh! So Eclectic.

It’s All Weddings

I have had to make lots of wedding cards this year, and still continue to need to make them.

Z-Fold cards with Colorful Season

These Z-fold cards have been hugely popular on my blog these past few months.

Flap Fold Daisy Card

I love this one for it’s different fold.


Black and White Dragonfly Dreams

A different type of fold card I made for a Blog Hop.

Christmas Pines Eclipse

Merry Patterns Half Fold card

This one below was probably my favourite Christmas card though.

UPDATE: To make it easier for you I have a collage below ready to PIN of some of the favourites.  PIN this and it will bring you back to this post later.

So what’s your favourite from this year?

What would you like to see more of?  I would love to know.

Thanks for sharing this journey with me this year.

To lots more creating and sharing in 2018.

Jenny

cards, Catalogues, Stampin' Up!

THE NEW HEDGEHUGS CUTENESS!

I showed last post one of the cards I have recently made with the new Hedgehugs set.  By the way did you check out the video from that post?  I would love to know your thoughts on it.

The Hedgehugs set is very cute and I can’t wait for you to see it.  This card I am sharing today was the first card I made with the set.  I kept the card simple, but isn’t the new Sweet Soiree Specialty Designer Series Paper gorgeous??

Here is the card for you.

I raised up the cute Hedgehog with dimensionals.

Check out all the new products coming.  I am loving that Berry Burst Metallic Edge ribbon too.

Have you got your new Occasions Catalogue yet? 

I am in the process of sending them out now.  If you are in Australia and would like your free copy then drop me a comment OR Head -> HERE to fill out the request form.

Thanks for visiting today,

Jenny

cards, Catalogues, Stampin' Up!, Techniques, Tutorials, Videos

HEDGEHUGS WITH THE STAMPARATUS!

I have been playing with new products the last few days.  I am loving this new set Hedgehugs coming out in the new Occasions Catalogue on January 3rd.  I think you will love it too.

I have recently got the Stamparatus and have used that to stamp this so all the images are evenly spaced.

Today I put together a video showing how to use the Stamparatus for this.  It’s a different type of video.  I spent the last 2 days to put together one and it just wasn’t happening.  What do you think of this format.  Would you like to see more of this type or would you like the traditional type of videos?  Do let me know.  The video is below. (Please note: If you are receiving this post by email subscription the video might not show up so head directly to the blog post by clicking on the post title above).

If you missed the card size for the Whisper White on the video here are the measurements again.

Metric       14.8cm x 7cm.

Imperial   5 1/2″ x 2 3/4″.

Hope that is helpful.

Other details on the card:

Paper:  Sweet Soiree Specialty Designer Series Paper, Old Olive card base.

Ink: Berry Burst, Old Olive, Marina Mist.

Other: Whisper White Organza Ribbon.

————-

STAMPARATUS RESERVATION

While we are talking Stamparatus, you only have a few days left until the end of the month to reserve your Stamparatus.  This will be shipped out early March.  After that you won’t be able to order one until the new catalogue in June 2018.

To reserve your Stamparatus: Head -> HERE. Scroll part way down the page and click on the box on the right hand side of the page under Stamparatus.

The Stamparatus is $85 plus shipping.  You won’t need to pay until it ships in early March.  You will need add your credit card details when you reserve it though.  If you have any further questions, please drop me a comment or email me.

Jenny


cards, Catalogues, Christmas, Stampin' Up!

ONE LAST CHRISTMAS CARD WITH HEARTS COME HOME – AND A HAPPY CHRISTMAS!

It’s my last Christmas share today.  I made this one a couple of months ago.  So it is about time to share it with you.

This one I Cased from my friend Leonie who I think Cased it off Pinterest.  I have seen it on Pinterest anyway.  It uses the Hearts Come Home stamp set and the Hometown Greetings Edgelits.

The little houses were cut from Whisper White and adhered to a Night of Navy diecut circle.  The Circle is layered on to a Silver Foil Scallop Circle. Both are cut from the Layering Circles Framelits.  I had heat embossed Santa and his reindeers in Silver Embossing Powder too.

The Night of Navy card strip was embossed with the Softly Falling Embossing Folder and I added some Silver Foil Strips underneath the piece. After wrapping around some Silver ribbon I adhered the piece on to a Whisper White Card mat that I had heat embossed the sentiment in Silver.  It was all adhered to a Night of Navy card base.

There you have it, Christmas creating is done.  I am looking forward to packing all the Christmas stamps away and now turn to the new Occasions Catalogue.  I can’t wait to play with some fun new products coming out.  Watch this space for more.

For now, I wish you a very Happy Christmas.  Thanks for stopping by.  I hope however you spend Christmas the time is full of happiness and joy.  Perhaps you can take time to remember the greatest gift we have received – and it is not found under the tree.  It is one of Hope and Grace so freely given to us.

Christmas blessings to you and yours,

Love Jenny x


cards, Catalogues, Christmas, Classes, Stampin' Up!, Techniques, Tutorials

CHRISTMAS TAG TIME CLASS!

This Friday and Saturday for my last class for the year we made Christmas tags.  It was a lot of fun and my class members were very creative.  I wanted to share them with you.

Firstly, I made up a Circle Christmas tag which I will show you further below.  They all got to make one of these (or more if they wanted too).  Then I had some other tag samples from the past year or 2 I had made or received and put out my retired and current papers and ribbons and Christmas stamps and let them be creative.  I forgot to take photos from Friday’s class but here is Saturday’s creative achievements.

Aren’t they great???

——-

I wanted to show you the Carols of Christmas Circle Christmas tag particularly and how we made it.


You can make these type of tags to any size or any shape you like.  The principle is the same. I will give you the general instructions but then give you the measurements I used below.

The card will be cut depending on the size of the circle Framelit you use. Cut your card to about twice the length of the circle and score in half.  This is for your card base.

You will need a second piece of card for the front measuring just larger than your die.

For the measurements for this tag:

Cut your card to 9cm x 18cm score at 9cm.  (3 1/2″ x 7″ score at 3 1/2″)

1. I used the Largest scallop circle of the Layering Circles Framelits.  Place the top of the Framelit just off the edge of the scored fold.  This edge won’t cut creating your fold for the card.

2. On a smaller piece of card cut a full size scallop circle with the same Framelit.  This is for the front of the card.

3. Adhere the full size scallop circle onto the front of the folded scallop card lining up the scallops carefully.  I found using the Multipurpose adhesive gives you a little more sliding room.

4. Using the largest circle in the Layering Circles Framelits cut a circle from Whisper White to stamp your sentiment from the Carols of Christmas set.

5. I cut a smaller circle in white to line inside the tag so you can write on.

6.  Using a hole punch or I used the Crop A Dile, punch through at the top to tie your ribbon through.  You may like to mark the place to punch with a pencil to mark it in the right spot.

Here is a condensed photo for pinning.

Hope you like it.  Everyone loved it that came to class.

Thanks for stopping by,

Jenny


cards, Personal Ramblings, Stampin' Up!

A 15 MINUTE WEDDING CARD!

It’s a crazy time of year isn’t it??? I feel I have fallen off the rails somewhere.  I need a holiday.  Oh! That’s right, I just got back a week ago from one. :/

Anyway,  you know how you get wedding invites at least 6 weeks before the Big Day.  So you know it is coming up. Haha! Well yes Josh has another wedding to go to today so of course I made a card late yesterday afternoon.  I had literally 15 minutes before I picked up my daughter from work.

Sorry the photo isn’t even great as it was late last night when I took a photo.  I had done a quick search on Pinterest earlier in the day to get ideas so I was inspired by one I saw on there – and it was quick!!  Isn’t that bad for a wedding. 😦

I used the Floral Themes stamp set.  The paper is from the Delightful Daisy Designer Series Paper pack.  Who would have thought!  I think it took most of the time to tie the ribbon!

To add to the dramas I had all my clear stamping blocks out in my studio for classes this weekend and I was in too much hurry to go outside and get them.  So I put the stamps on an inkpad to stamp it.  The trouble with that though is you can’t see where you are stamping.  Hehe! It was a bit of a gamble.  That explains the slight angle on the sentiment. 🙂

Later on I added an insert in the card. I added a piece of white copy paper and stamped the sentiment from the Rose Wonder set.  Sorry I didn’t take a photo.  I did relent and go and get a stamping block though.   I also got my Adhesive Pearls which were out in the studio too.  I think that finishes it off.

So a very quick card but my son was happy.

I need to make up a batch of wedding cards.  I say that all the time… He already has 2 invites on the fridge for the New Year.

So there you go.  I hope life isn’t too crazy for you.  I hope to come up for air soon.

Have a great weekend,

Jenny 

cards, Christmas, Classes, Stampin' Up!

TAG TIME CLASS. LAST ONE FOR THE YEAR!

Just a quick post for you today.  Wollongong Peeps! If you still need some Christmas tags for your gifts then stop by this weekend.

TAG TIME CLASS

Friday 16th 10am or Saturday 17th 2pm.  Cost: $15

Make as many tags as you like in the time.  I will have a few samples you can copy or create your own with the papers and embellishments I have out.

Let me know by Thursday.

Jenny 

cards, Catalogues, Christmas

MERRY LITTLE CHRISTMAS SLEIGH RIDE!

I made this card a couple of months ago now but only just getting around to sharing it with you.

I have used the Santa’s Sleigh set.  You tend to forget the Christmas sets in the Annual Catalogue with all the other exciting ones in the Holiday Catalogue.

The tree is inked in Tranquil Tide on Tranquil Tide card and the bear is stamped in Powder Pink on Powder Pink card.  They are both cut with the Sleigh Thinlits Dies.  Using the Thinlits I cut a Sleigh from the solid die and the ornate die from Gold Foil Sheets.  For the gift I heat embossed the stamped image in White Embossing powder and cut that out and the bow is heat embossed with Gold Embossing Powder.

The sentiment is heat embossed in White Embossing Powder on a strip of black card.

To assemble it all together I layered a piece of the Merry Little Christmas paper onto a black card mat.  I wrapped around some Fresh Fig ribbon before adhering it to the Fresh Fig card base.  Finishing it off with a bow from Gold ribbon.

Thanks for visiting today.  I hope your Christmas preparations are going along well.  I have just returned from holidays so I guess I should start thinking about it.

Jenny


cards, Catalogues, Stampin' Up!

RESERVE YOUR STAMPARATUS NOW!

Exciting news! The Reservation for the Stamparatus is now open AND ALL reservations will be filled. Isn’t that great news!!

You will want one:

– if you have a 2 step or 3 step stamp set and want the images lined up well.

– if you would like to re-stamp an image that doesn’t come out well.

– if you have multiple cards to make and would like them the same each time.

I think it is a necessary tool for any stamper!

TO RESERVE YOUR OWN:

Head to my store -> HERE.    Click on the ‘shop now’ tab at the top. Then next page scroll part way down the page and click on the Reservation promotion Tab.

– If you haven’t already set up an account then you need to do that first.

– to reserve your Stamparatus, you will need to add your credit card details. The total will not be deducted until your Stamparatus is shipped to you in early March. The total is $85 + shipping.

– there is a limit of one per person in the Reservation period which is from the 6th-31st December.

– This tool will be available in the upcoming 2018 Annual catalogue.

Now go and reserve your Stamparatus.

Jenny