cards, Stampin' Up!

YOU CAN GET THE EASTERN PALACE BUNDLE NOW!!

A new catalogue is exciting but waiting is SO HARD!!! Stampin’ Up! have released a bundle exclusively NOW so you don’t have to wait,  AND by getting the bundle now means you get a discount PLUS  a free gift.  NICE!

Here is a close up of the bundles so you can see them.

This is just one card you can create with the Starter Bundle.  What else could you create?

But it’s really only when you see them you know what they are like.  If you are looking for inspiration head to my PINTEREST board -> HERE.

If you want to see how versatile the Thinlits are then head  -> HERE to this Youtube video by US Demonstrator Barb Mullikin.  It’s amazing just what you can do with these.

Watch for more exciting projects with this bundle over the next week.

You can order them now directly from me or in my store -> HERE. 

If ordering Online please use the HOST CODE this week:  XYJJTB29

Jenny


cards, Stampin' Up!

EASTERN PALACE IN FRESH FIG!

I have been playing around with this brand new bundle coming soon,  the Eastern Palace suite.  I am liking all the different ways you can use this bundle.  I love how differently the Eastern Medallions Thinlits cut  to others we already had.

This  card I actually made before I made the one I showed in the last post and I have just realised I didn’t post this card.  Oops!  I CASED this card from Lyssa Zwolanek from songofmyheartstampers.com. You can see the original card HERE. 

The base is Sahara Sand.  What about the mat colour.  What do you think?? This is one of the new Incolors Fresh Fig.  It’s a little deeper than Rich Razzleberry.  You can see the difference further below.

I like how the circle diecuts in the centre.  It’s a cool pattern.  Then I have cut 2 different centre die pieces.  I added a Gold Vinyl sticker on the top one.  The sentiment is really nice.  I like that font.

I added a thin strip of the Gold sticker down the bottom edge and then some of the gorgeous Gold Foil Designer Series Paper from the Eastern Palace Designer Series Paper.

I finished it off with some Adhesive Pearls.

Here is the Fresh Fig colour in comparison to Rich Razzleberry and Perfect Plum.  This is from Brian King’s blog HERE.  Head there and check out some of the other colour comparisons too.

Thanks for visiting.  I am going to go and play with this bundle some more so stay tuned.

Jenny


cards, Catalogues, Stampin' Up!

EASTERN PALACE MINI CARDS!

We had our team meeting last night.  I decided that I might get some swap cards made – like decided in the middle of the day!!  So these cards had to be quick – and they were!  A little die-cutting, only a little amount of stamping and then sticking them all together.

I have just started playing with this new suite, the Eastern Palace bundle, which will be available to order from next Monday.  I really like how fancy the dies cut and there are so many ways to put them together.  I will show you more about that another day but for now here is the card.

These are little 10cm x 10cm cards (4″x 4″).  I cut a smaller piece of the new Eastern Palace Specialty Designer Series Paper and adhered that to the base and then cut a piece of Very Vanilla cardstock just a little smaller again.  From this piece of Very Vanilla I cut the circular shape using a Thinlit and then the flower petals using a different Thinlit from the Eastern Medallions Thinlits set. Voila! A fancy card with little trouble at all. 🙂

I stamped one of the sentiments at the bottom from the Eastern Beauty stamp set.  I love how the sentiment curves around. Then I stamped the small flourish in both top corners.  From a different piece of the Eastern Palace Designer Series Paper I punched a circle with the 1/2″ circle punch and raised that up with Dimensionals in the centre of the petals and then added an Adhesive Pearl.

I hope you like them.  I think they were well received.  Would you like your own?  I would love to send you some Happy Mail in the post to wherever you are.  Just send me an email/comment.

Stay tuned for some more Eastern Palace projects next week including a Blog Hop.

Have a happy day,

Jenny.


cards, Classes, Stampin' Up!

RETIRING STAMP A STACK THIS FRIDAY!

For this week’s Stamp A Stack class we will be using some of the retiring products.  Come and join in the fun if you are in the Wollongong area.

This Friday 28th April at 10am or 7pm.

COST: $15 ($5 extra to use my adhesives).

BYO: scissors and Adhesives.

PLEASE RSVP: Wednesday 26th.

Can’t make it?  Get the kit by mail.  Includes all materials. Does not include stamped images.  You can substitute with your own stamps.  $15 plus postage.

Hope to see you.  Let’s give these products one last Hurrah! 🙂

cards, Catalogues, Stampin' Up!

TOP 5 RETIRING ACCESSORIES!

Today I am looking at my TOP 5 in Retiring Accessories.  This is so broad as it includes inks, papers, tools and Big Shot items.  What to choose!

Excluding the outgoing Incolors and Papers I narrowed it down.

Owl Builder Punch.  I am devastated BUT I am going to hang on to this little fellow.  Grab your punch before they all go.

$31 AUS.

This punch makes fun cards for any occasion. This card was made quite some time ago.


Balloon Pop Up Thinlits reduced to $44.80 AUS.  These make some fun cards.


Botanical Builders Framelits.  20% off reduced to $44.80  So many ways you can put together these beautiful blooms.


Woodgrain Embossing Folder  $13  This one is a great one for Masculine Cards.


Ombre Ink Pads  available in Rich Razzleberry, Bermuda Bay and Calypso Coral.  Reduced to $12.60.        Ink images from light to dark easily.


There you have it.  There are so many other choices too.

If you wish to order any of these retiring items, act quickly.  They are selling out.

Order by contacting me directly

OR

Order Online HERE.  Please use the Host Code this week: ZBPP4MCE

Thank you.


cards, Catalogues, Techniques

ANOTHER LADY IN RED!

A few weeks ago I shared a number of projects with the ‘Beautiful You’ ladies. I showed how to change the dress line of one of the ladies.  If you missed that post you can see that HERE.

I started making a video but I didn’t come to share that.  We won’t worry about the video now, but during the process I made a couple of these ladies so thought I would finish the cards off. I have the card to show you today.  It is similar to the original card.

Once I coloured the stamped lady with the Aquapainter and Watercolor Pencils, I cut the piece with the Layering Oval Framelits. Then I adhered a Paper Lace Doily behind it with a few loops of Gold Thread.  I actually had a white card piece already embossed with the ‘Fluttering’ Embossing Folder.  This piece was adhered on to a Red card mat and then a Thick Whisper White card base.  The sentiment “Celebrate” was stamped in black on to Real Red card and punched out with the Duet Banner Punch.

If you want to see the rest of the ‘Beautiful You’ cards I have shared recently then be sure to click on the tag below of “Beautiful You” and it will take you to all the posts.

Thanks for visiting today,

Jenny


3D projects, cards, Catalogues, Challenges, Stampin' Up!

A FUN CAROUSEL BIRTHDAY CARD FOR COLOUR INKSPIRATIONS #07 CHALLENGE!

I have wanted to make a Bendi card for some time.  I had actually forgotten about it until I saw it on Splitcoaststampers last week.  I thought this would be a great idea for this week’s Colour Inkspirations Challenge #07 and Carousel Birthday set might just work well for it. Why not use it too when it will be leaving us very soon. Boo Hoo!

So here are the colours for this week.

And here is my card…

Can’t you just hear that Carnival music playing. 🙂

If you would like to make your own Bendi card then you can find the tutorial HERE on Splitcoaststampers.com.

Just a tip with the tutorial:  I spent a lot of time stressing about where to line the slits up and how long the tabs should be.  Don’t worry too much about it though.  If you mark the pencil lines as it say on the tutorial. Mark the tabs in first that will slide in your slits. Make them how wide or the angle you want then cut the tabs.  Then line up the tabs on the pencil line where the slit is to be and mark the widest part of the tab in pencil on the line.  I then cut the slits with my Stampin’ Trimmer.

Have fun making your own,

Jenny

Get your Carousel Birthday set in store ->HERE while it is still available.  Wood Mount $47.00 AUS  Clear Mount $33.00  AUS

cards

FLORAL PHRASES WEDDING CARD!

Last weekend I had a wedding to go to.  It was a lovely occasion and special to see.  I thought I would show you the card.

The base card is Dapper Denim.  You might be able to see the sparkling card mat.  I have layered the stamped white piece on to Dazzling Diamonds Glimmer Paper.  Just a tip:  Save your Glimmer paper and cut a rectangle from the centre of the Glimmer Paper to use on another project.  You have the frame shape to use for this project. On the white card I stamped the floral strips and layered on 2 hearts from the Sunshine Wishes Thinlits.  One heart is from Dapper Denim and the other heart from Dazzling Diamonds Glimmer Paper.  The sentiment is from Rose Wonder.

I stamped the inside too.  (The photos seems a bit washed out sorry!).

I stamped the floral strip again and this sentiment is from Rose Wonder also.  This is a great set for weddings.

To finish the card I added a bow with the Dapper Denim Ruched Ribbon.

Thanks for stopping by,

Jenny

cards, Challenges

TOP 5 PICK FOR COLOUR INKSPIRATIONS #06!

I am a little excited!  I have just been chosen as a TOP 5 Pick for this past week’s Colour INKspirations Challenge #06.  This was for my Dragonfly Dreaming card I showed recently. It’s nice to know they liked my card.  I can now proudly display the badge on my blog. 🙂

This was my card if you didn’t see it.

I am really enjoying taking part in these challenges.  It has helped me think about my stamping a bit more and to give things a go.  Life is crazy, busy but it has been good to take some time out and stamp something for myself.

If you want to join in too then head over to the Facebook Group Page HERE and check it out.

Wishing you a happy day/night.

Jenny

cards, Catalogues, Challenges, Techniques

DRAGONFLY DREAMING FOR A COLOUR CHALLENGE!

I didn’t get to the Stampin’ Up! Onstage event this weekend for a number of reasons which was sad BUT I did get to hang out with my beautiful girl for Brunch and a movie and we had a lovely family wedding yesterday AND as a bonus I got to stamp today.  So while I missed all my stamping buddies and all the sneak peek into the new catalogue I had a special weekend. 🙂

This Colour INKspirations Colour challenge has been running for the last 3 weeks but I haven’t had a chance to look at it and to be honest I was a bit daunted as to how to put all those colours together!

This week’s colours for Challenge #06 were Night of Navy, Pool Party, Calypso Coral and Gold.  Yep! I would not normally put those colours together.

Here is what came together today.

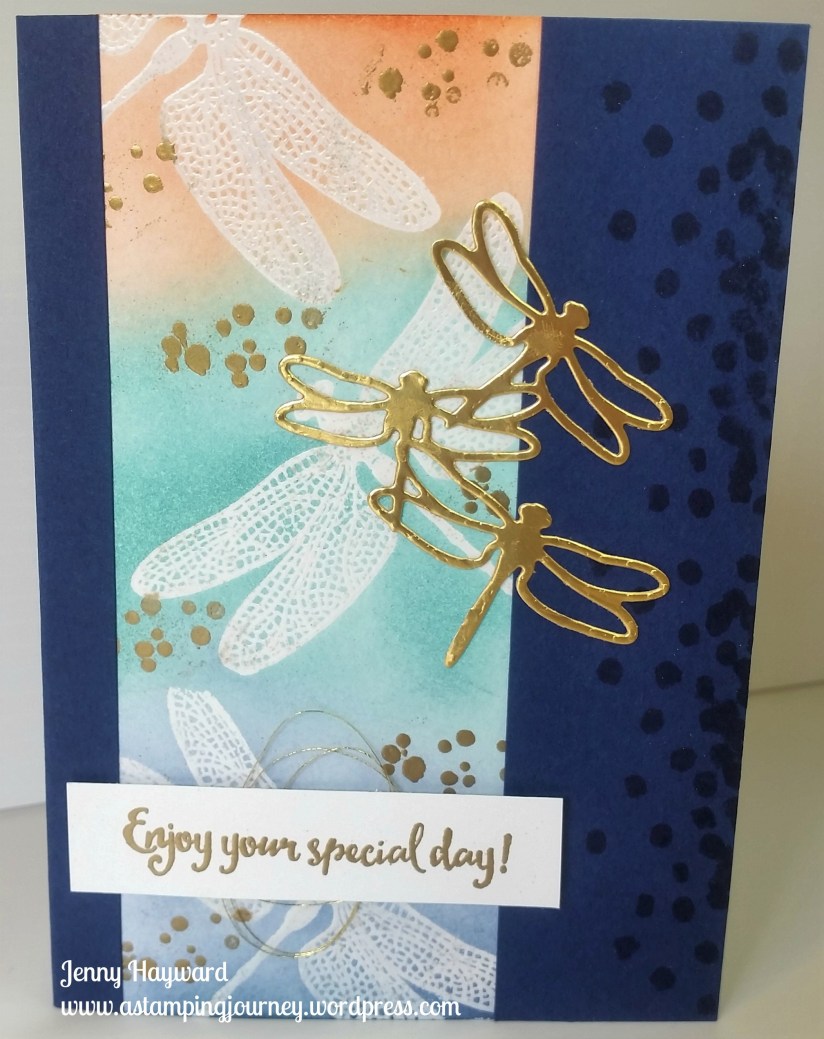
It’s hard to tell by the photo but the front of the Night of Navy base card is actually cut and the sponged strip is set behind the cut section rather than layering it on top. To do that, I cut down on the left side of the Night of Navy card to leave a small border. I then adhered the sponged panel behind that on the left. Then with the portion of card I had cut off I cut it down to about 3cm (just over an inch). I adhered that over the sponged piece on the right. I hope that makes sense?? 🙂

To Create the Sponged Panel:

On a piece of Whisper White firstly wipe over the piece with the Embossing Buddy.  Stamp your dragonfly from Dragonfly Dreams with Versamark and then add Clear Embossing Powder and heat with your Heat Tool.  Using sponges and starting at the bottom sponge over Night of Navy ink, then Pool Party in the middle and Calypso Coral at the top.  Ink up the “spots” from Timeless Textures with Versamark and then add Gold Embossing Powder and Heat.  

After adhering the piece to your card as described above stamp the “dots” from Dragonfly Dreams in Night of Navy ink down the right hand side of the card base.  On a strip of Whisper White stamp the sentiment from Dragonfly Dreams in Versamark and then Gold Embossing Powder.  Add some loops of Gold Thread behind the sentiment and add that to your card with Dimensionals.  Cut some small dragonflies from Gold Foil and add 3 to your card.

I actually didn’t think I would get a card done for this challenge so that was a nice accomplishment for the day.  Hope you like it.

Have a great week,

Jenny