cards, Techniques

SUMMER LAUNCH!

While I am in the Summer Mini Mode I thought I would show you the projects we did at my Mini Catalogue launch on Saturday.  It was a small group but we had a lot of fun – I think???  After a quick Scavenger Hunt through the Mini and checking out all the great new products, we did 2 projects. This was the first one.

This card was using the technique called Inlaid Embossing.  The stars were punched out from Whisper White Card and then adhered to the Real Red cardstock before running it through the Big Shot using the new Square Lattice Textured Impressions Folder.  It creates such a cool effect.  You can use any punched shape.  Just make sure that all the shapes are adhered down well.  I have use the ‘Extreme Guitar’ stamp and the crown is from the ‘Extreme Elements’ set.  The greeting is from ‘Short and Sweet’.  I punched this out with the small oval punch and then a black oval with the large oval punch.   I think this makes a cool guy card.   Do you think?????

The second card we did I kept a lot simpler.  It was using the fun ‘Aviary’ set. 

The bird stand was stamped on Very Vanilla in Chocolate Chip ink.   The cage was stamped on a scrap piece of Very Vanilla.  I stamped the bird in Baja Breeze ink.  The cage was then cut out and mounted with Dimensionals.  The greeting is from the set ‘Teeny Tiny Sentiments’, which can you believe is 50% off at the moment with the December Frenzy!  I scalloped the edge of the Chocolate Chip mat and adhered it all onto Crumb Cake card base.  I tied a little knot from the Victoria Lace and added that with a glue dot. 

I have so many Christmas projects that I have been working on so I will show you those in the next few posts.  Otherwise, it will be New Year before I finish!!

Until next time, Happy Stamping!

cards, Catalogues, Stampin' Up!

IT’S DECEMBER FRENZY!!

It’s December and it’s Summer! Why doesn’t it feel like that outside. The rain has been coming down for days. (Not that there is anything wrong with that. We do need the rain!).  A little sunshine now would be good though!  Stampin’ Up! can bring you some sunshine.  The Summer Mini Catalogue is available from today.  You can view it by clicking on the link in the right hand side bar.  There are some fun new products in there.  I have been playing around with some new goodies.  One of the new stamp sets I have been playing with is ‘Aviary’.  I wasn’t sure about this one at first but it is really growing on me.  Here is a quick card I CASED from the catalogue. 

The photo is a little dark because of the lighting.  Sorry!

I did change the card slightly.  Don’t you love the look on that little owl.  He looks really perplexed!!  The sentiment is from ‘Tiny Tags’.

Today also is the start of the December Frenzy Sale.  Some catalogue items are reduced by up to 50% off.  How cool is that!  Just in time for that last minute Christmas shopping.  Don’t forget to buy yourself a Christmas present 😉  You can view the details here.  Just as an example though:

Heard form the Heart   p104     (W) 119167       $23.37

Teeny Tiny Sentiments p105  (W) 119185          $31.48

Selected Stampin’ Write Markers                          $3.45

Go and check out the rest of the deals.  If you don’t have a local Demonstrator, you can place an order through me and I can send it to you anywhere in Australia.      If you would like a copy of the new Summer Mini then email me jghayward@yahoo.com and I will get one to you.

I’m off to play with some more goodies.  Happy Browsing the catalogue! 

cards, Classes

10,000 HITS!

Can you believe it! I have just hit 10,000 hits on my blog and I didn’t even realise it.  Thanks to Andrea for pointing it out to me.  I can remember the excitement when I hit 1,000 hits!  It’s nice to know that people click on my blog (even if it is by accident!!).  Sometimes you feel like you are talking to yourself here.  So, if you stop by make sure you leave a comment.  Even if it is just to tell me how you are going.  I like to hear it.  Remember too, you can subscribe to my blog.  Just click on the link in the right side bar and it will ask your email address.  Then, when I update my blog it will be sent straight to your email.  That makes life easier for you.

I have a lot of Christmas projects I have been working on in the last few weeks and I can show you them now.  It seems funny because today I have been playing around with my new Summer mini goodies.

A few weeks ago I was asked to do a Christmas card for the residents of a local nursing home.  The requirements were that it be simple as many have difficulty with their hands. I wasn’t even sure how many would turn up. So, I turned to the ‘Lovely As A Tree’ stamp set.  Always a good stand by!   I ended up having just over 20 there.  One lady was to turn 101 the following week.  She was amazing and I have to say was more adept than some of the 90 year olds!  You’re never to old to stamp!!!

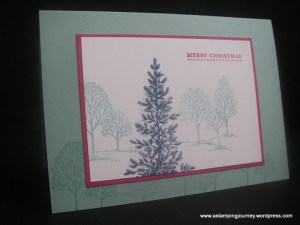
This is the card we made. 

I stamped the front of the card and the Whisper White card with the group of trees in Baja Breeze.  The large tree was stamped in front of these on the white card in Night of Navy.  The greeting from Teeny Tiny Sentiments was stamped in Rose Red.  The white Card was then matted onto Rose Red card and then adhered to the Baja Breeze base.  I was so tempted to use Dazzling Diamonds on the large tree.  It would have looked nice but we probably would have had a nice mess!  They really liked what they did and have asked me back in the new year. So it musn’t have been too bad for them. LOL

Tomorrow the new Summer Mini Catalogue becomes available.  There are so many new and exciting products in there let me tell you!  Tomorrow is also the start of December Frenzy.  Some products are up to 50% off.  This is just in time for some last minute Christmas shopping.  So don’t forget to stop by to check it out!  

cards, swaps, Uncategorized

REGIONALS SWAPS SYDNEY 2010!

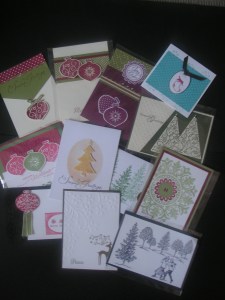
It has taken a little while to get back here.  Sorry about that.  I have been laid up in bed sick for 2 days.  Finally, I could get these swaps sorted to show you.  Having so many makes it hard to photograph, especially with my little camera!!!  I have grouped them together to show you.  If you click on the photo you will see an enlarged photo to view it clearer.  

The Elegant Bouquet embossing folder was popular on a few! 


Some ‘Artistic’ ones! (with the stamp set and the Big Shot)

Lots of Christmas cards! Delightful Decorations were popular.

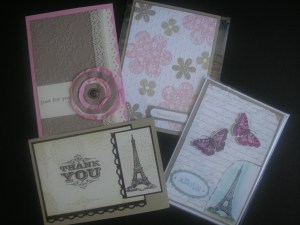
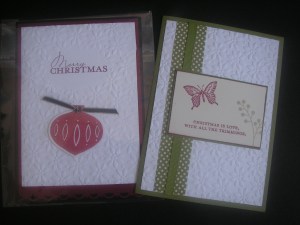
I wanted to show you these 2 particularly.  Both use the Petals-a-plenty Embossing folder.  The one on the left is by Cheryl Taylor. I like how she has left an oval not embossed in the centre to give a space for the sentiment.  The ornament is from ‘Contempo Christmas’.  It is hard to see in the photo but she has used Champagne Mist Shimmer Paint which gives a nice sparkle. The one on the right is from splendidstamping.com (sorry, I don’t know their name)  She has used non-traditional stamps ‘Dreams du jour’ and ‘Always’ to create the images.  The greeting is from ‘Contempo Christmas’ .  They are both simple but very effective.

I have to show you this clever creation too.

This is by Karen Cumming.  I chatted to Karen at Regionals about the “Cards for the Troops” she organises.  It was so wonderful to talk to her.  Go and check her blog out here and read some of the responses she has received back.  It is such a wonderful thing for the troops serving overseas to be able to send a Christmas Card back to their family at home.  It will make their Christmas!

Back to the creation.  This is a chocolate coin ornament.  How cool is it!!  The images are from ‘Artistic Etchings’.  She has stamped the medallion onto Real Red card and punched it out.  You need 2 per ornament.  Sandwich a chocolate coin in between.  The top is the crown stamped in Black and cut out and adhered to create the hanger.  Just tie some ribbon on, a few drops of Crystal Effects were added to the front and you are done.  I am going to whip up a few of these this Christmas!  Of course, you get really small ones in the pack of coins when you buy them.  But don’t worry, you just eat those ones!!!!!  Do you like the label Karen put on this.  “In case of emergency, Unwrap and eat!!!”  Too funny!!

Unfortunately, I didn’t take any photos of our group.  Too busy, chatting and taking in all the info given out.   I still haven’t finished my Make and Takes so I will have to get onto that.  But then, I still have some unfinished from convention!  Maybe on the holidays I will have some time to catch up – Perhaps!

I have some more Christmas creations to show you, so pop back soon.  Until then, Happy Stamping!  x


cards, Challenges

JUST ADD CHRISTMAS!

I have been very good today.  I got stuck into my swaps for Sydney Regionals and finished them except putting them in the cello. bags.  So, I got to play!  I checked out Just Add Christmas challenge earlier and it was ‘Just Add Christmas’. You can see all the lovely creations here.  Since I have been getting in Christmas mode I wanted to play along.  I have been working on this card in my mind for days so it didn’t take too long to put together.  Here is my card for the Just Add Christmas challenge.

The backgrouund paper is from the Newsprint DSP.  I have used the Victoria lace coming in the new Summer Mini with an Antique brad.  It is a bit hard to see but I have added some Adhesive Pearls to the ornaments.  Here is a run-down of what I have used.

Stamps: Tree Trimmings, Christmas Classics.

Ink: Real Red, Old Olive.

Card: Real Red, Old Olive, Very Vanilla, Newsprint DSP.

Other: Vintage Wallpaper Embossing Folder, Top Note Die, Victoria Lace, Antique Brad, Sponge, Adhesive Pearls.

OK, got to run!  The Wednesday crazy afternoon begins between school pick-up, swimming lessons, cricket training, cook dinner and team meeting this evening.  Be back later with some more Christmas Creations! 

cards

SCALLOPED DASHER!

Just stopping by very quickly.  I am still working on my swaps for the Stampin’ Up! Regionals in Sydney this saturday, as well as a few other things.  I wanted to show you this Christmas card I did a few weeks back. 

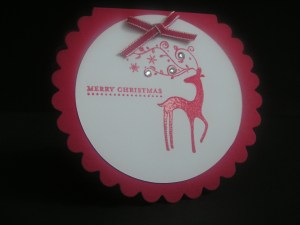
You might have seen these around your blog travels.  I cut the scalloped circle with the Big shot from a folded card base.  Before cutting, line up the scallop circle die with part of the scallop just hanging off the edge of the fold line of the card.  Does that make sense???  I then cut a circle with the circle scissors from Whisper White card.  I embossed Dasher and the sentiment from Teeny Tiny Sentiments on the white card in Real Red.  I added a bow with the Real Red narrow taffeta ribbon and some Rhinestones to his antlers.  This is a very quick card!!

OK I should be off.  Best get to bed and get stuck into finishing my swaps tomorrow.  Come back and visit soon.

cards, Challenges

JUST A BIT LATE FOR JAI!!

I really wanted to play along with the Just-Add-Ink Challenge this week. I liked the sketch and it has been so long since I have been able to take part.  You can see the sketch here.  It wasn’t till Wednesday that I got some time and I just got my new summer mini goodies, so I had to play! This card just wasn’t going right though.  I ended up doing this twice to get it to work.  So, I missed the cut-off! But after all the trouble I went through, I thought I would show you anyway.  This is for JAI42.  Make sure you pop by and see all the stunning entries.  Wow! There is some pretty high standard work there! 

So, here it is!!!!

This is using some new goodies here from the upcoming Summer Mini Catalogue.  It is a bit hard to see but I stamped the flower from the Hostess set “Because I care” in Pretty in Pink on the Vanilla card before I ran it through the Big Shot with the new Lattice Embossing Folder.  I sponged around the edge then with the Pretty in Pink ink.  The base is Kraft (Crumb Cake).  I stamped the flower on another piece of Very Vanilla and tried to colour the flowers.  (I need a bit of work on this colouring thing! I ended up doing it a second time and it still wasn’t right.  This is the first one that I ended up using!!)  The ‘friends’ is from “Tiny Tags”.  Some lovely Victoria Lace and Antique brad finished it off. 

Better late than never right????   😉

I hope to play along this week.  It is Just Add Christmas.  I need to come up with something special though!

Have a lovely weekend.  I hope you can get time to stamp.  Why not play along with the JAI challenge this week and get going with your Christmas cards. 

Come back and visit soon. xx

cards, Challenges

NOW FOR SOME CARDS!!

I can now show you some of the cards I did on our wonderful stamping weekend.  I have shown you the other girl’s make and takes we did and I will get to mine at the end of this post.  First, I will show you the challenge cards we did.

This was my first challenge card.

STAMPS: Fifth Avenue Floral, Elements of Style

The next one I decided to do a Christmas Card.  This was for the “Clean and Simple’ Challenge (CAS78).

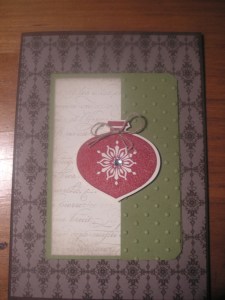
This was using some Early Espresso DSP from the Patterns Stack.  I stamped the “En Francais” stamp in Crumb Cake onto the Very Vanilla and sponged Crumb Cake around the edge.  The Old Olive strip was run through the Big Shot with the Perfect Polka Dots Embossing Folder.  I stamped an Ornament from Delightful Decorations and punched it out.  How good is it that you don’t have to cut this out, you can use the corresponding punch!!!  Which by the way, is one of the great Christmas Bundles on offer at the moment where you can get a roll of exclusive ribbon for FREE when you purchase any of the bundles.

Back to the card: I added a Self-Adhesive Rhinestone to the centre of the ornament.  I still wasn’t happy with it though.  Then when I got home I added some Linen thread which seemed to finish it off

For the next one.  Now, it was getting very late (or early depending on how you look at it!) by this time.  I slapped this card together quickly.

It’s not a great photo.  This was a ‘Clean and Simple’ challenge (CAS76).  I think I will do a faux metal crown for the top right square rather than the stamped and raised crown.  That will look a bit better – maybe!!

The next day we did another challenge.  It took me so long to do this card that I only had time to do one.  But, I was very happy with this one. 

This is with my new favourite set “Elements of Style”.  I have been looking at this set on US blogs for months.  I was so pleased to see it in the new catalogue.  I stamped the flowers in Crumb Cake and coloured it in with Pretty In Pink and Regal Rose ink and Blender pens.  I coloured the leaves in Old Olive ink.  I need a bit of work on my colouring.  It took so long to colour.  The bird was stamped in Pretty in Pink and Crumb Cake sponged aorund the edges.  The ribbon is retired Kraft Taffeta ribbon (Thanks Leonie!), but I think it matched nicely with this.

I stamped the inside too.

Now for my Make and Take.

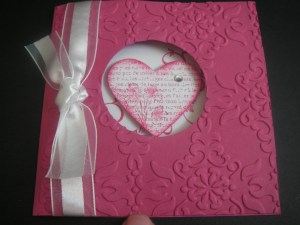
This card was inspired by one I saw in our Demonstrator magazine we receive monthly.   The Rose Red Card measures 21cmx10.5cm and scored at 10.5cm.  I cut a circle out using the Circle scissors then ran the front through the Big Shot using the Vintage Wallpaper Embossing Folder. 

This is the inside:

The Very Vanilla card was 10.1cmx10.1cm.  I sponged the edges in Rose Red ink and stamped the flourish from “Elements of Style”.  The heart is from the hostess set “Punch Potpourri” stamped in Rose Red and the flowers coloured with Pretty in Pink.  I punched this out and mounted this with mounting tape and a Rhinestone added to finish.  I tied a bow around the front with the Organza ribbon. 

Ok. That’s me done!!! You are probably sick of hearing about this weekend so I will leave it at that!  You have probably had enough of these marathon posts too.  I hope you have enjoyed our creations as much as we had making them. 

I’m off now to catch my breath.  I will see you soon with some more creations. 

cards, Personal Ramblings

SOME MORE CREATIONS!!!

Do you want to hear some more about our “Incentive Trip” weekend???? 

Firstly, let me show you the gorgeous little bags that Leonie made for us.


They were made in Concord Crush, Pear Pizzazz, Cherry Cobbler, Poppy Parade and Daffodil Delight.  The card fronts were embossed in the “Elegant Bouquet” embossing folder and covered brown lunch sacks.  Another piece of card went over the top to create a flap and ribbon was attached to the top flap.  Leonie used the lovely hostess set “Because I Care” and this card piece was actually attached to the front.  Here is a close-up.  It is a bit dark though sorry.

We had a lovely lunch by the pool in the sunshine.  By the time we finished though it started raining and that was it for the rest of the weekend.  But, who cares if it rains and your inside creating!!!

Here are some of the Make and Takes we did on Saturday.

This is one that we all did by Tracey.


This is so much nicer in real life.  You can’t tell but the card front has been sprayed with shimmer mist to give it a nice gold sparkle.  Just what you want for Christmas.  The centre of the Medallion stamp has been punched out and the Old Olive centre is adhered inside.  You can see it in this next photo.

You can see a bit of sparkle there.  The gold centre is faux metal. I had been wanting to try that for a while so that was great to do.

This next card is by Erin.  It uses the “Cottage Garden” set.

This is using the new Incolors Concord Crush and Pear Pizzazz and the bright and funky “Sunny Garden” DSP.  There was a bit of cutting for this but that can be very therapeutic!!!

Here is Leonie, Andrea and Tracey hard at work creating.

Tracey winning Prize patrol!!!  That is always a lot of fun!

This was my Prize Patrol gift.  Isn’t it gorgeous.  It was created by Andrea and filled with ribbon and ink refills.

Now if you stop by Andrea’s blog you know that she is very sweet and lovely.  BUT, she can be a bit cheeky!!!   🙂

Thanks for stopping by.  I have some more projects to show you next time.

cards, Tutorials

ORNAMENT TAGS!

I have been having fun creating this week.  I can’t show you everything yet.  That will have to wait until next week.  What I can show you are these little tags I have been making.  They are so quick to make.  You can whip up a number of these in no time ready to adorn your gifts this Christmas.  I have put together a simple tutorial to show you how they are done.

These are little tags using the set “Delightful Decorations” and the matching ornament punch.  It is so great there is a matching punch for this set.  I don’t think I could be bothered cutting them out!

  What you will need:

Stamps: Delightful Decorations (121502)

 Ornament Extra Large Punch (119847)

Whisper White Cardstock                          

Real Red Ink

Adhesive Rhinestones (119246)

 1/8” (3.2mm) Real Red Taffeta Ribbon

 1. Cut Cardstock 10cmx6cm. Score on long side at 5cm and fold on score lines.

2. Ink Ornament Stamp from Delightful Decorations in Real Red ink. Line stamp up over piece of card so tip of ornament hangs just over the edge of the folded card. Stamp image.

3. Place card into ornament punch. Line up image in the window. Have the top of the punch just off the edge of the folded edge of the card. See Photo 1 to assist you. Punch out the ornament.

Photo 1


4. Tie a bow with the Real Red Taffeta ribbon and adhere to the top of the punch with a glue dot. Add an adhesive Rhinestone to the centre of the ornament. See Photo 2

Photo 2

5. Now you have a tiny tag for Christmas that opens out for you to write inside.

Why not try other variation and different colours??? See Photo 3

Here I have used a different stamp in the set. The Old Olive Tag is simply stamped and punch out on a single layer of card and tied with gold cord at the top.

Photo 3


 Enjoy making these.  I have a fun weekend ahead with some stamping buddies.  I can’t wait!  I will have lots of stories to tell.  (Although, there will be some things that can’t be shared!!!!) LOL