cards, Catalogues, Stampin' Up!

STAMPIN’ UP! PRODUCT OF THE MONTH IS HERE~


The NEW Stampin’ Up!® Product of the Month has begun.

With the Product of the Month program you can grab a special, exclusive item each month for just $9 AUD when you place a $125+ order!
(Check your market for your own value amount).

Here’s what you need to know:

✨ Product of the Month is brand-new Exclusive product releases near the start of each month.
✨ There wil be a different product each month.
✨ You must have a Stampin’ Up!® online account to participate.
✨ Add the Product of the Month after your cart reaches $125+.
✨ Limit 1 per Stampin’ Up! account each month.
✨ Available only while supplies last—once it’s gone, it’s gone!
✨ If you order one month and you missed a previous month Product of the Month you can have the opportunity to choose that product option instead if there are supplies available.

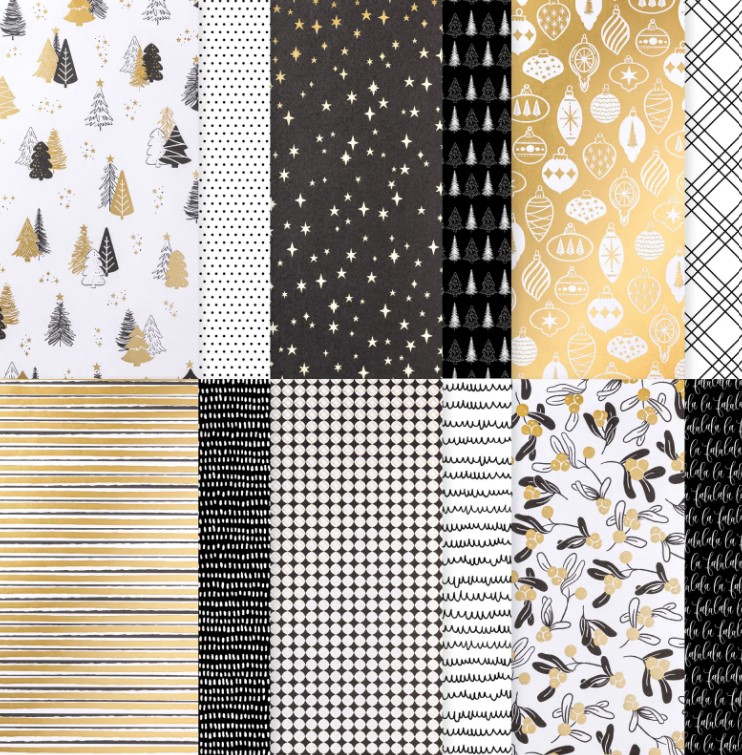
December Product of the Month has just been released. This is the gorgeous True Blue Florals 12″x12″ Designer Series Paper.
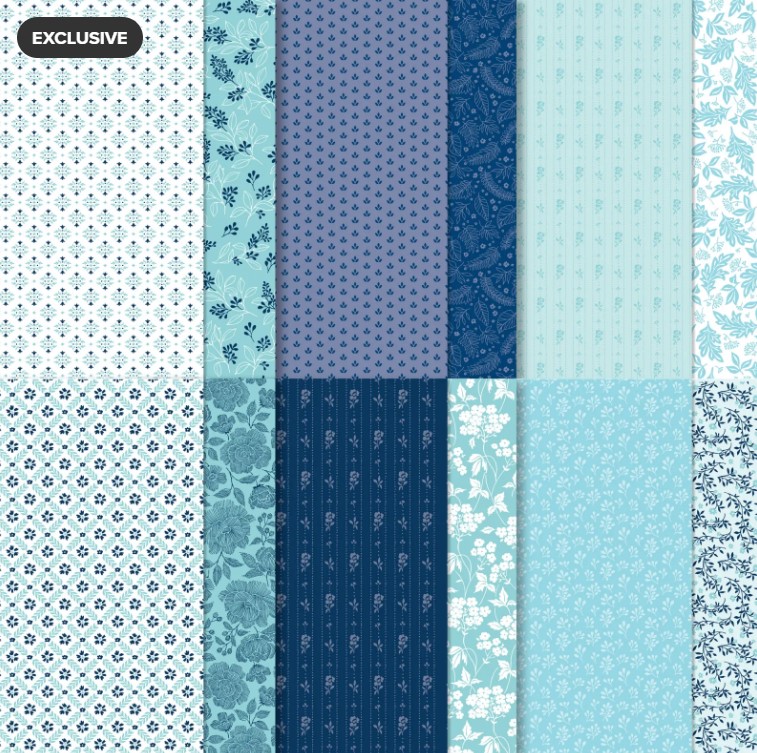
What do you think??

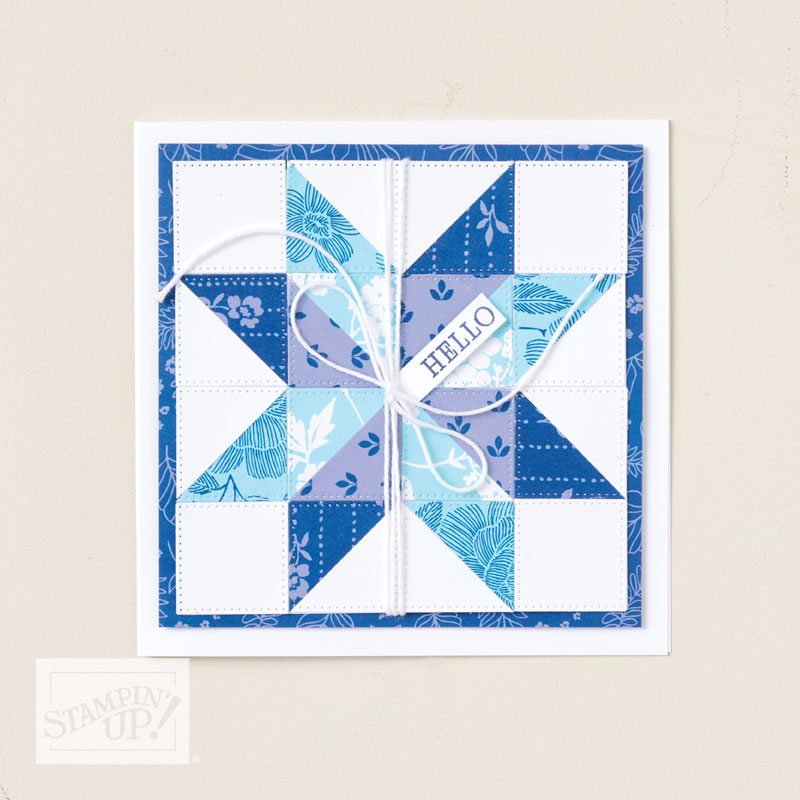
Here are some projects with this paper. I will be back later to share more with you.

With this one below the lined flowers were fussy cut from one of the papers. It looks so great. The other smaller flowers were cut from another pattern and the centres coloured in yellow.

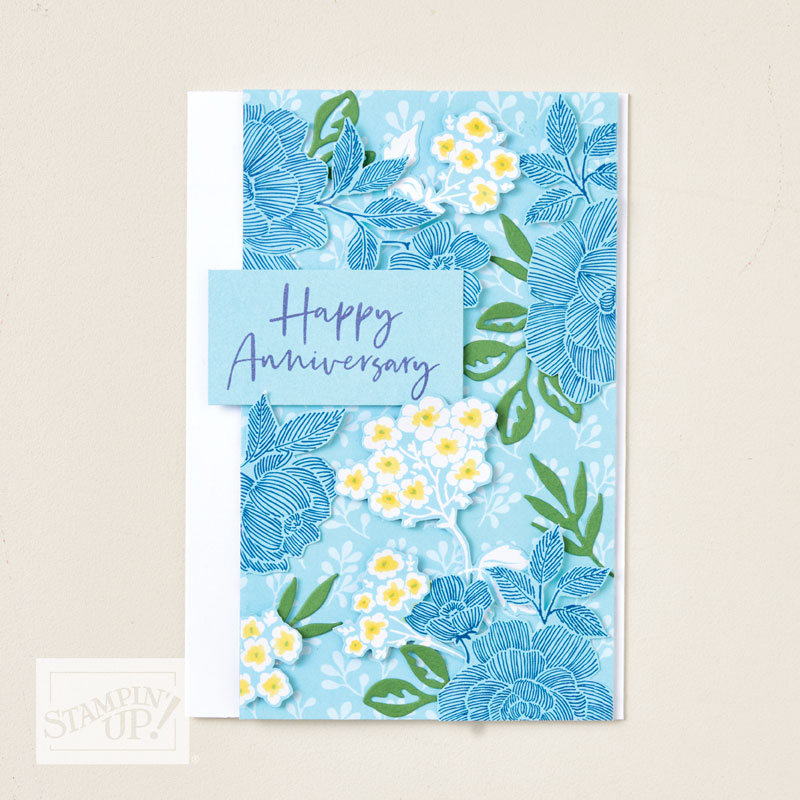
Use your paper as the card base as a different option.

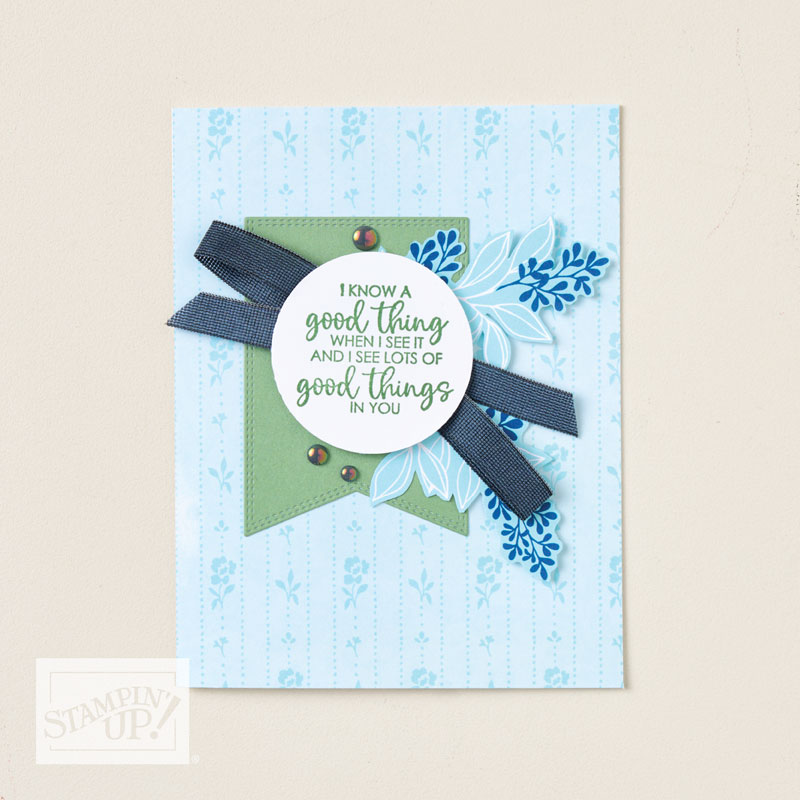
This one below uses 3 patterns from the paper. And those lovely flowers from the Pretty Florals Bundle but you could use any stamps/dies.

That about a patchwork design. It’s a great way of showing off the different patterns. For this one diecut a number of squares. Having the “dotted” edge from the Stylish Shapes gives a good effect but you could cut your squares with a Paper Trimmer. With the paper squares and some of the white square cut them in half diagonally. I would suggest then laying the pieces out in your patchwork look pattern before you adhere them down. And a TIP: maybe cut a piece of card the same size as your finished piece and adhere the white triangles and paper triangles directly to them to make it easier.

Don’t miss out on your Product of the Month this month. But remember these are WHILE SUPPLIES LAST.

If you need to shop for your supplies and you are in Australia then I would love to help you get them. You can head to my store -> HERE OR Contact me directly.

Jenny

cards, Catalogues, Christmas

SWEET SUNDAY WITH A BLUE ELF – AND SOME STENCILLING…

Sweet Sunday. It’s a cute blue elf wishing you a Merry Christmas.

This is with the Festive Friends Bundle. The elf was coloured with the Stampin’ Blends and I diecut the trees and the snowflake from the die set. The Misty Moonlight card mat was embossed with the Peaceful Greenery Embossing Folder.

I have been wanting to do more with stencilling too so I pulled out the retired Linked Together Masks to give them a go. Not quite the effect I was going for but I think it works ok perhaps. I was wanting a little more contrast between the light blue and the darker blue highlights.

I added a strip of the Peaceful Garden Paper which I had torn the top edge of and layed it on the White card before diecutting with one of the rectangles from the Textured Notes Dies. Then I adhered the strip down and added it to the card with Dimensionals.

The Festive Friends set is a cute one with this elf and santa and the snowman. I think I haved used it quite a lot this Christmas for those cute cards.

You can see it more -> HERE.

Hope your Christmas cards are coming together well.

Happy Crafting,

Jenny

cards, Catalogues, Christmas, Online Exclusives

‘TIS THE SEASON WITH THE STAMPIN’ UP! ORNAMENTAL CHRISTMAS BUNDLE ~

One with the Stampin’ Up! Ornamental Christmas Bundle today.

'Tis the Season with the Stampin' Up! Ornamental Christmas Bundle

Do you add texture on your cards? There are different types of texture here. The embossed background, gold detailed star diecut and some soft satin ribbon. And of course add the bling. Adding the texture adds extra dimension and interest on a card so it is not so flat looking.

If one of your cards is not quite looking right or looking a little flat maybe see how you can add some texture as some type of element. It will make a big difference.

This is the Ornamental Christmas Bundle I have used.

You can see it more -> HERE.

Happy Christmas Creating,

Jenny

cards, Catalogues, Christmas

ANOTHER SHINY, GOLD CARD WITH THE STAMPIN’ UP! MODERN CHRISTMAS PAPER

More with the Stampin’ Up! Modern Christmas Specialty Paper. I have loved playing with this paper. It is so shiny and so classy for Christmas this year.

I have to say though. It is hard to take a photo with all the shine and glare you get. I used 2 different patterns of the paper together with this one and then a simple sentiment diecut with a circle from the Spotlight on Nature Dies.

I added texture by embossing a strip of Garden Green card with the Soft Waves Embossing Folder. Layering the pieces of paper on a card mat gives some contrast. The Cherry Cobbler piece was diecut with one of the rectangles in the Textured Notes Dies.

This would be a simple design if you have to mass produce your Christmas cards. It still adds a little class and shine but easy to cut and stick together in no time.

Hope your Christmas cards are going well.

Happy Crafting,

Jenny

If you need supplies and you are in Australia I would love to help you. You can head to my store -> HERE Or contact me directly.

cards, Christmas

ADDING A SHINY GOLD SENTIMENT WITH THE ORNAMENTAL CHRISTMAS BUNDLE

Christmas time is certainly the occasion for some gold and shine. This is a simple card with shine using the Modern Christmas Specialty Paper. And the addition of the Ornamental Christmas Bundle.

Initially I stamped the sentiment in black ink on the Garden Green card. It just felt flat. After a couple of days I came back to it and I redid it and heat embossed the sentiment in Gold. That made it extra shiny and classy.

If a card is not working sometimes it’s just a matter of redoing the sentiment to give it a little WOW! especially with some shiny gold.

I’m loving the Ornamental Christmas Bundle and the Modern Christmas Paper. The paper is not your traditional red and green but you can add those colours as well. It gives you extra class.

This is the Ornamental Christmas Bundle.

This is the Modern Christmas Specialty Paper.

You can see it more -> HERE.

Happy Christmas Crafting,

Jenny

cards, Online Exclusives

SWEET SUNDAY WITH THE CAKE DAY BUNDLE ~

It’s Sweet Sunday time. And it is literally sweet if this was real.

Try this cake with the layers and drizzling icing. Add some Macarons and meringes and sprinkles. You can even add the candles and sparklers. At least with this version you would be safe from a sugar coma.

This is created with the Cake Day Bundle just released. A die can create a folded cake piece card which is cool. Or add the front piece just to your card. Then add the fun elements.

This is the Cake Day Bundle. This has just been released as Online Exclusives. You can see it more -> HERE.

Happy Crafting,

Jenny

If you need supplies and you are in Australia I would love to help you get them. You can head to my store at the link just above and search what you would like OR contact me directly.

cards, Christmas, Online Exclusives, Stampin' Up!

CLASSY GOLD WITH THE STAMPIN’ UP! ORNAMENTAL CHRISTMAS BUNDLE ~

I have played a lot with the Stampin’ Up! Ornamental Christmas Bundle and the Modern Christmas Specialty Paper. It is so gorgeous.

For this one I added a little more classy gold.

To create this diecut an ornament shape from Gold Foil then position it in the Christmas Words Collage Embossing Folder. You can see the words to get the best place. Then emboss through your Diecut Machine.

Also diecut an ornament from the lovely Modern Christmas paper too. Add a strip of black card and then some diecut gold dots.

If you don’t have this particular bundle you could still get a similar look. You may have another ornament style punch or die and even a different Embossing Folder. Gold adds a lot of class for your Christmas cards.

Happy Crafting.

Jenny

If you are in Australia and would love some new goodies to create with I would love to help you get them. You can stop by my store -> HERE OR Contact me directly.

cards, Techniques, Tutorials, Videos

FLIP IT FUN FOLD CARD + VIDEO

Today’s video is a Flip It card. I don’t know what it’s actual name is but that’s what I call it. I’m going to show you how.

This is the card.

The front panel stands up when you Flip It.

Then when it lays flat.

It is a little larger than a standard card so you may need to make an envelope to fit or give it directly to your special person. You may want to explain how it flips too so they can see the fun of it (and give you a WOW!)

I used the cute Festive Friends Stamps and Dies. You can create this for any occasion whether it is Christmas or Birthday or some other special event.

Here is the video to create your own Or head straight to my Youtube.

Hope you get to make one. As always I will send the writtent tutorial to my Newsletter Subscribers next week. I send out a Tutorial each week. If you would like to receive my Tutorials then you can subscribe to them. The Tab is on the Right Hand Side Bar on my blog.

Happy Crafting,

Jenny

If you need supplies and you are in Australia I would love to help you get them. You can stop by my Store -> HERE or Contact me Directly.

cards, Online Exclusives

HIDDEN GEM TUESDAY – BEAUTIFUL PATTERN EMBOSSING FOLDER WITH ONLINE EXCLUSIVES

It’s Hidden Gem Tuesday. I Showcase products on the website that sometimes gets hidden.

Today is the new release of some Online Exclusives. One of my favourites is the Beautiful Pattern Embossing Folder. It’s a simple design but so delicate. It really adds a lovely details to your projects.

I have been creating with it. This one is lots of shiny and sparkle with the added texture with the Embossing Folder.

This is the Beautiful Pattern Embossing Folder.

Have a look at some of the other projects created by Stampin’ Up! artists with this Embossing Folder.

How lovely is it embossed on Vellum – ‘Just Lovely’!

And the Vellum has been re-released today too. It is such a great paper for your crafting. I’m so glad it is back.

It makes a project so soft and delicate too. More Vellum. These products on these cards are from the Brushed With Beauty Suite released today too.

You can see the Beautiful Pattern Embossing Folder -> HERE along with lots of other new Online Exclusives released today. (Including the Vellum)

Go and check it all out.

If you are in Australia and need supplies you can stop by my store at the link above or Contact me and I can help you.

Happy Crafting,

Jenny

cards, Catalogues, Techniques

WEDNESDAY’S WOW! 170 – ADD COLOUR ON YOUR EMBOSSED CARD

Wednesday’s WOW! #170 – Colour your Embossed Card with Ink.

If you have an embossed image on white card sometimes it can be a little plain. You can add a little colour to lift it. Of course you could swipe the Inkpad over the Embossing Folder before or after embossing, but try a little light watercolouring with your Water Painter and Ink Pads. It can really highlight the detail.

This one is with the Traditional Wreath Embossing Folder but you could try it with most folders.

Try it out.

Happy Crafting,

Jenny

If you need supplies for your crafting then I would love to help you. You can stop by my store -> HERE OR Contact me directly.