cards, Techniques

WEDNESDAY’S WOW! #48 – WAYS WITH THE TIN TILE EMBOSSING FOLDER!

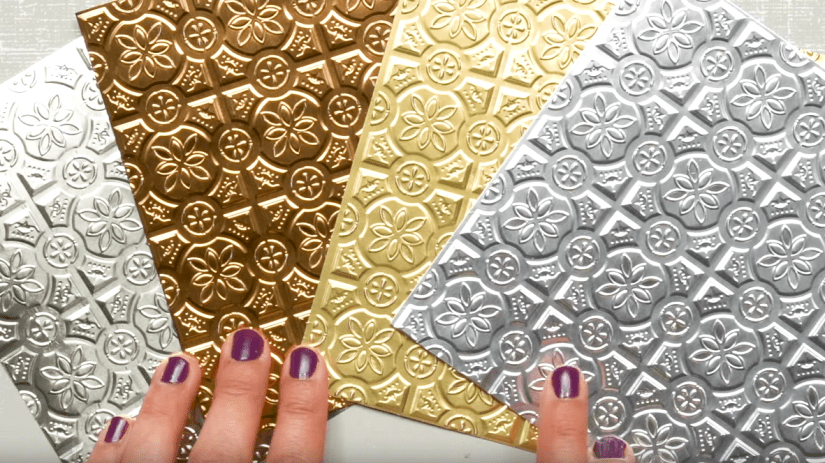
I have been using the Tin Tile Embossing Folder a lot lately.  This Embossing Folder is so popular every time I use it in class too.  Everyone loves it.  You don’t have to just run it through the Big Shot with  a piece of card in the folder, Why not try some other cool ways to use it.

I found this video from Stampin’ Up! with a great tip for getting the best impression on your card but also some other fun ways to take your embossed card that extra step. So today for Wednesday’s WOW! #48 we are looking at ways you can use the Tin Tile Embossing Folder.  I have a card below that I had actually used this idea on it before I even saw this video so be sure to look below.

I have to say I have yet to try embossing the Foil Sheets but don’t they look just gorgeous.  (adding to my list to do …)  And they looked so spectacular lightly sanding them and inking over them in parts as it showed in the video.

I like the card inked too after it has been embossed with the folder, but sponging over it with the Shimmer Paint does take the card to the next level.  I shared that video a few weeks ago of how to do that.   You can see that video -> HERE.

I will share the shimmered card piece again for you here below.

Using the idea of adding the Shimmer Paint to your embossed card we used that on one of our cards for the Shimmer Class last week.  Everyone just loved this too and we dragged out the good and faithful set Lovely As A Tree.  It’s been a while since we have used this set but it never gets dated.  It lends itself to so many occasions and techniques. NOTE: If you don’t have this set yet do yourself a favour and grab it.  You can order it in my store now -> HERE.

Here is the card we made.  Using the Copper Shimmer Paint we lightly daubered over the embossed card in places to add some shine.  Just a note too.  For the tree we daubered over some Copper Shimmer directly on the stamp.  We also did that with the Sentiment which is from the Host Set Hung With Care.

So now you have some important items you need to be sure to get:

Tin Tile Embossing Folder, Shimmer Paint, Lovely As A Tree.  Head to me store now to grab them. (link above)

Have fun with it.  Thanks for visiting me.

Jenny

cards, Catalogues, Classes, Techniques

WEDNESDAY’S WOW! #47 – MAKING UP A SHIMMER PAINT SPRAY!

This weekend is my Shimmer Paint Technique class.  I have been having lots of fun sponging and spraying this stuff around.  For our Wednesday’s WOW! #47 I thought I would share with you how to make the Shimmer Spray up.  Also, I will show you one of the cards we will make in class using this spray.

MAKE YOUR SHIMMER PAINT SPRAY

Add a small amount of the Shimmer Paint in a Stampin’ Spritzer bottle.  I added about 1cm, or approximately 1/2″.  The more paint the more intense the spray will be. Then top up the bottle with Rubbing Alcohol.  The Rubbing Alcohol can be picked up at most Chemists (or Drug Stores).  You can add water instead of alcohol but it doesn’t dry as quickly.  Give it a good shake to mix them together.  Before you use this each time if it has sat for a while then be sure to shake it.  That’s all there is to it.

TIP: When you are spraying your card check which direction the nozzle is as to where it will spray …  You might like to spray inside a box or cover the table to avoid any random spraying.

The further away you hold the spritzer the finer the mist will be.  Bring the Spritzer in closer and it will be more heavier.

This is the card we will be creating on the weekend.  (By the way there are still spaces if you are a Wollongong local and want to join us. Check the previous post for class details).

I have used the Southern Serenade stamp set and stamped it on to Shimmery White cardstock.  That gives extra sparkle but also is good for the liquid used.  I stamped the images in Black Stazon and coloured them with the Watercolor Pencils.   After it was finished I spritzed the card.  This spray is using the Vegas Gold Shimmer Paint.

You can see the Shimmer Paints on page 38 of the Holiday catalogue or view them in store ->HERE.  Scroll down the page to see each one.  There are 4 colours: Vegas Gold, Bright Copper, Champagne Mist (which is a silver) and Frost White.

Get your Free Sponge Dauber for each pot of Shimmer Paint you order from me this week.  Each pot is $14.

TO ORDER: Contact me Directly 

OR 

ORDER ONLINE -> HERE.  Please use the Host Code: KGQKCBA4

See you again soon,

Jenny

cards, Catalogues, Classes, Stampin' Up!

GETTING YOUR SHIMMER ON IN CLASS THIS WEEK!

For local Wollongong Peeps we are getting your shimmer on this week.  You will learn how to use the Shimmer Paint in different ways while creating some gorgeous cards. These paints are so fun to use and you can achieve some great effects with them.

Here are the details.

Friday 23rd November 10am and 7pm in East Corrimal.

COST: $20 ($5 extra to use my adhesives).  ** Receive a Free Sponge Dauber for each bottle of Shimmer Paint you purchase.

PLEASE RSVP: Thursday 22nd. Earlier to reserve your seat.

Here are the cards we will be making.

Come and have some shimmery fun.  You need time out for yourself. Let me know ASAP. 🙂

As a bonus, invite a friend with you that I haven’t met to receive a special gift for the both of you. 

Jenny 

cards, Catalogues, Stampin' Up!, Tutorials, Videos

VIDEO SURVEY – CAN YOU TAKE A MOMENT PLEASE?

This is a different type of post today.  I am considering classes and my direction for next year.  Videos and tutorials are becoming a big part of the way we share stamping techniques and projects with each other.  Is that how you want to see them??

I would love your views and have put together a very short survey.  It is 2 very quick questions. Would you mind taking about 20 seconds out of your day to answer the 2 questions please??

That would be really great.  I love to hear your ideas.

Here is the link to the survey -> HERE.

Thanks for taking the time to complete this for me. And Thanks for following me along on this crazy, creative journey. 🙂

Jenny


cards, Catalogues, Christmas

12 WEEKS OF CHRISTMAS – WEEK 7 – PEEK A BOO GINGERBREAD MAN!

Today is Week 7 of our 12 Weeks of Christmas series.  This card is a cute one if I can say that.

I haven’t used this stamp set for quite some time and was reminded of it recently. So I thought I would just have to use it for this week.

Here is my card.  I call it my Peek A Boo Gingerbread man.

I have used the Festive Farmhouse Designer Series Paper.  A circle was cut in it with the Layering Circles Framelits and then adhered the legs of the gingerbread man behind the circle.  Then a piece of white card was adhered to the back of the paper.  Once it was all adhered on to the crumb cake mat and the card base I stuck an Dimensional behind his head to prop him up a little.  The Crumb Cake card was embossed with the Sparkle Embossed Folder.  The sentiment was stamped on a strip of Old Olive card and finished with a Red Rhinestone.

Hehe! Don’t you think he is cute?

Thanks for visiting me for our 7th week.  Have you caught the past weeks projects? Be sure to click on the tag  of 12 Weeks of Christmas at the bottom of this post on my blog to see them all.

Jenny

cards, Classes, Onstage, Personal Ramblings, Stampin' Up!, swaps

ONSTAGE – BUDDY GIFTS AND SWAPS!

Did you catch the video in yesterday’s post with the swaps I received from Onstage?  If not, head back to the last post. I have the still photos there too.

Today I wanted to share with you my buddy gifts and the swaps I made to share.

BUDDY GIFT PACKS

I made up little Gift Packs – or Onstage survival kits. 😉 I made up 4 of them.

These packs contained a notebook.  I loved these notebooks.  Two had on the front “Don’t Forget To Be Awesome” and the other two were “My Awesome Book of Brilliant Ideas”.  I thought these would be great to write notes in at the Onstage sessions.  In the packs there was some mini Tic Tacs, Tea Bag, Kit Kat Chocolate and of course Mini Post-It notes for the new catalogues.  I will show you a close up of the tags I made.

THE TAGS

A scallop square was cut with the Layering Square Framelits and also a larger black square.  On the white card I stamped the sentiment from the Around The Corner stamp set.  Then stamped the small “flowery” centre shape on to Mango Melody Card and punched it out with the 3/4″ circle punch.  Then I diecut a flower in Mango Melody Card from the Flourish Thinlits and layered them together.  Before adhering the flower to the card with Dimensionals I stamped the leaf from the Around The Corner set in Granny Apple Green.  The Black Glittered Organdy Ribbon was adhered between the white scallop square card and the black card.  They are simple but I loved how they turned out.

MY SWAP

I didn’t have a lot of time to make swaps but I really wanted to and I knew I wasn’t going to have a lot of time to swap on the Saturday as I was helping with registration in the morning. So I kept the card simple and only ended up making 15 of them.

This was my swap card.

I have used the Rooted in Nature Bundle.  The tree and the leaf were heat embossed in Copper and diecut out. The sentiment is from Wood Words stamp set.  I wanted to go for an angle look so angled the paper from the Love What You Do Specialty Paper.  Underneath the paper there was a strip of the Copper Foil Paper. To finish I tied a knot using the Copper Trim.

Now since I hadn’t made many swaps I had a few doubles of cards from recent classes so thought I would add those to the swap mix.  These are the group of cards.  I had 2-3 of each card. These were received well too.

Thanks everyone for swapping with me.  I hope you liked your card you received from me.

A SPECIAL THANK YOU CARD

Earlier I mentioned that I was helping on the Saturday.  This was the special card I received from Stampin’ Up! to say Thanks.  Totally unexpected.  It was signed by all the staff that were there.  How lovely.

This uses the Tropical Escape Designer Series Paper.

Thanks for visiting me.  I hope you like them.

Tomorrow is another 12 Weeks of Christmas Edition so see you then.

Jenny

3D projects, cards, Catalogues, Christmas, Onstage, Stampin' Up!, swaps, Videos

WEDNESDAY’S WOW! #46 – CHECKING OUT MY ONSTAGE SWAPS!

Something different for you for Wednesday’s WOW! today for #46.  Since I have just returned from Onstage in Melbourne I thought you might like to see the swaps I received.  I could show you photos – and I will but I have a video for you as sometimes you can see them a little better and especially see what the 3D ones are actually like.

So here is the video below.  Further down I have the still photos for you if you want to PIN them.

Such a selection. Aren’t they just lovely?? Thank you everyone who swapped with me.  I hope these give you some inspiration for your projects.

I will show you the swap card that I created shortly.

Thanks for visiting,

Jenny


cards, Catalogues

SNOWFLAKE SHOWCASE WEEK – BONUS DAY WITH AN ALL OCCASIONS CARD!

I have been sharing projects all this week with the Snowflake Showcase products.  Today while I am in Melbourne for the Stampin’ Up! Onstage event I thought I could squeeze in a little bonus project for you.

I shared a card a few days back that was for any occasion.  I love that these products can be used not just for Christmas and not just to make snowflakes.  So I thought today’s bonus card needed to be another all occasion card.

The Snowfall Thinlits can be used to make some pretty flowers.  I kept the flower simple on this card.  The “snowfall” image was stamped on the Rich Razzleberry card base for some background. It doesn’t have to be snow. 🙂 The paper strip is from the Share What You Love Specialty Designer Series Paper.  The Old Olive card strip was embossed with the Basket Weave Embossing Folder.  I love how this layout turned out.  It was loosely based on a Freshly Made Sketches #310 sketch. 

You still have time to order these products.  BUT – this is a BIG BUT!  They are only available during November AND ONLY WHILE SUPPLIES LAST.

Here they are again and ordering details for you if you are in Australia.  Now my Aussie friends,  I know that being snowflakes it puts you off these as we don’t have a snowy, wintry Christmas BUT look what else you can make with them.

Here is all the details.

SNOWFLAKE SHOWCASE PRODUCTS

ORDER ANY OF THE SNOWFLAKE SHOWCASE PRODUCTS NOW AND RECEIVE A FREE GIFT.

Grab the Tutorial AND card kit to create 2 gorgeous projects when you order these items with me PLUS receive 1 sheet 6″x12″ velvet paper FREE.

  • Order the Snow Is Falling Stamp set and the Snowfall Thinlits.

COST:      $98 plus shipping.

  • Add the Happiness Surrounds stamp set for an additional $30 and you will also receive the Snowflake Trinkets for free.

You can view the products closer and order in my store now -> HERE. 

Please use the Host Code: KGQKCBA4  Australian residents only sorry.

Your Free items with a Thank You card will be sent out to you separately so be sure to not mark your order anonymous.  Thanks for your order.

——-

I will share more projects with you of these soon.  I hope you have enjoyed them.

Jenny


cards, Catalogues

SNOWFLAKE SHOWCASE WEEK – DAY 5 + 12 WEEKS OF CHRISTMAS WEEK 6. WHAT A TREAT!


Two in One for you today.  It’s Friday which means I have a special project for you for our 12 Weeks of Christmas series.  And since it is the end of our Snowflake Showcase Week let’s use snowflakes for this project.  I do hope you like this.

I wanted to create a special Christmas Gift Tag/Ornament using the Snowflakes but keeping it simple so you can easily create a few of them.

To create the Snowflake Tag/Ornament

Cut the large snowflake from the Snowfall Thinlits from White Velvet Paper. Cut the next size down snowflake from Silver Glimmer Paper, the next size down from Tranquil Tide and one of the smaller ones from White Velvet Paper.  Layer them and adhere them together.  I used the Multipurpose Adhesive for that.

Cut two medium size circle from the Layering Circles Framelits from Tranquil Tide card.  Adhere the snowflake on to the front of the one of the circles.  Loop a length of the Silver Metallic Edge Ribbon adhere behind the Tranquil Tide Circle.  Adhere the 2nd circle behind that so the ribbon is sandwiched between the circles.  That last circle behind is optional but I think it gives a neater finish so you don’t see the ribbon at the back.

—–

Have you liked these projects with the Snowflake Showcase??  Are these products something you would buy?

I did say a Week of projects.  Well … I am off to Stampin’ Up! Onstage this weekend.  SO, I am going to give you a bonus project tomorrow with these products to keep you going all weekend.  I will be back next week to tell you what I can.  I am so excited to be off to Melbourne.

Have a great weekend and if you are going to Onstage somewhere in the world have a great time.  By the way, these events are just for Demonstrators.  If you would love to go and you are not a Demonstrator then maybe you will just have to join right. It’s just another added bonus. 🙂

If you are in Australia you can join with me in my JEN’s INK team.  I have lots of hobby demonstrators if you just want the discount for yourself OR maybe you would like to get a little income and have some friends/family or new customers purchase from you. There is no hard selling as everyone loves the products. I show you the steps and help you whatever you want to achieve.  You can stop by my page at the top to ‘JOIN THE JEN’s INK TEAM’ and find out more.

Be sure to come back tomorrow for the bonus project.

Jenny


cards, Christmas, Classes

SNOWFLAKE SHOWCASE WEEK – DAY 4!

Today I have another card for our Snowflake Showcase Week.  I realised that it is using Bermuda Bay again.  Sorry about that but isn’t it a nice snowflake-y colour.

This is a card we made in our class last week.  I wasn’t sure about it.  I thought it might be too simple but everyone loved it.  So I thought I would include this in our Showcase week.  Really it might be simple but with the gorgeous detail there doesn’t have to be much on a card.

The lovely swirly snowflake is cut with the White Velvet Paper and the large snowflake with the Silver Glimmer Paper.  I added a Silver Adhesive Rhinestone to the centre of it.  I added a couple of stamped snowflakes.  The sentiment is stamped in Basic Gray.  It’s a sweet sentiment but I wouldn’t wish a blizzard on anyone. 🙂

** DON’T FORGET: ORDER ANY OF THE SNOWFLAKE SHOWCASE PRODUCTS NOW AND RECEIVE A FREE GIFT.

Get the Tutorial AND card kits to create 2 gorgeous projects when you order these Snowflake Showcase items with me PLUS receive 1 sheet 6″x12″ velvet paper FREE.

  • Order the Snow Is Falling Stamp set and the Snowfall Thinlits.

COST:      $98 plus shipping.

  • Add the Happiness Surrounds stamp set for an additional $30 and you will also receive the Snowflake Trinkets for free.

You can view the products closer and order in my store now -> HERE. 

Please use the Host Code: KGQKCBA4  Australian residents only sorry.

Your Free items with a Thank You card will be sent out to you separately so be sure to not mark your order anonymous.  Thanks for your order.

———

Thanks for visiting.  I have a special project for you tomorrow.  I hope that you like it so be sure to stop by.

Jenny