Catalogues, Christmas, Stampin' Up!

POINSETTIA SPARKLE!

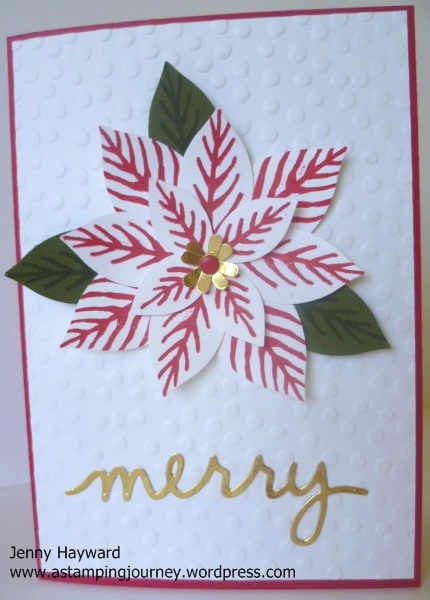
Today’s card I want to share is using the great bundle ‘Reason For The Season’ stamp set and Festive Flower Builder Punch.  I love how this card came together.

P1170552

The base card is Real Red.  That seems to be the colour card I have used most with these recent Christmas cards!  I embossed some Whisper White cardstock with the Decorative Dots Embossing Folder.  The flower is so easy to put together.  Stamp out all your petals and leaves, I have used Real Red on Whisper White and Mossy Meadow ink on the cardstock.  I punched out a circle with the 1 3/8″ circle punch in scrap white card and built up the flower on this.  I have used the Multipurpose adhesive to adhere it all together. The centre is punched out with Gold Foil and I added a Real Red Brights Candy Dot to the centre.  The “merry” cut from Gold Foil is from the Christmas Greetings Thinlets.

I would really recommend this Bundle.  You can find it on p31 of the Holiday Catalogue.  In Australia it is $57.75. Save 15% as a Bundle. Gotta love that!  You can order this through my Online Store HERE or by phoning/emailing me.

Here are these great products.

reason for season                    festive flower punch

Thanks for stopping by today.

Jenny

cards, Christmas

CHRISTMAS CUTIES ANGEL!

I wanted to colour the other day.  I haven’t done a lot of colouring especially that Blendabilities aren’t around. I pulled out the ‘Christmas Cuties’ stamp set that is available in the Holiday Catalogue.  There are some really cute images in this set and I played around with different mediums. I will show you these over the next week or so.

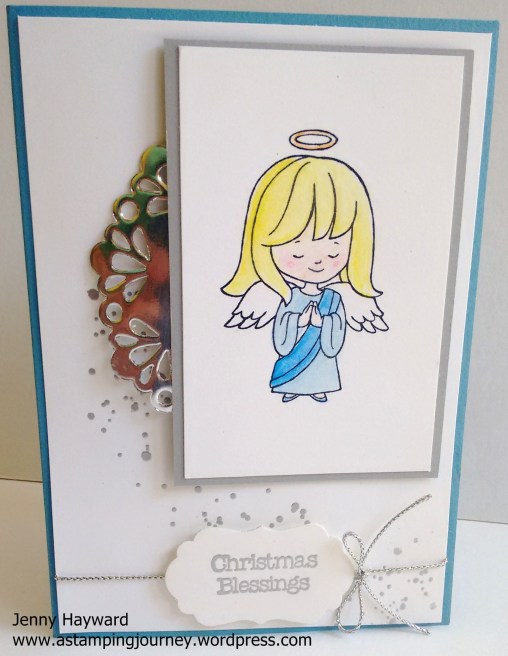
Now I did say I haven’t done a lot of colouring!  I wanted to pull out my watercolour pencils that have sat dormant for so many years.  I hadn’t played with them a lot before that anyway.  SO, here is the end result with them.  I put together this card.  I am not completely happy with the colouring BUT I like the card. The layout is based on the CAS challenges (Colour and Sketch for Clean and Simple cards).  You can find the blog post Here.

IMG_20151005_111721972

Isn’t this angel sweet??  I stamped this on the Thick Whisper White Cardstock and it was then matted on Smoky Slate card. The base card is Marina Mist. The greeting and the “splodges” (from ‘Gorgeous Grunge’) are heat embossed with silver Embossing Powder.  It is hard to tell though.  I finished it off with a silver doily and Silver cord.

There you have it.  A little play with my watercoloured pencils again.

Thanks for visiting,

Jenny

cards, Catalogues, Christmas, Classes

DELICATE ORNAMENTS ON BERRIES AND BOUGHS!

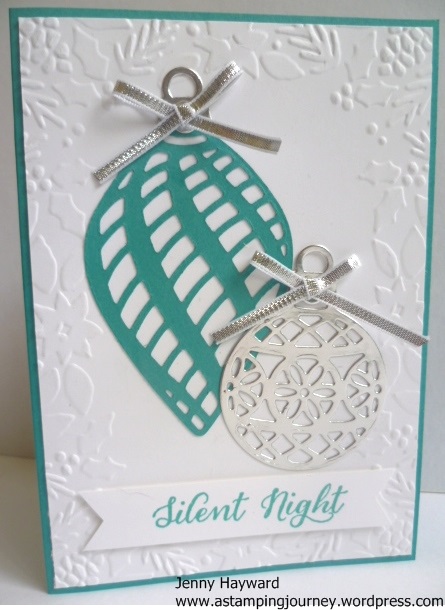
I was playing around with some left-over Stamp A Stack kits the other week.  I just made a quick card up with one of the kits left.  I thought you might like to see it.

P1170418

The card base and the large ornament is in Bermuda Bay. I embossed the white card with the ‘Boughs and Berries’ Embossing Folder. On this card I added another ornament from the ‘Delicate Ornaments’ Thinlets cut from the Silver Foil Sheets to give a little sparkle.  The greeting is from the ‘Wonderland’ stamp set. A little Silver Ribbon finishes it off.

Thanks for visiting today.  I hope you have a wonderful day,

Jenny

Catalogues, Christmas, Classes, Stampin' Up!

HOLIDAY CATALOGUE OPEN HOUSE!!

If you are a Wollongong local come along to my Holiday Catalogue Open House.  You can see and play with lots of products from the Holiday Catalogue.  It’s time to get started on those Christmas cards if you haven’t already done so. Come and see what is new.  Here are the details.

HOLIDAY CATALOGUE OPEN HOUSE!

WHEN:  Saturday 19th September at 2pm.
Stop by for a short time or stay the whole time.  

COST: $10 which includes 2 Make and Takes (Check them out below),

Giveaways, Lucky Door Prize, Yummy Afternoon Tea and …

pick up the Holiday Catalogue if you haven’t already received one.

PLEASE RSVP by Thursday 17th.  Book early as places are limited and booking up already.

See you there. 🙂

Blog Hops, cards, Catalogues, Christmas, Stampin' Up!

ESAD HOLIDAY CATALOGUE BLOG HOP!!

ESAD Blog Hop Header Holiday 2015

Thanks for joining us today for another ESAD Blog Hop.  This time we are focusing on some of the awesome products in the new Holiday Catalogue.  You might have just come from Kelly’s Blog or you might be starting here. Either way you can take the Hop around in a circle.

There is so much to love in this catalogue so it was hard to choose but I decided on picking the first stamp set that made my wish list.  (Maybe because that was near the front – I don’t know.  It is all so good!).

Firstly, I need to tell you about what ESAD is about.

ESAD Info Holiday 2015

OK.  Now I am looking at the ‘Home For Christmas’ product suite on  page 8-9 of the catalogue.  I love the vintage feel of these products.  Sorry lots of photos but I think you will rather quickly look at photos than lots of information when you are hurrying on your hop. 🙂

P1170376

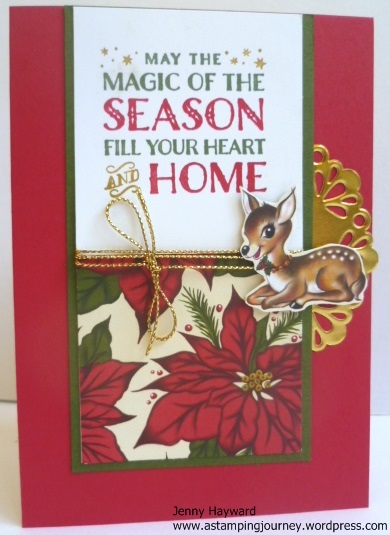
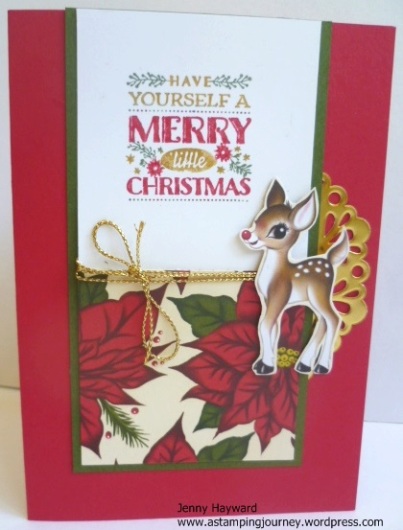
I have used the markers to colour the sentiments from the ‘Cozy Christmas’ stamp set.  The sweet deers are from the ‘Home for Christmas’ Designer Series Paper that I have fussy cut out.  So cute! The beautiful poinsettia paper is from the same ‘Home For Christmas’ pack.  You don’t need much more to this.  I have added some Gold Cord and Gold Doily.  Here is a close-up of the cards.

P1170379

P1170377

So I had to then make a bag using the Curvy Keepsake Framelits to make a cute set.

P1170385

P1170388

P1170394

I hope you like these.  Thanks for stopping by. Now get hopping to the next stop on the Blog Hop. You will now go to Libby’s blog HERE.

If you get lost then here are all the blogs to join in.

1. Libby Dyson

2. Paula Reid

3. Keryn Campbell

4. Carly Middleton

5. Rachael Lewsley

6. Narelle Fasulo

7. Emily Campbell

8. Emma Palonek

9. Jo Weedon

10. Rebecca Scurr

11. Andrea Buckland

12. Rochelle Blok

13. Kathryn Ruddick

14. Monique Fielder

15. Bernie Collins

16. Liv Ingle

17. Sally Williams

18. Ria Kaire

19. Delys Cram

20. Jessica Williams

21. Lou Kitzelman

22. Barbara Williams

23. Kelly Kent

24. Jenny Hayward

cards, Christmas

STAMPIN’ UP! HOME FOR CHRISTMAS PLAYTIME!

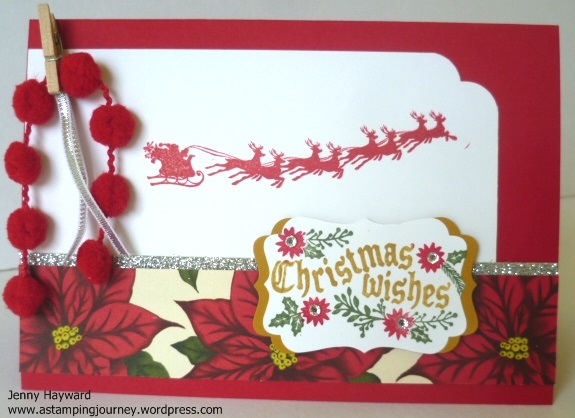
As demonstrators we could order from the Holiday Catalogue weeks ago.  When I received my preoder I didn’t know what to play with first.  Do I stamp or punch or do I cut??? Such a dilemma. After I had a little play I made up a card using the Home For Christmas product suite.  This was one of the first cards I made.  I will be honest I am not completely happy with it.  Not sure why but maybe you can help me out there.  I shared it on my Facebook page a few weeks ago and realised I hadn’t shared it here. So for your viewing pleasure – or not! here is the card. 🙂

P1170191

I loosely based the layout of the card on Freshly Made Sketches #142

FMS Final 142-001

I do love the new Curvy Corner Trio Punch I have used here.  I used markers for the greeting and punched it out using the Decorative Label Punch. A little sparkle with the Silver Glimmer Paper and Rhinestones and finished off with some Real Red Pom Pom Trim and Silver Ribbon.

I am showcasing this suite in the ESAD Blog Hop TOMORROW (Sunday) so head back here at 6.30pm AEST.  We are all focusing on the great products in the Holiday Catalogue.  I do hope you can join us.

Jenny

Catalogues, Christmas, Stampin' Up!

DO YOU WANT TO SEE THE 2015 HOLIDAY CATALOGUE???

It’s September 1st which means ….It’s Spring!!! Well in the Southern Hemisphere it is BUT even more exciting – (can I say that??) – Yes, even more exciting is the 2015 Stampin’ Up! Holiday Catalogue is live TODAY!!!

You are going to absolutely love this.  There is so much AWESOMENESS!! Now click HERE to go and view it online.  (I will add the link in the sidebar shortly for future reference).

2015_HolidayMini_en-AU

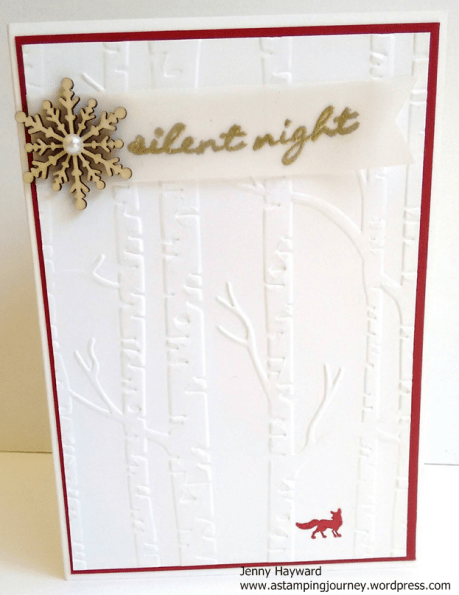
I have been playing with products in this catalogue for a few weeks now.  (Just one of the benefits of being a demonstrator!).  I have posted a few projects recently and I have more to share with you too.  Yesterday I had a quick play and made up this card.  This was inspired from some cards on Pinterest.

Christmas

I have used the new ‘Woodland’Embossing Folder.  Now this is towards the back of the catalogue (p39) and can be overlooked especially by us downunder as we don’t celebrate Halloween and Thanksgiving and people tend to stop after the Christmas products; BUT keep going there are some awesome products that you will be able to use anytime.  The stamp set is ‘Jingle All the Way’ (p12) and I love those sweet wooden Snowflake Elements (p23). I have finished it off with an Adhesive Pearl.

So now I am going to stop talking so you can go looking at the catalogue.  If you want to get any of that goodness and don’t have a Demonstrator then let me know.  If you would like a Catalogue sent to you then let me know too.  I know you can read it online but it is so much nicer to have the real thing. 🙂

Happy Reading 🙂

Jenny

3D projects, Christmas

12 WEEKS OF CHRISTMAS REVIEW!

Did you enjoy the recent 12 Weeks of Christmas projects?? There were a lot of awesome projects by the team. What was your favourite project do you think???  I would love to hear what you thought.

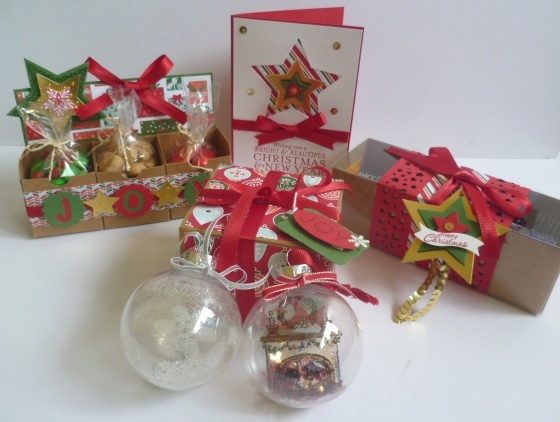
I was looking at my projects the other day and noticed a theme.  I didn’t plan it like this though. These are my projects I created over the 12 Weeks.  Do you notice anything???

P1150540

I seemed to have a theme of using the Nordic Noel DSP and different Gift Packaging that Stampin’ Up! has available.  I have to say it is so great that there are so many different sizes and types available.  These do make dressing up gifts and treats quick and easy.  For these projects I used the Tiny Treat Boxes (only available now until January 5th), the Kraft Gift boxes and the Tag a Bag Boxes.

If you missed these posts you can find them all here.

Tiny Treat Holder

Clear Ornaments and Gift Box

Tag a Bag Box Treats and matching card.

If you want to check all the projects from our 12 Weeks of Christmas then just click on the tag below of “12 Weeks of Christmas” and all the posts should come up.

It might be a bit late to make any of these projects for this Christmas but maybe they will be useful for next Christmas or another occasion.

Have a wonderful Christmas surrounded by the ones you love and may you take some time to reflect on the Greatest Gift we have been given.

I am taking a break from blogging for a week so I will see you with more creative projects in 2015. Thanks for being part of my journey this year. 🙂

Jenny x

Merry Christmas manger

3D projects, Christmas

TEAM SECRET SANTA!

We had our last ‘Inky Fingers’ team meeting for the year last week.  As usual we had swaps and also had a Secret Santa.  I will show you the Secret Santa gifts in a minute but first I will show you the swaps I made.

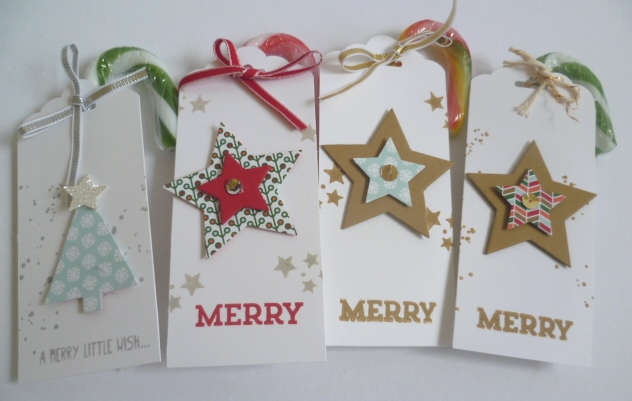
I had limited time but I made up some tags with a candy cane attached. These are just some of the selection.

P1150552

I used the Scallop Tag Topper Punch to punch out the top of the tags.  I stamped the background on the tags with ‘Gorgeous Grunge’ for the speckled effect and the stars from ‘Be the Star’ stamp set.  The “Merry” is from ‘Cheerful Tags’ and the “Merry Little Wish” from ‘Get Your Santa On’. I used the Nordic Noel DSP to cut the trees and the stars.

Now I will show you the Secret Santa gift I received.  This is a cute little backpack and was filled with teabags and chocolate!

P1150619

P1150614

Isn’t it sweet?? I have been wanting to make one of these for a while but now I have my own cute one.  Thank you my Secret Santa 🙂

Here is the gift bag that I made for my Secret Santa. It was a regular white gift bag with handles and then I made up the stars to hang off it. It is hard to see but I stamped the stars in Lost Lagoon and heat embossed them. The silver stars were embossed with the Big Shot using the Perfect Polka Dots Embossing Folder. I added a Rhinestone to each star and threaded Silver ribbon to hang them.  I didn’t take a photo of the whole bag.  Sorry – but I think you get an idea.

P1150586

I hope your Christmas preparations are going well.  It is hard to believe that Christmas is in just 2 days. Yikes!!

Thanks for stopping by,

Jenny 

cards, Christmas

I JUST HAVE TO SHOW YOU THESE CHRISTMAS CARDS!

I am very proud to show you these cards today.  I can say that because I didn’t make them.  These were made by my clever Mother-in-law (who is 87!).  She has just started getting more into cardmaking recently and just loving it.  I loved these cards she has just made and thought I have to show you her fabulous work.

Firstly on this card, trees were punched with the Tree punch from Rich Razzleberry from the Brights Designer Series Paper Stack.  The white paper has been embossed with the Square Lattice Embossing Folder and adhered to a Tempting Turquoise card base. A non-traditional colour scheme here.

P1150629

These next 2 use the ‘Festival of Trees’ set.  The left card is on a Real Red card base.  The scallop edge is cut with the Scallop Thinlet and adhered at an angle.  Great idea!  The star is from the ‘Bright and Beautiful’ stamp set.  The one on the right is on a White card base and the edges sponged.  The scallop edge this time is ran through the Big Shot with the Delicate Details Embossing Folder to give it some texture. The greeting is stamped on a piece of white card and added to the card.
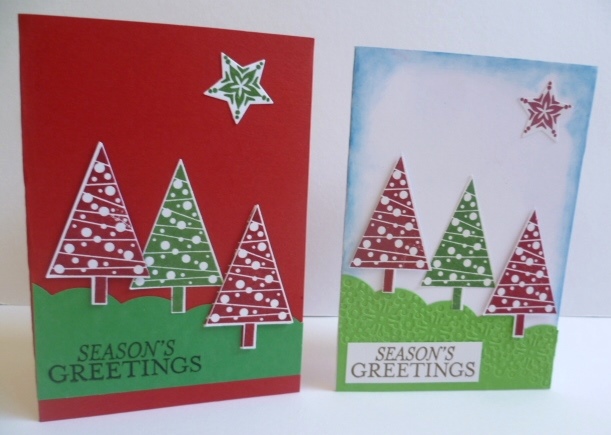
P1150628

Now for the next two. The one on the left has a large star cut from the Pool Party base card then a piece of Pacific Point card is adhered underneath.  A star is cut from Silver Foil Sheet and then another star is stamped and cut out with the matching Framelits and then layered together.  The greeting from ‘Bright and Beautiful’ is matted on a Pacific Point card piece and adhered to the card.

The right one is on a Real Red card base.  The ornaments are from ‘Ornamental Keepsakes’ stamp set.  Two Wild Wasabi Ornaments are stamped directly onto the Whisper White card mat. Another ornament is stamped in Real Red and cut out with the Framelits.  The “JOY” is from the ‘Bright and Beautiful’ stamp set and stamped in Smoky Slate.
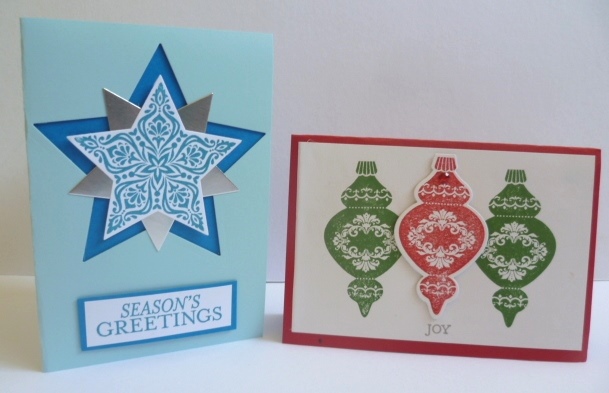
P1150626

Now for the last two which I think is very clever.
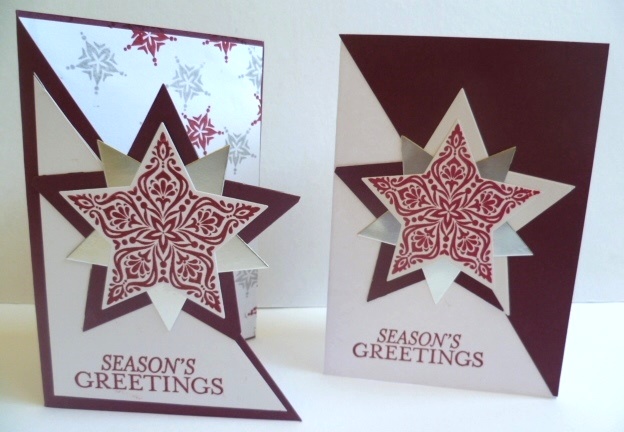
P1150624

The one on the left is on a Blackberry Base.  The front of the card is cut at an angle.  Then a Whisper White angled piece is adhered to the front.  Stars are cut from Blackberry Bliss, Silver Foil and a white one stamped.  These are all layered together and the greeting stamped on the front. Inside on a Whisper White card mat the smaller stars are stamped in the upper right corner and partway down on the right side.  This is in Smoky Slate and I think Cherry Cobbler (?).  The card on the right is on a Whisper White card base.  The angled piece that was cut from the other card is adhered to the front of this card.  Then a large star is cut from both Blackberry Bliss and Whisper White and half the white star is adhered to the Blackberry card.  (Clever!!).  Then another star is cut from Silver Foil Sheet and one stamped on Whisper White. These were layered on the front of the card and a greeting is added.

What do you think?? Pretty clever, Hey! I am so proud of her.  I think she has done an awesome job.  So why don’t you stand and applaud my Mother-In-Law’s great results.  Or why not drop her a comment here and tell her what an awesome job she has done.  I know she would love that.  Her name is Verna BTW. 🙂

Thanks for stopping by and seeing these wonderful cards today.

Well, I might just have to go back to showing you my projects next post!!

Until then, Happy Stamping,

Jenny