cards, Stampin' Up!, Techniques

BEST BIRDS WITH PLAYFUL PALETTES!

After I made the card with the Best Birds set the other day (you can see that card in a post or 2 back), I thought I would make a couple more cards with these stamps and dies.  I had some bits of the Playful Palette DSP stack lying around and I am really trying to use my paper more. I have so much paper left over when it comes to the end of a catalogue.

These “bits” were just the right size for the front of a card.  Here they are for you.

The first card is using the Sweet Sugarplum card base.  Flowers were stamped on the base. I have used the new Oval Layering Framelits to cut some white card and stamped the hatch pattern in Peekaboo Peach and the sentiment in black.  I really like the sentiments in this set. It has beautiful font and lovely words. I sponged the edges of the Peekaboo Peach birds before adhering them to the card.

Best Birds 2

The next card I had 3 pieces of the Playful Palette Paper stack that just fitted nicely.  I matted them on to black card and added it to a Blushing Bride card base.  The bird was cut in the Sweet Sugarplum.  The tag is cut from the ‘Tags and Labels’ Framelits.

Best Birds and Playful Palette strips

So some cute cards using  “bits” on my table.  That’s always a good thing isn’t it. 🙂

Have a great weekend,

Jenny

cards, Stampin' Up!, Techniques

BEST BIRDS IN ROSE RED!

Yesterday was my Mother-in-Law’s birthday.  As she makes cards herself the pressure is always on when I make a card for her.  I thought for the card I would ink up the ‘Best Birds’ set that I have had for a few weeks and have not been able to use yet. I played around with watercolouring it.  I will show you the card and then share a few tips in making this.

Rose Red Birds

I chose Rose Red as the base card as that is my Mother-in-Law’s favourite Stampin’ Up! colour.  Well any of the reds!  (TIP#1) I used a piece of Watercolor paper and firstly washed over the card in the centre area with the aquapainter to lightly dampen the card  I have discovered recently by wetting the card it allows the ink to spread much easier creating a more washed look.  I used Blushing Bride on the left, then Rose Red in the middle section and Cherry Cobbler towards the right end.

(TIP#2) For regular watercolouring you can use the Thick Whisper White card or Shimmery White but if you are creating a washed look you MUST use the Stampin’ Up! Watercolor paper. (TIP #3) You need to be patient and let it dry.  Either you can use a Heat Tool or leave it for a few hours.

I stamped the bird, the branch and the flowers on watercolour paper too Black StazOn and watercoloured them.  (TIP #4) When colouring the bird I gave a light watercolour with the Rose Red and added highlights of Cherry Cobbler.  On the wing I washed over it with Crumb Cake and then highlighted it with Soft Suede.  The branch was coloured with Soft Suede for the branch and Old Olive for the leaves. The flowers were coloured with Rose Red and then darker highlights added in the centre with more concentrated Rose Red.

These were all then cut with the matching ‘Birds and Blooms’ Thinlits.  Too easy with that. No hand cutting necessary!! 🙂

I was going to cut the washed piece with the ‘Lots of Labels’ Framelits. I left the framelit on the card ready to cut in the morning but when I looked at it then I thought it might look OK to have a frame over it.  I cut the frame from Crumb Cake with the 2 largest ‘Lots of Labels Framelits’.  I am really pleased I went that way with it. I stamped the hatch pattern from the stamp set in Rose Red in the middle of the piece and stamped the sentiment in Memento Black.  Then it was all put together and a couple of flowers stamped around the edge to finish.  I was pleased with the finished result – and I think it received approval when I gave it to her today. 🙂

I hope you found these tips helpful when you create your next watercoloured card.  Let me know how you go.

Have a great day,

Jenny

cards, Stampin' Up!, Techniques

WETLANDS DIRECT TO PAPER TECHNIQUE!

We made this card at our team meeting earlier this month. Thanks Barbara for sharing it. I thought I would show you how you can make it too.  First let me show you the card.

Wetlands

I have used the ‘Wetlands’ stamp set.  I am glad this is still around.  I haven’t had a lot of time to play with this set.  I have used the Direct to Paper technique to create the background.

 DIRECT TO PAPER TUTORIAL

1. Choose your ink, I have used Crumb Cake and Soft Sky.  You can use regular Whisper White cardstock for this technique. With the Crumb Cake ink place it over your cardstock near the edge.  With the inkpad tilted very slightly upwards swipe the cardstock across the card starting at just off the edge of your card just in the lower half of the card.  You may want to repeat the swiping a couple of times until you are happy with it. Always starting off the cardstock each time.  It is fine to have white patches showing.

?

2. Now using the Soft Sky repeat the swiping in the top half of the card.  Repeat the swiping a couple of times until you are happy with the coverage.

?

?

3.  When you are finished stamp the image and the greeting from the ‘Wetlands’ set using Black ink.

?

Each time you do this technique it will be different – which is the fun part.  You never know what you are going to get.  Try it with different stamps and see what you get.  I can’t wait to try this again.

Thanks for visiting me,

Jenny


cards, Classes, Stampin' Up!, Techniques

WATER SPRITZING TUTORIAL!

A few weeks ago for Onstage I didn’t have an opportunity to make swaps to share with other demonstrators.  Life has been a little busy. 🙂  I did make a card for the Display boards though where you can add your swap cards or samples.  They are always so inspiring and is a big part of why I love to go.  It’s like a live Pinterest board!!!! 😉

I thought it was time to show you the card. This is a technique I have been playing around with recentlly. I don’t really know what the name of the technique is but I call it the Water Spritzed technique. I will show you how to do this below so read on.

This is my card I made for the board.

waterspritzed_Bythetide

You can see the little “splodges” in the ink where the colour has lifted. It creates a cool motley effect.  Here is how it is done.

WATER SPRITZED TECHNIQUE

1. Using Thick Whisper White or Shimmery white cardstock, heat emboss your images.  On these I embossed the coral and the fish with white Embossing powder.  I stamped the seahorse with Black Stazon.  It is important to emboss or to use the Stazon so the ink on the images don’t run when you spritz.

2. Use your first colour and sponge in patches over the card. I have used Bermuda Bay here.

P1180329

Then add your 2nd colour.  I have used Daffodil Delight.

P1180331

3. Fill in with your 3rd colour.  I have used Marina Mist I think.  It’s good to have 3 co-ordinating colours. Once you have sponged the colours on, use a tissue to wipe off the ink where the images are embossed.  This makes the embossing shine.

P1180332

4. With a spritzer with water or I use an old Stampin’ mist bottle, hold the bottle a little away and lightly spray the card.  You don’t want to soak the card just lightly mist.  You will see some of the colour start to lift.  Mist until you are happy with the coverage.  Keep the card level or you will start to have runs from the water running down. Leave the card aside on the table for a few minutes.  The longer you leave the card, the more effect you will get.  Finish off drying your card with the Heat Tool lightly.  You don’t want to melt your embossed images any more.

P1180334

You can now finish your card as you like.

Here is the first card I made using this effect. I have used Rose Wonder set. Thank you to my friend Leonie for showing me this technique.  We made this card at my last technique class too. I have heat embossed the images in white,  The inks I have used are Elegant Eggplant, Tempting Turquoise and Bermuda Bay.

image-6194

I made another card that day but I didn’t leave the water sitting on the card for long so it doesn’t have as much mottling.  I was a little disappointed with the colour combination. I used Watermelon Wonder, Mint Macaron I think and Lavender Lace. I thought I would show you the card anyway. This is using Birthday Blossoms.

image-6191

So how about you have a try at this technique.  Each time you do one it will turn out different. It’s fun.

Thanks for visiting me today.  Have a wonderful day/night.

Jenny

cards, Stampin' Up!, Techniques

SOMETHING FOR BABY!

I can finally show you this card.  A friend who is also one of my downlines had a baby boy back in January.  I have only got to see her recently so now I can show you the card.

baby blue

I found the idea for the window card on Pinterest but I changed it around and made it larger into a standard size card.  The window was cut with the Square Framelits. The Designer Series Paper was the ‘Perfectly Artistic’  Sale-A-Bration paper which is now no longer available.  Well it was when I made the card 😉

The cute little suit is from ‘Something For Baby’.  It is so nice to have the matching framelits too.  No cutting!!  The greeting is from ‘A Dozen Thoughts’, stamped and then punched with the Oval Punch.  I cut a red banner using the ‘Itty Bitty Framelits’.  I cut the banner in half and adhered this to the back of the oval to make it larger. The red gives it a “POP” I think.  I added the red Candy Dot to the bib.  I am still unsure, maybe it should have been a Tempting Turquoise one?? Sometimes you second guess yourself.

Here is the inside.

baby Insdie _ 2

I added a piece of Whisper White to the bottom inside.  I stamped the duck in the Tempting Turquoise too. The greeting is from Sale-A-Bration set ‘Sky is the Limit’ which is no longer available either. 😦  I stamped it and then cut the greeting with the ‘Project Life Cards and Labels Framelits’

I think it has the cute factor.  What do you reckon?? 🙂

Thanks for visiting today.

Have a great day.  The weather is turning chilly now.  I am sad that Summer is leaving us but it is a relief to have cooler nights to sleep better.

Jenny

3D projects, cards, Techniques

FOLD FLAT CARDS!

How was your Christmas??  Our’s was a little quiet on the day but then celebrating with different family members for the last 3 days.  It’s all done now for another year.  I have packed up my Christmas stamps and cards and ready to move on to some different creating.  I haven’t had a lot of chance to create with the new products from the upcoming Occasions and Sale-A-Bration so I am looking forward to getting them inky.

I have had these projects for a while now and with all the excitement of the Holiday Catalogue they got put aside so I thought it was time to share these before we move on.  These are called Fold-Flat (or 3D) Cards.  You might have seen them around blogland.

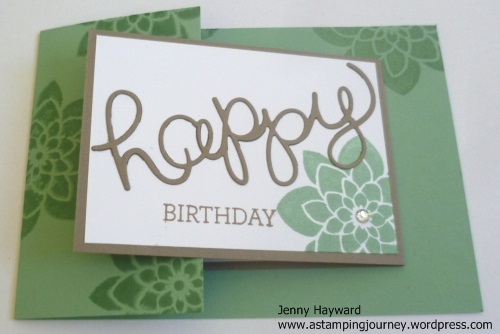
This one below uses ‘Celebrate Today’ we made this in a class a few months ago.  The original instructions were from HERE. You can follow along in that post.  They are available in English too. I have used the ‘Bohemian’ DSP.  Edited to add: The Measurements for this are just below this card.  The smaller version is further below.

P1170178

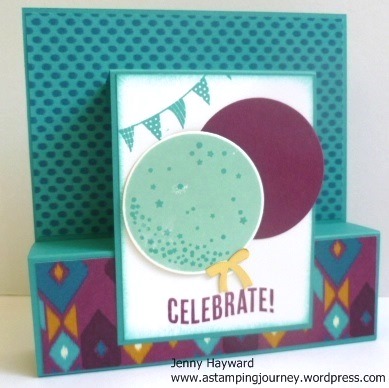
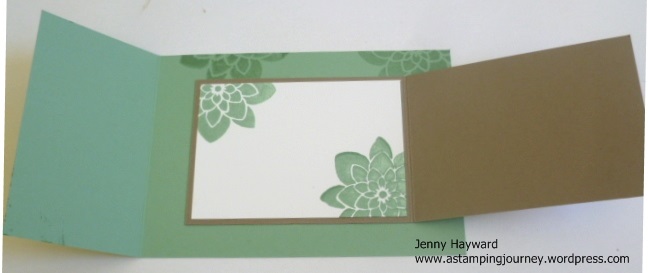
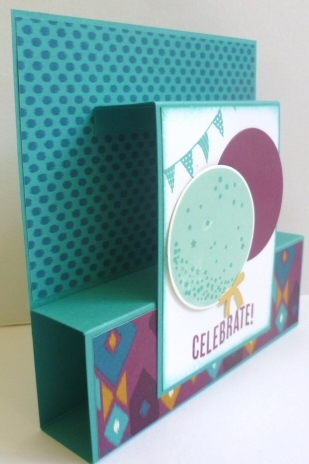
This is a side view.  This folds flat so you can post it.  I did find this quite large so later I made one smaller so it can fit in a standard size envelope.

P1170179


LARGE FOLD FLAT CARD TUTORIAL

Large back panel: 15cm x 27cm (6″ x 10 5/8″) Score on the long side at 15cm, 18cm, 23cm, 26cm. (6″, 7″, 9″ and 10″)
Front panel: 8.5cm x 15cm (3 3/8″ x 6″)  Score on the long side at 1cm and 4cm. (1/2″ and 1 1/2″).
Fold each of the pieces.  The card for the back panel is folded up into a box shape and the small tab adhered on to the card.  Check the photos if you are unsure what I mean.
The Front panel piece is folded up.  The small tab is adhered to the back panel about 1/3 of the way down.  Then adhere the larger section on to the “box” shape formed from the back panel.
Decorate as you like.  The Paper pieces are 4mm or 1/8″ smaller for that section.

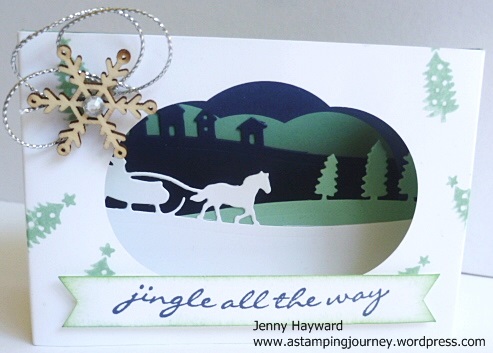
This smaller one uses the set ‘Something For Baby’.

P1170183

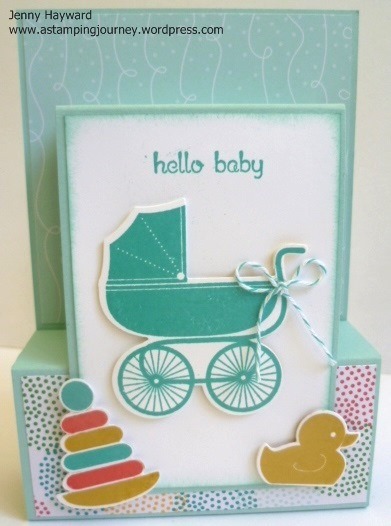
A side-view for you.

P1170182

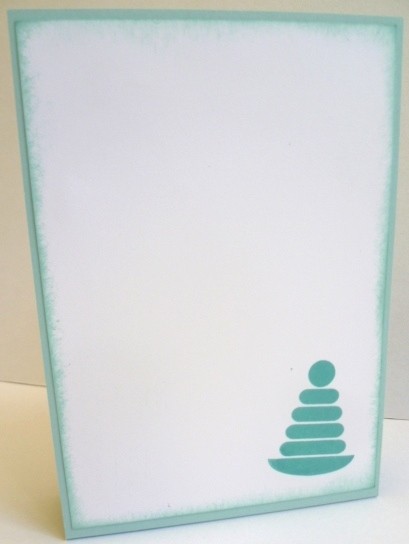
On the back you can adhere some Whisper White card so you can add the message.

P1170184

I will share my measurements for the smaller one.  Putting it together is the same as the large one so you can follow along in the above link.  It is very simple though.  Just a matter of folding on the scored lines and adhering.  There is a little trick to adhering the front piece so I will tell you that further down.

FOLD FLAT CARDS (Smaller version).

Base: Cut card 10.5cm x 27cm. (4 1/8″ x 10 5/8″).  Score at 15cm, 18cm, 23cm and 26cm.  (6″, 7 1/8″, 9″ and 10 1/4″).

Designer Series Paper strips.    TOP PIECE – 10.1 cm x 9.6cm (4″ x 3 3/4″)                     BOTTOM PIECE – 10.1 cm x 4.6cm (4″ x 1  7/8″)

Back: Cut Whisper White 10.1cm x 14.6cm (4″ x 5 3/4″)


Front Panel: Cut Card 7.5cm x 15cm (3″ x 6″).  Score at 1cm and 4cm.  (1/2″ x 1 9/16 – I hope that measurement is right?? It doesn’t seem right)  🙂

Card Mat: Whisper White – 7.1cm x 10.6cm (2 3/4″ x 4 3/16″).

ASSEMBLING (If you are having trouble following this, head to the link I added above for photos.  I didn’t think I would repeat the photo steps).

For the Base piece.  Add Adhesive to the smaller tab (on the back as it is lying down on the table) and fold up to adhere to the front.  (I added the DSP first so I could line up the fold just below the DSP).

Fold the front Panel on the score lines.  Add adhesive to the small scored section at the top.  Before sticking down the tab fold this under carefully and line up the second score line with the top edge of the base card and then press down on the small tab to adhere this to the base card lower down.  If you are not sure then check the tutorial link above to see the image. Add adhesive to the back of the front panel and then adhere to the folded section of the base card near the bottom.

++

I hope this all makes sense.  I loved making these and since I had the instructions out still to share these with you I decided to make one of these cards using some new Sale-A-Bration products.   I will post that card next post so come and visit again.

Jenny

cards, Techniques

SLEIGH RIDE DIORAMA CARD!

In a previous post I showed you the swaps I received from last week’s team meeting.  I thought I would show you the project we all made.  Vanessa showed us how to make this.  It is so cute! It is a Diorama card using the Sleigh Ride Edgelits and the ‘Jingle All the Way’ stamp set.

P1170665

This is only small.  I should have take a side view photo perhaps.  It is box-like and inside you have different layers creating the scene. I have used Pool Party and Night of Navy.  I finished it off with a Snowflake Element and some Silver cord.  I can’t share the exact dimensions as Vanessa has used this in a class and it was kind of her to share it with us.   I have found one on Splitcoaststampers Here which is very similar so you can make your own.

Thanks for visiting.

Enjoy your day,

Jenny 🙂

cards, Challenges, Techniques

FRESHLY MADE SKETCHES #200 – TAKE 2!

Yesterday I shared a card I made for the Freshly Made Sketches 200th Birthday Challenge.  I mentioned that the card I posted wasn’t my first card I made for it.  I wasn’t really happy with the first card but I thought I would show you it today.  It was my first time inking this stamp set up and I had an idea in my head but it just didn’t seem to work.  I don’t know?? You can be the judge. 🙂

Here is my card.

P1170266

I started with watercolour paper and lightly misted water on the card.  Then I used an aquapainter and the inkpads to brush colour over the card picking up ink from the pool of ink in the lid.  I used Marina Mist, Calypso Coral and Pear Pizzazz and let it dry.  Really I left it overnight as I had to get going doing other things.  I really wanted to stamp the card to get it finished and picked up the stamp several times to stamp but had to seriously talk to myself to wait!!!  The stamp set is ‘Gift From The Garden’. I stamped the pots in Mossy Meadow onto the card and then on scrap white stamped them again in Calypso Coral.  I cut the pots out and raised them up off the card with dimensionals.  I stamped the gloves onto scrap white card also and cut them out.  The greeting is from ‘Butterfly Basics.  I finished the card off with Whisper White Baker’s Twine and a Marina Mist Candy Dot.

Something is a miss though.  What do you think????

Thanks for visiting today.  I hope your week is super awesome. 🙂

Jenny

cards, Techniques

CRAZY ABOUT YOU JOY FOLD!

Just a quick post for you. Back to more projects from our Crafty Weekend. It has been some time since I have done this type of card. Here is this one for you.

P1170040

P1170041

I have used ‘Crazy About You’ stamp set and ‘Hello You’ Thinlets to make this card in Mint Macaron and Soft Suede.  This is a JOY FOLD card.  It is very easy to make.  It is a basic size card but cut your card vertically and score halfway. The front flap is cut in half.  Then a smaller folded card is adhered to the inside and they overlap when folding.  If that all makes sense??? You can find a tutorial to make your own on Splitcoaststampers HERE.  It was fun to make.  I must make another one again very soon.

Today I have been playing with some new toys from the upcoming Holiday Catalogue.  I will share them very soon.

Enjoy your day whatever you may do.

Come and visit again soon,

Jenny

cards, Classes, Techniques

FUN FOLD CLASS – IS FUN!!!

These are the fun cards we are making at my Saturday Stampers class this Saturday 15th August. (2pm). Cost $15 If you are local to Wollongong do come on by.  You just need to let me know by Thursday so I can have all the card cut.  They might look a bit tricky but they are really not hard to do.  I think you will like them.

P1170174