3D projects, cards, Tutorials

PAINTED BLOOMS BOXED SET!

There is only one week left of the current Stampin’ Up! Catalogue and the Occasions Catalogue.  I know there are lots of sneak peeks around of the new Catalogue but today I want to share a special project with you.  The Painted Blooms Designer Series Paper in the Occasions Catalogue is just so gorgeous and it saddens me that I haven’t used enough of it yet.  I had this idea in my head last week and just had to get this idea working before the week was out.

Firstly, I made the cards.  In the pack of Painted Blooms DSP there is a sheet with a gorgeous flower garden scene.  What could you really do with a sheet like this??? It just seems too nice to cut into it.  I saw this idea on Patty Bennett’s blog to cut the sheet equally and make a card set.  So I did just that!!  Here are my cards.

P1160748

Laying out all the cards like this you can see the lovely image.  It does seem such a shame to cut it up but it does make a gorgeous card set.  I changed the sentiments on my cards to the ones Patty had on her blog.  The bases for the cards were either Blackberry Bliss, Pool Party, Wild Wasabi or Rose Red.  I used ‘Perfect Pennnants’ for the sentiments in the top row.  If you have a look under the sentiment, I punched out a circle using the 1 3/8″ circle punch, cut it in half and adhered that under the sentiment to layer it..  The sentiments for the cards in the bottom row were from ‘Wetlands’ set.  I cut this out with the smallest banner die in the Banner Framelits set and I hand cut a narrow banner to adhere under that.

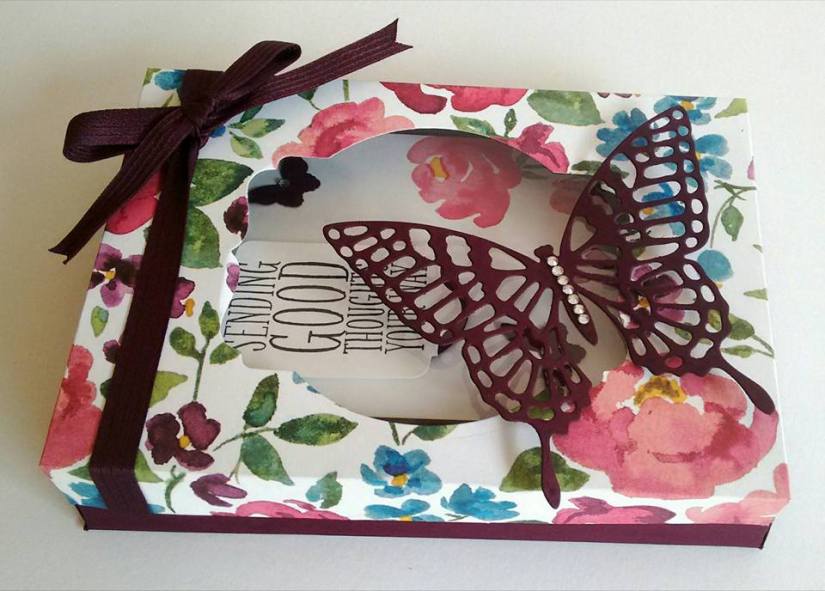
Now after making this card set I needed something nice to put them in.  I wanted a window gift box. I came across this idea from Chiaki on Stampingpro.  I used the Dressup Card Box listed HERE on the instruction Sheets.  I did change the measurements. (It took a little fiddling!). The Australian card bases are larger in size than the US and the envelopes I had were larger too (mine weren’t Stampin’ Up! ones – shh!). I will tell you my measurements shortly but here is the finished box.
box

ABOUT THE BOX

The lid for the box was made using another sheet in the pack of Painted Blooms DSP.  On the bottom of the box inside I adhered a matching piece of that DSP to line the box. I didn’t take a picture of that.  The Blackberry Bliss Satin ribbon is not wrapped around the whole box.  I wrapped a piece over the lid and tucked the ends just inside the lid.  That means the receiver won’t have to undo the ribbon each time they open the box.  I tied a bow with the ribbon and attached that to the top.

I cut a window in the lid – BEFORE ASSEMBLING – with the Deco Labels Framelits.  The width is a little wider than the Big Shot so I had to fold up one side and lay it over the framelit.  I adhered a piece of Window Sheet inside the box lid.  That just finishes it off.  I cut a large butterfly using the Butterfly Dies and adhered that straight on to the acetate.  A little bling never goes astray to finish off a project 🙂

Now for the actual box measurements.  I will give you the measurements I used. For those with Imperial measurements you can follow Chiaki’s tutorial.  I am sure those measurements will be fine.

THE BOX (Metric)

BOX BASE

Cut card 19cm x 24cm.  Score on each side at 3.2cm.  Cut up opposite tabs on both ends and adhere.

BOX LID

Cut card 21.5cm x 16.5cm.  Score at each side at 1.9cm.  Cut up opposite tabs on both ends.  Cut your window before adhering together.

Hope you like this project??  Thanks for stopping by,

Jenny
3D projects, Tutorials

LARGE TOTE BAGS ARE ALL THE RAGE!!!

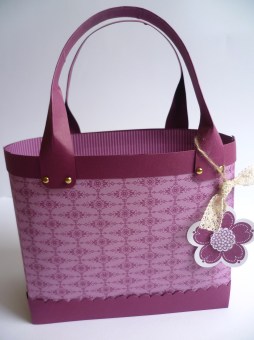
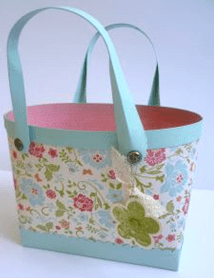
You  might have seen lots of little Tote Bags around the internet???  They are great little gift bags to give those special gifts to others.  A few years ago now I created a larger Tote Bag as many of them were great for card sizes or small gifts but if you have a larger gift THEN a larger Tote is needed right???  The Totes I shared way back then continue to be a huge hit on my blog and they have a large number of repins on Pinterest every week.  SO, if you have missed it, I thought I would show you these again. I have another type of bag in the process at the moment and when I finally get to create them I will share that too.

So here is my Tote bags for you that you can make to give that special larger gift.  (maybe a top or scarf or LOTS of chocolates!!!). 😉

new tote                  P1030185

You can find the tutorial to make these in this post HERE.

A little while after making these I decided it was time for an update.

P1110769

You can find this Tote in this post HERE.  I followed the original tutorial with a few modifications.

I would love to see your versions so send me a photo. If you make one then don’t forget to give credit.  🙂

Have a great weekend,

Jenny

cards, Stampin' Up!, Techniques, Tutorials

BLENDABILITIES + WHITE EMBOSSING = COOL EFFECT!!!!

I am loving using the new Blendabilities.  Have you had much of a play yet?? When they first came out I discovered this cool technique but I only got a chance to try it out a couple of weeks ago. Finally I can show you the cards PLUS I have a tutorial so you can try this out yourself.

For this card I used the Hostess Set “Hello There”.  I love how you can get the different coloured effect.  Isn’t it cool???  Once I coloured it (which you can read about in the tutorial below), I added it to my card.  For the card I wrapped some White Baker’s Twine around a piece of Sweet Taffy DSP and adhered this to a card base of Melon Mambo. I added the little flowers punched from the Itty Bitty Accents punch pack.  It is hard to see it clearly but I added some Dazzling Diamonds to the centre to add some sparkle.

P1140207

So how do you create the effect?  I will show you.

COLOURING WHITE EMBOSSING WITH BLENDABILITIES

To show you how to create the technique I am making some little tags using the Scallop Tag Topper Punch.

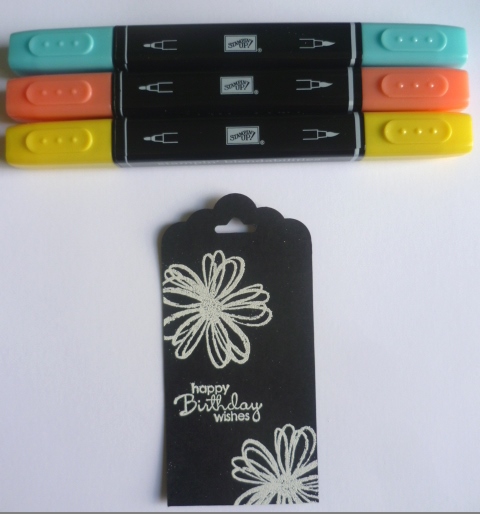
1. White emboss your image. If you are not familiar with that then I will just explain this.  Swipe your cardstock with the Embossing Buddy (this reduces the static on your project in which stray specks of embossing powder will cling to).  Stamp your image in Versamark and then pour over your White embossing powder.  Tip off the excess then heat the image with your Heat Tool to melt the Embossing Powder.  (I love watching the embossing powder melt.  It is so magic.  I don’t think you ever get sick of watching it.)

Take just a minute to let this dry before you start colouring.

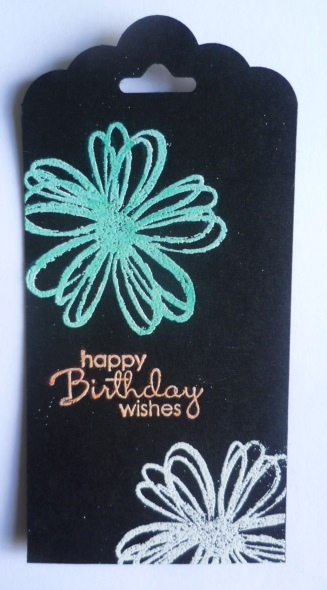
2.  Select your Blendabilites.  I used Coastal Cabana, Calypso Coral and Daffodil Delight.  Colour over your image as you like.  I found using the fine tip more effective especially on the finer parts of the image.

P1140279


P1140281

3. Once you have finished colouring you can complete your project.

P1140277

I made lots of these at the time to give out.

P1140282

Now you can go and try this technique yourself and watch the magic happen.  ENJOY!!

Until next time 🙂

Jenny


3D projects, Tutorials

A NEW DESIGNER TOTE BAG!!

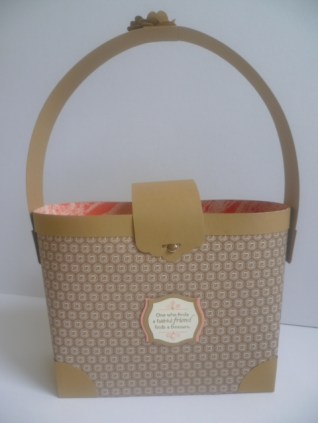
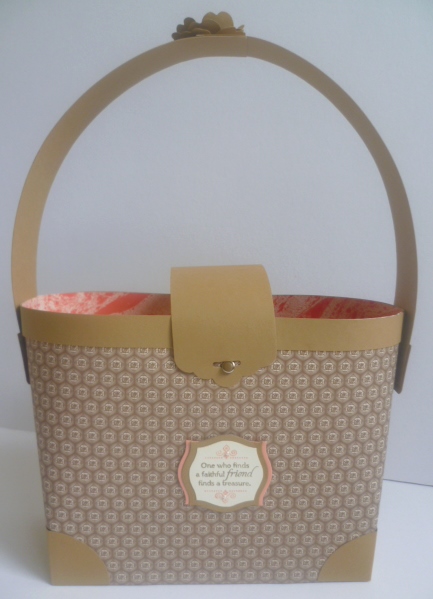
I have been wanting to create another Tote Bag for a long time but I haven’t had a chance – until now!  The ‘Large Tote Bag’ has been my most popular post over the last 2 years but I wanted to freshen it up.  Here is my new Tote.  Below I will share all the details for you.

P1110771

Here are a few other views. 

I have used the lovely Venetian Romance DSP and Baked Brown Sugar Cardstock.  I added the Soft Suede Candy Dots to the tabs.  They match in so well I think.  I added a flower to the top to hide the join.  I will tell you about that below.  The greeting is from ‘World Treasures’.  I coloured the words with markers (Baked Brown Sugar and Crisp Canteloupe) and cut around the inside of the border.  I cut a piece from Baked Brown Sugar with the Apothecary Framelits and layered this under the greeting and then cut another in Crisp Canteloupe and cut this one in half to layer underneath.

Let’s move on with ‘HOW TO MAKE THE TOTE BAG’ 

The original post for the Tote Bag with step-by-step instructions is HERE.  These are in metric.

** Edited to add: I have since updated that post to have Imperial measurements as well.

If you would like the tutorial emailed to you then drop me a comment.  

Let me tell you the modifications.

1. Omit the card strip for along the bottom edge.  Punch 2 circles in Baked Brown Sugar with the 2 1/2″ circle punch. Cut them in half.  You then have 4 pieces.  Fold each one in half and then adhere these to the corners of your bag.

2. For your handle, Omit the 2 card strips and the steps to prepare your handle.

Cut 2 pieces 3.5cm x 25cm (1 3/8″x10″). Join the 2 strips.  Adhere the handle to each end of the bag.  I used Sticky Strip for strength.  Cut small tabs to add to your handles.  Cut 2 pieces 4cm x 3cm (1 5/8″ x 1 3/8″).  Round the corners on the bottom edge.  Adhere these to the ends of your bag.  Add the Candy Dots or Brads for decoration. (If you are using Brads then place them on your tabs before you add the tabs to your bag).

3.  For your Bag Closure: Cut your card 5cm x 16cm ( 2″x 6 1/4″).  Punch one end out with the Scallop Tag Topper Punch.  Adhere the other end to the back of your Tote Bag.  Gently bend the closure over and mark the point on the front.  Place a Brad on the front to that will hold your closure.  I used a Candy Dot on a Brad.

4.  To cover the join in the handle I added a punch flower.  I punched out 3 flowers using the Pansy Punch and curled them a little.  Join these together by overlapping a little and adding Sticky Strip.  Add a small flower punched from the Boho Blossoms punch.  Adhere a large Adhesive Pearl to the middle.

I hope you like this version.  I hope you can go and make a Tote Bag yourself.  I hope the instructions are clear.  If you have any problems then please don’t hesitate to contact me.

Have a great day. 🙂

Jenny

cards, Techniques, Tutorials

KISSED BUTTERFLIES

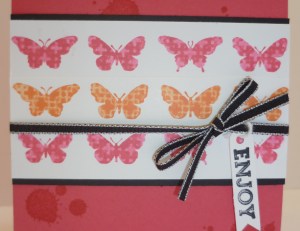
Have you kissed lately??? Your stamps – what else would I be talking about!!!  Here is a recent ‘Kissed’ card I made using the’ Butterfly Collection’ wheel.

P1090660

I have used Melon Mambo and Pumpkin Pie.  The other stamp sets I have used are ‘Gorgeous Grunge’ and ‘Oh Goodie’ which is a sneak peak at a stamp set in the upcoming Holiday Catalogue.

This card was inspired by a project in last month’s Demonstrator magazine.  I really liked the effect so I thought I would give it a go, and I thought I would share with you how to do it too.  So, let’s get kissing!!!

KISSING YOUR EMBOSSING FOLDERS

1. Firstly, take an Embossing Folder with a small print on it.  I have used the Square Lattice folder.  Run a piece of scrap Whisper White card through it.

P1090656

2.  Ink up your wheel and run your wheel over the card.  Alternatively, ink a solid image stamp and stamp on the embossed card.  This is taking off some of the ink on your wheel or stamp.  OK now you are thinking,  Why can’t you wheel or stamp directly on to the Embossing Folder.  You can but it doesn’t give you such a defined impression.  Try it and see.  (I did!!).  It really pays to do the extra step.

P1090657

3. Run your wheel over a second piece of Whisper White card that you are using for your finished card.  You will see the embossed print on your stamped image.

P1090658

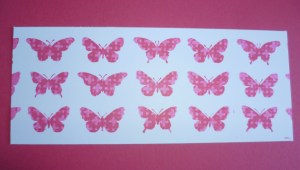
4. For the finished card above, I inked up the wheel in Pumpkin Pie and repeated the steps.  That is I ran it over the scrap Whisper White.  You can use the same piece you already used it doesn’t matter as you are just wanting to take off some of the ink.  Then wheeled it over another strip of Whisper White card.  I cut the middle row of butterflies out and adhered them over the Melon Mambo piece I had previously inked.  (As in Step 3).

P1090660-1

For the card I finished it off with some black Taffeta ribbon.

I hope you like this technique.  Now go and get kissing your stamps – and Embossing Folders.

Have a great weekend,

Jenny

cards, Techniques, Tutorials

PAPILLION POTPOURRI CHALKBOARD

You have probably seen the Chalkboard Technique around Blogland by now haven’t you???  I have been wanting to have a go at this technique but hadn’t got around to it until a couple of weeks ago at our Team Meeting.  The wonderful Vanessa Webb showed us this technique.  I created the Chalkboard but didn’t assemble the card until a couple of days later.  This Chalkboard Technique went a few steps further than most of the ones you might have seen around.  I will share the details later but first here is the card.  Just note this is my first attempt so it is a little scratchy.  Ooh! Saying scratchy about chalkboard sends shivers down your spine!!!!!

P1070827

CHALKBOARD TECHNIQUE

1. Firstly rub your Black Cardstock with the Embossing Buddy. Stamp your greeting in Whisper White Ink onto the Black cardstock.

2. Pour over White Embossing Powder and heat emboss.

3. Stamp the greeting again in Whisper White and stamp just offset to the right of the greeting you have stamped already.  Use the Stamp-A-Ma-Jig to help you line it up right.  You don’t need to heat emboss this time.

4. Stamp images you wish to use in Whisper White and heat emboss with White Embossing Powder.  You don’t need to re-stamp these ones.

5.  Using coloured Pencils go over the images particularly where you had restamped on the greeting.  This creates a block type print.  (If you know what I mean!!). I added a bit of colour to the butterflies as well.

6.  Using a tissue pick up some Whisper White ink and dab off on scrap paper then rub over in patches on the black card to create rub marks.

7.  Optional step:  I draw a line edge around the card in pencil and you probably can’t see it well but I outlined all my images with white pencil.  It kind of creates a shadow.

8.  Assemble your finished piece onto a contrasting colour card mat and card base.

This is a fun technique.  If you didn’t want to do all the colouring.  Just stamp in Whisper White and Emboss in White Embossing powder.  Then rub the white ink over the card as I described in Step 6.  I will have to try the simpler version now.  Just add that to the list of projects to tick off!!!!

Thanks for stopping by and I hope you like this version of Chalkboard.  Leave me a comment.  It is nice to know you have been to visit.

Have a good day,

Jenny
Tutorials, Uncategorized

IT’S A POP-UP!!!!!

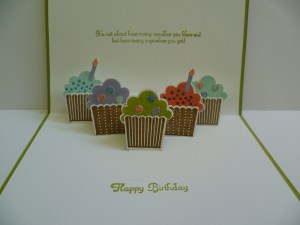
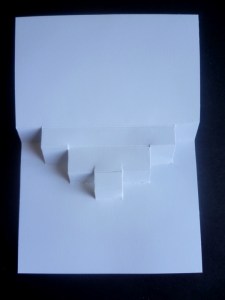
Finally I have got back to you with instructions of how I made the Cupcake Pop-Up card.  I showed this card one or two posts back but here is a photo of the card to refresh your memory.

Leonie N  showed me how to make this card at a stamping day a few weeks ago.   It is so cool and gives such a ‘WOW’ when you open it.  I have put together a few steps and some photos to help you.

CUPCAKE POP-UP CARD

NB. All the measurements are in metric.  I have used the Cutter to cut the slits for the Pop-up.  I found that so much easier.

1.  Cut Card 20cmx13.8cm.  Score card along the 20cm side at 10cm.

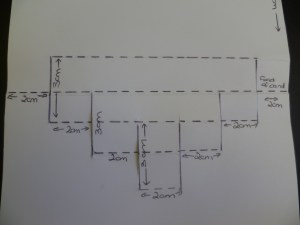
Here is the template to go with the photos.

——-   Score lines                         ______  Cut lines

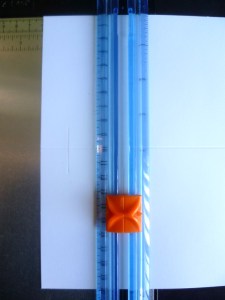
2. Line the card up on the cutter with the 13.8cm edge at the top. Starting at the scored centre line, move across 2cm.  Cut 1.5cm below the score line and 1.5cm above the score line (ie making a 3cm cut).  It is a bit hard to tell but in the photo I have the edge of the card lined up at the 2cm mark.  I have the cutter at the 11.5cm mark and will cut up to 8.5cm.

3. At the 4cm mark on the cutter, cut from the score line down 3cm. (Sorry I didn’t have a photo of this one but you can get the idea from the other photos and the template- I hope!)

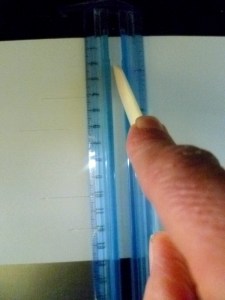
4. At the 6cm mark, measure down 1.5cm below the score line (this is the 11.5cm mark on the cutter). Cut 3cm down (ie to the 14.5cm mark). (The photo shows the cutting ending at the 14.5cm mark).

5. At the 8cm mark, cut a line following the same measures as Step 4 above.  (ie measure down 1.5cm below the score line down to 14.5cm.

6. At the 10cm mark, cut from the score line down 3cm. (Missed that photo too!)

7. At the 12cm mark, cut 1.5 cm below the score line and 1.5cm above the score line. (Like you did in Step 2).  You can see the other cut marks from the earlier steps.

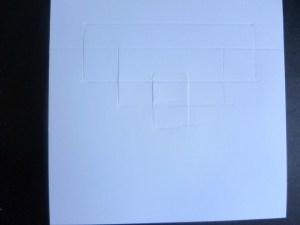
Here you can see all the lines cut.  If it’s not too clear refer to the template photo above.

8. Now the cuts are made, score the lines between each cut line (see the template above to show the score lines).  Don’t score out towards the edge of the card.

9.  Now the folding begins.  Here are a few tips to help with the folding. Firstly, fold the card in half on the regular score line.  Lift up the top half of the card and fold on the first score line.  Then turn the card over and fold the card back on each of the score lines.  Then open the card and push from behind on each of the folds and cuts to push it in shape.  Press along the score lines to make the scored lines crisper.

10. Now the folding is done, you can adhere this in to your card.  Place adhesive on one half of the back of the template.  Place inside the base card while folded.  Then you can add adhesive to the other half of the template and adhere in the base card.

Phew! I hope you are still with me!!!  I hope this all makes sense???  If any questions, please don’t hesitate to ask.

Enjoy!

Jenny x

3D projects, Tutorials

“TAKE-OUT BOX TUTORIAL”

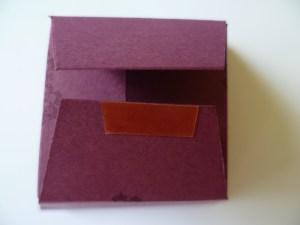
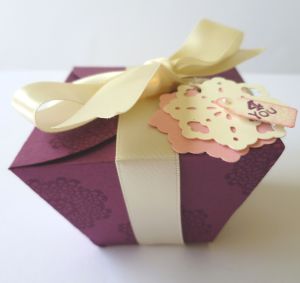
Last post I showed you a Take-Out Box I had created.  I have now put together a tutorial for you.  This is created with the Petal Cone Die on the Big Shot.   I hope it is clear enough for you.

TAKE-OUT BOX

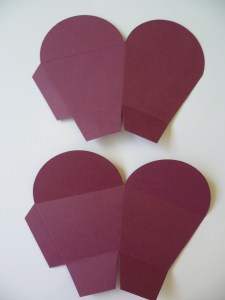
1. Cut 2 Petal Cone Die pieces.  You would need to do these one at a time so it doesn’t cut the score line rather than score it.

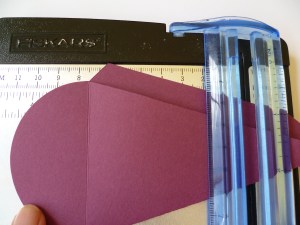
2.  Place ONE of the pieces in your cutter.  Place the score line at the circle end at the 7.5cm (3″) mark.  The score line must run Vertical in the cutter.  (This is really important).  Have the point of the tab resting against the grid at the top.  Check the photo for correct placement.  I hope this is clear enough.  Once in position cut the card piece.  Do this with both pieces.

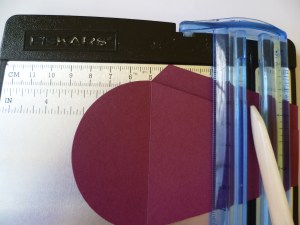
3.  Move the piece along the cutter to the 5cm (2″) mark.  Have the score line running vertical again at this mark.  Have the point of the tab running up against the grid on the cutter.  See the photo again for placement.  Now score the card piece.  I use my bone folder some people have the scoring blade on the cutter.

4. Now you have your pieces cut.  Cut up the score line at the bottom to the score line and also cut off the small rectangle at the bottom of the side tab.  (Does that make sense??).  Now your pieces are ready.  Place Sticky Strip along one tab at the side and attach the 2 pieces to have one long length.  (Sorry missed a photo of this step). Stamp your pieces at this point before assembling.

5.  Assemble your box together now.  Add Sticky Strip to the other tab and adhere the box together.  On the bottom of the box fold in 2 opposite tabs.  Then place Sticky Strip to the very top edge of one of the other tabs and adhere these 2 tabs together.

6.  To fold up the top I interlocked each of the curved edges like this shown in the photo.  If you want to add a wire handle like the sample I did in the previous post then you can punch two holes in either side of the box with the Crop-A-Dile.  Then I curved a piece of wire and pushed it through. This is optional to add the wire.

7.  Now you can dress it up how you like.  On this version I added some Very Vanilla Satin ribbon and a tag using the Triple Layer Doily Punch.

The ideas are endless as to how you can create your box, let alone all the goodies you can fill in it. 🙂

I hope you enjoy creating your own.  Thanks for looking.

Jenny
3D projects, Tutorials

LARGE TOTE BAG TUTORIAL!!!!

A few months ago I wanted a larger size Gift bag.  When I went surfing around the internet I could only find Tote Bags that would be large enough for Note cards or similar.  So I created my own! I wanted to share this Tutorial with you before Christmas – but it didn’t happen.  The other day I created another one and put together some step-by-step photos to help you.  I have to apologise in advance for the quality of the photos.  It was a very overcast day when I took them.  I hope it gives you an idea though.

Here is the Tote Bag that I had created previously.

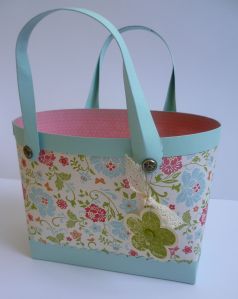
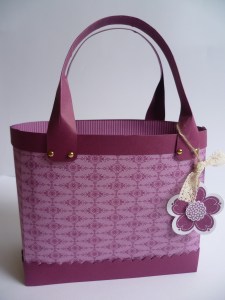
I used the Rich Razzleberry Paper from the Brights DSP stack.  The tag is from the hostess set ‘Posy Punch’.  The design of the tote is based around the Box in a Bag you may have seen around.

Now do you want to make one??  Here is the tutorial.  I hope it is clear enough. 🙂  The finished size is ~ Width: 18cm at the base (approx. 7″), Height: 15cm to the top of the bag not including the handles (approx 6″), Depth is 8cm at the base (approx. 3″).  EDITED: I have now updated the tutorial to include the Imperial Measurements. I have also added a new version. You can see that post HERE.

LARGE TOTE BAG

BASE: Card measuring 27.5cmx17.5cm (11″x7″)

On the 27.5cm side score at 5cm and 22.5cm (2″ and 9″) On the 17.5cm side score at 5cm and 12.5cm (2″ and 5″).  Fold on the score lines and then cut the score lines on the long side up to the score line running across to create 2 small tabs on each end. 

Add Sticky Strip to the small tabs and fold in and assemble the box.

DSP (patterned paper) FOR SIDES: 2 pieces @ 15cmx27cm (6″x10 1/2″).  

Place sticky strip along the 15cm (6″) side and join the 2 pieces together to make one long length.

CARD STRIP: for along bottom edge.  2 pieces measuring 3.5cmx27cm (1 1/2″ x11″). Join the two pieces together and scallop along the top edge of the long piece.  It’s a bit hard to see because it is so long but this shows the joined strip with the scallop edge!

CARD STRIP: for along top edge. 2 pieces measuring 1.6cmx27cm (1/2″x11 1/2″). Join the 2 pieces together to make a long strip.

HANDLES: 2 card strips measuring 2.4cmx29.5cm (1″x11 1/2″)

Score both pieces lengthways at 1.2cm (1/2″).  This is from the 3cm (1 1/4″) mark at the top down to 3cm (1 1/4″) from the bottom edge. (ie 26.5cm mark on cutter).  That is, you don’t want to score right to each end.   Check the photos out.

Here is a close-up of the ends to get an idea of the scoring.  So you stop 3cm (1 1/4″) short of the end.

Fold along score line but flatten out the ends. Round the corners with the corner punch. 

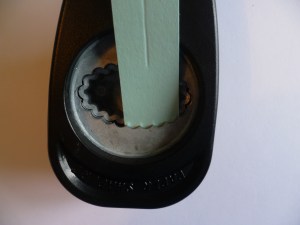
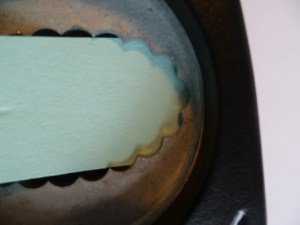
Now when you get to the finished bag below you will notice that the handles I have made are different to the tote above.  To create the ends of these handles I have used the Scallop Oval Punch.  To do this I slipped the ends of the handle strips in through the top of the punch.  I put it in on the side first and then turned the strip to the end of the scallop.  Make sense???  Here are some photos to show you what I have done.

Slip the card strip into the top of the Punch on the side.

Gently turn the strip to the end and punch the end of the strip.

Here are the punched ends.

Now all the pieces are prepared you are ready to assemble the Tote.

Add Sticky Strip along the bottom edge of the DSP piece and along one of the short sides.  (Don’t take the red backing off the side piece yet!!!!).   Lay box along the edge of DSP and slowly wrap the DSP around the box. (See the photo below). Stop before you get to the end so you can remove the backing off the side piece.  Now you can finish wrapping the DSP around the bottom and then adhere the side pieces together.  I do it this way because if you remove the backing of the Sticky strip on the side piece at the same time as the bottom you get it stuck to everything (believe me it happens!! You might be more skilled than me :)).

Adhere the scallop edge strip and wrap this around the outside of your DSP covered box at the bottom.

Adhere the other long strip along the top edge of the bag as a trim.

Now you can add the handles.  You can pierce holes through the top of the bag to attach the brads and handles together, or attach the brads to the handles and then adhere the handles with sticky strip or dimensionals.  Whatever you prefer. 

Here is the finished bag.

You are wondering what that DSP is from????  Well, you can get that for FREE!  This is part of the DSP pack (Everyday Enchantment) that you can select for Free during Sale-A-Bration when you place a $100 order.  It is just gorgeous paper!

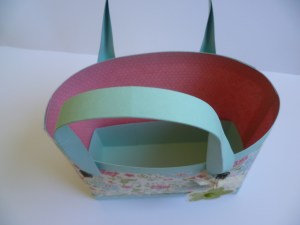
Here is the inside of the tote.

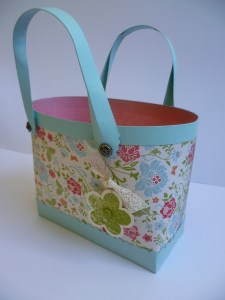
Here is a side view.

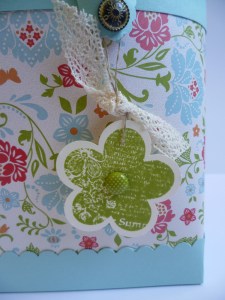
Thought I would show you a close-up of the tag on the bag.  This is using the Hostess set ‘Posy Punch’.

Hope you enjoy this project.  If you create one of these Totes, I would love to see your version.  Drop me a link or a photo.  I like to share with my creative friends but please, don’t forget to give credit if you do create one 🙂

If you have any questions just drop me a note in the Comment section.

Happy Creating!

Jenny x

3D projects, Tutorials

SUMMER MINI CHRISTMAS TAGS!!

Last Friday I had my Summer Mini Catalogue Launch and it was my last class for the year.  I am a bit sad about that.  I love meeting up with my lovely ladies, although I am looking forward to a little break.  I just wanted to show you the fun project we did.  Christmas is almost upon us (17 days to go apparently I was reminded of today – and I still have to hit the shops!). I thought it would be good to create some Christmas tags as I haven’t had a chance to get any done in classes so far.  This is the little bag and tags.  (sorry it is a bit hard to catch the bag without the glare).

To create this I cut a large scallop circle with the Big Shot and then embossed with the Vintage Wallpaper Embossing Folder.  This was folded in half and 2 holes punched with the Crop-A-Dile to thread the Old Olive Satin Ribbon through.  The backing to the bag is a piece of Old Olive Card measuring 10cmx16cm and attached inside the Scallop Circle topper with Sticky Strip.  You can then attach a cellophane bag onto the card piece with sticky strip.  The ‘Joy at Christmas’ label is punched from Perfect Punches in Cherry Cobbler and Old Olive.  A rhinestone is added to the label although you can’t see that too clearly.

Here is a close up of the tags.  At the launch they made 4 of each.

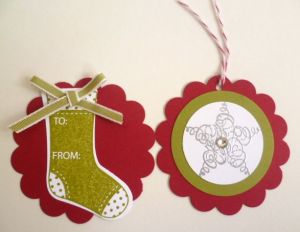
For both of them I punched out a 6cm (2 3/8″) scallop circle in Cherry Cobbler.   On the left is the tag from Stitched Stockings set stamped in Old Olive.  A small bow from Old Olive Taffeta ribbon was added to the top (Yes, I know it was small I heard enough complaints the whole time about how hard it was to tie the bows – Sorry ladies!!!!)

On the right we used the new A la Carte stamp ‘Stylish Star’.  It was embossed in silver on Whisper White card and punched out with the 1 3/8″ circle punch.  A 1 3/4″ circle in Old Olive was punched out and they were both added to the Scallop Circle.  I added a large Rhinestone in the centre.  A hole was punched at the top and the new Cherry Cobbler Twine was tied on.  I love that new Twine it is so soft.  It comes in the Cherry Cobbler, Early Espresso and the White – so good!!!  I haven’t shown the back on this one but we also punched out a circle with the 1 3/4″ in Whisper White and “to” and “from” from the set ‘Fabulous Phrases’ was stamped in Cherry Cobbler.

Hope your not getting too frantic with the Christmas chaos.  I might even head out to the shops.  I am so bad.  I have never left it this late for Christmas shopping but life has been a little choatic lately!

Thanks for stopping by.  Come visit again soon and don’t forget to say Hi and leave a comment when you stop by 🙂

Jenny x