cards, Stampin' Up!, Techniques, Tutorials

BABY BEAR COLOURS!

I have shown you a couple of ‘Baby Bear’ cards now but I realised I hadn’t shown you the Colour Cards for the bears that I made up some weeks ago.  You might have seen some similar around your blog travels but I thought I would make some to show my ladies coming to my classes so they can see the difference.

Just a couple of notes before you see the colour cards.

~If you are not sure already, when I mention stamp the colour off, it means to ink up the stamp and lightly stamp on some scrap paper to lighten the colour.

~Each of the stamps in the ‘Baby Bear’ set have numbers. You will notice the more solid stamp has #1 next to it, the next more patterned stamp is #2, the more detailed pattern is #3.  You might find that some people stamp in reverse order so the darker colour first which would be #3 and then work backwards to the lighter colour  Play around yourself to see what you feel more comfortable with and what way gives you the better effect.  I found going from #1 with the lighter colour up to #3 with the darker one to be work fine.

~When I note the number below the colour card that denotes the number on the stamp. eg. #1 is the numbered 1 stamp.

~When stamping the bear some people have said they have had trouble lining up the bear for each stamp.  What I found that helps is when you ink up and go to stamp the 2nd stamp, I line the inked image up with the stamped one by lining up it’s bottom and then lining up the ears.  I have found that helps a lot. Hope it might help you.
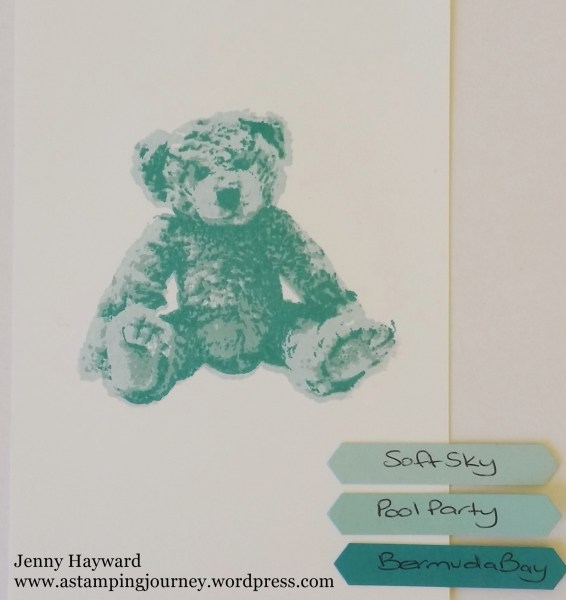
bermuda bay

#1 Soft Sky, #2 Pool Party, #3 Bermuda Bay.
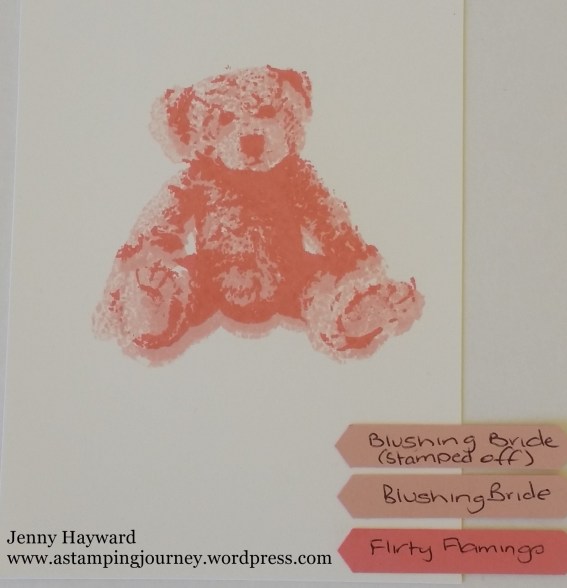
blushing bride

#1 Blushing Bride (stamped off first), #2 Blushing Bride, #3 Flirty Flamingo.
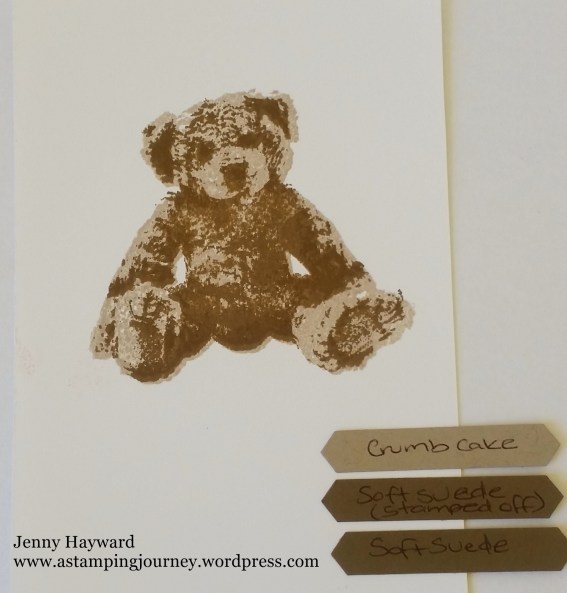
soft suede

#1 Crumb Cake, #2 Soft Suede (stamped off first), Soft Suede.
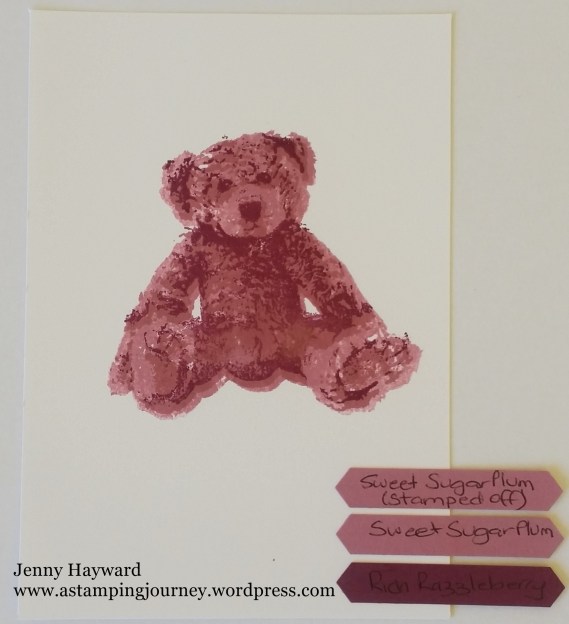
sweet sugarplum

#1 Sweet Sugarplum (stamped off first), #2 Sweet Sugarplum, #3 Rich Razzleberry.

————

You can play around with all different colour combinations.  What colours have you done? I would love to know.

I do love this bear.  It is very cute and I love the detail of it’s fur.

Thanks for visiting me today.

Jenny

3D projects, cards, Tutorials

MY PROJECT IS OUT FOR ‘WE STAMP FOR LARA 2016’!

Lara header

Have you joined in with ‘We Stamp For Lara’ yet?  My project is released today.  Here is a sneak peek for you.

?

I shared all the details in a recent blog post.  This is a fundraiser event for a special little girl.  Lara has so many medical challenges.  We are seeking to raise money to get a special mattress for her that can help turn her in the night.  You can read all about it in this blog post HERE.

For $15 you receive 1 tutorial a day for 15 days.  All the money raised goes directly to help young Lara and her family.  You can join anytime during the time (2nd May – 15th May) and still access all the tutorials.  Tutorials are available on a special Facebook group. If you are not on Facebook then they can be emailed to you. You can comment or email me here if you would like to join in.  Payment is made by Bank Transfer or Paypal.

We are mainly focusing on  the ‘Number of Years’ stamp set and matching Framelits.  To help with the fundraising too I am donating my commission to ‘We Stamp For Lara’ when you purchase the ‘Number of Years’ set and framelits.  Buy the Bundle and save money.  These are available in the new Catalogue but not as a Bundle so get them now.

Bundle Price is $85.75.  (Stamp set alone is $47, Framelits are $54 – so great value!)

Stop by my store HERE to order directly or contact me by email or a comment here.

Please use the Host Code: APFCFBMW when ordering at my store this week.

Thank you

Jenny

3D projects, Personal Ramblings, Stampin' Up!, Tutorials

WE STAMP FOR LARA 2016!

Lara header

I have been on a secret project the last few weeks.  I am so excited and honoured to be a part of it and I am glad I can now share it with you.  A group of demonstrators have put together some awesome tutorial projects for you all to raise money for this special family. Madonna is a former demonstrator and a friend and I have followed along with their struggles right from the beginning. Let me share a little bit about their story from her Mum Madonna….

Lara was born on the 5th of November 2008. The fourth child of Mark and Madonna. She was different to her siblings. She looked different…she had twisted feet….she didn’t cry like the other babies. She didn’t move like them either. However, after a week in the nicu we were released to go home, with a paediatrician’s words ringing in our heads “She may or may not be normal, depending of if she does or does not reach developmental milestones.” She was given a diagnosis of Cerebral palsy at 5 months during a hospital stint to correct a floppy voicebox. During that stay she was also put on naso-gastric feeding (a tube down the nose and into her tummy). By one she had started having seizures and had a number of other “foibles”.
Over the last seven and a bit years Lara has had many hospital stays with a number of illnesses. She has been diagnosed as having a “life-limited” condition. We do not know what that means. We do know that she is unable to talk or walk. She cannot communicate via traditional words or even gestures as her ability to control her limbs is very limited. What she does do is convey her love through her eyes. She verbalises some sounds and is very quick to moan and whinge if she wants to be moved or has a full nappy!

Lara has a plethora of drugs each day to keep her seizure activity stable. This is mostly successful but a simple cold can be enough to put us in hospital for a little visit due to her compromised immunity and poor lung function. She needs to be moved into different positions to help her manage her secretions and to prevent pressure areas.

One of the items we are looking at fundraising for over the next few months is a better pressure mattress for Lara’s bed. She has a hospital bed that we are able to manoeuvre into various positions for her (tilt, height etc) but the mattress is very simple and we use an egg shell topper at the moment to assist in the pressure management. We (actually, Mark..mostly) move her from side to side during the night to alleviate the risk of pressure areas. An appropriate mattress can help with those risks.

We are so grateful to all of you for always being willing to put your hands up to help us to Help Lara. She is a delight and a blessing. If you have ever gazed into the depths of her gorgeous blue eyes you would understand she is a special little person in more ways than just her diagnoses.

Lara

If you want to read more about Lara’s Life you can visit her Facebook page HERE. 

So will you help us out?  You can from anywhere in the world.

HOW IT WORKS.

For $15 you will receive 15 projects each day for 15 days! That’s $1 per tutorial!  All the money goes directly to help get this family this special mattress.  Let’s help give them a good night sleep.

This fundraiser runs from 1st May to the 15th May.  You can join at any time during that time and still receive all the tutorials.

Drop me a comment and I will get back to you with the payment details (by bank deposit or Paypal) and to add you to the special Facebook group where you will access the tutorials.  If you haven’t got Facebook but want to join in then please let me know that too. 🙂

Here is a sneak of my project coming up soon.

?

So let’s do this.  I am joining in as I want to get all these great tutorials but more importantly help this lovely family.

Jenny

3D projects, Tutorials

SKINNY MINI TREAT BAG HOLDERS!

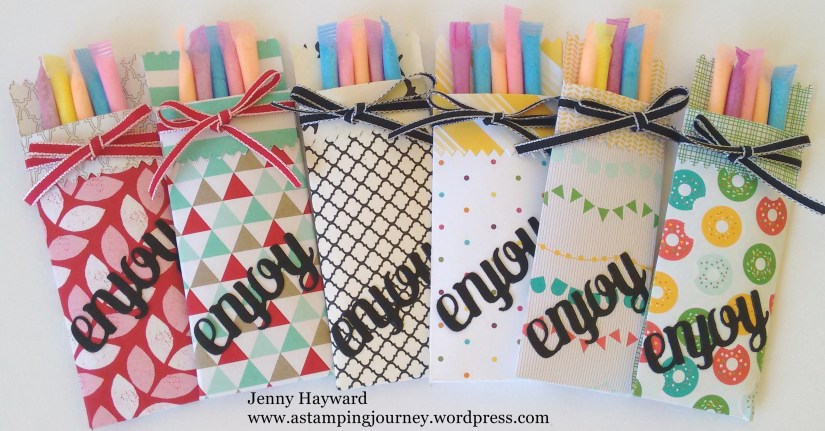
A few weeks ago I shared the Easter Baskets I made for the upcoming Easter markets.  I made a few cute treat holders for the markets too.  I have been wanting to show you the project for a couple of weeks but with Easter and Sale-A-Bration there were so many other projects to show you. 🙂

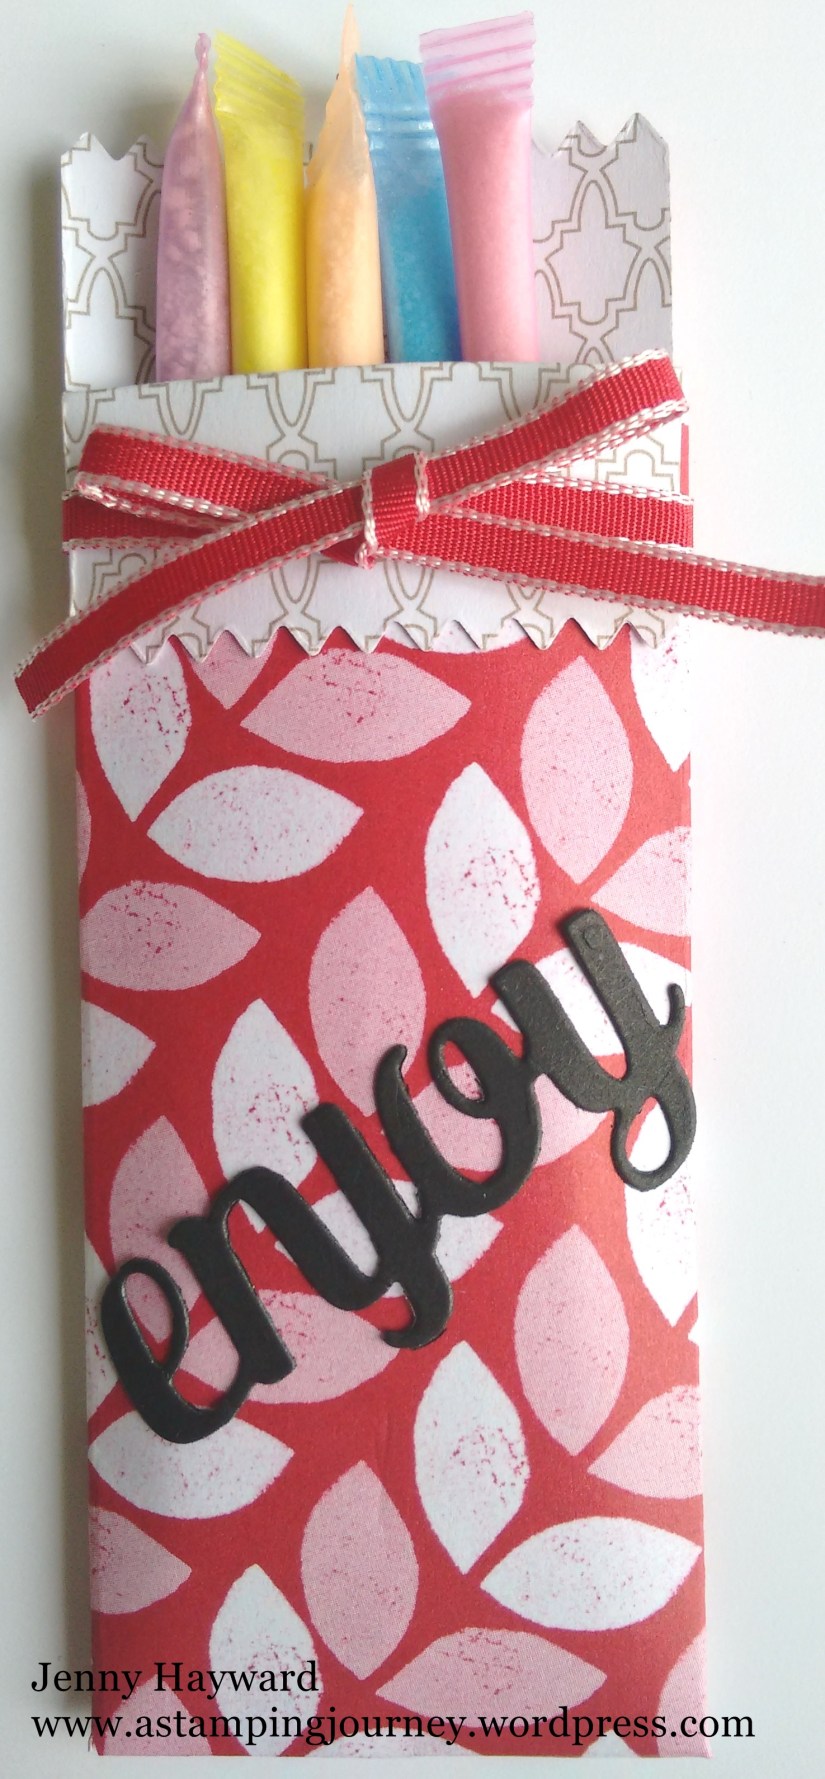
These are really quick to make and you can use them for any small treats.  Here I have some little sherbet straws for the kiddies but you could add a chocolate treat or coffee sachet.  I have used some retired Designer Series Paper.

448

447

Aren’t they fun and colourful?? I have simply decorated them with some ribbon (retired) and cut the “enjoy” (which is in the Mini Treat Bag Thinlits set), from black card to add to the front.  Really they probably took all of one hour to make.  I didn’t have a lot of time but wanted something cute but inexpensive to add to my stall.

Do you want to know how to make them?

SKINNY MINI TREAT BAGS

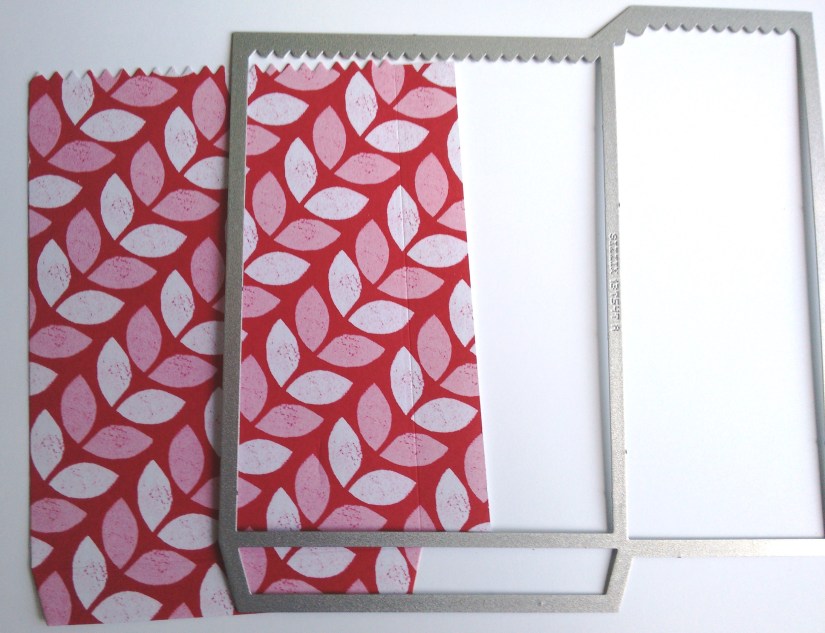
1. Cut a piece of Designer Series Paper (DSP) a little larger than the large section of your ‘Mini Treat Bag Thinlits’= 10.5cm x 15cm (4″ x 6″).  Cut the piece out on your Big Shot.

442

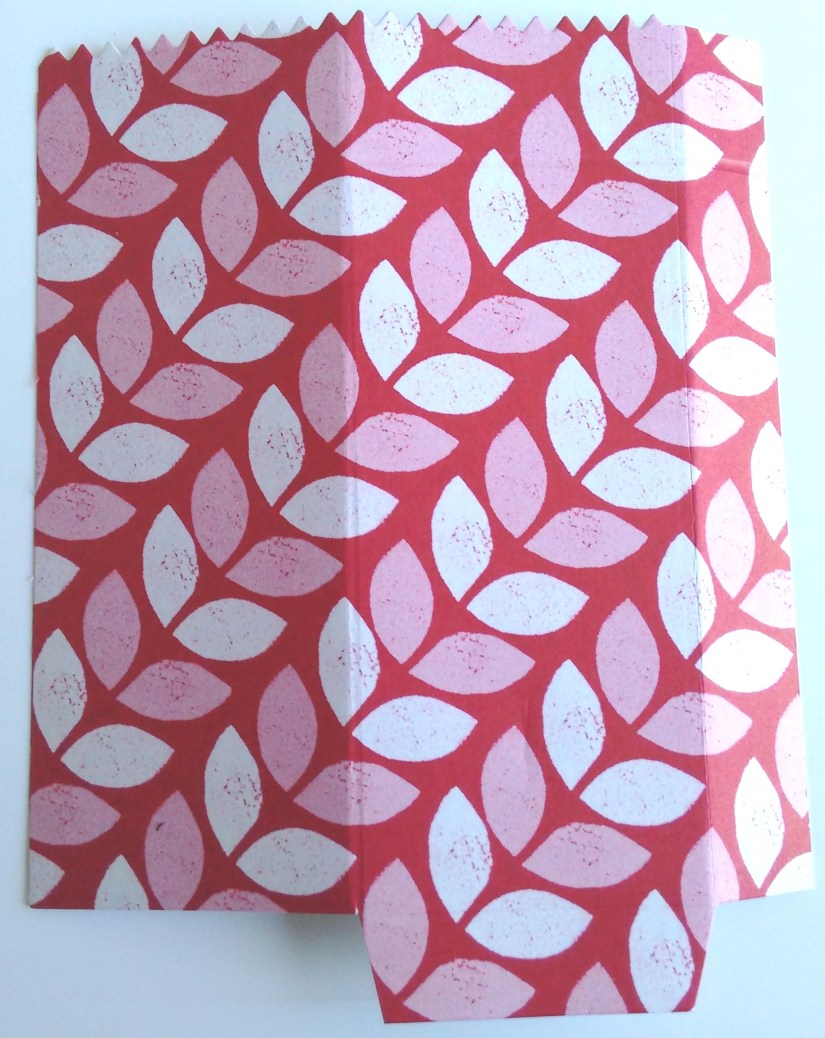
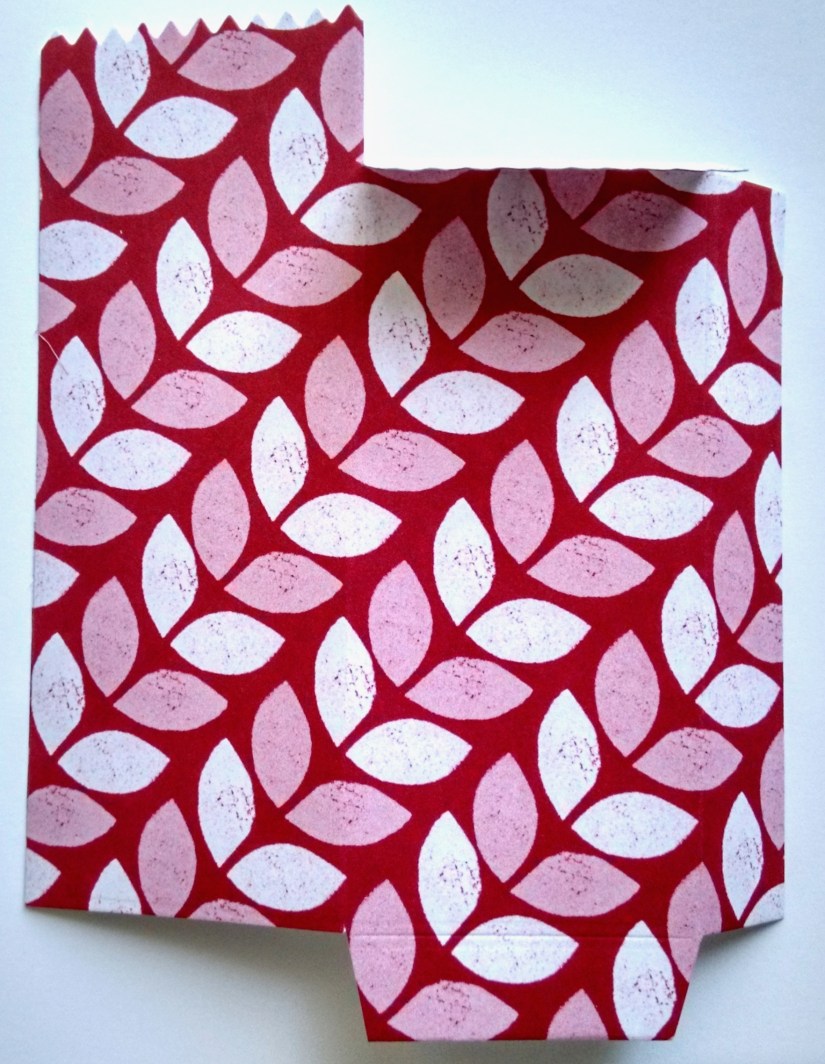
2. Score the large section in half vertically so at approximately 4.6cm (1 7/8″).  The photo below shows the DSP piece with the right side facing up. Cut off the left hand side on the bottom tab section.

Place your piece on your Paper Trimmer with the narrow side tab at the top.  Line up your zig zag edge at 2cm (3/4″) and score a line from the top edge and just to the score line in the middle.

444

Cut off the small tab on the top left with your scissors. (Which I hadn’t done yet in the photo). I like to taper the end of the long side tab to give a neater finish when you fold.

3. Fold on all the score lines and open out again. At the top cut down on the middle score line to where it meets the 2cm (3/4″) score line running across.

445

4. Fold again on the score lines so the folded flap piece is at the front and the taller section is at the back. Place adhesive on the right side (the outside) of the long tab and fold to adhere to the back of the bag with the tab section on the inside.  (It doesn’t matter too much if it is adhered to the outside. Just for a neater finish I like it on the inside).

Place adhesive at the back of the small bottom tab and fold over to the back to adhere down. (I wasn’t worried that this was on the outside at the back). Place adhesive under the front flap to adhere down.

Decorate as you like and fill it with treats you would like to give.

446

I hope this is easy to follow for you. Please let me know if you any questions.

Enjoy 🙂

3D projects, cards, Classes, Stamp At Home Kits, Stampin' Up!, Tutorials

PARTY POP-UP’S CLASS OR KIT TO GO!

I have an exciting class coming up next week. We are using the Party Pop-Up Thinlits from the Occasions Catalogue. If you can’t make the class (which is a little sad by the way as we do have a lot of fun), you can grab the Kit.

Here are all the details.

We will be using the Thinlits in 3 different ways.

SATURDAY 12TH MARCH    2PM      

Please RSVP by Thursday 10th.

COST:  ** NOTE DIFFERENT CLASS OPTIONS.
a) Class Only:    $20

b) Free Class with ‘Party Pop-Up Thinlits     $50

c) Kit Only: Can’t make the class? Purchase the kit which contains all card and embellishments and cut Thinlits (excludes stamped images). Also includes instructions.                                                                                              $20.

BYO scissors and adhesives.

Here is a sneak.

ATT_1455430144351_image-5251

So join in the class or buy the kit.  Let me know ASAP,

Jenny

3D projects, Sale-A-Bration, Stampin' Up!, Tutorials

PERFECTLY ARTISTIC BAGS!

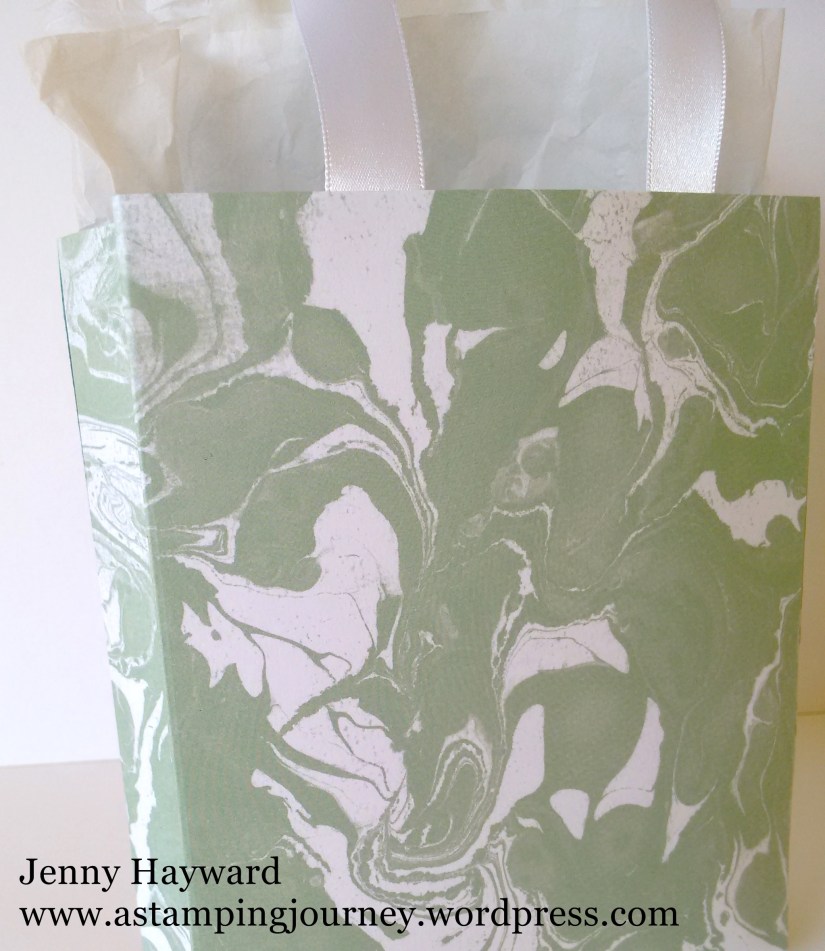
I know I told you I was going to share some more Bloomin’ Heart Thinlits cards and I will, but I HAVE to show you these bags. I realised the other day that there was less than a week left of some fantastic Sale-A-Bration products. I still had so much of the lovely ‘Perfectly Artistic’ DSP that I just HAD to use. What better way but to use it but to make some bags.

Here they are for you. I thought I would make 3 different ones. I will show you how to make them too.

5186

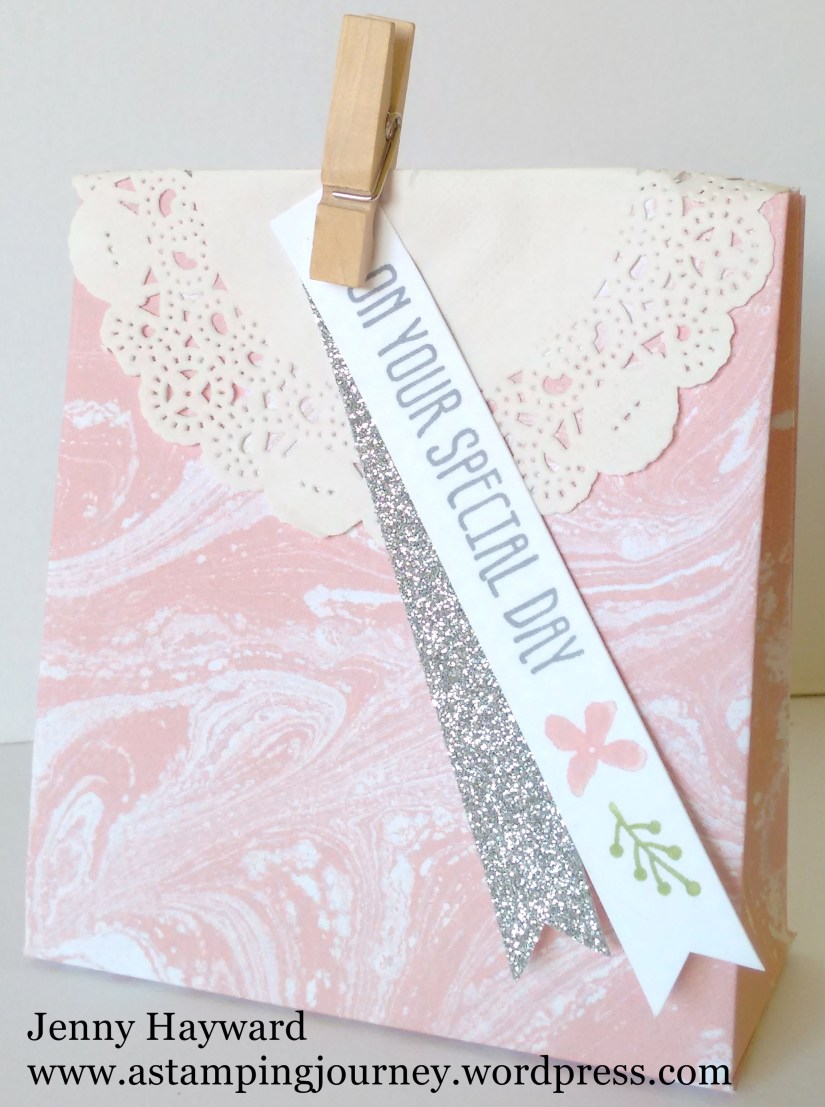
BLUSHING BRIDE MINI BAG

This cute little pink one is very simple to make. I found the idea on the internet somewhere quite some time ago but I am not sure where now – sorry 🙂

image-5196

Cut your paper to 15cm x 30cm.  (6″ x 12″)

On the 15cm (6″) side, score at 4cm. (1 1/2″)

On the 30cm (12″) side score at 10cm, 14cm, 24cm and 28cm.  (4″, 5 1/2″, 9 1/2″ and 11″)

Cut up on the score lines on the 30cm (12″) side up until it meets the other score line. Cut off the small tab at the end. Add adhesive on the small tab at the side and assemble. Add adhesive to the bottom tabs and fold up and adhere.

Decorate as you like. I have used the greeting from a Sale-A-Bration set ‘Botanicals For You’. I added a strip of Silver Glimmer Paper too for the dazzle factor. To close the bag I simply used a Wooden Clothespin over a folded Paper Doily. 

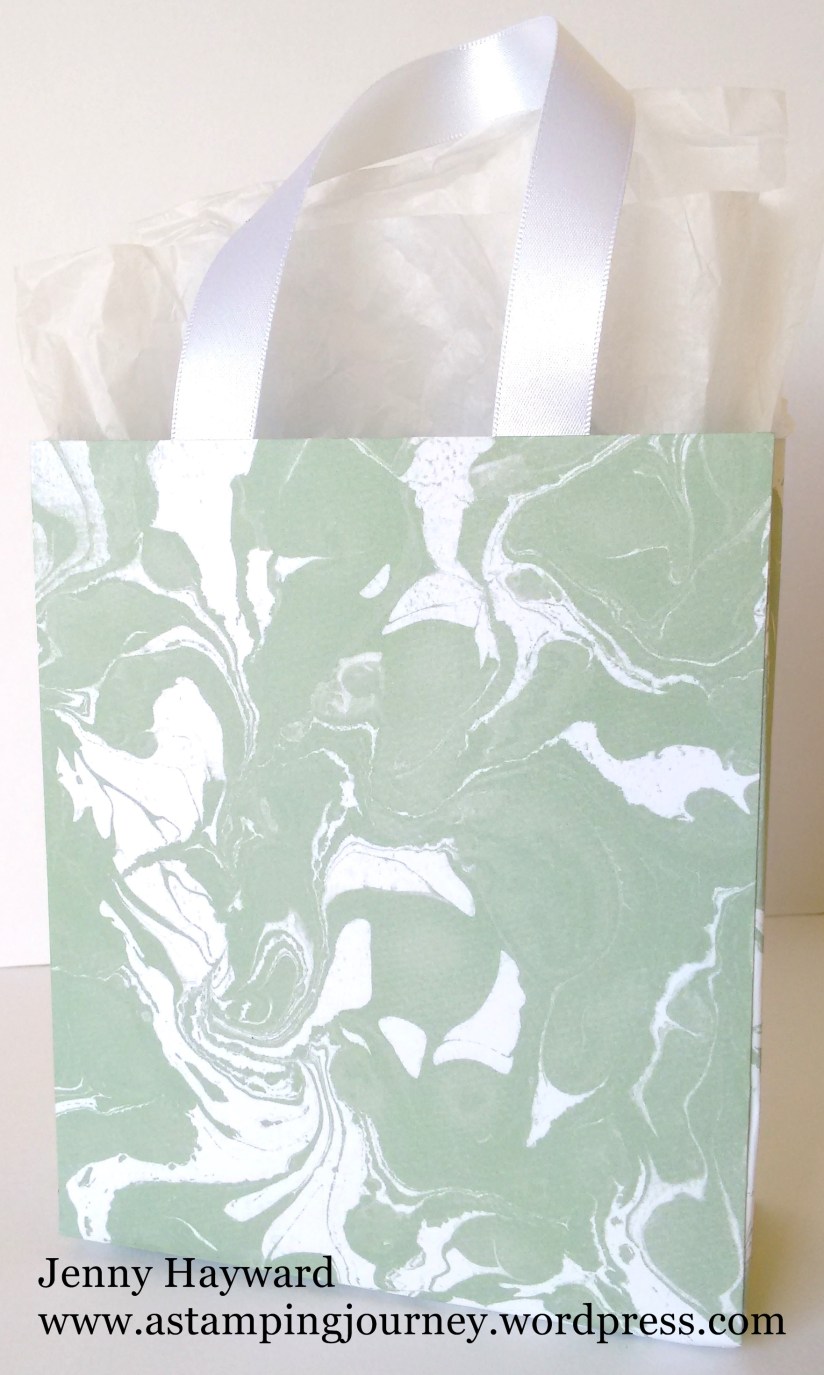
MINT MACARON BAG

5192

Here is a side view.

5203

The Mint Macaron is another quick bag. You can find the tutorial to make this bag at ChicNScratch HERE.

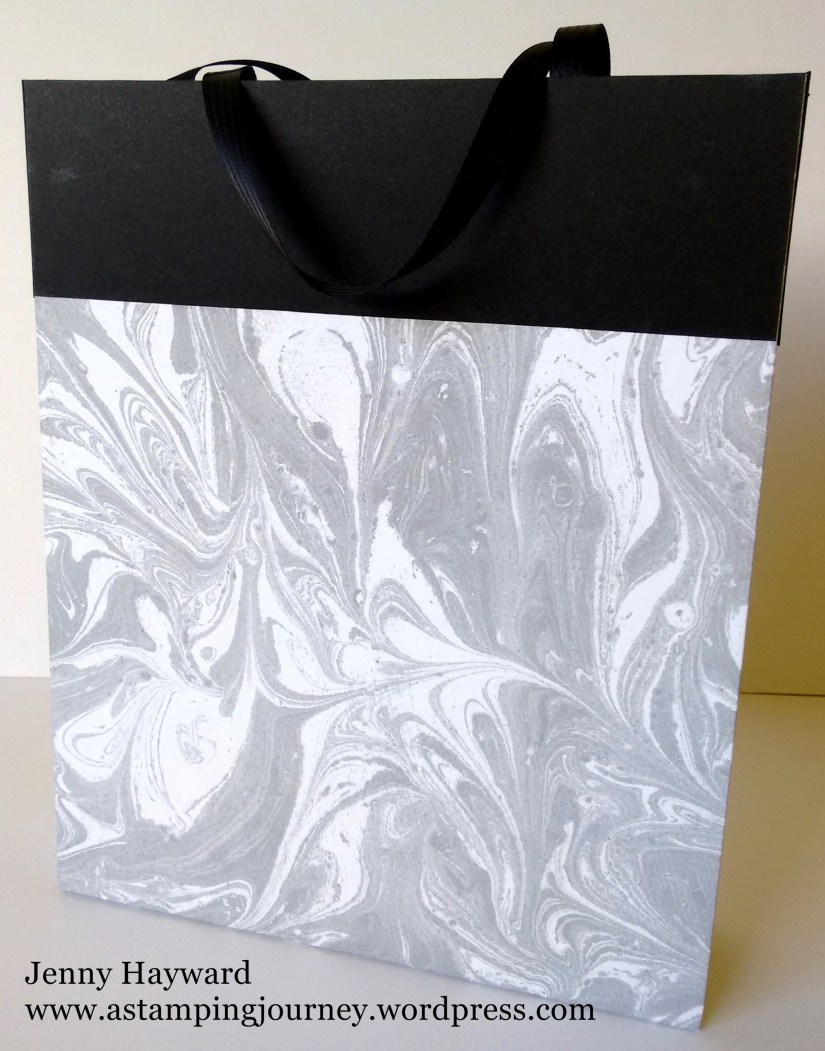
LARGE BASIC GRAY BAG

5191

This large bag is so easy to make.  I don’t know why it has taken me so long to make one of these. You can find the instructions on a number of blogs.

For mine, I took 2 sheets of the Basic Gray pattern from the pack. On 3 sides, score at 5cm (2″). Cut up on the tabs at the bottom. Place adhesive along the bottom of one sheet and join the 2 sheets together. Place adhesive to the side tabs on one sheet and assemble together.

TIP #1 you could if you like score on the top edge as well when you are scoring and then fold that score line forward to show the inside colour on the outside, if that makes sense? I had decided that I wanted a black edge. I cut strips from black card stock approximately 5cm (2″) wide and adhered that along the top edge. I think it makes a striking contrast.

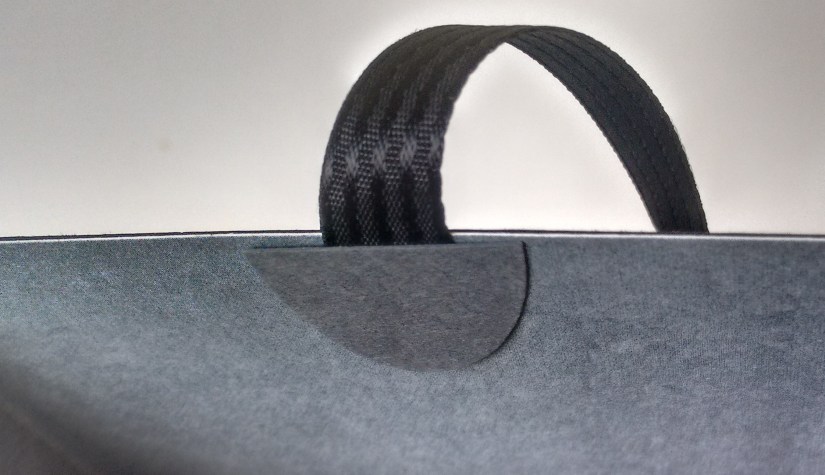
TIP #2 for your ribbon handles.  I didn’t punch holes in my bags to add the ribbon.  I added the strong Tear Tape to each end of the ribbon and adhered them to inside of the bag.  To cover the ends I punched out an oval in card and adhered this over the ends.  It gives a neater finish I think.

insdie

I hope you like these bags. They were fun and I was surprised how easy they were to make. Go and make some yourself. 🙂

Until  next time,

Jenny

cards, Christmas, Tutorials

SNOWY OWLS!

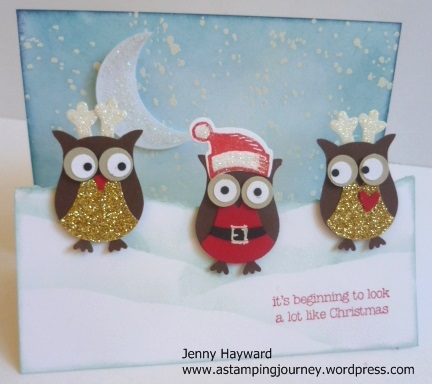
I made this cute card at our stamping weekend and I haven’t shown you yet.  Well actually I half made it and I had to finish it when I got home and that is probably why you haven’t seen it yet.  I get lots of comments about this card at my classes.  I CASED this from my friend Leonie who I think CASED it from Pinterest??  I will show you it then I will tell you about it.

P1170702

Does this have the cute factor??? This is using the Owl Punch.  The owl hat is from the ‘Snow Place’ Set and the antlers are cut with the ‘Snow Friends’ Framelits.  I drew the “santa Belt” with the white gel pen.  The greeting is from ‘Christmas Cuties’. The Moon is punched from a circle punch with a “bite” punched out with the circle punch again. I wanted to tell you about the background though and the card base.

Firstly for the card base I will give you the instructions but not the exact measurements  as you can make it any size you like really. The card base width is a standard size card (so metric – 14.8cm). The length is the length of your standard card (metric is A4).  Score the card length in equal thirds.  Score the right hand end section in half again.  So it is a bit like an odd-shaped “M” ??? Makes sense?? Yes!!!  🙂  On the back panel I cut another piece of white card to that size.  On this piece I stamped the “splodges” from ‘Gorgeous Grunge’ in versamark and heat embossed in White Embossing Powder.  I sponged over Soft Sky and Marina Mist and directly on the edges I sponged Night of Navy.  I adhered that piece on to the back panel.

For the front I cut another piece of white card to the size of the front. I tore across the top edge. Then masked sections with scrap paper to sponge “hills” on to the piece with Pool Party – I think? I sponged around the whole front piece with Pool Party too.

Lots of punching but lots of fun to put together.

Thanks for stopping by now.  I am off on holidays for 2 weeks. YAY! Don’t worry you won’t miss me too much.  I have some posts scheduled.

Jenny

ORDER ONLINE 24/7 at my store HERE. (Australian Residents only)    This month please use HOST CODE: DRVPXZ7DB


3D projects, Stampin' Up!, Tutorials

THANK YOU TREAT HOLDERS!

A few posts back I showed you some cute tea bag holders I made.  You can see that post HERE. Based on these holders I made up some little Thank You Treat Holders for some special people this week.  Here is one of them to show you.

P1170515

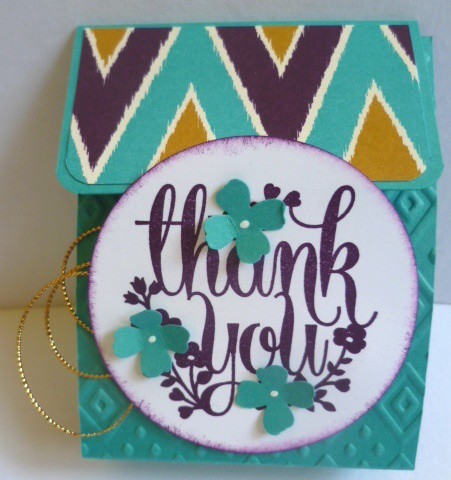
I have used the ‘Bohemian Designer Series Paper’ on the front flap.  I embossed the front panel with the ‘Boho Chic’ Embossing Folder. The greeting is from the Hostess set ‘You’re A Whole Lot of Lovely’.  This was punched out with the 2 1/2″ (6.4cm) Circle Punch.  The flap can be tucked in behind the circle to enclose it.  Some I added a little glue dot underneath the flap to hold it down as some kept popping up.  I added some little flowers punched from the ‘Itty Bitty Accents’ Pack and added little dots for the centres with white gel pen.  I added some loops of Gold Cord behind the circle before I adhered the circle down with dimensionals.

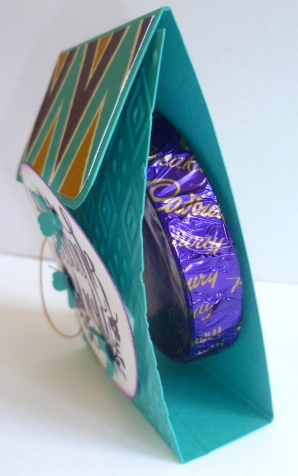
This Treat Holder was the perfect size for a little chocolate treat.  I added a glue dot to the back of the Chocolate to keep it in place.

P1170513

To make them I used the same directions for the Tea Bag Treat Holder that you will find in the above post link except I only scored the card (7 cm x 25cm) at 9cm, 11.5cm and 21cm.  ** If you would like the imperial measurements for these, then check at the above link for the tea bag Holders. Just don’t add the 4″ score line).

These were well received today I think 🙂

Thanks for stopping by,

Jenny

3D projects, Tutorials

TEA BAG HOLDERS FOR A CAUSE!!

I can finally share this project I have been working on the last 2 weeks.  They are all now sent off and reached their destination.  On a Facebook group I am on the call went out for help for a Fundraiser.  I offered to make some little gifts for the goodie bags they would have.  Then the realisation hit – What was I going to do?? I needed 65!!!  After a little pondering I decided to make some little Tea Bag Holders.  I had an abundance of teabags – and lots of retired paper. 🙂

Here is just a sample of some of them.

four

I used the set ‘Garden in Bloom’ for the little labels on the front.  I thought it was very appropriate for such an event.

Here is just one of them. I will share the ‘how to’ further below.

closed

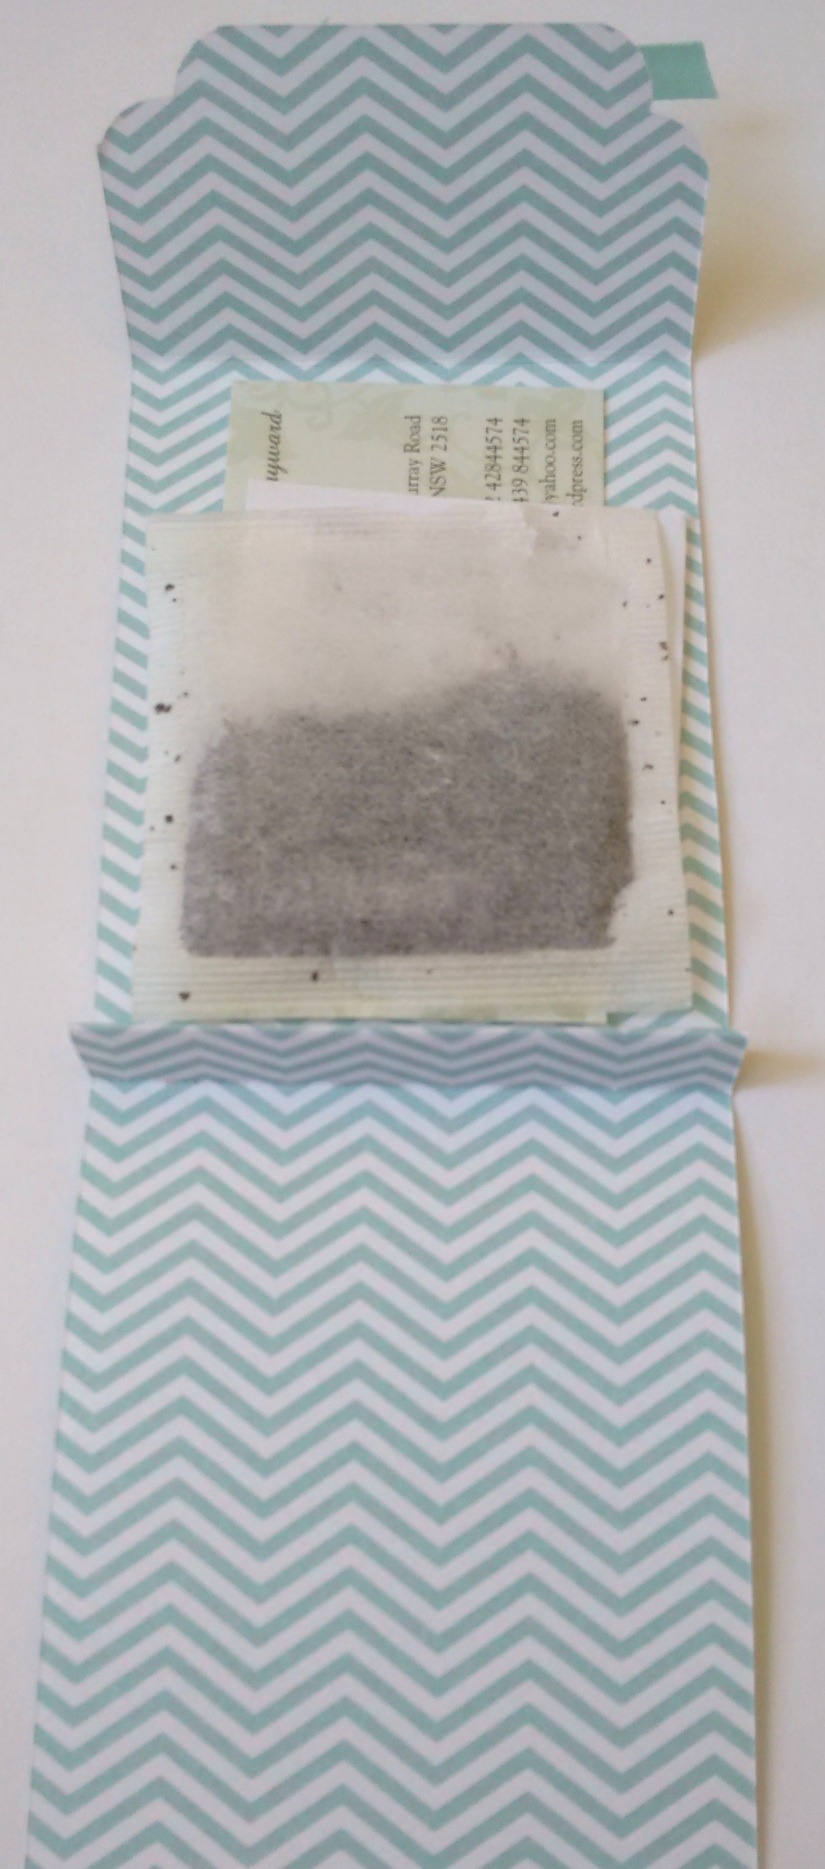
Opened out I could fit a tea bag, a cute tea verse (see below) and my business card.

IMG_20150928_100753384

Here is the verse I put inside.  I found this on Pinterest.

“When  your  day  seems  topsy  turvy,

And as stormy  as  can  be.

There  is  nothing  quite as  tranquil,

As a nice hot  cup  of tea.”

**

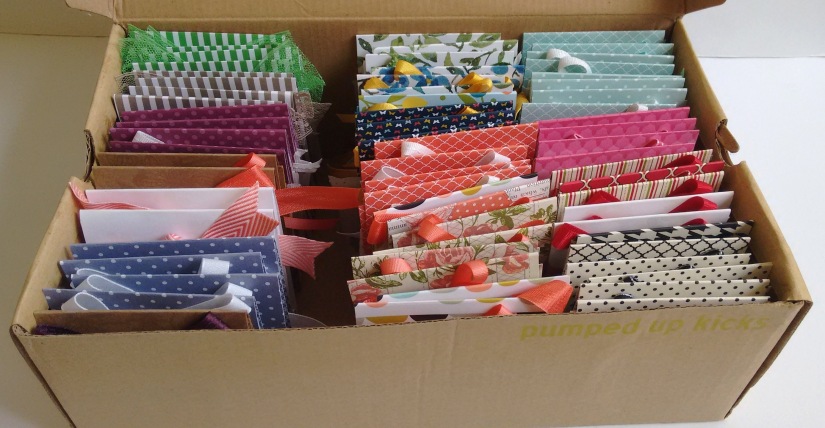
So here they are all 65 of them packed and ready to go.

box

So here are the details if you would like to make your own.  There are a few different versions around the internet but these were inspired by a Convention swap I received some years ago.  I adjusted the size so I could fit my business card in and just made them a little differently.  I could get 4 to a 12″x 12″ sheet of Designer Series Paper.

TEA BAG HOLDER

Cut your paper to 7.5 cm x 25 cm     (3″ x 9 7/8″)

Score your paper at 9 cm, 10.2 cm, 11.5 cm and 21 cm.    (3 1/2″, 4″, 4 1/2″ and 8 1/4″).

Fold on your score lines creating a “W” shape. (I hope that makes sense??).  The end with the narrowest scored piece is the front flap. Corner punch the corners on this flap.  I used the new Curvy Corner Trio Punch for most of them or else I used the regular Corner punch.  Add a bow to the front flap.

Stamp your greeting and punch out with the 1 3/4″ Circle Punch.  Add Dimensionals on the back just on the lower section.  Add to the front of your holder.  You can tuck the flap under the top of the punched circle to hold it together.

I hope you like these.  They are very quick to make once you get going.

Thanks for stopping by,

Jenny

cards, Catalogues, Punch Art, Stampin' Up!, Tutorials

A DIFFERENT FLOWER WITH THE FESTIVE FLOWER PUNCH!

I made this card a few weeks ago but only had a chance to show you now.  When I received my Festive Flower Punch I had to have a play and create a different flower than the traditional one. That’s what you do right??? 🙂  I made a card up with the flower.  Since making this flower I have seen some great variations on Pinterest. I have to say I do like those ones a lot so I will have to make those too.  Here is my card and I will give you the details of the flower.  You might remember the small flower that you could make with the wing of the 2-step bird punch?? Well this is it’s big brother 🙂

P1170407

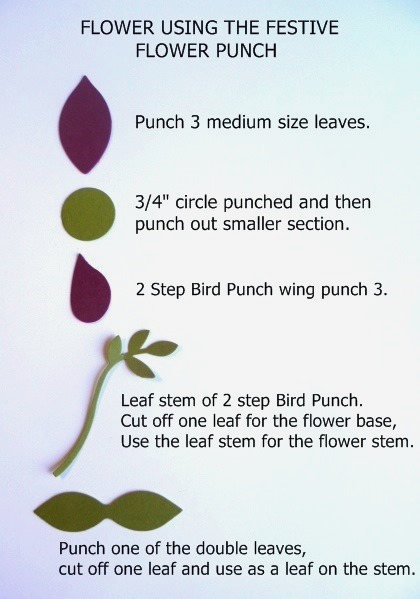
I have a chart below to show you how I created the flower so I won’t say too much about that.  For each of the pieces I sponged them with ink.  I have used Rich Razzleberry for the flowers and Old Olive for the stems.   See the pearl accent?? I was trying to work out what to add.  I added a Metal Rimmed Pearl but the silver didn’t go right so I created my own.  I punched a circle from the Gold Foil Sheets using the smaller circle from the Owl Punch.  I adhered a pearl to the centre and added the both with a glue dot onto a small bow from Whisper White Baker’s Twine.  I really liked this addition.  The greeting is from ‘Birthday Blossoms’ and I punched one corner with the new Curvy Corner Trio Punch.

Here is a chart to create your own flowers.

P1170321

So this punch is very versatile.  Not just for your Poinsettia flowers.  I can’t wait to make some other versions.

Here is the punch if you haven’t noticed it.  The punch can be found on P 31 of the catalogue and is $31.00 AUS.

festive flower punch

Thanks for stopping by.  I hope you have a super awesome weekend and you have time to create. I have my Holiday Catalogue Launch tomorrow so I am looking forward to sharing some fun projects using these great products from the Catalogue.

Jenny