cards, Christmas, Classes, Stampin' Up!

MERRY PATTERNS HALF FOLD CARD!

I have had a couple of great classes yesterday and today.  Lots of fun and chatter and creating.  We have a good time at class.  If you are local you will just have to come sometime.

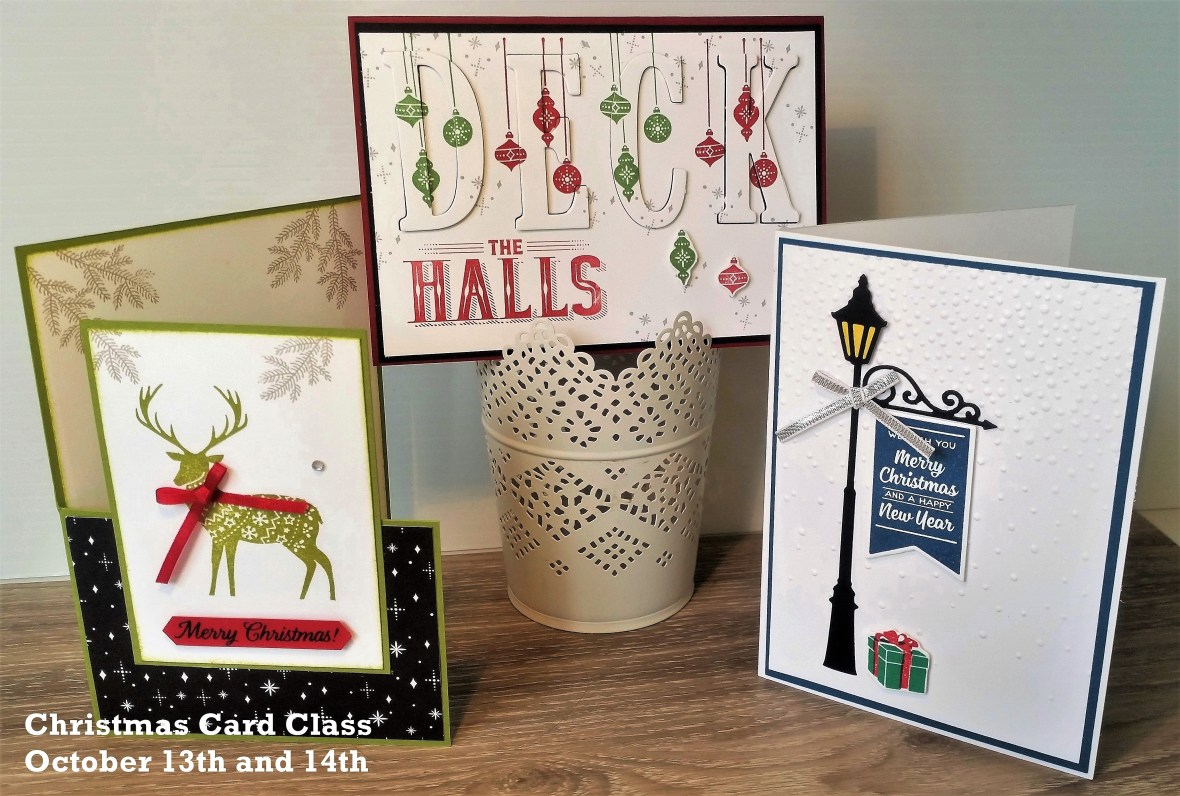
These are the cards we made.  Creating an Eclipse Christmas card with Carols of Christmas, a sweet one with Brightly Lit and a fun Half-Fold card with Merry Patterns. Everyone loved them. 🙂
I don’t often show the “how-to” of my class cards on my blog but I wanted to show you this one.   I have seen a few Half Fold cards on Pinterest lately and wanted to try this card AND as we only have a couple of weeks left for the Merry Patterns I thought it would be good to give this an ink.

So for you to make your own here are the details.  Of course, you could substitute any stamps and paper.

CREATING A HALF FOLD CARD

1. Whether you are using the Metric or imperial measurements it doesn’t matter the idea is the same.  Take your standard base card (for this one I used Old Olive) and score at the half way mark on the long side.  (For metric the base card is 14.8cm x 21cm.  Score on the long side at 10.5).

2. On your score line cut down half way.  Then cut across on the front of the card base from where you finished your cut on the score line to the edge of the card.

3. The piece that you have cut off becomes your card mat for the front image.  Cut a piece of Whisper White just slightly smaller than the card mat. (For metric that measures 10.1cm x 7cm).

4. Cut a piece of Whisper White for the inside of your card just slightly smaller than the inside card base.

5. Stamp and Decorate your card as you like. The Designer Series Paper for this card is from the Merry Little Christmas pack.

I hope this makes sense.  Please ask if you are unsure.

Jenny

PS. Only 2 weeks left to get your Merry Patterns set with qualifying parties/orders of a minimum of $450.  Be sure to book your event soon or place your order so you can grab your set.

cards, Christmas, Techniques, Tutorials

CHRISTMAS PINES ECLIPSE CARD!

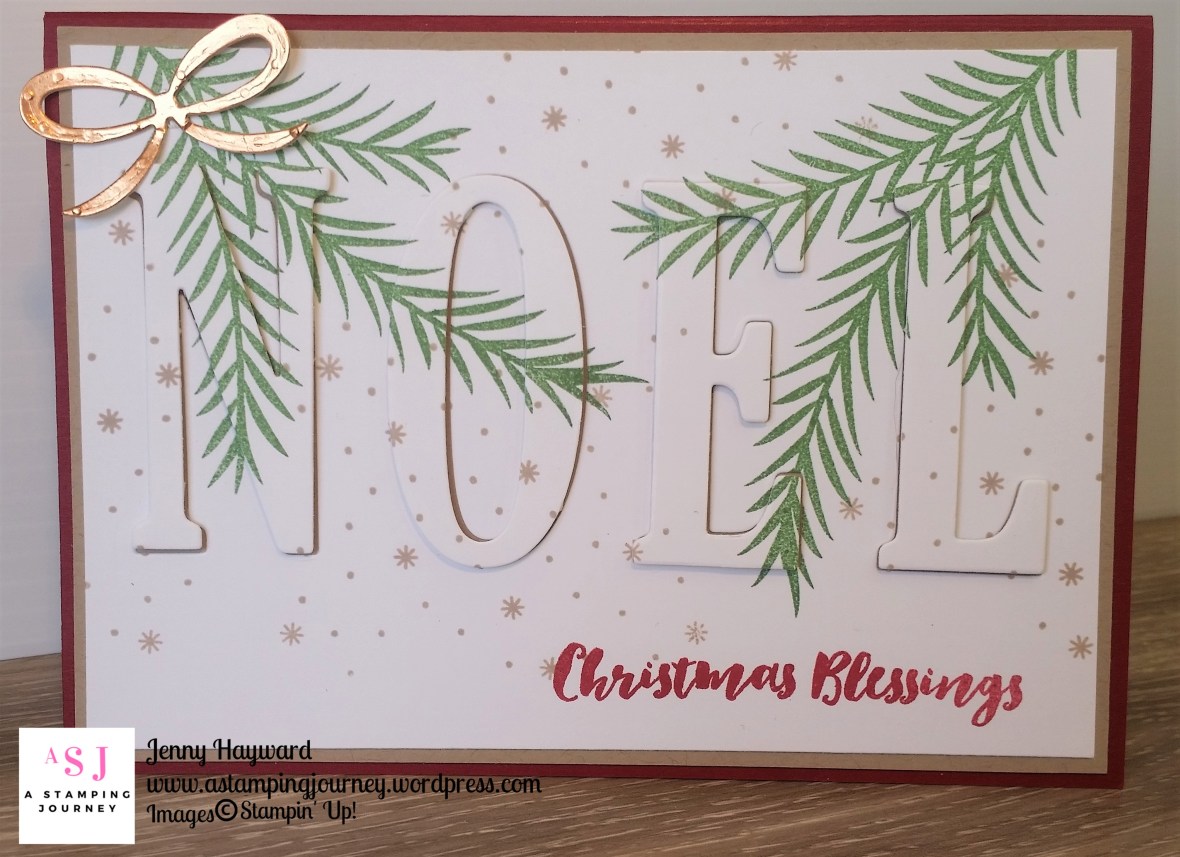
I have been playing with the Eclipse technique recently.  You can see one of them a couple of posts back I made for a colour challenge.  This one is a Christmas one using the Christmas Pines stamp set.

The base card is Cherry Cobbler and the card mat is Crumb Cake.  The pine leaves are stamped in Garden Green. The Gold Foil bow is cut from the Pretty Pines Thinlits.

Have you tried the Eclipse Technique yet.  SO easy but so effective.

Create the Eclipse Technique.

The Eclipse Technique is cutting the words or shapes directly from a stamped card piece and raising them off the card

1. Stamp your card with your chosen images.  You can use a piece of Designer Series paper (patterned paper) too as an alternative.

2. For this card I used the Large Letters Framelits to cut the word out of the white card.  You can use any dies though to cut other shapes from the stamped white card or paper mat.

3. Adhere the stamped white card mat or patterned paper piece directly on to your Crumb Cake card mat and then adhere both to the Cherry Cobbler card base.

4. Raise each letter up off the card in its place with Dimensionals.

NB: I have seen on some tutorials that the letters were cut several times from white card.  Then the cut letter was stacked up and adhered together and then the stamped letter was adhered on top of that stack.  I don’t think that is necessary.  Raising up the letter with Dimensionals is quite adequate.

————————-

Now you can go and create your own Eclipse card.

Thanks for looking today.   I hope your day is going OK??

Jenny 

Catalogues, Stampin' Up!, Videos

WATCH IT WEDNESDAY #7 – I’M EXCITED TO SHOW YOU THESE!

I have something exciting to share with you today for WATCH IT WEDNESDAY #7.  I was going to hold off for a couple of weeks before I shared it …but I can’t wait!!!

There is something new coming to Stampin’ Up! and Demonstrators can now buy them.  I received them yesterday and unpacked them.  So I had to take a video as I unveiled them.  So today we meet the Stampin’ Blends. 

In the video I said I used paper but it was actually Whisper White cardstock.  Just remember to use Memento Black ink when using these markers as they are alcohol based markers. Also, to have some scrap paper underneath your work as the ink does bleed through to the back but that’s ok.

I was very impressed with them when I played with them – and kind of excited if you could gather that. At the moment there is no official date for them to be available for customers.  So you will need to sit tight and wait.  I will let you know when I know.   As demonstrators we can order them until October 15th.  Just a tip:  If you are impatient to wait, then you can get them as part of your kit when you join the family until October 15.  Something to think about… Ask me for more info.

I hope you enjoyed this WATCH IT WEDNESDAY episode.  I have been playing around with them this afternoon so hopefully I will actually show you some finished  projects soon.

Have a great day.

Jenny


cards, Cards by Mail, Catalogues, Stampin' Up!

SOME COOL CARDS THIS WEEK AT CLASS? CAN’T MAKE IT? – GRAB THE CLASS TO GO.

Look at these cards for Card Class this week?  

Here are the details.  Of course if you can’t make it because of a clash with times OR you are too far away then Grab the CLASS TO GO!

Friday Oct 13th 10am or Saturday Oct 14th 2pm. Christmas Card class.  

Create 3  special Christmas cards. (1 of each card).  $20   

BYO: Scissors and adhesives.  

Please RSVP:  Thursday 12th. 

Can’t make it?? Why not grab the CLASS TO GO.  Cost: $20 

Does not include stamped images.  You can substitute the stamps or order them separately.

Jenny


cards, Catalogues, Personal Ramblings, Stampin' Up!

IT’S WORLD CARDMAKING DAY – AND I HAVE A SPECIAL PROJECT FOR MY NEWSLETTER SUBSCRIBERS!

OCTOBER 7TH IS WORLD CARDMAKING DAY!

And, we can celebrate all weekend! Do you get excited when you receive a surprise in the mail?  It’s a nice feeling. How about this weekend you make a card – and send it out!  Wouldn’t it make someone’s day. 🙂

Now you would have already read about the 15% off select stamps that Stampin’ Up! are offering at the moment.  If you can’t remember then head back a couple of posts.

BUT OCTOBER 7TH IS ALSO MY BIRTHDAY!!

To celebrate World Cardmaking Day (and my birthday) I am sending out a special project to my newsletter subscribers.  Plus, I have a some exclusive bonuses too – BECAUSE IT IS MY BIRTHDAY AND I WANT TO SHARE SOME EXTRA LOVE! 

To receive the exclusive project you have to be receiving my newsletters.  If you haven’t already, then be sure to click the link in the right side bar for ‘NEWSLETTER SIGN UP’.

Have a Happy WORLD CARDMAKING DAY!!!!

Jenny

cards, Challenges, Techniques

ECLIPSE TOUCHES OF TEXTURE FOR CI18!

It’s another Colour Challenge at Colour INKspirations group –  Colour INKspirations #18

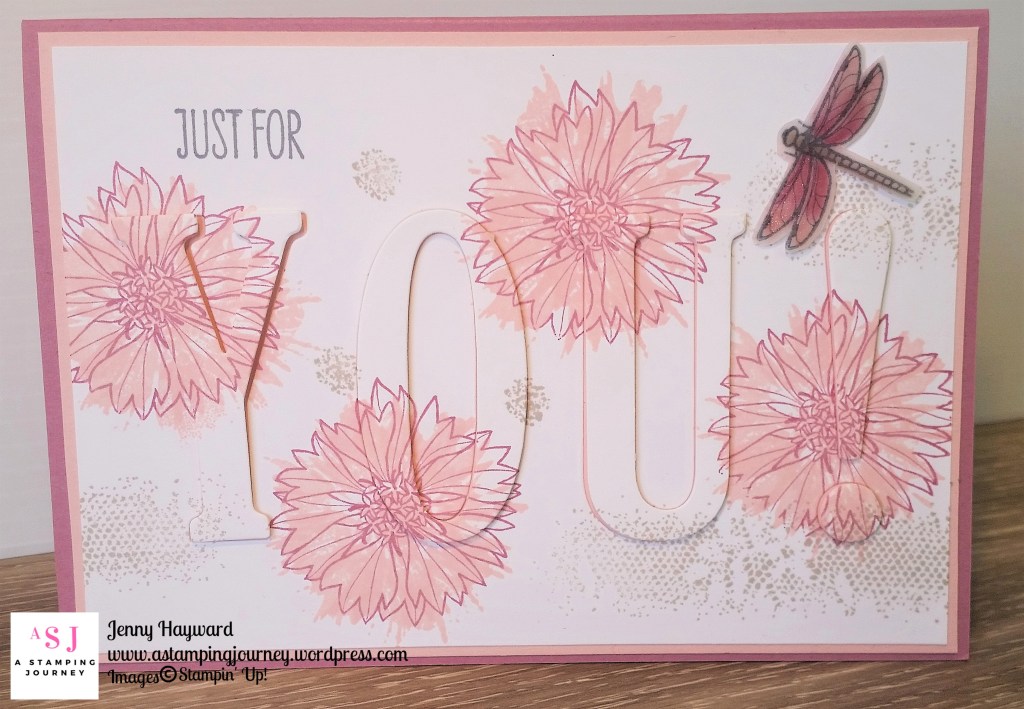
The colours this round are so pretty. Powder Pink, Basic Gray, Sahara Sand and Sweet Sugarplum.

So of course the card had to be pretty right?  I hope my card is anyway.

I have been playing around with the Eclipse Technique lately.  You might have seen that around your blog travels.  To do the Eclipse technique: You stamp over your white card mat (or you could use a piece of Designer Series Paper).  Then cut your letters or shapes out from the piece.  Once the card (or Paper) is adhered to your card mat, the letters are then adhered back on to your card mat raised up with Dimensionals giving a 3D look.

This is my card I created using the colours and using the set Touches of Texture.

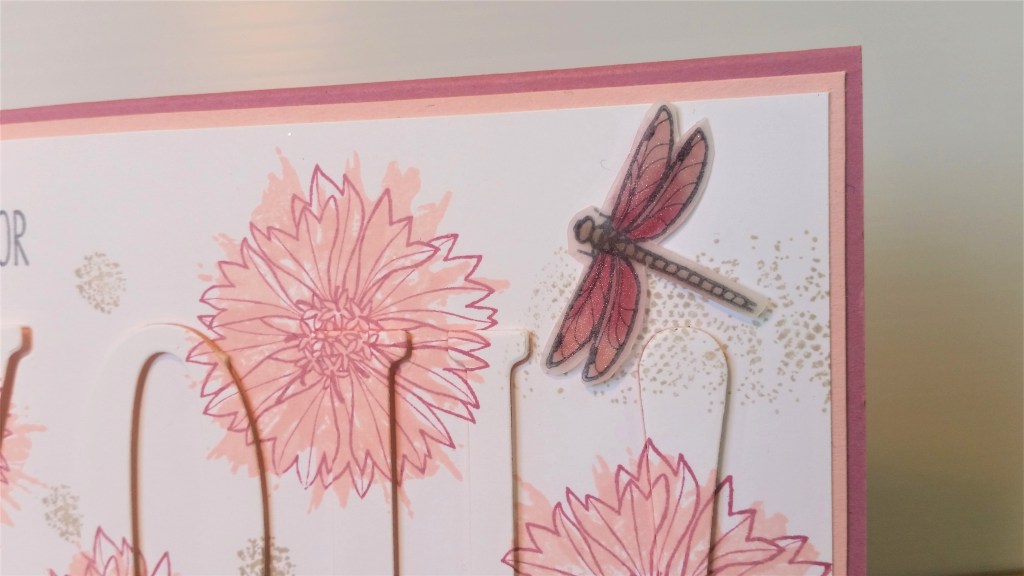
The “Just For” is stamped in Basic Gray from the Work of Art stamp set.  Check the dragonfly.  I stamped it on Vellum and coloured it in on the back with markers. Then went over it with the Wink of Stella pen.

You still have time to have a play.  Head -> HERE to join the Facebook group if you are not already a member there.  Challenges are great to take part in.

EDITED TO ADD:  I was picked in the TOP 5 at Colour Inkspirations challenge for this card.  So that is very exciting! 🙂

Thanks for looking.  Have a great day,

Jenny


cards, Catalogues, Stampin' Up!, Videos

WATCH IT WEDNESDAY #6 – CHECK OUT THAT PAPER!

I am really excited about today’s video.  I was thinking about putting together a video showing the beautiful papers in the catalogue since we have that awesome special on this month.  I don’t think the catalogue shows off what beautiful papers they are.  BUT I came across this video from Stampin’ Up! and I thought you would love this so much more.  Check out these papers! Really they are just gorgeous and all these ones are on special this month for the Buy 3, get one Free!  How cool!

Watch the video!

What do you think??  How lovely are they and this showcases them so well.

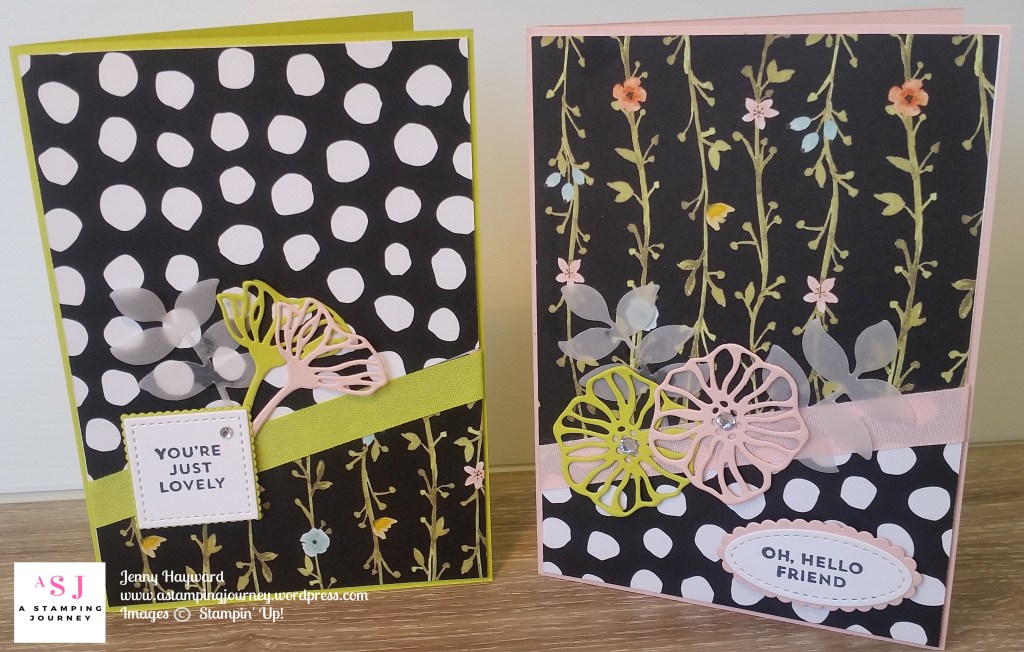
I have been playing around with some of the papers recently.  I will be sharing them to you over the next couple of weeks but here is sneak peek for you.

These cards use the Whole Lot of Lovely DSP that you saw in the video.  This uses the Angle cut for the papers.  I will tell you more about that when I blog about these in the next day or two so stay tuned.

Thanks for visiting.  I do hope you enjoyed this one as I much as I did.  I was just so excited seeing all the beautiful prints.

Until next time,

Jenny

** Grab your Free pack of Designer Series Paper when you purchase 3 packs.  What will you choose? There are these and so many more.  See the previous post to see the details.


cards, Catalogues, Christmas, Personal Ramblings, Stampin' Up!

SWEET HOME HOUSEWARMING!

I have a special card to share with you today. My niece and her partner recently bought their first home.  It is a very big deal and I wanted to make a card to share in their excitement.  The pressure was on though as my niece makes cards and comes to my classes.  Here is the card I made for them.

When I was going through my stamps I realised I didn’t have a lot for housewarming cards.  They are not cards you make too often but I came across the Sweet Home set and the Home Sweet Home  Thinlits.  I thought they would work well.  The colours are Old Olive, Soft Sky and Sweet Sugarplum.  The card layout was using the card sketch from CASE THIS SKETCH #193.

The paper I used was from the Merry Little Christmas DSP.  This paper doesn’t have to be used just for Christmas.  It has some great prints either Black and White or the Old Olive.  It really doesn’t do it justice in the catalogue. (p 12 Holiday Catalogue). When I sat the house on to the paper I thought it was a little plain so I added a Vellum circle and some loops of the Silver Thread. This was a fun card to put together. 

My niece really loved it.  It passed the test I think. 🙂

Thanks for visiting,

Jenny

Catalogues, Stampin' Up!

STOP THE PRESS! FREE PAPER OR 15% OFF STAMPS!! WHY NOT BOTH!

So what would you like?? Free paper or 15% off stamps?? Hard decision isn’t it.  Well, to make life a little easier why not get both.  There are 2 fantastic specials for this month.  Let me tell you all about it.

**SPECIAL NO. 1

There are select papers available from both the Annual and Holiday Catalogue.  See the list below and you can check them out pictured further below but you can see them even closer in the catalogue. The papers include 12″x 12″ and paper stacks.

Mmm! Now what would you choose?  I am glad you can get 4 choices here.

——————————

SPECIAL NO. 2


World Cardmaking Day is officially celebrated on Saturday October 7th this year.  Stampin’ Up! doesn’t want you celebrating for just one day.  Why not celebrate from 1st – 10th October with 15% off select stamps and also on notecards. AND if you choose to buy a Fast Fuse Adhesive you can get 2, yes 2, Refills for free!  Here are the details.


Is there a stamp set there that grabs your attention?  YES! Be sure to grab them between now and October 10 to get 15% off. Grab the notecards and envelopes too while you are at it.  They make up quick cards in no time.


All these can be seen in my store now -> HERE and orders can be made via my store and sent directly to you.  (psst! They don’t take long to arrive either when you order online!!).  If you are ordering online please use the Host Code: PW7NDBKF         

OR

You can contact me directly to order.  I love to chat to you anyway. 🙂

Thanks for visiting.  Now go and have fun choosing what you will get.

Jenny

cards, Techniques, Tutorials

BUBBLES AND BALLOONS FOR A BIRTHDAY BOY!

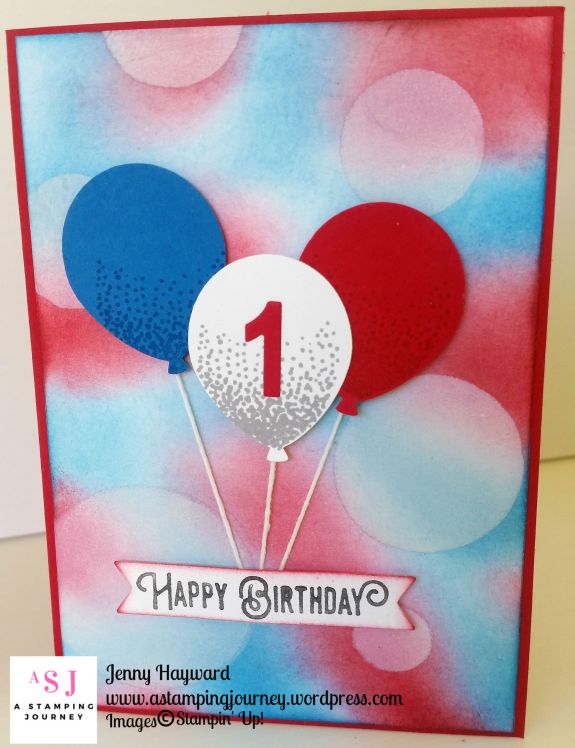
I was asked by a friend to make a special birthday card for her 1 year old grandson.  The birthday theme was Red, White, and Blue and bubbles and balloons and if I could incorporate those.  Or at least either the balloons or the bubbles with the colours.  My mind started ticking over.  What to do???

So here is the card that I made.

What do you think??  

The colours were Real Red, Pacific Point and Whisper White.

The Balloons were stamped with the Balloon Celebration set and punched with the co-ordinating Balloon Punch. The number 1 is cut with the small letters alphabet dies which is now retired but they are a useful size when you need small numbers.  I added some Snail Adhesive behind  the balloons, then added a length of White Baker’s Twine.  The three strands were then adhered down near the bottom of the card and then the sentiment was added over it.

The sentiment was from the Lift Me Up set.  I went over the “Happy Birthday” with the black marker and then stamped it on to white card.  It was then cut with the Bunch of Banners Framelits.

For the bubbles effect I used the Bokeh Technique.  Have you tried that technique before?  It has been a while since I have done it.   You can find other samples HERE. with this technique. I thought I added a tutorial back then but hadn’t.  So I will add a quick one below.  There are a number of different tutorials on the internet but to be honest I find them messy.  I am so not a messy stamper.  Maybe occasionally a little inky techniques but usually I need quick and clean – and done!!

So here is a non-messy Bokeh Technique Tutorial for you.  Hopefully soon I will create a video to share with you.

Firstly, You need a piece of acetate the size of your card front and cut 3 circles of different sizes over the card.  This creates a mask for the sponging.

On a piece of Whisper White card the size of your card mat, (This piece was 10.1 cm x 14.4 cm) sponge your chosen ink colours randomly over the card.  For this I used Real Red and Pacific Point. Sometimes it can look pretty ordinary at this point but persevere.

Once your card is covered with ink then place your acetate template over the card.  Sponge Whisper White craft ink over the circles.  You will want to dab or pounce the white ink on DO NOT RUB THE INK. Move your acetate template, if you are using a smaller piece over the card to different places to sponge more circles on. If you like, overlap some circles and have some going off the edge of the card for a good effect.   Let the card dry before you finish off the card.

Thanks for visiting me.  I love that you stop by.  I see lots of people stop by from all over the world so don’t be shy.  Do say HI. 🙂

Jenny