cards, Classes, Stamp A Stack At Home, Stamp At Home Kits, Workshops

WATERCOLOR WINGS STAMP A STACK BY MAIL!

This Friday is my next Stamp A Stack Class.  If you are local I would love to see you.  Here are the details.  But if you can’t be here then read on further.

STAMP A STACK CLASS THIS FRIDAY

Friday 26th June Stamp A Stack.  10am or 7.30pm

RSVP Thurs. 25th  Cost: $15  BYO: Scissors and Adhesives.

*****THIS WEEK IS “BRING A FRIEND” WEEK *****

Bring a Friend I haven’t met and you get 2 FOR THE PRICE OF 1!

Of course you can come without a friend. 🙂

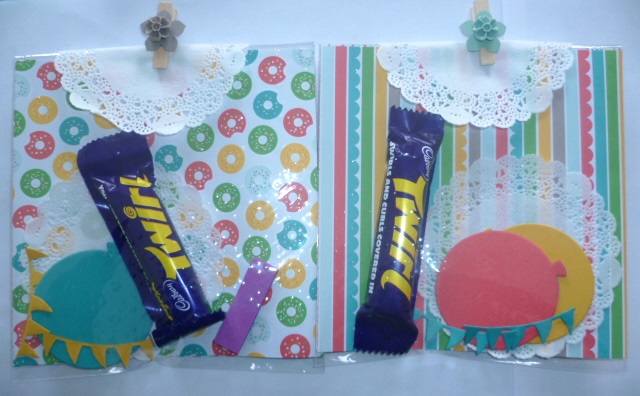
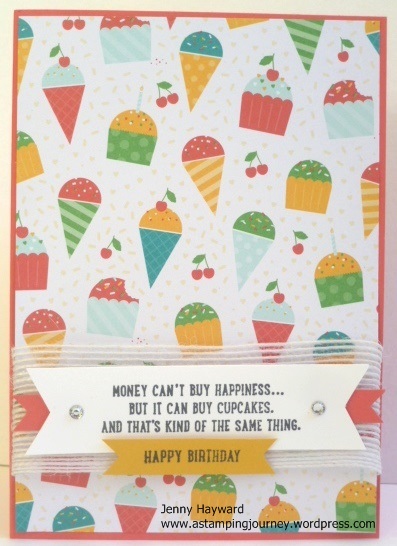
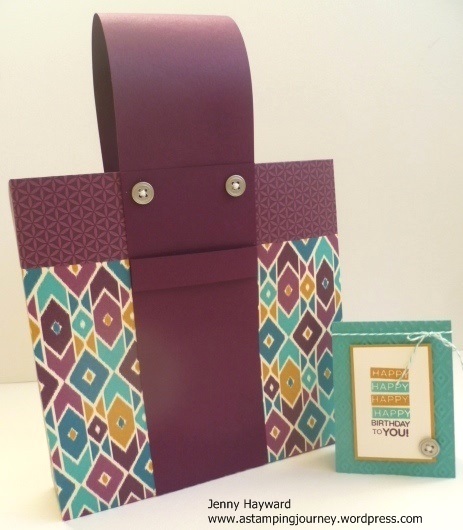
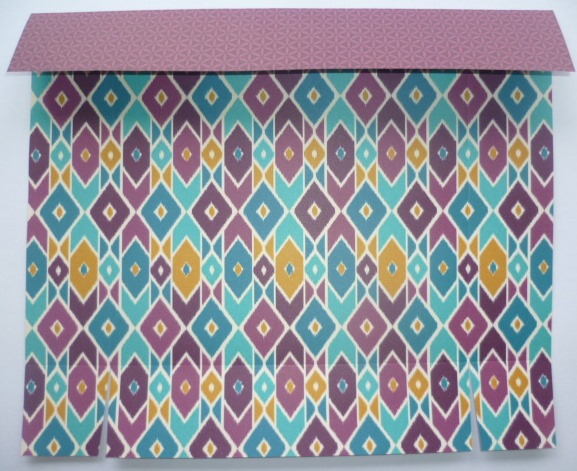
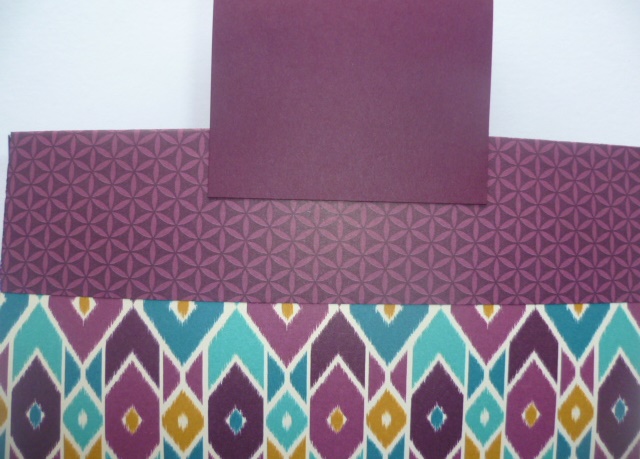
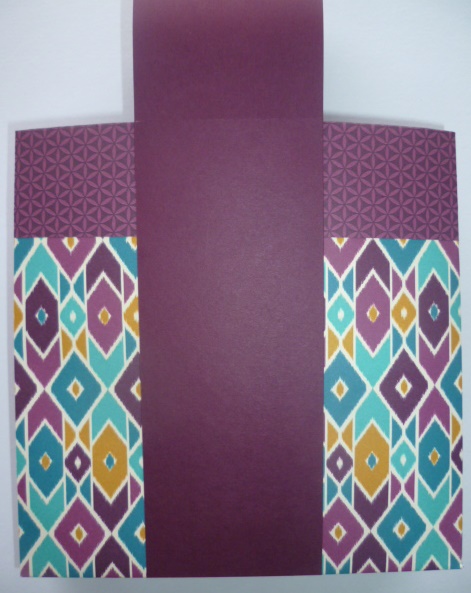
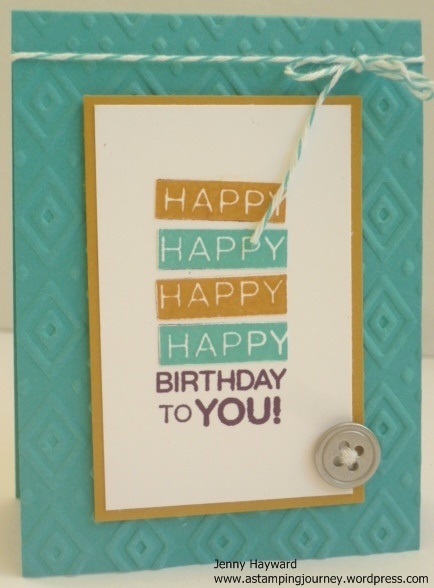
Here are the cards we will make.

P1160913      P1160916

I know that life is busy for many people or because of distance some people can’t make it so I have now made the class available by mail FOR YOU!!

STAMP A STACK CLASSES AVAILABLE BY MAIL  (Australian residents only)  

$15  + SHIPPING

Receive card kits for class cards to make in your own time.  Includes card pieces to make 6 cards (3 each of 2 different designs).  Card cut to size and includes ribbon/thread. You provide the stamps, inks and adhesives.  Embossed pieces can be done on request. Stamped images cannot be included as per Stampin’ Up! policy.

Stamps  – Substitute your own or order the stamps in addition + SHIPPING.
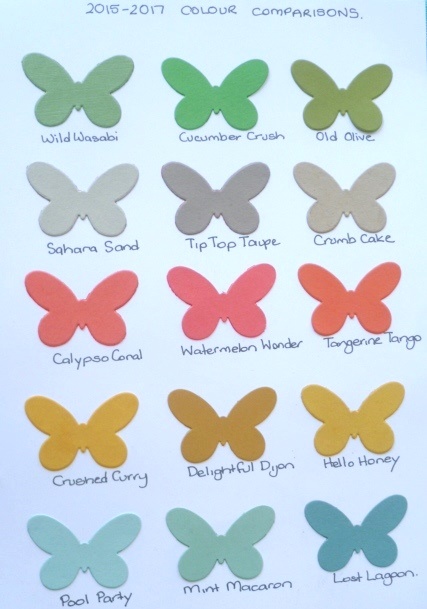
Stamps used:

Watercolor Wings – Photopolymer set (139424) $45

OR    Buy the Bundle which includes the Bold Butterfly Framelits (140232)  $62.75

The 2nd card uses the set ‘Birthday Blossoms’ ( W) (139167) $47.00 OR (C) (139471) $33.00

So now you don’t have to feel you miss out.

Please RSVP for the class ASAP or comment that you will like to join the Stamp A Stack by Mail.

cards, Stampin' Up!, Techniques

FAUX SHAVING CREAM BUTTERFLY!

A little while ago I shared the Faux Shaving Cream technique with you.  I showed everyone at our team meeting this week so beforehand I played around with a few other stamps using this technique.  I thought I would show you the card I made.

2nd faux shaving cream

There is quite a few new products on this card. Can you spot them??

I have used the set ‘Watercolor Wings’ and the butterfly was cut with the new Framelits, Bold Butterfly.  I have used 2 of the new Incolors Watermelon Wonder and Cucumber Crush.  (I also used Pacific Point for this technique too).  The other stamp I used to create the honeycomb effect was from Butterfly Basics. The White card is embossed with the lovely new embossing folder ‘Fluttering’.  How gorgeous is this folder??  The greeting I have used here is from ‘Butterfly Basics’ which continued from our recent Occasions Catalogue.  See the centre of the butterfly?  I cut the smaller butterfly with the Bold Butterfly Framelits from regular old baking paper! How cool!  In the centre of the butterfly I added a Watermelon Wonder In Color Blossom Accents. I was really happy how this turned out.  You really have to play with a few different ink colours and different stamps to see what effect you get.

If you missed the post showing the Faux Shaving Cream Technique and want to have a go yourself, you can find that tutorial post HERE on my blog.

Thanks for visiting today.  I hope you have a wonderful weekend. 🙂

Jenny

cards, Catalogues, Stampin' Up!, Workshops

2015 CATALOGUE LAUNCH MAKE AND TAKES!

I thought I would show you the Make and Takes we made at my launch last weekend.  I shared some of the fun in an earlier post.

Firstly, we made a bookmark showing the new Incolors and using the cute new set “Sprinkles of Life”.

The top of a strip of Whisper White (5cm x 21cm) was punched with the Scallop Tag Topper Punch. One of the greetings was stamped in Memento Ink at the top.  How cute is this saying?? Right at the bottom the cone was stamped in Tip Top Taupe and then each ice-cream scoop stamped in a different colour.  There is a matching punch which we could have punched out the scoops but to keep it simple and quick they were just stamped directly on to the card.  Everyone could choose their colour of the new Incolor Dotted Lace Trim.

P1160820

Now for the card. I changed my mind a few times with what we do leading up to this.  This card was inspired by a few cards I had seen on Pinterest.  Once again, each guest could choose their own colour.

This is using the set ‘I Think You’re Great’. The scallop lines were stamped in Delightful Dijon (or what they chose). The “hi” cloud was stamped in their matching base card colour and hand cut.The flowers were punched from Watermelon Wonder card using the small flower punch in the Itty Bitty Accent Punch Pack. A little bling and some white twine finished it off.  Now of course it’s nice to have a matching envelope.  So with the new Envelope paper we could make one using the Envelope Punch Board.

P1160860

For some guests who didn’t like the “hi” on their card they could make an alternative in their chosen colour with the “Happy Birthday” from ‘Remembering Your Birthday’ set.  It was nice to have a matching envelope to go with it too. 🙂

P1160813

Sorry if you missed my launch last weekend, I know for some people distance is an issue 😦  If you would like me to share some fun projects with you and your friends, why not invite me to come to your place and we can have some fun stamping together.  If you are further afield, then you can have a Catalogue Party yourself.  Collect some orders from your friends and send them to me.  I can have the orders sent back directly to you – and the bonus you still earn all the exciting little hostess benefits yourself.  You can check off some of those items on your Wish List – and get them for Free!! Do it!  🙂

Thanks for stopping by today.  It’s nice to have you visit me from near and far.  Have a wonderful day xx

Stampin' Up!, Weekly Deals

STAMPIN’ UP! UPDATES!!

Yes, I know I was going to show you my Make and Takes from my Launch in the next post.  Sorry about that.  Just a little commercial break here.  🙂  I have some important Stampin’ Up! Updates for you.

This week’s Weekly Deals!  You will love these.  Great punches and what about those gorgeous coloured inkpads??? Both favourite colours of mine and for $8.63! ‘And Many More’ Stamp set is very versatile and $35.25.

Email me or add a comment if you would like to order any of these great specials or for any Stampin’ Up! products for that matter and I will get back to you ASAP.

Jun 17

—————————————————–

Join in June

Less than 2 weeks to go! If your Wish List from the new Catalogue is HUGE.  Yesss! Then why not Join the Stampin’ Up! family.  What’s the deal?? Pay $169, Get $235 of Products PLUS 2 (Yes 2) additional stamp sets for FREE in June!!!!!  What amazing value is this!! I have already welcomed a couple of new people to my team this month and they are excited let me tell you.  2 extra free stamp sets to any value in the already fantastic value Starter Kit!  

So if you have been thinking (and thinking some more) then get on to it now.  I would love to welcome you to my fast growing little team.  You can be from anywhere in Australia.  Find out more information on my Blog page HERE.  You can join anytime from my Business page HERE.  If you still have some questions then email me and I will get back to you.

————————————————–

Speaking of my Website, have you visited there lately?? It has just had a fresh overhaul and is so much easier to find information.  Stop on by.  You can find some cute new projects, and all my class details Plus you can view the catalogues and Shop 24/7.

Visit by website HERE.

DBWS new screen

Here is one sweet new project that has been added.  This is with a new set ‘Birthday Blossoms’. Imagine this in other colour combinations.

Gallery_BeautifulBday_DBWS_6.2015_NA_SP_EU

—————————————————————————

Thanks for stopping by.  We will be back with our regular programming next post.   Have a super, wonderful day where you are.  🙂

Classes, Stampin' Up!, Uncategorized

CATALOGUE LAUNCH REVIEW!

I thought I would share some of the things from my launch on the weekend.  It was such a fun time and I am sorry if you couldn’t make it. 🙂

Firstly, I have to show you my butterfly wall.  It is a bit hard to photograph.  The lighting is not the best.  It is a bit overcast today when I took these photos.

P1160845

I will show you some close-ups. I have used the Butterflies Thinlets and the cute new Incolor Blossom Accents.

P1160830

P1160832

P1160848

These are some of the treat bags I made for my lovely guests.  Sorry I didn’t take photos of all the flower colours.  These were last minute things as my order didn’t arrive until the 11th hour. The glue was still drying when the first guests arrived 🙂

I used the large Cello bags. I added some of the sheets from the ‘Cherry on Top’ DSP stacks and added a doily.  I cut some Balloons and banners with the Balloon Framelits and added a chocolate treat and some post-it notes.

P1160822

It is hard to tell in the photo but I ran the bag through the Big Shot with the Boho Chic Embossing Folder.

P1160866

Here is a close-up of the pegs for the bags.  I punched out a flower with the Petite Petals Punch and adhered a flower onto it with the Multipurpose Liquid Glue.  This was then adhered to a little peg.  It was a simple, cute idea.  I got the idea from a lovely friend of mine 🙂

P1160877

I thought I would share the Colour Comparison chart for the new Incolors.  It’s a good way to see how they fit in with other current colours.  (Once again sorry about the lighting!  I really have to do something about this). 🙂

P1160833

Next post I will show you the Make and Takes we did.  I think that is enough photos for one day. 🙂

Jenny x

cards, Product Share, Stampin' Up!

2015 STAMPIN’ UP! CATALOGUE PRODUCT SHARES!

Do you like some of that lovely ribbon in that catalogue??  Of course, it is so lush.  But I know it can be hard to get through a whole roll of that ribbon.  So I have put together a Product Share so you can enjoy a taster.  Here are the details.  Message/comment to take part.  This is for only Australian residents.

RIBBON  p158-159

Dotted Lace Trim –  This is such gorgeous soft lace.

1.15m of each colour: Cucumber Crush, Delightful Dijon, Mint Macaron, Tip Top Taupe, Watermelon Wonder                                                         $13.80

lace ribbon

Metallic Thread – great for those little swirls to embellish your projects.

11.4 metres each of Silver and Gold Metallic Thread               $2.75

metallic thread

Thick Baker’s Twine

3.4 metres of each colour: Bermuda Bay, Calypso Coral, Cherry Cobbler, Smoky Slate, Very Vanilla.                                                                              $8.20

thick baker's twine


TOTAL TO JOIN ALL 3                                                              $24.75

JOIN ALL 3 AND SAVE 10%                              PAY ONLY $22.40


DESIGNER SERIES PAPER (DSP)  p142-143

12 – 6”x6” squares of each of the following DSP (total of 60 squares)

Everyday Chic, Bohemian, English Garden,  Merry Moments, Timeless Elegance.                                                                                                                 $25.00

bohemian                        timeless elegance


So, let me know ASAP to take part 🙂

cards

SPRINKLES AND CHERRY ON TOP!

Don’t you love that title!!! What else can I say really.  I have had some fun making up some cute projects with the ‘Sprinkles of Life’ stamp set and the ‘Cherry on Top’ Paper Stack.  These are the first ones I made the other day and thought I would share them with you.

This first one I just layered some of the ‘Cherry on Top’ DSP onto a Watermelon Wonder Card base.  The images are so cute you really don’t need much more.  Although I did deliberate a lot with this…. and I really am not too sure about it, but anyway first play!!  I added some of the White Jute ribbon and then stamped one of the greetings from the ‘Sprinkles of Life’ set and flagged the ends on the white card. The “Happy Birthday” I cut with the Bitty Banners Framelits.  It looked a bit bare so I added a little banner of Watermelon Wonder card under the white banner.  A little bling to finish.  OK, still not sure …..Thoughts???

P1160801

For this card I used a different pattern in the ‘Cherry On Top’ DSP stack.

P1160804

I stamped the greeting in black onto a piece of Whisper White Cardstock which I had punched the top with the Scallop Tag Topper punch.  Then I stamped the cone in Tip Top Taupe.  The ice-creams were stamped separately on scrap card. I will tell you how I coloured the ice-creams.  I stuck the ice-cream stamp on the block with the image facing down on the block (so upside down). I inked up the stamp in Watermelon Wonder and stamped it off first gently onto scrap paper and then on to white card. So it was a little lighter in colour. Then I cleaned the stamp, put it on the block the correct way and stamped it over the already stamped image.  I then did the same with the Cucumber Crush colour.  Then punched them both out with the Tree Builder punch. I was blog hopping the other day and came across this idea and now I can’t remember who it was sorry but how clever!!!

To finish the card I added a bow from the Watermelon Wonder Dotted Lace Trim. This is such gorgeous soft lace.  It is hard to see but I added a little sparkle with the 2-way Glue pen and Dazzling Diamonds to the bottom of the ice-creams.

This Sprinkles Of Life set is so cute AND the great thing is that $3 from every set sold will be donated to Ronald McDonald House.  How awesome!!! Here is the set.

Sprinkles of life

I know you will just want to get this set – not just because it is cute but because it is for such an awesome cause.  Stay tuned for more details on how you can support Ronald McDonald House.

Enjoy your day wherever you may be,

Jenny

3D projects, Stampin' Up!

BOHEMIAN TOTE!!

I have been playing around with the new Bohemian Designer Series Paper (DSP).  I really like the colours and the funky patterns.  Totes are all the go at the moment and I wanted to create a new Tote.  It is not a particularly new design using 2 sheets of the DSP but I thought I would change it up a bit.  Plus I added a little tab to hang your gift card off. I hope you like this one 🙂

P1160789       P1160791


P1160795

Would you like to make one?  Here are the instructions in metric and imperial.

BOHEMIAN TOTE

2 Sheets of 12×12 Designer Series Paper (DSP) I have used the Bohemian DSP

Handles: 2 pieces of 20.5cm x 8cm (8” x 3 1/8”) co-ordinating cardstock

1 piece of 28cm x 8cm (11” x 3 1/8”) co-ordinating cardstock

Card Tab on Handle:   2cm x 10cm (¾” x 4”) co-ordinating cardstock

Inside Base:   4.8cm x 20.2cm (1 7/8” x 8”) co-ordinating cardstock

  1. On each piece of DSP score your sheets at 5cm (2”) on each side. Fold on each of the score lines.
  2. Cut up on the small score lines at the bottom of each piece of DSP.

P1160761


  1. Add adhesive to the 2 small bottom tabs on one sheet of the DSP on the outside. Adhere this to the inside of the long bottom tab.
  2. Place this assembled piece on to the second piece of DSP which has the right side facing down.

P1160763


  1. Add adhesive to the bottom small tabs on the second DSP sheet and assemble on to the bottom of the first piece. Add adhesive to the long side tabs on the inside of the second sheet of DSP. Adhere this to the first piece.  Add adhesive to the long bottom tab of the second sheet of DSP and fold up on to the first piece.  So it is like wrapping the second sheet onto the first sheet. (The piece at the bottom would be the front of the bag so just check to see what print you want showing).
  2. On the 28cm x 8cm (11”x 3 1/8”) piece for the handle, place adhesive at each end of the handle ON THE UNDERSIDE. Adhere on the outside of the bag near the top.
  3. Take one end of this handle piece and adhere to the top of the bag on the outside of the bag. Adhere the other end to the other side of the bag on the outside of the bag.

P1160765

  1. Take one piece of your 20.5cmx8cm (8”x 3 1/8”) cardstock and place adhesive on the back of this piece. Line up the top edge of the piece with the top edge of your bag positioning it over the handle piece. And adhere on to the front of the bag.  Repeat with the other piece adhering this to the back of your back.  NOTE: If you wish to add brads to your bag for decoration ADD THESE FIRST.  (Just so you don’t see the back of them inside the bag).

P1160766

  1. Fold on the score lines of the small card tab and unfold.  Add adhesive to the ends (on the side facing up). Fold over the piece again and adhere this piece to the front of your bag.

P1160796


  1. Add your piece of cardstock base to the inside of the card. This provides some extra strength.

Decorate the bag as you like.

——————-

Card to hang on the front measures 20cm x 7.5cm. Score at 10cm.

7 ½” x 3”. Score at 3 ¾”

P1160798

For my card I used the Boho Chic Embossing Folder on the front of the Bermuda bag card.  The Happy Birthday is from ‘Amazing Birthday’. I stamped it first onto Whisper White Cardstock in Blackberry Bliss and then again twice on scrap card with Bermuda Bay and Delightful Dijon.  I cut 2 of the “HAPPY’s” out of each colour and adhered them over the top of the Blackberry Bliss greeting. The Whisper White piece was matted on to Delightful Dijon and the whole piece was raised up with dimensionals.  I wrapped around some Bermuda Bay Baker’s Twine and added a silver button that I had sewed with white sewing thread.  This complemented the silver buttons on the bag.


I hope you like this version of the Tote Bag.  It’s a good size for those larger gifts.  Enjoy making them.

Have a happy weekend.  I hope it’s a crafty one for you.  It’s a long weekend here so I hope there is some time to create this weekend.

Jenny


Catalogues, Stampin' Up!

THE 2015 STAMPIN’ UP! CATALOGUE IS HERE!

The excitement has been building over the last few weeks and there has been lots of sneak peeks shown on so many blogs and social media.  The wait is over!  The 2015 Stampin’ Up! Catalogue is now available.

2015_AnnualCatalog_en-AU

I will add the link in the right hand column but you can head over HERE now and see the Catalogue Online.  Whoo Hoo! Grab your cuppa and some paper so you can start making your wish list.  If you are someone who likes to have their own copy of the catalogue and you haven’t got one yet, then ASK ME FOR ONE!!! (Australian residents only!).  I will drop one in the post for you.

I am not going to ramble on today because I know you have important things to do – like read a catalogue!!!  🙂  But I will say that FOR TODAY ONLY ALL 3 CATALOGUES ARE AVAILABLE TO ORDER FROM – the 2014-15 Stampin’ Up! Catalogue, the Occasions Catalogue and the new 2015-16 Stampin’ Up Catalogue.

I am placing an order tonight so if you know what you want already and planning to order online (by 8pm) (HERE) then please use the Hostess Code:     2FBF4JF9

Join in June

Some exciting news though too before you go.  If your wish list is loooooong!!!!! Believe me I think it will be.  Then Join Stampin’ Up! during June and receive 2 additonal stamp set for FREE! Exciting!

Pay $169= $235 of products + 2 extra stamps set + Pay no shipping!  You do the Maths 🙂

Ask me for more information or you can join Online HERE now! It doesn’t matter where you live in Australia. I welcome you to my team. 🙂

Now on to “Operation Wish List” 🙂

Jenny