cards, Catalogues, Stampin' Up!

SUNDAY SUITE – COME SAIL AWAY!

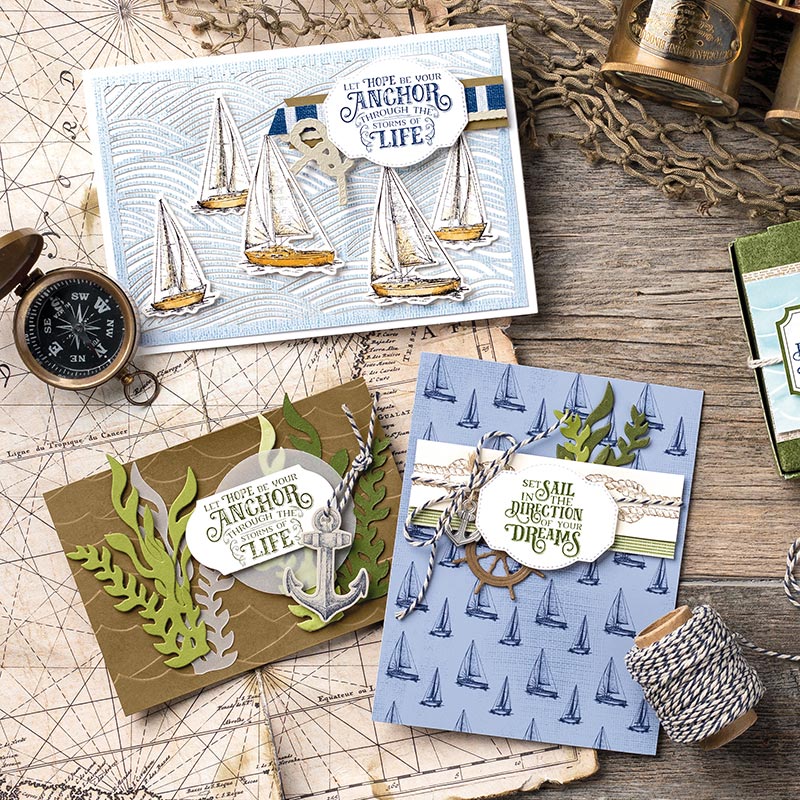
This weekend it’s all about the Sailing Home Bundle in my classes and on my blog here.  So I think it’s a good time to have a closer look at the full Come Sail Away Suite for Sunday Suites today.

This is a really great suite for those hard-to-make men’s cards.  Let’s face it.  We all struggle with them.  While it might be boats and sailing there are some other fun elements.  Let’s have a look.

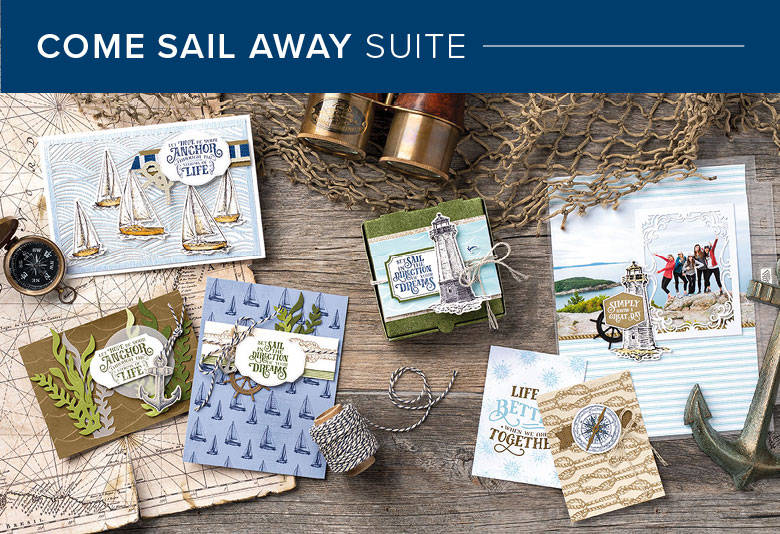
You can make some of the samples above and lots more with any or all of the Suite products below.

The Come Sail Away Suite can be ordered with just one item code making shopping so much easier. #152175  $165.25 AUD

or you can pick just one or 2 of the items.

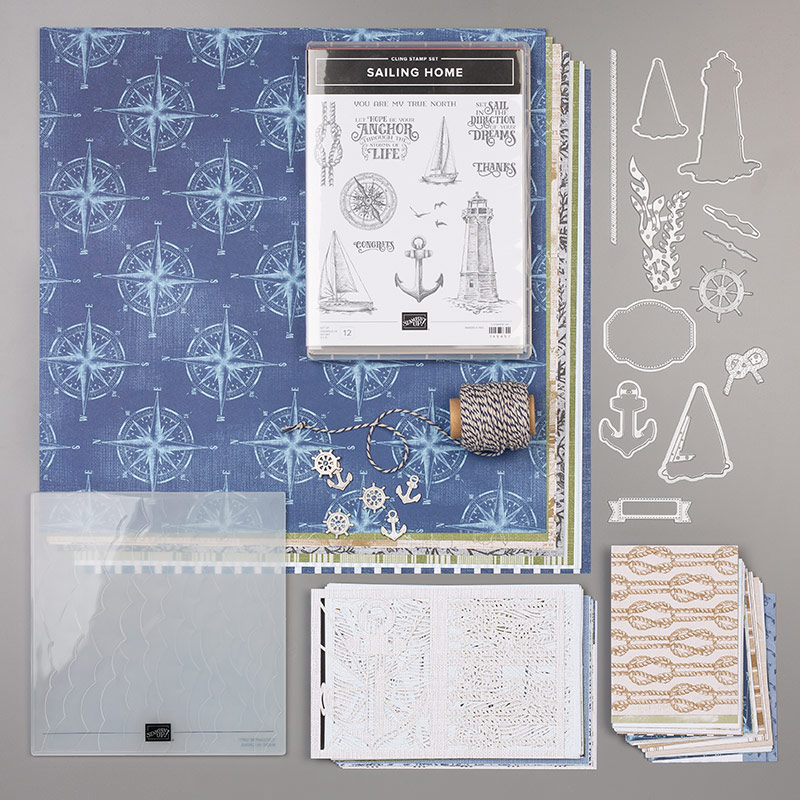
I wanted to show you a couple of the products in closer detail.

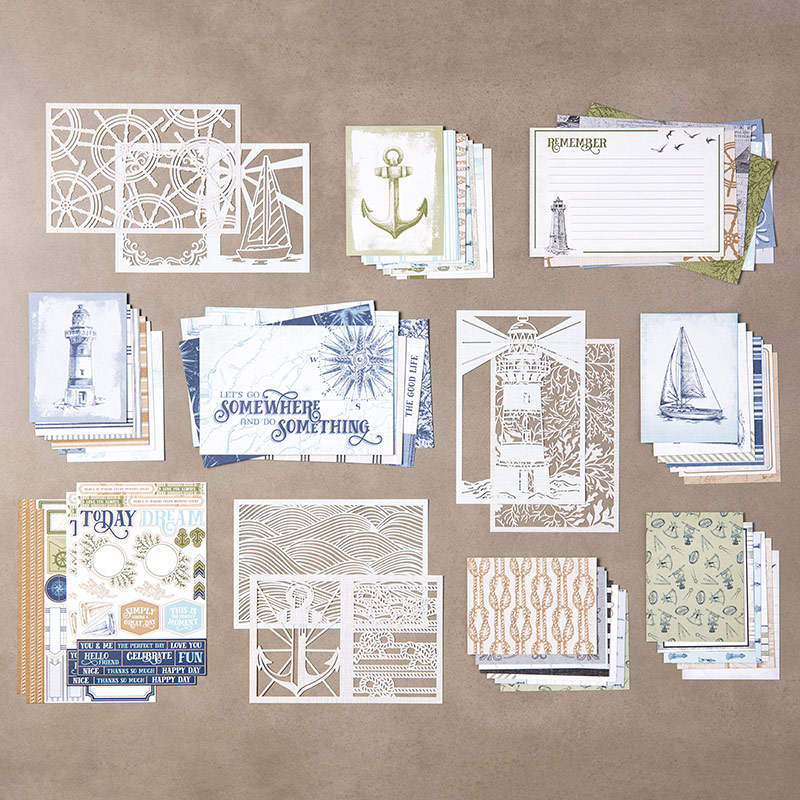
The Memories and More Card pack features maritime images.  It has 50 double-sized cards and they come in 2 different sizes. 3″ x 4″ (7.6 x 10.2 cm) and 4″ x 6″ (10.2 x 15.2 cm) sizes.  I love the single-sided laser-cut specialty cards.  See them below.

There is also some sticker sheets included too.  Don’t just think of the these card packs for scrapbooking.  They are great for cards as well.

You have to check out the Come Sail Away Designer Series Paper. 

The prints show really don’t show it justice to be honest.  There are some great nautical prints.  Check the video below the paper image.

Now you need to see this High Seas 3D Embossing Folder closer.  It is like waves.  Great with this bundle.  Available now for $17 AUD #149577 (You can order it in store in the link below)

You get a really good idea of this embossing folder in the Soft Suede sample below.  And by the way the card above that uses one of the diecut cards from the Memories and More pack.

What do you think of this bundle.  I can tell you everyone has loved using them in class this weekend.  … And they may have added it to their orders. 🙂

You can grab the Come Sail Away Suite with just one item code or grab one or two items.  Shop in my store now -> HERE.

Please use the Host Code: VA9WC4CZ

This weekend order the Sailing Home Bundle (stamps and dies $88 AUD) and receive the tutorials and the card kits for the 3 cards we have been making in class this weekend.  You can see them in an earlier post.  Also, receive 2 additional metres of Night of Navy Baker’s Twine. If you order the full Suite I will also send you out the Card kits and tutorials.

You will also be eligible for the Tutorial Bundle as a Thank you this month.  This contains 12 exclusive projects from Demonstrators around the world of which I am a part of.  (These are not using the Sailing Home Bundle).

Thanks for visiting me today to see these great products.  I hope you can use them for the men in your life.

Jenny


cards, Catalogues, Stampin' Up!

INSPIRED SAILING HOME CARDS!

I have another card for you today using the Sailing Home Bundle. 

Two Sailing Boats with Stampin' Up! Sailing Home

This card was inspired by a card by Nicole you can see HERE.

For my card I just stamped the compass and the birds in Crumb Cake Ink.  I added 2 boats on mine.  They were stamped in Memento Black and coloured with the Stampin’ Write Markers.

The strip of paper is from the Come Sail Away Designer Series Paper. I wanted to make it a little more general for the sentiment.  This could be used for a number of different occasions.  The sentiment is from Itty Bitty Greetings and punched with the Classic Label Punch.

Just keeping it simple for this card.

Like I did with this card, when you start with a stamp set and not sure where to go with it, it is good to look around especially on Pinterest for other cards with the stamp set.  You can CASE it directly or be inspired by the card and use that as a spring board for your own creations.

Thanks for visiting,

Jenny

cards, Catalogues, swaps

SAILING HOME MINI CARD!

Today I have a mini card for you using the Sailing Home bundle.  I received this one in a Team swap last month I think.  I am not sure who it was from sorry. 🙂

This is a mini Card measuring about 7.5cm x 7.5cm (3″x3″)

From what I can tell with this card the sky was sponged in the top part of the card using Pool Party ink. The water was created using the lines in the High Tide set.  It’s great when the stamp sets co-ordinate with each other. I think it was given a light wash with the Aquapainter to blend out the colours. The lighthouse was stamped separately and then diecut and coloured in small sections of it.

It’s a sweet card so Thank You to whoever made this card.

Come back tomorrow so you can see more cards using the Sailing Home stamps and the co-ordinating Smooth Sailing dies.

SAILING HOME WEEKEND SPECIAL

Order the Sailing Home Bundle (Australian residents only). Receive the card kit for 3 great cards and also an additional 2 metres of Night of Navy Twine.  You will also receive a Tutorial Bundle of 12 exclusive projects (these are not using the Sailing Home Bundle).

Head to my store -> HERE to order.  Please use the Host Code: VA9WC4CZ   $88 + Shipping and Handling.

Thanks and have a great weekend,

Jenny

cards, Catalogues, Classes, Onstage, Stampin' Up!

SAILING HOME ONSTAGE CARD!

This weekend is my Sailing Home Classes, So over the next few days I am going to be sharing some of the cards I have been making with this suite of products.  I think we should call it a Sailing Home Long Weekend shall we.  Who loves to spend their free time sailing on the wide blue waters?? 🙂

Onstage was a few months ago now.  I have been a little slow in showing you some projects, apart from the fact that it took some time to finish off some of the cards I was waiting to share a few projects close together with the Sailing Home Suite. The first card is  one we made at Onstage in April.

Sailing Home Onstage card

In the suite of products is the Sailing Home Stamp set and the Smooth Sailing Dies.

First step in making this card was giving a light wash over a piece of Watercolor card with the Balmy Blue ink and an Aquapainter.  It dried while we stamped and cut the other pieces to the card.  I like the little Sail Away Trinkets.  They are very cute and you can dress them up with some Night Of Navy Baker’s Twine.  The easiest way of adhering these on to your projects is to use Glue Dots.

Some pieces of the Come Sail Away Designer Series Paper were layered on to a note card before assembling all the other elements.

Be sure to stop by over the next few days for some more projects with this suite.  It’s been lots of fun playing with them.

Have a good day,

Jenny

Blog Hops, cards, Catalogues, Stampin' Up!

WILDLY HAPPY FOR STAMPING AROUND THE WORLD AUGUST BLOGHOP!

Welcome to another Stamping Around The World Blog Hop.  So nice to have you.  You might have come from Margriet’s Blog or just starting Here.  Welcome and enjoy the hop.

Today I am using the set Wildly Happy as that was the one I used in the Tutorials for this month.

I wanted to do something a little different with this set.  I was thinking about this recently and was reminded that when you see pictures of elephants they are often in herds.  I did a little research and read that they are very social especially the female of the species and will keep close together looking out for each other.

So I created a little herd of elephants with the little baby.

Stampin' Up! Wildly Happy

To create this I used the Masking Technique. I have explained it further below. The elephants were stamped on Thick Whisper White card and coloured with the Smoky Slate Light and Dark Stampin’ Blends and I also used the Petal Pink ones for the baby.  The grass was with the Light Granny Apple Green Stampin’ Blends.

MASKING YOUR ELEPHANTS

A piece of Thick Whisper White. Cut the card using one of the larger Rectangles Stitched dies. 

Note: I didn’t cut the card with the Rectangles Stitched Die until after I finished stamping and colouring the elephant so it is ok to leave it until then if you wish.

1. Firstly you will want to stamp your elephant on to a Sticky Note or you can use scrap paper with some removable adhesive.  Cut around the outline of the image.  For this card you will need to stamp 3 elephants in total on the Sticky Notes as you will use them all at one time in places.

2. Stamp your elephant and baby near the bottom right hand corner. Inking the stamp in Memento Ink.  Place one of your cut out Sticky Note elephants over the top of the image.  Ink up your stamp and stamp again just to the top left of the first one.  You will want to line it up so you just have the larger elephant shown.

3. Ink and stamp another elephant to the top right of the first one. The baby one should be just off the edge of the card but that is ok.

4. Place 3 of the Sticky Note elephants over each of the stamped elephants.

Masking Technique

5. Stamp another elephant in between the top 2 elephants.  And one elephant to the left of the left Sticky Note elephant.  Each time remember to line the elephant up to just stamp the adult one.

6. Move a Sticky Note to the last elephant stamped on the left and then ink and stamp another one to the left of this.

Once stamped you can then colour the elephants with the Smoky Slate Stampin’ Blends and colour the little baby one with Petal Pink.  I found them very easy to colour.  Using the Light Smoky Slate Blends colour the elephants completely.  Then using the Dark Blends add lines over the printed lines (wrinkles) on the elephants.

To assemble the card, emboss the Smoky Slate card, 10.1cm x 14.4cm (5⅜” x 4⅛”)  with the Tin Tile Embossing Folder and wrap around a length of the Petal Pink ribbon. Then adhere this to the Petal Pink Card base. Raise up the stamped card piece to the front.

Stamp the sentiment on Petal Pink card and cut with an oval die in the Stitched Shapes Dies.  Then raise that up off the card with Dimensionals.

Wildly Happy _ Elephant Herd

***

Enjoy making this card.  Try the masking Technique with any stamped image.

Now continue the Blog Hop.  This time you are off to Allie’s Blog.  If you get lost the Roll Call list is below.

Roll Call List

Stefanie Pletscher (The Crafty Medic)

Sue Allen (Simply Craft)

Linda (Stampin by the Beach)

JoAnne (Luv 2 Create)

Alicia Yap (Paper Munchkin)

Amanda Gillmore (She Creates: By The Sea Shore)

Margriet Siekman (Creatief met Marsie)

Jenny Hayward (A Stamping Journey)

Alejandra Gomez (Creating with Allie)

cards, Catalogues, Classes

SAILING HOME CARD CLASS OR KIT TO GO!

Come along and make some great cards using the Sailing Home Suite Or you can grab the Kit to Go.

WHEN: Friday 16th Aug. 10am or Saturday 17th Aug. 2pm

COST: Class only or with the Bundle.

CLASS: $20 (+Extra $5 to use my adhesives)

BUNDLE: $95 – Includes the Sailing Home Bundle (Sailing Home    stamp set and Die) and a discounted class fee. Receive an additional 2m of Night of Navy Baker’s Twine Free.

RSVP: Wednesday 14th Aug.


STAMP AT HOME – KIT TO GO

Purchase the Sailing Home Bundle    $88 + $5.95 shipping and handling.

Receive the tutorials to make 3 projects and all the materials Free.

Also, receive Free an additional 2 metres of Night of Navy Baker’s Twine.

Stampin' Up! Sailing Home Bundle

Contact me for more information.  If you are coming to class be sure to book in ASAP. 🙂

Jenny


cards, Catalogues

SUNDAY SUITE – DINOROAR!

Dinoroar

Today’s Sunday Suite we are looking at is the Dinoroar Suite.  This is such a cute set. I don’t have any young children anymore but if you have children or grandchildren this would be a great suite for you.

This is all the products you will find in the Dinoroar Suite.  Those cute little dinosaurs in the Dino Days stamp set.  I have heard too that some of the dies will cut the dinosaurs in the Dinoroar Designer Series Paper.  That’s always cool when you can do that.  No cutting with scissors.

Stampin' Up! Dinoroar Suite

If you choose to get the whole suite it is just one item code.  That makes life easy.  In Australia that is $132.50  #152194

How about this for a cute card created by a Stampin’ Up! artist.  Have a close look at the threads under the hatched egg.  This is actually the Denim Ribbon that has been pulled apart to create the threads… Clever!

Dinoroar _ Hatched Egg

Another cute card below.  You know I don’t think you necessarily have to have young children to have this suite.  Many older people would be happy to have this cute dino on a card too. 🙂

If you do have young children what about a cute banner though with the paper.  Great for their bedroom or for a birthday party.  Oh! The ideas are endless.  Such fun.

You can grab this suite or parts of it in my store now.  Head over -> HERE.

Please use the Host Code: VA9WC4CZ

Have a great day.

Jenny

Stamping Around The World Tutorials


cards, Catalogues, swaps

BIRD BALLAD MINI CARD AND ENVELOPE!

I received this mini card in our team swap last month using the gorgeous Free As A Bird stamp set and the Bird Ballad Designer Series Paper.  I shared my swap a few posts back using the Wildly Happy stamp set. Pop back a few posts if you missed it.

I think it was from Barbara.  It is gorgeous isn’t it.

Bird Ballad Mini Card

The birds were cut from the Designer Series Paper.  You know what I love too?  The envelope is stamped.  It’s nice to dress up the envelopes even for these mini cards.

The card is a small 7.5cm x 7.5cm or 3″x3″.

Just a quick one today but thanks for visiting me.  It means a lot.  I don’t really like talking to myself. 🙂

Have a great day,

Jenny

Catalogues, Stampin' Up!, Videos

WEDNESDAY’S WOW! #79 – UNBOXING MY 2019 HOLIDAY CATALOGUE PREORDER!

A little different Wednesday’s WOW! today.  My preorder arrived on my doorstep early this morning for the upcoming 2019 Holiday Catalogue (or Autumn/Winter Catalogue for our Northern Hemisphere friends).  So hold everything – I had to make a video unboxing it.

For Wednesday’s WOW! #79 – join me as I am unboxing my Holiday Catalogue preorder.

If you haven’t seen the catalogue yet then let’s check out JUST SOME of the gorgeousness.

I hope you like it.  I always like seeing what different products people order.

What is your favourite?

Stay tuned as I start to create with these products very soon.

2019 Stampin' Up! Holiday Catalogue

I will be starting to send the Holiday Catalogues our very soon so if you are in Australia you can request one by filling out the request form -> HERE

Jenny

3D projects

BIRD BALLAD TENT BOX!

I have this cute little box to share with you today.  It is a Tent box.  I have used the Bird Ballad Designer Series Paper.  We made this box at our team meeting last month.  It’s such a sweet size and you can fill the box with some chocolate treats and wrap it up in some gorgeous paper.

Bird Ballad Tent Box

The little flowers from the Free As A Bird stamp set were stamped on scrap white with Memento Black ink and then coloured with the Petal Pink and the Mint Macaron Stampin’ Blends.  Then they were then handcut.

I love this paper from the Bird Ballad Designer Series Paper packThe paper creates a little wrapper around the box.  You could make this style any size you like.

So would you like to make your own little Tent Box.

You can find it on Sam’s blog – Pootles -> HERE. 

Thanks for visiting me today.

Jenny