cards, Catalogues

IN THE TROPICS DAISY!

I had this idea in my head for a little while and thought I would give it a try. I have to say it didn’t work out as well as I had imagined. But, … I’m going to show anyway.


When I first saw the pineapple top in the In The Tropics Dies I wondered if it would make a grassy clump. That idea could work with the Daisy Lane set or similar.

After I cut the “grass” I sponged the ends with the Old Olive ink.

The patterned paper is from the Best Dressed Designer Series Paper pack.

The sentiment is from the Itty Bitty Greetings set and was cut with the Stitched So Sweetly Dies.

What do you think of this idea? Yay or Nay?

I’m keeping this brief today. Our computer has died so doing this on the IPad and Phone. I’m adaptable right. 😆 So apologies roday for the standard of the post.

Thanks for visiting me.

Jenny

Blog Hops, cards, Catalogues

STAMPING AROUND THE WORLD FEBRUARY BLOGHOP – HAPPY BIRTHDAY TO YOU!

Time for another Blog Hop with the Stamping Around The World Tutorial Group.  This month I am sharing a project with the Happy Birthday To You stamp set as that is the stamp set I used for the Tutorials this month.

I wanted to try something a little different with the dies.  I wanted to layer up the flowers on the card to give more dimension.  A bit like the old Paper Tole effect.  You can tell in the photo how it looks.

I stamped the cake from Happy Birthday To You on white card 3 times.  I used Basic Gray ink as it is a little softer.  I coloured just the cake on one, and then the flowers on the other 2 cakes.  They were coloured with Stampin’ Blends (Flirty Flamingo and Old Olive).  The cake was coloured with Mint Macaron.

On one of the cakes (the one without the flowers coloured in), I cut the full cake out with the Birthday Dies.  On the other two cakes I cut the flowers out with the flower die.  On one of these diecut flowers I trimmed off the top flower to have just a single flower.

Then diecut some leaves from Old Olive and Mint Macaron and adhere them behind the flowers before assembling them together.  You will find it so much easier – trust me!! 😉

After all the diecutting you can layer the cake together using Dimensionals to layer up the flowers.  The full diecut flowers was layered on to the diecut cake and then the single flower was raised up on top of these flowers.  If that makes sense?  So there were 3 layers with the top flowers.  Check the photo below to see it.

To finish the card I adhered a piece of the Perennial Essence paper on to a white card mat and then they were adhered to a Flirty Flamingo card base.

A rectangle from Vellum was cut from the Stitched So Sweetly Dies.  To adhere this to the card I added a little Snail Adhesive  behind where the cake would be and then the cake was adhered on to the Vellum with Dimensionals.

The little sentiment is from Itty Bitty Greetings and cut with the cute little shape in the Stitched So Sweetly Dies.

Just a reminder that the Stamping Around The World are put together by 12 Demonstrators from around the world.  You can receive these tutorials as a Thank you for ordering from one of us.  Or you can purchase the Tutorials from me for $20 AUD.

Now you can head off on the Hop again.  Click on the little blue frog below and it will send you to the links.

Happy Hopping,

Jenny


cards, Catalogues, Stampin' Up!

BLUE POPPY PATCH WITH THE PAINTED POPPIES!

Last week I shared a card with the Painted Poppies stamp set in a blue colour.  I made another card at the same time too so thought I would show you that one.

I used the Stone 3D Embossing Folder on the Balmy Blue card as I did on the other one.  The Poppies was stamped in Memento Black and then coloured with the Balmy Blue Stampin’ Blends. Gotta love the new Stitched So Sweetly Dies.  I used those to cut the white scalloped rectangle.

The sentiment from Itty Bitty Greetings was heat embossed in white on black card and punched with the Classic Label Punch.

The Whisper White Crinkled Seam Binding Ribbon is so lovely.  It is soft and so easy to tie in to a bow.  Don’t forget you can colour this ribbon with your Stampin’ Blends if you want to match your project.

I’m thinking other colours for these poppies.  Let’s see how we go with that one.

Have a great week,

Jenny

TO ORDER:

Head to my store and shop now -> HERE.

New tutorials now available for February.

12 projects included in the bundle from Demonstrators from Around the World.  Receive the tutorial bundle Free with any order from me or you can purchase the tutorial bundle for $20 AUD.

cards, Catalogues, Stampin' Up!

INSPIRED SAILING HOME CARDS!

I have another card for you today using the Sailing Home Bundle. 

Two Sailing Boats with Stampin' Up! Sailing Home

This card was inspired by a card by Nicole you can see HERE.

For my card I just stamped the compass and the birds in Crumb Cake Ink.  I added 2 boats on mine.  They were stamped in Memento Black and coloured with the Stampin’ Write Markers.

The strip of paper is from the Come Sail Away Designer Series Paper. I wanted to make it a little more general for the sentiment.  This could be used for a number of different occasions.  The sentiment is from Itty Bitty Greetings and punched with the Classic Label Punch.

Just keeping it simple for this card.

Like I did with this card, when you start with a stamp set and not sure where to go with it, it is good to look around especially on Pinterest for other cards with the stamp set.  You can CASE it directly or be inspired by the card and use that as a spring board for your own creations.

Thanks for visiting,

Jenny

Blog Hops, cards, Catalogues

STAMPING AROUND THE WORLD JUNE BLOG HOP – DAISY LANE!

It’s time for another exciting Blog Hop with Stamping Around the World Team.  You might have come from Linda’s Blog HERE or starting on my blog.  Either way.  Enjoy seeing all the amazing projects from Demonstrators around the World. 

Each month the team all contribute tutorials to send out as a Thank You for  when you order with any one of us.  That’s pretty exciting – and I can tell you these projects have been pretty amazing AND they are exclusive too so you won’t see them anywhere else.  I am honoured to be a part of it.  

The idea with these Blog Hops is to share a project with you with products we have used in our Tutorial for the month.  I have used the new Daisy Lane Bundle.  

Today I have 2 cards using the Daisy Lane stamp set and the Medium Daisy Punch.  I have also used the larger Daisy Punch.

The layout for the cards was based on the Freshly Made Sketches #339.  I thought it was a great way to use the paper. On these cards I used the Mosaic Mood Specialty Designer Series Paper.

It’s great way to show off the both side of the paper.  The Designer Series Paper needs to be square and to be the width of the white card mat whatever size you choose to make the card in.  These are standard card sizes.  See the measurements below.

Card Measurements:

Card Base: Mint Macaron 14.8cm x 21cm Scored at 10.5cm (5 1/2″ x 8 1/2″ Scored at 4 1/4″)

Soft Suede Card Mat: 10.1cm x 14.4cm (4 1/8″x 5 3/8″)

Whisper White Card Mat:  9.7cm x 14cm (4”x 5 1/4″)

Designer Series Paper:  9.7cm x 9.7cm (4″x 4″).

Cut the DSP diagonally and flip one side.  For these cards I used 2 different prints in the pack and actually swapped one half with the other as I thought the colours worked better together.

See the cards close up

I have punched 2 flowers of each size and layered them together.  The flowers were stamped in Soft Suede. and I used the Gold Faceted Gems in the centre of the flowers.
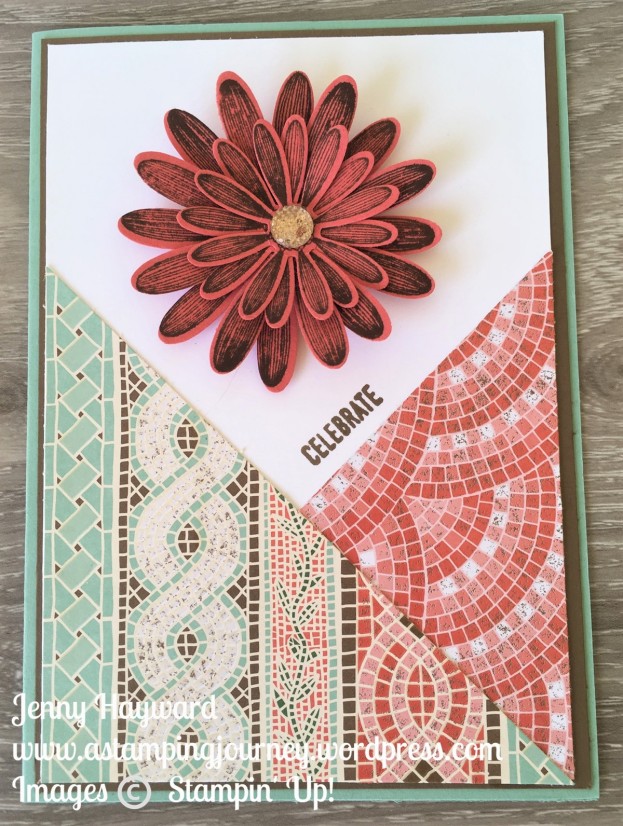
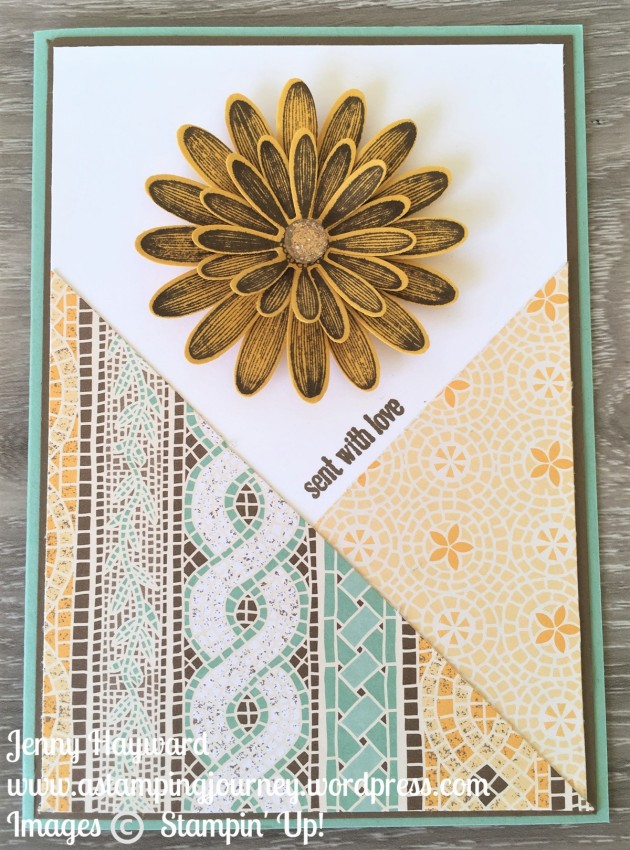
The sentiments are from the Itty Bitty Greetings stamp set.

Now the Daisy Lane Bundle is in store now -> HERE for $61 AUS When shopping in store please use the Host Code: H2BBRFTE

If you have the Daisy Delight set and the larger Daisy Punch then this is a great compliment to them and will really extend your creating so you can make the layered daisies in both sizes.  You can grab those in my store too if you haven’t already got them. With your qualifying orders you will get the Tutorial bundle with 12 projects that I will send out to you.

Now you can head off on the hop again and head to Jo Anne’s blog HERE or follow the arrows.  If you get lost follow the list below.


Eva Pottsova (Crafting with Angels)

Rebecca-Jo Unwin (Rebecca-Jo Unwin)

Stefanie Pletscher (The Crafty Medic)

Donna Gray (Stamping with Donna G)

Sue Allen (Sue Allen Simply Craft)

Linda Handford (Stampin by the Beach)

Jenny Hayward (A Stamping Journey)

Jo Anne Hewins (Luv 2 Create)

Lori Mueller (Stampin’ Dreams)

Margriet Siekman (Creatief met Marsie)


Thanks for visiting. Enjoy hopping! 🙂

Jenny
cards, Catalogues, Stampin' Up!

DELIGHTFUL GORGEOUS GRAPE!

OK, I know I said I would share my projects from my Catalogue Showcase from last weekend and I will but I have one more card with the Delightfully Detailed Laser-Cut paper while we are on that topic.  I hope you are not sick of them. I just have this one I wanted to share with you and then I will move on.  I will come back to this paper down the track though don’t you worry. 🙂

I had a small section of the Laser-Cut paper and thought I would add it to a tag.  When I did do that I found that the paper was so fine that it really should be on a card to support it a little more.  SO, I added the tag to a card. A Gorgeous Grape one at that.  This is a new colour and I think I like it!

The white card is embossed with the new Tufted Embossing Folder.  Have you noticed that in the catalogue?  It is a little hard to see it.  It is like a quilted effect you might say.  What about that gorgeous Mini Striped Gorgeous Grape ribbon. 

Now have you added this paper to your Wish List yet?? Or better still added it to your shopping cart??? I think you need to.

Order it Online in my store -> HERE now.  Please use the Host Code: PUB9TYMG

OR contact me directly to order.  (Australian residents only).

Jenny