cards, Catalogues, Punch Art, Stampin' Up!, Tutorials

A DIFFERENT FLOWER WITH THE FESTIVE FLOWER PUNCH!

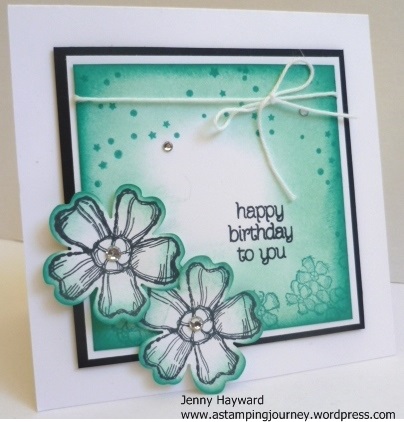
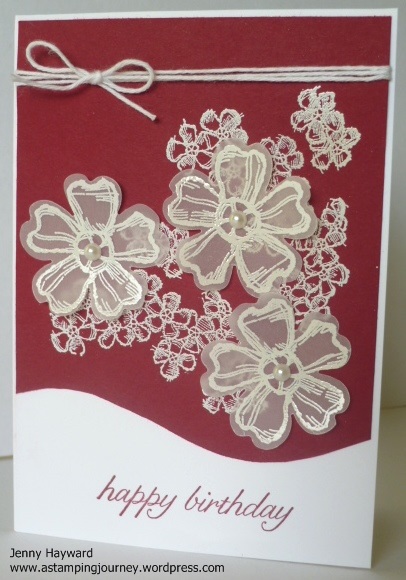
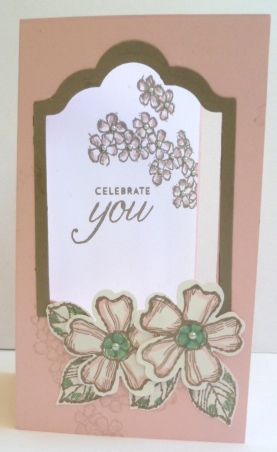
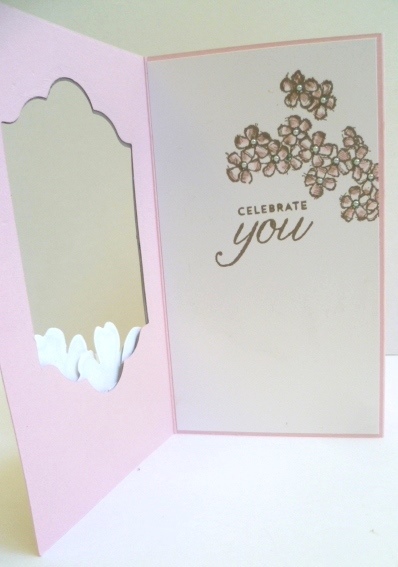
I made this card a few weeks ago but only had a chance to show you now.  When I received my Festive Flower Punch I had to have a play and create a different flower than the traditional one. That’s what you do right??? 🙂  I made a card up with the flower.  Since making this flower I have seen some great variations on Pinterest. I have to say I do like those ones a lot so I will have to make those too.  Here is my card and I will give you the details of the flower.  You might remember the small flower that you could make with the wing of the 2-step bird punch?? Well this is it’s big brother 🙂

P1170407

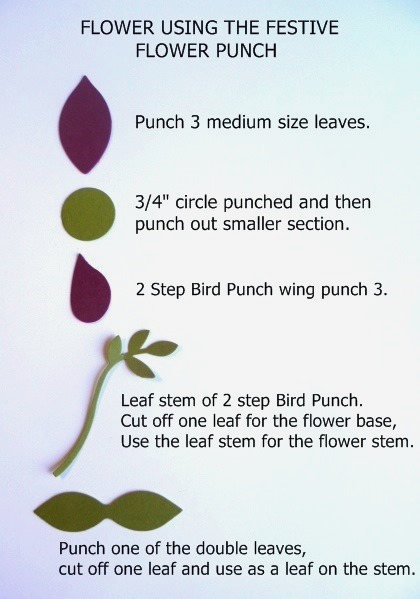
I have a chart below to show you how I created the flower so I won’t say too much about that.  For each of the pieces I sponged them with ink.  I have used Rich Razzleberry for the flowers and Old Olive for the stems.   See the pearl accent?? I was trying to work out what to add.  I added a Metal Rimmed Pearl but the silver didn’t go right so I created my own.  I punched a circle from the Gold Foil Sheets using the smaller circle from the Owl Punch.  I adhered a pearl to the centre and added the both with a glue dot onto a small bow from Whisper White Baker’s Twine.  I really liked this addition.  The greeting is from ‘Birthday Blossoms’ and I punched one corner with the new Curvy Corner Trio Punch.

Here is a chart to create your own flowers.

P1170321

So this punch is very versatile.  Not just for your Poinsettia flowers.  I can’t wait to make some other versions.

Here is the punch if you haven’t noticed it.  The punch can be found on P 31 of the catalogue and is $31.00 AUS.

festive flower punch

Thanks for stopping by.  I hope you have a super awesome weekend and you have time to create. I have my Holiday Catalogue Launch tomorrow so I am looking forward to sharing some fun projects using these great products from the Catalogue.

Jenny

cards

BIRTHDAY BLOSSOMS IN BERMUDA BAY!!

I thought I would get back to sharing the cards I made at our stamping weekend a few weeks ago. This one I think is one of my favourites.  First off, Andrea CASED the card on Pinterest with a few changes.  We all loved it and had to copy although I changed mine a little too. Here is the card.

P1170030

This is a 10cm x 10cm card (4″x4″).  On a piece of white square (I think it is about 6.1cm x 6.1cm).   I sponged in towards the centre of the card in Pool Party.and then sponged the edges in Bermuda Bay.  I stamped the small blossoms from ‘Birthday Blossoms’ in Bermuda Bay. Check out the stamping spots/stars at the top of the card piece.  Can you tell what I used??  This is from the stars in the ‘Celebrate Today’ set.  The greeting from ‘Circle of Spring’ is stamped in Black StazOn.

I tied around some Whisper White Baker’s Twine. Then the sponged card piece was layered on another piece of white and then on a piece of Basic Black.  The flowers are stamped in Black StazOn and punched out with the Pansy Punch.  I then sponged the edges of these in Bermuda Bay.  They were raised up with dimensionals and I added some Adhesive Rhinestones to the centres of the flowers and then added a couple on the card.

I hope you like????  🙂

Have a great weekend.  Sadly, I didn’t receive my preorder today from the upcoming Holiday Catalogue. Not that I have a lot of time to stamp this weekend.  SIGH! I guess I have some other stamps to work with if I do. I can’t wait to get my new Christmas goodies.  I tell you, you are going to L.O.V.E. it.  September 1st is the day so stay tuned but I am mailing out Holiday Catalogues in the next couple of weeks so let me know if you would like your own.

Stop by and visit again soon,

Jenny

cards, Challenges, Stampin' Up!

VELLUM BIRTHDAY BLOSSOMS!

On a Facebook group I am on they recently set a little game.  It was a Tic Tac Toe Board.  Pick 3 items in the one row to make your card.  I thought that would be fun.  I took a little time out from my regular creating to have a go.  I will show you the card but first I will tell you the process I went through in making this card.  Maybe it will help you when the MOJO has gone out the window. 🙂

Firstly, I selected the 3 elements from the Tic Tac Toe Board to include on my card.  I chose Birthday, Flowers and Red.  That’s half the battle right!!  Well I pull out all my flower stamps – and there are quite a few.  I really wanted to use one of the new ones. OK, Birthday Blossoms, Definitely Dahlia or Garden in Bloom??

The colour was already chosen.  I don’t often use red except for Christmas but I chose Cherry Cobbler.  I love the richness in this colour. I knew I wanted to white emboss the vellum too.  Just an idea I had.

How to put it together though?? That is what sends me undone and generally I just put it all aside in the “too hard” basket.  I contemplated things for a little while and wondered what to do. When the ideas weren’t really coming together for a card I thought … Why not look at a card sketch.  I went to Pinterest and I have a board for Card sketches. You know you can actually use the ideas you pin not just PIN them to a board!!! 😉 Straight away I looked at the board and found what I was after.

So here is the sketch I worked with. It is from this great site HERE. I like the simple sketches.

CTS_130

Here is the final result.

P1170158

I used Birthday Blossoms Heat embossing the small blossoms in White Embossing Powder onto the Cherry Cobbler card.  The larger flowers were heat embossed in white on vellum and then punched out with the Pansy Punch. To get the curve on the card I hand-drew a curvy pencil line on scrap paper until I was happy with it.  I cut that out and then used that as a stencil on the Cherry Cobbler card.  I lightly drew the line and then cut this curve out.  I was happy with the result of that.  It really could have gone any way!!

The greeting was stamped in Cherry Cobbler onto Thick White Cardstock as a card base. I added some large Adhesive pearls to the centre of the flower and finished it off by wrapping some White Baker’s Twine around the card a few times. I did stamp the inside with the blossoms in Cherry Cobbler and one of the greetings in the set.  I didn’t take a photo of that.

I hope explaining the process might help you next time.  I will try and remember that myself 😉

Have a great “stampy” week.  I will be back to share more soon.

Jenny

cards, Stampin' Up!, Techniques

BIRTHDAY BLOSSOMS TRI-FOLD CARD!

Here is one of the cards we made at our stamping weekend.  I like the way this turned out. Andrea first made it and had CASED it from Pinterest. (Sorry I don’t know who the original creator was). Of course, we all really liked it and had to copy. 🙂

P1170032

The base card is Pink Pirouette and the frame is Tip Top Taupe.  To make the frame I used the ‘Lots of Labels’ Framelits using 2 framelits together.  I used the smaller framelit that I used for the frame to cut a window in the front of the card.  I stamped the flowers and leaves in Tip Top Taupe in scrap white card. The great thing is the flower matches the Pansy Punch – no cutting!!! You do have to cut the leaves out but that is OK. I went around the outlines on the flowers and leaves with the Markers (Pink Pirouette and Mint Macaron) and I coloured the centres in. I added some pearls for some glam.  The small flowers were inked in Pink Pirouette and then stamped off before stamping on the base card in the bottom left corner.

Now open wide …..

P1170034

The smaller flowers were stamped on a piece of Whisper White in Tip Top Taupe and coloured with the markers again.  The greeting was stamped in Soft Suede.  You can’t quite see but I added tiny pearls to all the centres.

Now open it out….

P1170035

I inked up the small flowers again in Pink Pirouette and stamped them off on scrap paper. Then I stamped them on the next flap along the edge on the right side. I repeated this a few times of inking, stamping off  and stamping on the card.

Do you want to know the dimensions???  It is basically a standard base card and score the card in 1/3rd’s.  If that makes sense??  I did make this card a little taller though (15.4cm x 21cm).  It is easy to make your own and just a little different to the standard card.

Thanks for visiting me today.  Have a super wonderful day today 🙂

Jenny

cards, Classes, Stamp A Stack At Home, Stamp At Home Kits, Workshops

WATERCOLOR WINGS STAMP A STACK BY MAIL!

This Friday is my next Stamp A Stack Class.  If you are local I would love to see you.  Here are the details.  But if you can’t be here then read on further.

STAMP A STACK CLASS THIS FRIDAY

Friday 26th June Stamp A Stack.  10am or 7.30pm

RSVP Thurs. 25th  Cost: $15  BYO: Scissors and Adhesives.

*****THIS WEEK IS “BRING A FRIEND” WEEK *****

Bring a Friend I haven’t met and you get 2 FOR THE PRICE OF 1!

Of course you can come without a friend. 🙂

Here are the cards we will make.

P1160913      P1160916

I know that life is busy for many people or because of distance some people can’t make it so I have now made the class available by mail FOR YOU!!

STAMP A STACK CLASSES AVAILABLE BY MAIL  (Australian residents only)  

$15  + SHIPPING

Receive card kits for class cards to make in your own time.  Includes card pieces to make 6 cards (3 each of 2 different designs).  Card cut to size and includes ribbon/thread. You provide the stamps, inks and adhesives.  Embossed pieces can be done on request. Stamped images cannot be included as per Stampin’ Up! policy.

Stamps  – Substitute your own or order the stamps in addition + SHIPPING.

Stamps used:

Watercolor Wings – Photopolymer set (139424) $45

OR    Buy the Bundle which includes the Bold Butterfly Framelits (140232)  $62.75

The 2nd card uses the set ‘Birthday Blossoms’ ( W) (139167) $47.00 OR (C) (139471) $33.00

So now you don’t have to feel you miss out.

Please RSVP for the class ASAP or comment that you will like to join the Stamp A Stack by Mail.

Stampin' Up!, Weekly Deals

STAMPIN’ UP! UPDATES!!

Yes, I know I was going to show you my Make and Takes from my Launch in the next post.  Sorry about that.  Just a little commercial break here.  🙂  I have some important Stampin’ Up! Updates for you.

This week’s Weekly Deals!  You will love these.  Great punches and what about those gorgeous coloured inkpads??? Both favourite colours of mine and for $8.63! ‘And Many More’ Stamp set is very versatile and $35.25.

Email me or add a comment if you would like to order any of these great specials or for any Stampin’ Up! products for that matter and I will get back to you ASAP.

Jun 17

—————————————————–

Join in June

Less than 2 weeks to go! If your Wish List from the new Catalogue is HUGE.  Yesss! Then why not Join the Stampin’ Up! family.  What’s the deal?? Pay $169, Get $235 of Products PLUS 2 (Yes 2) additional stamp sets for FREE in June!!!!!  What amazing value is this!! I have already welcomed a couple of new people to my team this month and they are excited let me tell you.  2 extra free stamp sets to any value in the already fantastic value Starter Kit!  

So if you have been thinking (and thinking some more) then get on to it now.  I would love to welcome you to my fast growing little team.  You can be from anywhere in Australia.  Find out more information on my Blog page HERE.  You can join anytime from my Business page HERE.  If you still have some questions then email me and I will get back to you.

————————————————–

Speaking of my Website, have you visited there lately?? It has just had a fresh overhaul and is so much easier to find information.  Stop on by.  You can find some cute new projects, and all my class details Plus you can view the catalogues and Shop 24/7.

Visit by website HERE.

DBWS new screen

Here is one sweet new project that has been added.  This is with a new set ‘Birthday Blossoms’. Imagine this in other colour combinations.

Gallery_BeautifulBday_DBWS_6.2015_NA_SP_EU

—————————————————————————

Thanks for stopping by.  We will be back with our regular programming next post.   Have a super, wonderful day where you are.  🙂