cards, Online Exclusives, Stampin' Up!, Videos

DISTRESSED SUNFLOWER EMBOSSING FOLDER CARD ~

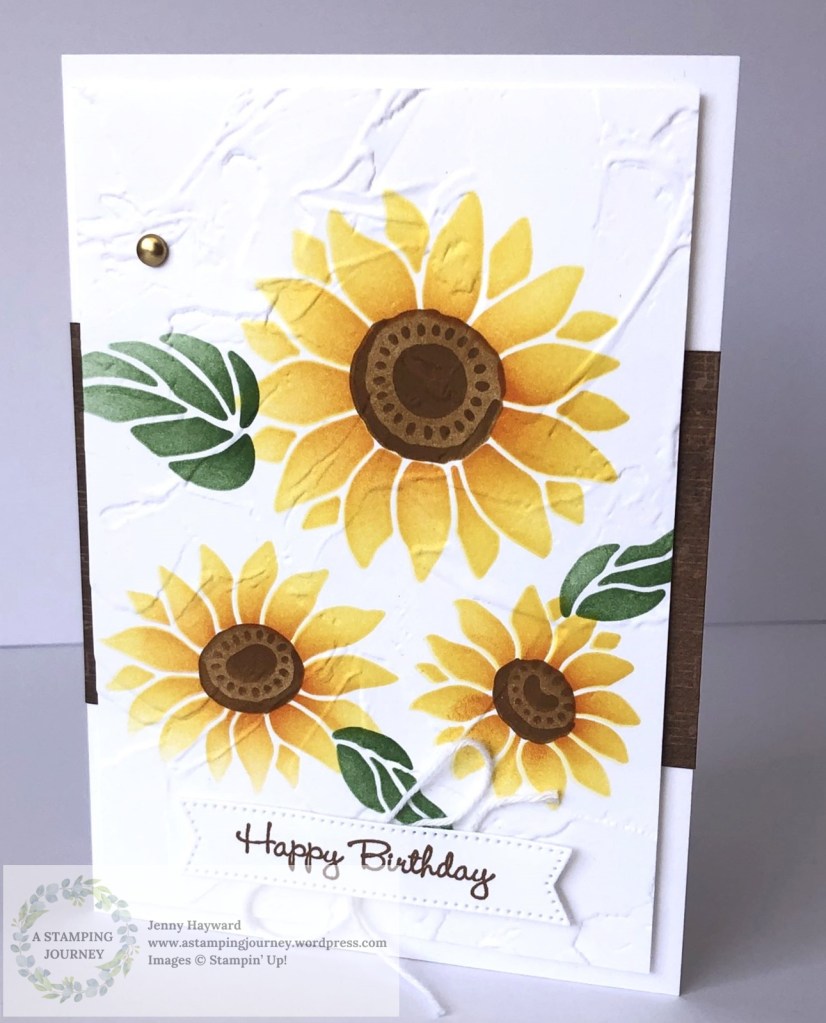
I have been meaning to show some more cards with the Sunflower Embossing Folder. I shared a number of the cards in my recent video but it might be good to see them close up.

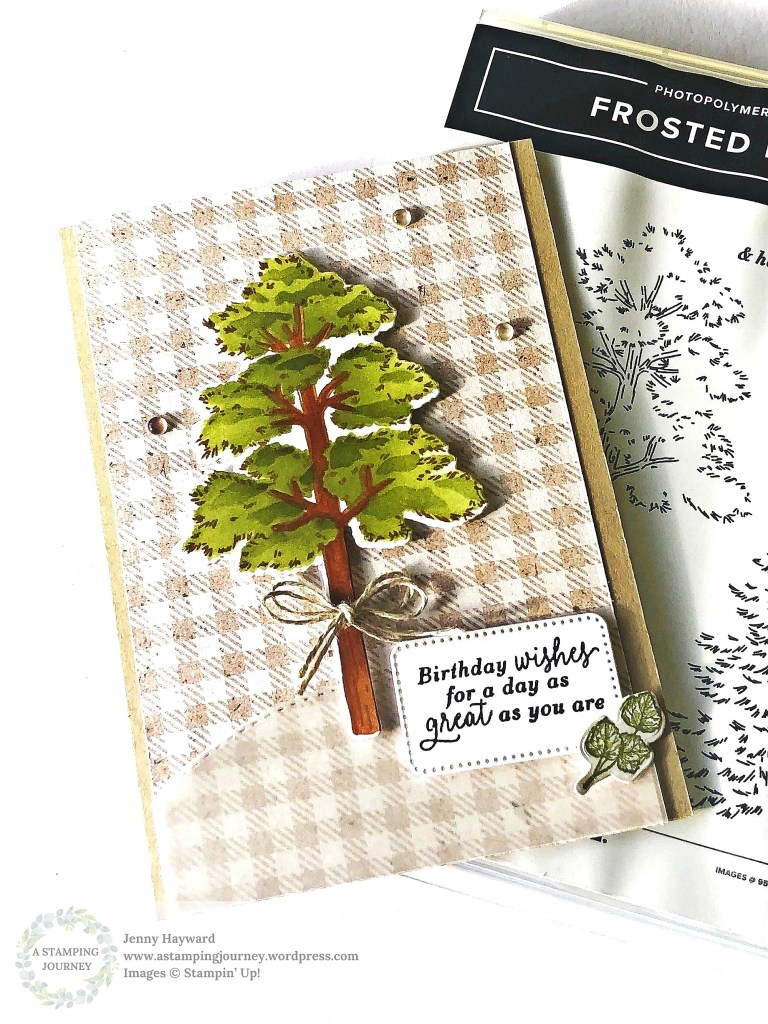
This one is more a distressed looking card.

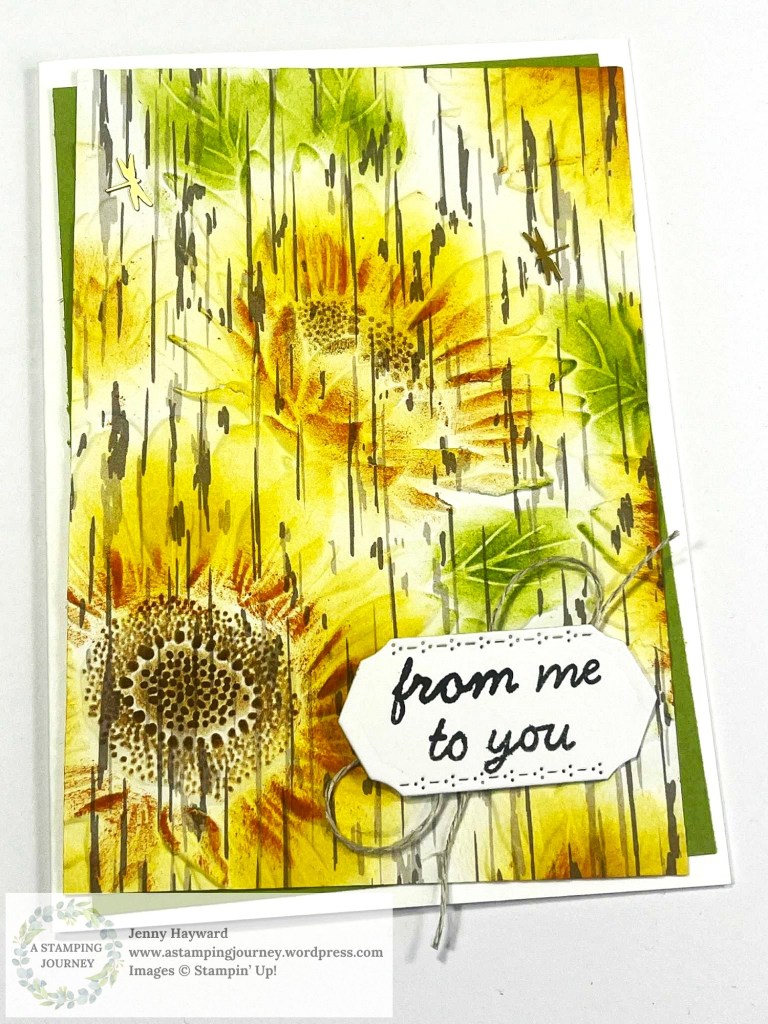
I embossed with the folder on a piece of the “wood” look pattern from the Nests of Winter Paper pack. You could use any similar print.

Then you can add your colouring. This one I used the Ink Pads and Blending Brushes then assembled it on the card base with a piece of Old Olive card off-set a little. I think curling up the edges of the embossed piece might have given a more distressed look.

I have had so much fun with this Embossing Folder. I hope to get back to you again soon with some more card projects soon.

If you missed it you can see the video of 5+ Ways with the Sunflower Embossing Folder -> HERE.

Happy Crafting,

Jenny

If you need supplies for your cardmaking I would love to help you get them. You can head to my store -> HERE OR Contact me directly.

cards, Classes, Techniques, Tutorials

FAUX TEARING TECHNIQUE FUN!

Our last class was creating with the Faux Tearing Technique. It was a lot of fun looking back at this older technique. Have you tried it?

This was one of the cards we made. This one using the Irresistible Blooms Stamps and Dies.

It is very easy technique to do. All you need is Blending Brushes and ink and use any stamps you have. You can use scrap paper for the masks or use the Masking Paper or large Sticky Note Paper.

Tear your paper so it is at least as wide as your white card. Position that over your card at the top and bottom leaving a gap on the card in the centre section.

Blend over some ink on the white card building up your colour. Hold your paper firmly so it doesn’t move. I then moved the paper away from the inked edge just slightly and added some more ink for a light edge. Then return your masks to the original position and stamp over the images having some go off the edge of the masked area.

Finish your card as you like.

Are you game to try it?

Happy crafting,

Jenny

Need supplies for your next project and you are in Australia?

Head over to my store -> HERE. Or contact me directly. (at present I am away until the 12th of September so please email not phone as I won’t have the phone available).

cards, Catalogues, Stampin' Up!

SWEET SUNDAY WITH THE MUSICAL JAMBOREE STAMP SET!

It’s a cute sing, song with the Muscial Jamboree Stamp Set for Sweet Sunday.

Isn’t this character having such a great time singing his heart out??

Stampin' Up! Musical Jamboree Stamp Set

(Card created by Stampin’ Up! artists)

On the circle diecut with one from the Spotlight in Nature dies the image was stamped and coloured with the Stampin’ Blends. The clouds were first cut from the Hot Air Balloon Dies and then placed on the circle creating a mask. Then brush over the sky with some ink with the Blending Brushes.

On the Timber 3D Embossing Folder ink was swiped over the inside of the folder. You can swipe over with the Ink Pad or use the Brayer with ink. Then add your Balmy Blue card mat and run it through the machine. This adds an extra dimension to you card and highlights the embossed detail.

So enjoy a little sing along with this cutie for our Sweet Sunday. Have a great week ahead. I hope you escape to your craft space this week.

Happy Crafting,

Jenny

For your crafty supplies in Australia head to my store -> HERE. Or you can contact me directly and I can assist you.

cards, Online Exclusives, Stampin' Up!

BIRTHDAY WISHES WITH STAMPIN’ UP! FROSTED FOREST ~

I have mentioned the Frosted Forest Bundle before. You most likely have seen it around too.

There are masks that you can layer up the colour using the Blending Brushes. Using the masks to build the colour.

It’s a great one for masculine cards too. This one is a Birthday Wishes one.

The background paper is from the Perennial Lavender Designer Series Paper pack.

The leaf and the words are from the Loveliest Tree stamp set. They work so well together.

This is the Frosted Forest Bundle with the masks below.

The Loveliest Tree Bundle. Does it look familiar?

If you want to create your own they are now available. You can shop Online in my store -> HERE. Please use the Host Code: JTRANKN3

Or contact me directly.

Happy Crafting,

Jenny

cards, Stampin' Up!, Techniques, Tutorials

WEDNESDAY’S WOW! #164 – MASK A BACKGROUND ~

Wednesday’s WOW! #164 – Creating a masked background.

Here’s a technique for you to try sometime. You can create a masked frame and add colour to the centre area.

To do this use the Masking Paper to add strips around the edge of your card leaving a rectangle or square shape in the middle. Using the Brayer or the Blending Brushes roll (or brush) over your ink. Try different colours to create a coloured background.

Once you are done gently remove the masking paper and stamp over your images. Stamping them in black ink will really highlight them against the background. Then it is a matter of adding a simple greeting.

Hope you get to try this out in your crafting soon.

Happy Crafting,

Jenny

Bonus Days are happening now. Receive a $9 voucher now to redeem in August when your orders are over $90.

Need supplies and you are in Australia? Head to my store -> HERE. Please use the Host Code: JTRANKN3

Or contact me directly and I can help you with your order.

cards, Stampin' Up!, Techniques, Videos

TIPS USING THE LAYERS OF BEAUTY!

I shared a card just last post with the Layers of Beauty Bundle. That gorgeous bundle is so popular right now.

After a request I have put together a video in creating the card and shared some tips in using the masks particularly. They are fun to use but there might be some little points to look out for when using them.

This is the card.

You can follow along with the video here or it is now on Youtube.

Hope you find them helpful.

Happy Crafting,

Jenny

Need some supplies and you are in Australia? I would love to help you out. You can shop in my store -> HERE OR contact me directly.

cards, Catalogues, Stampin' Up!

STAMPIN’ UP! LAYERS OF BEAUTY ~

I have been playing with the Layers of Beauty Bundle – the stamps, Dies and Masks. I have seen some beautiful creations with these.

I’m still not sure of this card I created. I thought with this one I would stamp the outline in Basic Gray but looking at it afterwards you can see the lines and I’m not sure I like that. I added the colour through the masks. Perhaps I went a little heavy handed with the ink colour blending.

Still a work in progress. But here’s the card.

I added the strips of the Unbounded Beauty Designer Series Paper for something a little different.

The Masks are easy to use I will say that. There are 5 masks all numbered. You use them from 1-5 to build up your layers. I would suggest starting off with the light colours first and getting darker to 3. 1-3 are the flowers. Then the 4 and 5 are for the leaves. So start with the lighter colour for 4 and darker with 5 for the highlights on the leaves.

I think I will head back to the craft room and work on these a little more. They are fun to work with.

These are the Layers of Beauty Bundle. Great Bundle to get all 3 of the products together – and to save. You can get them separately too.

You can see this Bundle in store -> HERE. I see that it is low inventory so you may want to be quick with this one.

If you would like to shop for any products head to that link above to order

OR

Contact me directly and I would love to help you out. (Australian residents only sorry).

I do hope you get to play with them.

Happy Crafting,

Jenny

cards, Catalogues, Stampin' Up!, Techniques

ABUNDANT BEAUTY – A HAPPY ACCIDENT!

This card came about by a Happy Accident.

When I was creating an earlier card I diecut a square from a piece of white card with the Stylish Shapes Dies. There was still some white on the scrap piece that I could do something with later. You save bits like that right??

When I made one of the Sunflower cards recently I grabbed it to stamp my sentiment on.

BUT I thought hang on a minute – that would make a great frame! So I sponged some more Sunflowers with the Abundant Beauty Decorative Masks, cut them out and added them to the frame. How good was it that I actually centred the words on it though too.

Here is the card.

Here it is side on to get a closer look.

The Abundant Beauty Decorative Masks has layers that you can build up your flower adding ink or texture paste or even heat embossing. It creates such a great effect.

The paper is from the Les Shoppes Designer Series Paper. The sentiment is from the Go To Greetings stamp set.

Do you have “happy accidents”?

Happy Crafting,

Jenny

If you are in Australia and need some crafting supplies I would love to serve you.

You can shop online in my store -> HERE. Please use the Host Code: 9U6Y3AFW

Or contact me directly.

cards, Catalogues, Techniques

SUNFLOWERS WITH THE STAMPIN’ UP! ABUNDANT BEAUTY MASKS

Can you believe it? This was my first time at using masks of any time. And I do love how you create the layering Sunflowers from the Abundant Beauty Masks.

The colours I used was Daffodil Delight first on the flowers and then a little Pumpkin Pie in the middle of the flowers. I used Pecan Pie for the centre and then Pecan Pie for the detailed area in the centre. The leaves were with Garden Green.

I was inspired by Patty Bennett to emboss the card with an embossing folder after sponging. This one uses the Painted Texture 3D Embossing Folder.

The paper strip behind the stamped image is from the Joy of Christmas Designer Series Paper. The sentiment is from the Go To Greetings.

This is one of the cards we were making in class today.

I have had lots of play with these masks so I will show you more soon.

If you are in Australia and need some supplies I would love to serve you.

You can shop directly in my store -> HERE. Please use the Host Code: 9U6Y3AFW

OR contact me and I can help you.

Happy Crafting,

Jenny

cards, Catalogues

TWO-TONE FLORA WITH SPONGING!

I have been loving the Two-Tone Flora Bundle recently. It’s such a gorgeous set. For this card I sponged a background under the delicate diecut.

For the colours on the flowers I used Highland Heather and Gorgeous Grape. And Petal Pink and Calypso Coral. The sentiment is from the Go-To Greetings set.

See how I have done the background. I used the Blending Brush to build up the colour on the white card. It was darker on the bottom and built up lighter towards the top.

This is the blending in progress. TIP: Start off your card and gradually move up the card as you blend in a circular motion.

Isn’t the detailed background die so gorgeous? It is so delicate.

The Two-Tone Flora is not available as a Bundle now but you can buy the stamp set and the Dies individually.

In Australia and need supplies? I would love to serve you.

Head to my store to order -> HERE. Please use the Host Code: EVJ4EJYC

Or contact me directly. Thanks for choosing to shop with me.

Happy Crafting,

Jenny