cards, Catalogues, Christmas, Stampin' Up!, Techniques, Tutorials

WHITE HOLLY BACKGROUND WITH REINDEER FUN DIES!

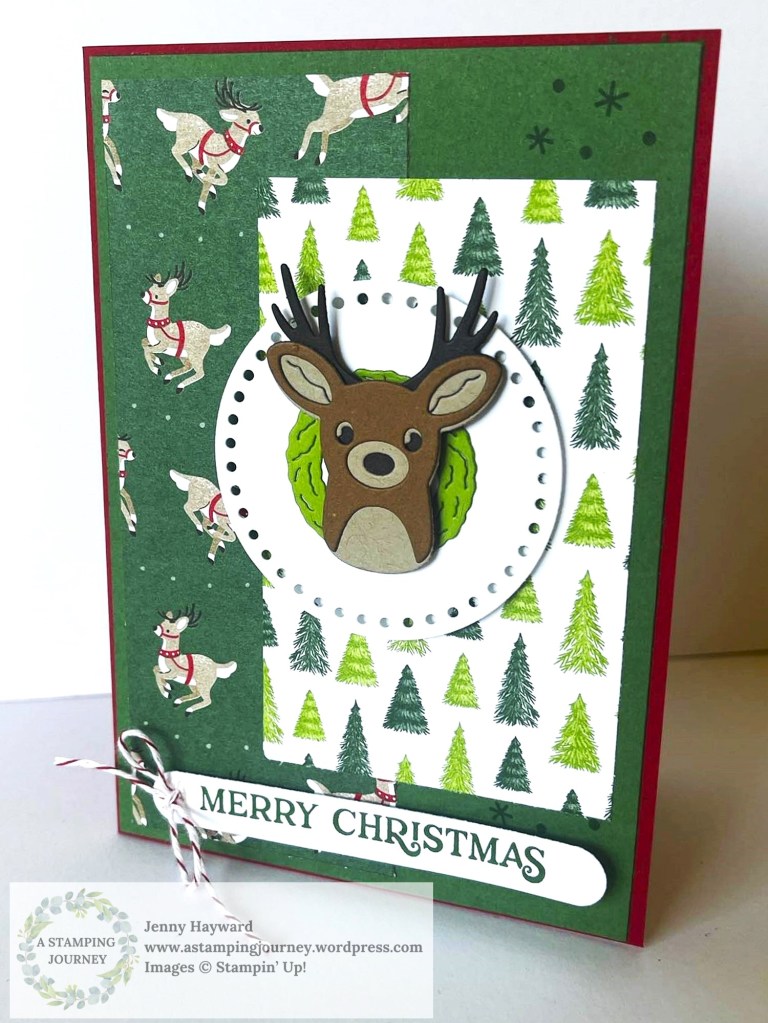
Did you know you can create your own textured background with dies?

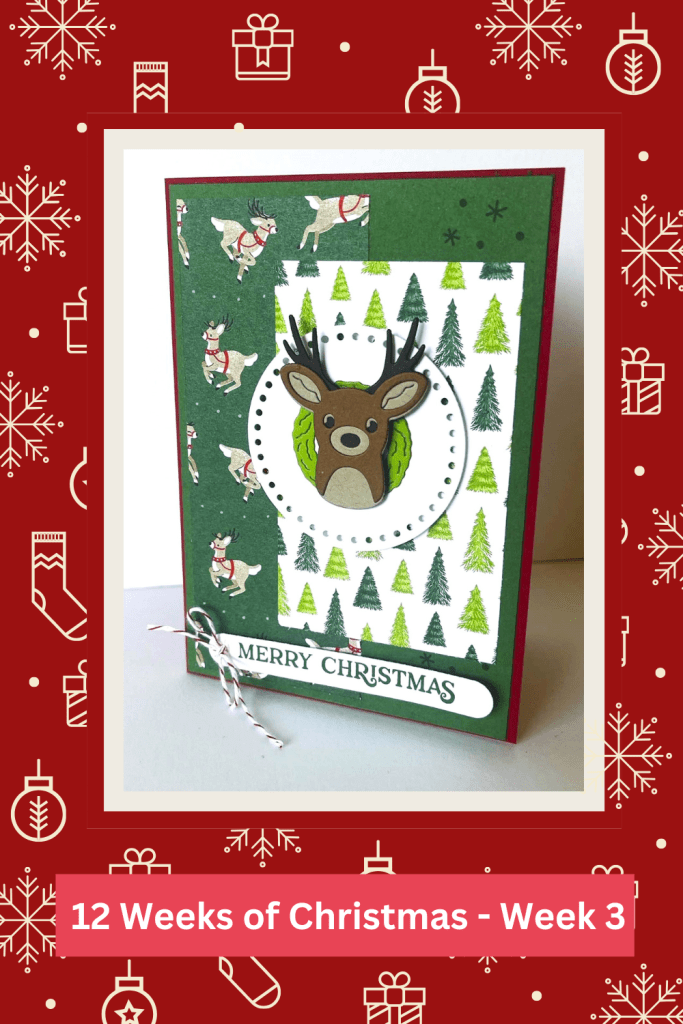
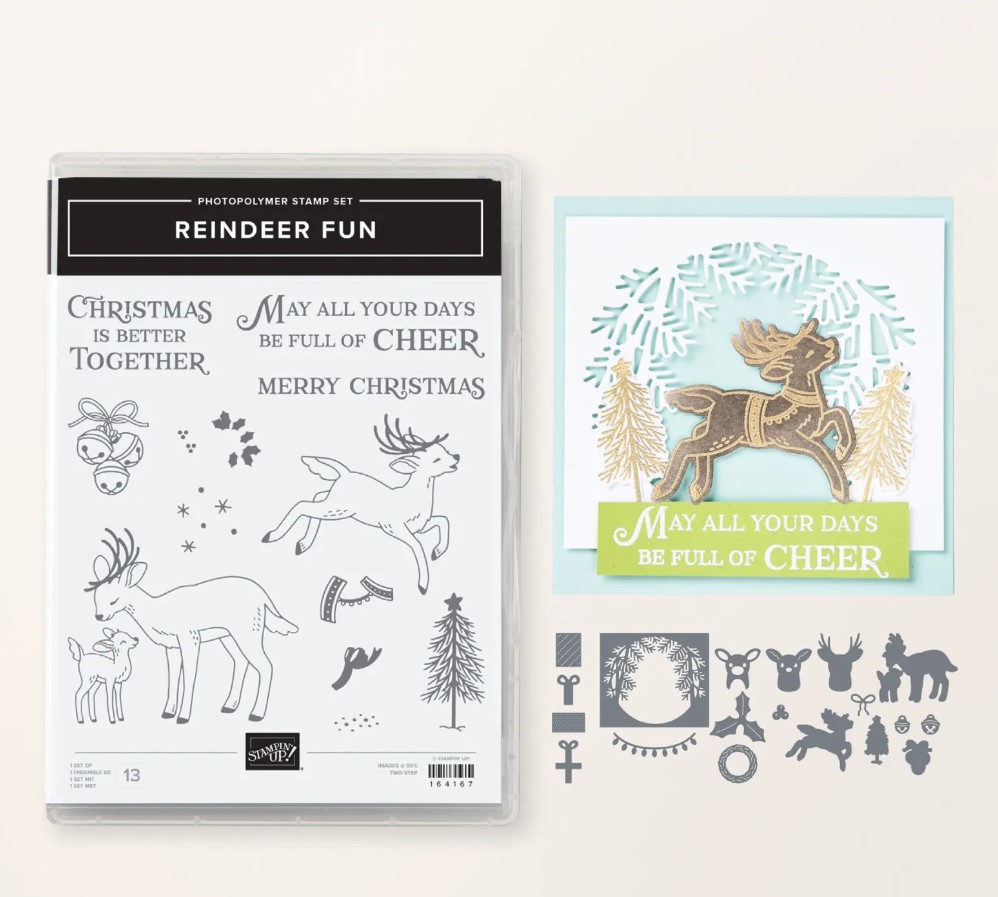
For this card I diecut lots of white Berries and Holly leaves from the Reindeer Fun Dies and adhered these together. Then I added them to a white card mat. It adds a subtle texture.

Here’s how to Create this effect:

  • Diecut lots of Holly Leaves and Berries from the dies on white card.
  • Adhere the Holly and Berries together.
  • Lay all the Holly/Berry pieces out on the white card mat to position them how you like. Have some overhanging the edges.
  • Adhere them down to the card mat. Turn over the card and trim off the overhanging pieces.

Then complete the card as you like.

I added a strip of Reindeer Days Paper and a strip of the Green Glimmer Paper along with the bells coloured with Stampin’ Blends. I finished it off with a bow from the Real Red and Gold Ribbon.

Try this idea with some dies you have. It takes a little diecutting and sticking together but it is a fun way to use them.

Hope your Christmas Creating is going along well.

Jenny

If you need some crafty supplies and you are in Australia you can stop by my store -> HERE. Or Contact me directly. I would love to help you out.

Stampin' Up!

PAPER FOLDED TREES FOR WEEK 11 OF 12 WEEKS OF CHRISTMAS

It’s Week 11 for our 12 Weeks of Christmas Series. The time has flown by. Here we are nearly at our last week.

Our project today is using some of those scraps of Christmas Paper you have. I’m going to show you how to make Paper Folded Trees. They can be added to a card or to a tag.

They are very easy to do and you can create them in any size. Just be sure it is a square piece of paper. You can fold little bases for them too.

Check the video to see how to fold them.

Have fun making them.

If you need any products and you are in Australia. Do stop by my store-> HERE or Contact me directly. I would love to help you out.

Happy Crafting,

Jenny

cards, Catalogues, Christmas, Stampin' Up!

FROSTED FOREST FOR WEEK 7 – 12 WEEKS OF CHRISTMAS

It’s Week 7 for our 12 Weeks of Christmas series.

This week’s card is using the Frosted Forest stamps and masks. You could use this idea with any tree stamp.

This is a Portrait Fold card. That’s what I’m calling it anyway. I’m not sure if it has a particular name. The fold is at the top of the card.

You can follow along with the video below. The full tutorial will be sent out in next week’s newsletter if you are a subscriber. If not check the side bar on my blog.

I have used the Reindeer Days Designer Series Paper and some sparkly Glimmer Paper.

I used just one mask in the Frosted Forest mask set. You can add other layers of ink if you would like to.

This is the card.

Embossing the card mat adds some extra texture. I have used the Timber 3D Embossing Folder on this one.

Hope you enjoy it.

Happy Crafting,

Jenny

You can PIN it Now to Pinterest to come back to later.

Need to order and you are in Australia? I would love to help you.

You can shop in my store Online -> HERE. OR contact me directly.

3D projects, cards, Christmas

GIFT CARD HOLDER WITH AN ENVELOPE FOR WEEK 6 – 12 WEEKS OF CHRISTMAS!

It’s Week 6 of our 12 Weeks of Christmas Series. Can you believe we are half-way through already!

This week’s project is a Gift Card Holder. It is so easy to create. It’s made with a standard White Envelope, some festive paper and matching ribbon.

You can see how to make one in the video below. Gift Cards are a popular gift for Christmas so I hope you get to make one for yourself.

This is the Gift Card I created in the video. I will share some other versions in a later post.

I decorated this one with the Reindeer Days Designer Series Paper. The words on the front are from the Trucking Along Stamp Set. The inside is one from the Greetings of the Season Stamp Set.

You can PIN this now on Pinterest to come back to.

If you have missed out on past projects from the 12 Weeks of Christmas then be sure to head back some posts on my blog here Or head to Youtube. They are all on my Channel.

If you would like the written tutorial for these projects then be sure to subscribe to my newsletters. I send out a free tutorial each week. You can find the link to subscribe in the right hand column on my blog.

Have fun creating,

Jenny

Do you need supplies and you are in Australia? I would love to serve you.

You can head to my store -> HERE. Please use the Host Code: EXSTTBB6 Or contact me directly.

Stampin' Up!

A CUT AND FLIP CARD WITH REINDEER DAYS!

Did you catch last week’s video for our 12 Weeks of Christmas series?? It was created with the Cut and Flip Method. That’s what I call it anyway.

The card in the video was using the Season of Green and Gold Specialty Designer Series Paper. I created another version. This one is using the Reindeer Days Designer Series Paper.

Simply put the Cut and Flip Method is take a piece of pretty paper. Cutting it and then flipping one side over. So you see both sides of the paper. And it is cool too.

This is the card.

The sentiment is from Reindeer Fun Stamps and Dies. The tree was stamped in Garden Green and Granny Apple Green.

Don’t forget some sparkle with the Granny Apple Green Glimmer Paper.

You can check the video by heading back a post or two.

Have fun creating one.

Happy Crafting,

Jenny

Need some supplies for your crafting and you are in Australia? You can stop by my store -> HERE OR Contact me directly.

For orders over $75 receive a Tutorial Bundle of nearly 40 projects.

cards, Catalogues, Christmas, Videos

CUTE DEER WITH THE REINDEER FUN FOR WEEK 3 OF 12 WEEKS OF CHRISTMAS

It’s Week 3 for our 12 Weeks of Christmas series.

This card is using the Reindeer Fun Stamps and Dies which are just the cutest. The card shows a great way of using different papers together too. I used the Reindeer Days Designer Series Paper.

This is the card.

You can follow along with the video.

You can PIN this image now to come back to later for your creating.

The tutorial to create the card will be sent out in next week’s newsletter. If you haven’t subscribed yet to my newsletter you can find the link in the right hand column on my blog.

In the video I showed a template for variations in colour with the deer head. I have that below so you can refer back to it later.

They can look so different using different colours. Don’t forget the Red Glimmer for a Rudolph nose.

Enjoy Week 3. Be sure to check back again soon. If you have missed the last 2 then head back some posts on my blog to catch them.

Happy Crafting,

Jenny

Need supplies for any of your projects? I would love to help you.

You can head to my store -> HERE. Please use the Host Code: JDH3D9KQ OR contact me directly.

cards, Catalogues, Christmas, Classes, Stampin' Up!

CHRISTMAS IS BETTER TOGETHER WITH STAMPIN’ UP! REINDEER DAYS!

I have been playing with the Reindeer Days Designer Series Paper recently. And of course the Reindeer Fun Stamps and Dies.

We have a class on this Friday with it so it’s been lots of fun. This is one of the cards we will be making in class.

In the die set it’s not just dies for cute reindeers it has dies to make the holly leaves and it also has gifts dies too. It is very versatile.

The little deer image I have used on this card doesn’t have a die. I have cut this with scissors.

This is the cute Reindeer Fun Stamps and Dies and the Reindeer Days Paper.

See them -> HERE.

See it -> HERE.

I have more to share with you with these Reindeers so watch out.

If you would like these you can shop for them at those links in my store OR Contact me directly and I can help.

Have a great day,

Jenny

cards, Catalogues, Christmas

SUNNY SURFING SANTA FOR CHRISTMAS!

Playing a little more with the Surfing Santa Stamp set.

For us in the Southern Hemisphere this really appeals to us with our Sunny, warm Christmas.

Sunny and Bright for Christmas with the Surfing Santa Stamp Set from Stampin' Up!

A little closer view. I stamped the gifts on the card in red for a subtle background.

The Santa was fun to colour and coloured with the Stampin’ Blends. The paper strip was from Reindeer Days and added a little sparkle with the Festive Glimmer Paper.

I shared another card with the Surfing Santa just recently. You can head back one or 2 posts on my blog to see that one if you missed it.

Here is the Surfing Santa Stamp Set.

Have a great day,

Jenny

Need your Crafting Supplies and you are in Australia? I would love to help you.

You can stop by my store online -> HERE. Please use the Host Code: JT69XW3P

Or Contact me directly.

cards, Catalogues, Christmas

GIFTS TOSSED UP WITH THE STAMPIN’ UP! SURFING SANTA STAMP SET.

I have been playing a bit with the Surfing Santa set this week. This one is a great one for our warm, sunny Christmas.

I had this idea with this one to have the gifts look like they were tossed up on the waves. This is the card. I have to say though it wasn’t quite what was in my head. Something is not quite right. But maybe it’s an idea for when you use this set.

The paper is from the Reindeer Days pack which works ok with it.

This is the Surfing Santa Stamp Set.

Very cool isn’t it. Not just for Christmas though. I think the wave and the sun would be great with the Beach Day stamp set. I must try that.

You can see it more in my store -> HERE.

Happy Crafting,

Jenny

If you “need” to order your crafting supplies and you are in Australia I would love to help you.

You can shop in my store -> HERE. Please use the Host Code: JT69XW3P OR contact me directly.