cards, Catalogues, Christmas

SWEET SUNDAY WITH A BLUE ELF – AND SOME STENCILLING…

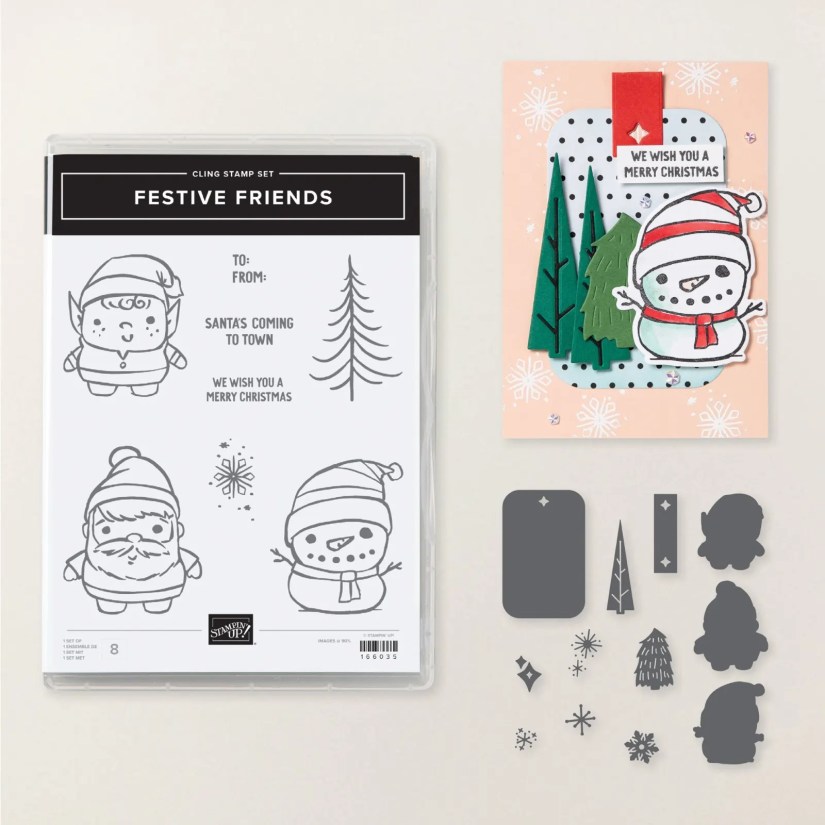
Sweet Sunday. It’s a cute blue elf wishing you a Merry Christmas.

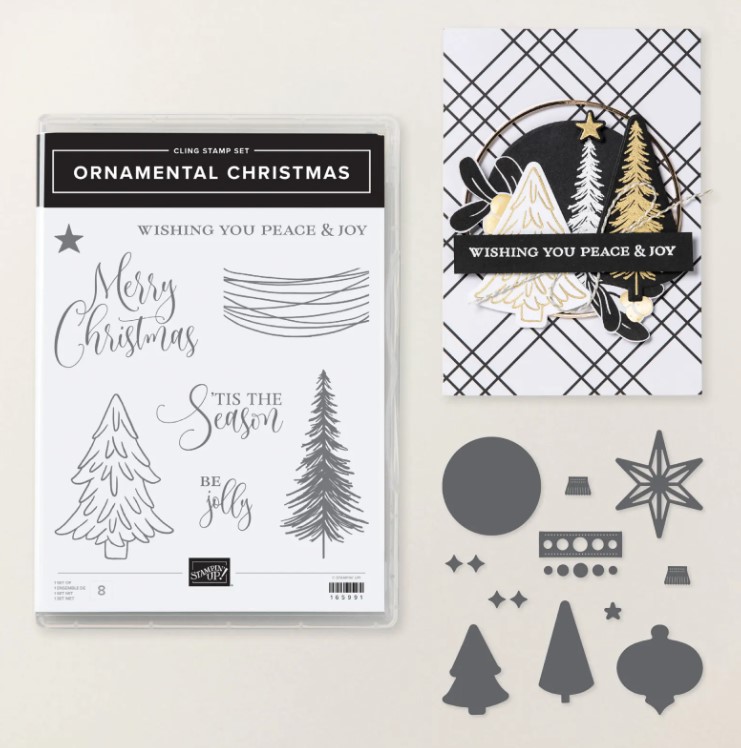
This is with the Festive Friends Bundle. The elf was coloured with the Stampin’ Blends and I diecut the trees and the snowflake from the die set. The Misty Moonlight card mat was embossed with the Peaceful Greenery Embossing Folder.

I have been wanting to do more with stencilling too so I pulled out the retired Linked Together Masks to give them a go. Not quite the effect I was going for but I think it works ok perhaps. I was wanting a little more contrast between the light blue and the darker blue highlights.

I added a strip of the Peaceful Garden Paper which I had torn the top edge of and layed it on the White card before diecutting with one of the rectangles from the Textured Notes Dies. Then I adhered the strip down and added it to the card with Dimensionals.

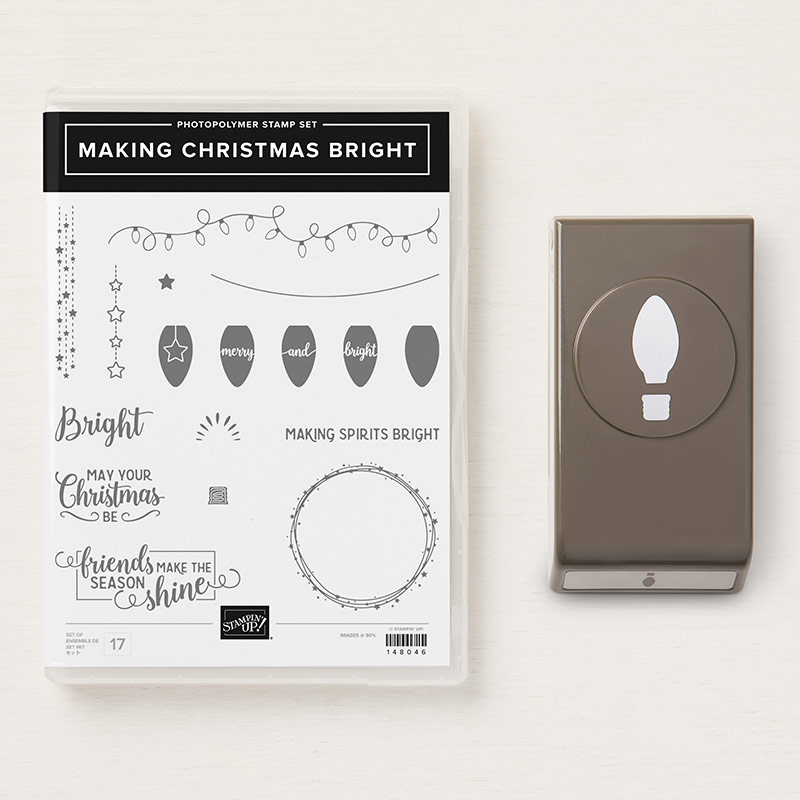
The Festive Friends set is a cute one with this elf and santa and the snowman. I think I haved used it quite a lot this Christmas for those cute cards.

You can see it more -> HERE.

Hope your Christmas cards are coming together well.

Happy Crafting,

Jenny

cards, Catalogues, Christmas, Online Exclusives

‘TIS THE SEASON WITH THE STAMPIN’ UP! ORNAMENTAL CHRISTMAS BUNDLE ~

One with the Stampin’ Up! Ornamental Christmas Bundle today.

'Tis the Season with the Stampin' Up! Ornamental Christmas Bundle

Do you add texture on your cards? There are different types of texture here. The embossed background, gold detailed star diecut and some soft satin ribbon. And of course add the bling. Adding the texture adds extra dimension and interest on a card so it is not so flat looking.

If one of your cards is not quite looking right or looking a little flat maybe see how you can add some texture as some type of element. It will make a big difference.

This is the Ornamental Christmas Bundle I have used.

You can see it more -> HERE.

Happy Christmas Creating,

Jenny

cards, Catalogues, Stampin' Up!, swaps

TEAM CARD SWAPS!

I shared recently a card I made for our recent Team Card swaps. That was the card shown in last week’s video. Today I thought I would share the swaps I received.

Part of the fun of our stamping events like Onstage is swapping and since we couldn’t all be together this year I thought it would be still fun to hold a swap. Some of my JEN’s INK team joined in. You might like to see the cards.

My card is the Highland Heather card in the bottom left with the Curvy Celebrations bundle. There was quite a mix of Christmas and other occasions. I think these cards are great what do you reckon?? Give them a cheer.

Swaps are just one part of the fun of being in my team. If you would love to join in then come and join us and be part of the Stampin’ Up! family and part of JEN’s INK. (If you are in Australia). I love my lovely team members. I’m so proud of them.

Find 9 Reasons why you would want to join Stampin’ Up! -> HERE. And joining today with Extravaganza Sale on you would get even more value as there is 10% off many of the Annual Catalogue Products.

Thanks for stopping by today,

Jenny

cards, Christmas

CHRISTMAS CARD LOVE!

We received lots of lovely cards this Christmas.  It was always nice opening the envelopes.  There were store bought cards and handmade cards.  All so nice that we were thought of.  Since it’s all about hand-made here I thought I would show you the beautiful hand-made cards we received.  Maybe they will inspire you.

These are with some non Stampin’ Up! products.  Aren’t they gorgeous?

These ones below are predominantly with Stampin’ Up! products. Such a beautiful selection.

All sent with love.  I am so blessed. 🙂

Thank You to those of you who sent me cards.  All appreciated.

I think that’s a wrap for Christmas 2019.  January brings us the new 2020 Mini Catalogue and Sale-A-Bration which we all love.  Stay tuned for projects with these.

Still time to request your free catalogues too.  Head -> HERE to fill out the short request form.  Australian residents only. 

Thanks for following me along this year.  I have loved sharing my projects with you and can’t wait to share more in 2020.

Happy creating,

Jenny x

cards, Catalogues, Christmas

STAR BORDER WITH MAKING CHRISTMAS BRIGHT!

Another card for you with the Making Christmas Bright Bundle.  This one I wanted to use the star strip that is in the set.

I stamped the star strip several times and across the card and stamped 3 rows of the star strip.  It took some time lining them up.  I did try using the Stamparatus but it wasn’t lining up properly so I just stamped it by “eye”. I held my breath and just stamped.  That’s how it is done didn’t you know. 😉 I coloured the stars with the markers using Real Red, Old Olive and Daffodil Delight.  The colours are really bright.  It is actually Real Red.  Something happened in the editing. 🙂

The string was stamped across the corner for the 3 bulbs to run along it.  The bulbs were punched out with the Bulb Builder Punch. and raised up with Dimensionals.

This card was inspired by Sara’s card -> HERE.

Are you liking this bundle yet?  Lots you can do with it.  Are you liking that you can get it as a bundle now and save 10%? From January it will be individual prices so I would get it now if I was  you. 🙂 Grab it in store -> HERE. It is $61 AUS for the bundle now.

Thanks for stopping by with me.  I have another card with this Bundle to share with you tomorrow for our 11th Week of 12 Weeks of Christmas series so be sure to stop on by.

Jenny

3D projects, cards, Catalogues, Christmas, Onstage, Stampin' Up!, swaps, Videos

WEDNESDAY’S WOW! #46 – CHECKING OUT MY ONSTAGE SWAPS!

Something different for you for Wednesday’s WOW! today for #46.  Since I have just returned from Onstage in Melbourne I thought you might like to see the swaps I received.  I could show you photos – and I will but I have a video for you as sometimes you can see them a little better and especially see what the 3D ones are actually like.

So here is the video below.  Further down I have the still photos for you if you want to PIN them.

Such a selection. Aren’t they just lovely?? Thank you everyone who swapped with me.  I hope these give you some inspiration for your projects.

I will show you the swap card that I created shortly.

Thanks for visiting,

Jenny


cards, Catalogues, Challenges, Stampin' Up!

STAMPIN’ DREAMS BLOG HOP – CASE THE CATALOGUE!

Today I am taking part in the Stampin’ Dreams Blog Hop where the theme is CASE THE CATALOGUE.  I have to say first off I am a little excited to be a part of this Blog Hop, but I am a little daunted too. Have you seen the amazing line up in this Hop??  WOW!  How exciting to be a part of it! I hope you enjoy our little hop.

You would have just done a BIG jump from the US from the lovely Debbie Henderson’s blog HERE or just starting out on my blog.

Now CASE THE CATALOGUE.  Do you realise how many gorgeous projects are in this catalogue?  Where do you start?

I decided since I am focusing on Christmas in July this month I will CASE one from the Christmas section.  I chose the card in the top right on P 118.

This is my card.

I created the card on a Thick Whisper White base.  The Designer Series Paper is from the Delightful Daisy pack.  The colour in this pack is actually Old Olive but I think the Pear Pizzazz that I used goes well with the lighter colourings in the paper.  I used the Holly Berry Happiness stamp set and the Holly Berry Builder Punch. This is a great stamp set if you don’t like colouring.  It is a 2 step one so it has the outline and the solid stamp to in-fill.  Adds colour so easily.  🙂

To stamp the wreath it is easier if you draw a circle in pencil on to your card first.  I traced around one of the Layering Circle Framelits and then you can stamp up your image around it. It is easy to see being in Photopolymer. Then just erase your pencil circle out. You can add the red berries in after.

The sentiment is stamped on a Pear Pizzazz card strip and then I flagged the ends.  I stamped and punched out the holly and check out the large red berries.  I am not sure if you can see in the photo below but I went over the berries with the Fine Tip Adhesive and left it to dry.  This adds a little shine to your berries.

The catalogue is a great resource for inspiration.  I always forget to look at it when I am stuck. What about you?  We should turn to it more often. 🙂

Now to continue the Hop you are off to Carolina’s blog HERE. Thanks for visiting me.

Jenny

Uncategorized

CHRISTMAS CARD CLASS FOR CHRISTMAS IN JULY!

This Friday if you are a Wollongong local come along to Card Class where we are getting Christmassy!!  After all it is Christmas in July.

Here are the details.  Why not come along.  Bring a friend if you like.  More the merrier.

We will make 3 special Christmas cards.  This is 2 of them.

WHEN:  Friday 21st July at 10am or 7pm at my studio in East Corrimal.

COST:  $20 please BYO own adhesives.

RSVP:  Please by Wednesday 19th.

I can’t wait to share these cards with you.  Let me know.

Jenny

cards, Christmas, Personal Ramblings, Stampin' Up!

SOME SPECIAL CHRISTMAS CARDS!

I hope you all have had a lovely Christmas??  We received some lovely cards over Christmas both store-bought and hand-made.  I like both let me say. 🙂 I thought I would show you the hand-made cards as it is all about sharing here.  There were some beautiful cards from family and friends.  Maybe they will inspire you.

20161226_145744

20161226_150007

Thanks for those of you who have sent us cards.

Enjoy the rest of the festive season and the New Year celebrations but please keep safe.

Jenny

cards, Christmas, Stampin' Up!

HOLLY JOLLY LAYERS CHRISTMAS!

Some quick cards using the Holly Jolly Layers stamp set (which is a Hostess set from the Holiday Catalogue).  I made them a few weeks ago and used one of the versions for a Stamp-A-Stack.

holly-jolly-layers

I kept the layout the same on both and used different stamps in the set. On both of the cards the base is Real Red. Then a Crumb Cake mat on which I stamped the string of lights down the bottom in Crumb Cake. The piece was then run through the Big Shot with the Softly Falling Embossing Folder.  Once adhered to the card base I added a strip of the Candy Cane Lane Designer Series Paper.

TO STAMP THE IMAGES.

For the card on the Left: I stamped the greeting in Real Red and cut the piece with the Layering Squares Framelits.  A larger square in Chocolate Chip was cut with the next size up square in the Framelits and then a Scallop Square from the Layering Squares was cut from Real Red Glimmer Paper. They were all adhered together and then raised off the base card with Dimensionals.

For the card on the Right: I stamped the circle greeting in Real Red and cut this out with  a Scallop Framelit from the Layering Circles Framelits.  After cleaning the stamp then ink it up with Garden Green BUT BEFORE stamping use your Blender Pen to wipe off the “berries”in the centre of the holly.  This is done by wiping off the ink on the stamp and then wiping the tip of the Blender pen on to scrap paper to take off excess ink. It might take a couple of goes. Once it is clean you can use your Real Red Marker to colour in the berries.   THEN, you can stamp the image on to Whisper White card and cut it out with (I think) the 1 1/4″ Circle Punch. (Just check the size.  It could have been the 1 3/8” Circle punch.  It was some time ago that I made it).

These pieces were then adhered together with Dimensionals in between and then using Dimensionals to raise it up off the card.

Hope all your plans are coming together for Christmas.

See you again soon,

Jenny