Catalogues, Classes, Workshops

NEW CATALOGUE LAUNCH PARTY!

I have reviewed the Catalogue Online but now It’s on this Friday and Saturday – The New Catalogue Launch Party at my Place – and you are invited!

There are 2 times so if you are a Wollongong local I am sure there will be a time to suit you.

FRIDAY 17th 7.30pm        OR          SATURDAY 18th 2pm

Come along and give some new products a test run in the Product playground,  make a card or 2, have some games; Lots of fun all around!

COST: $15 (Includes make and takes, catalogue, refreshments, Goodie Bag and Giveaways)

RSVP: Thursday  16th.  Places are filling up fast so don’t delay.

See you there,

Jenny

cards, Classes, Stampin' Up!, Techniques

WATER SPRITZING TUTORIAL!

A few weeks ago for Onstage I didn’t have an opportunity to make swaps to share with other demonstrators.  Life has been a little busy. 🙂  I did make a card for the Display boards though where you can add your swap cards or samples.  They are always so inspiring and is a big part of why I love to go.  It’s like a live Pinterest board!!!! 😉

I thought it was time to show you the card. This is a technique I have been playing around with recentlly. I don’t really know what the name of the technique is but I call it the Water Spritzed technique. I will show you how to do this below so read on.

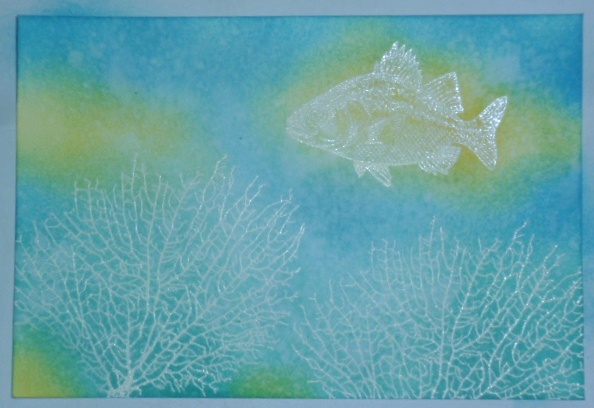
This is my card I made for the board.

waterspritzed_Bythetide

You can see the little “splodges” in the ink where the colour has lifted. It creates a cool motley effect.  Here is how it is done.

WATER SPRITZED TECHNIQUE

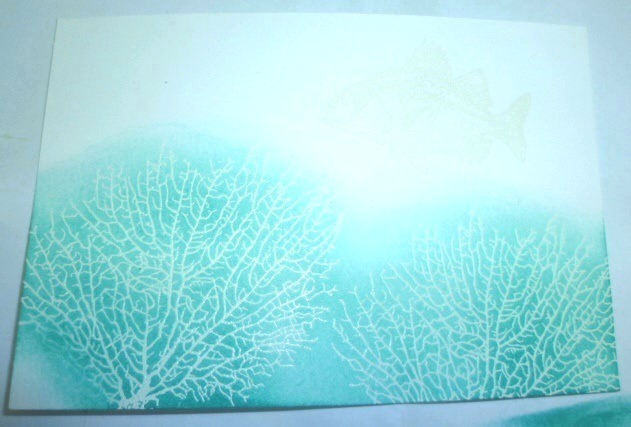
1. Using Thick Whisper White or Shimmery white cardstock, heat emboss your images.  On these I embossed the coral and the fish with white Embossing powder.  I stamped the seahorse with Black Stazon.  It is important to emboss or to use the Stazon so the ink on the images don’t run when you spritz.

2. Use your first colour and sponge in patches over the card. I have used Bermuda Bay here.

P1180329

Then add your 2nd colour.  I have used Daffodil Delight.

P1180331

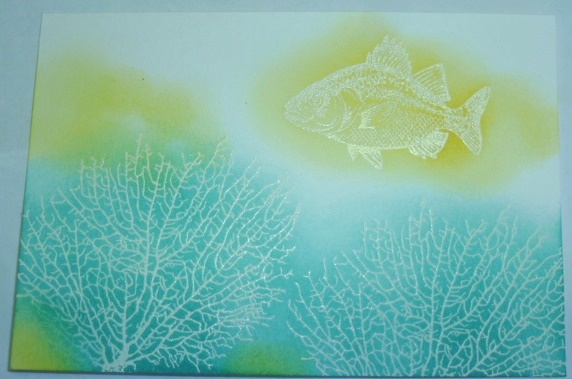
3. Fill in with your 3rd colour.  I have used Marina Mist I think.  It’s good to have 3 co-ordinating colours. Once you have sponged the colours on, use a tissue to wipe off the ink where the images are embossed.  This makes the embossing shine.

P1180332

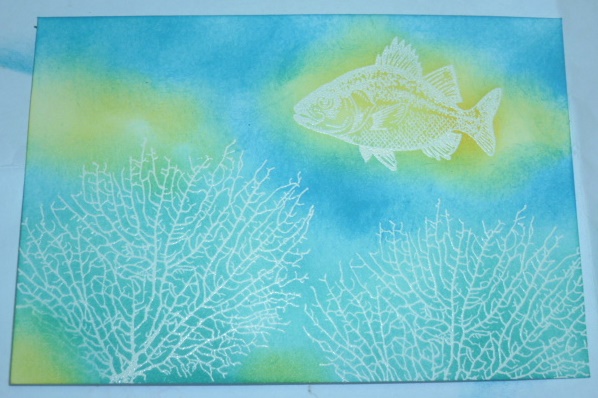
4. With a spritzer with water or I use an old Stampin’ mist bottle, hold the bottle a little away and lightly spray the card.  You don’t want to soak the card just lightly mist.  You will see some of the colour start to lift.  Mist until you are happy with the coverage.  Keep the card level or you will start to have runs from the water running down. Leave the card aside on the table for a few minutes.  The longer you leave the card, the more effect you will get.  Finish off drying your card with the Heat Tool lightly.  You don’t want to melt your embossed images any more.

P1180334

You can now finish your card as you like.

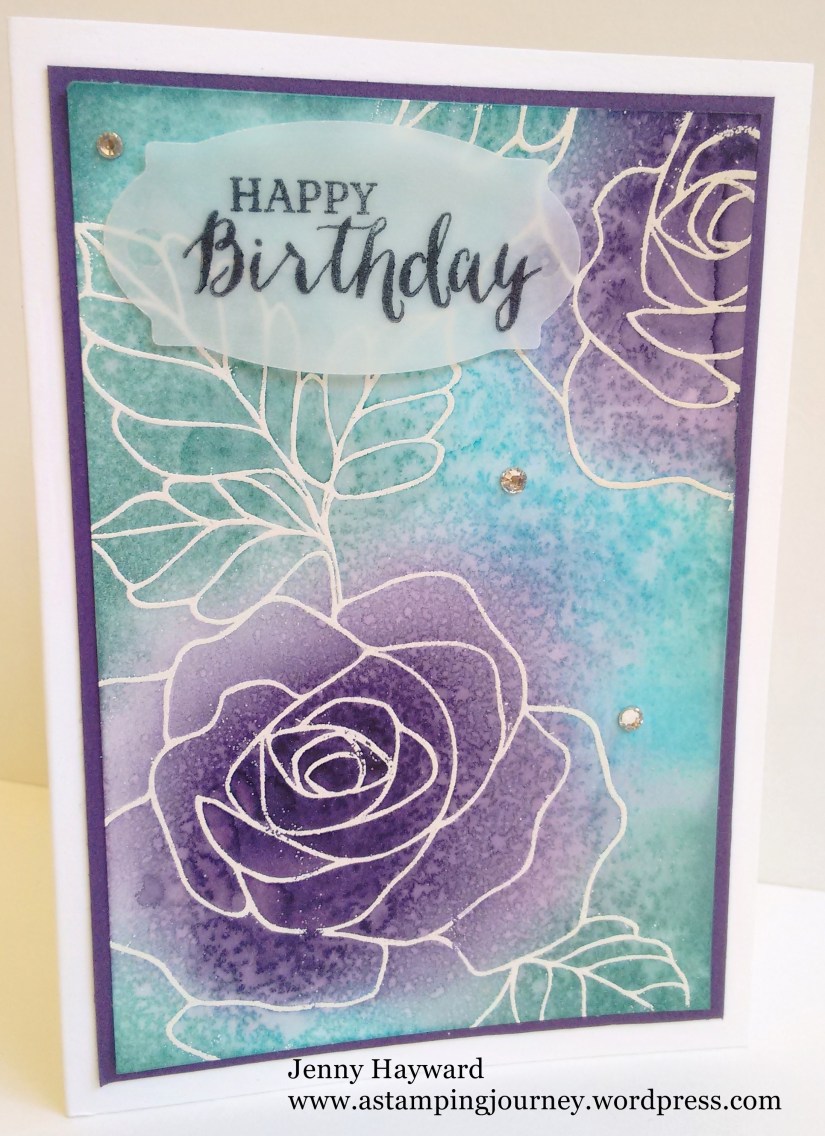
Here is the first card I made using this effect. I have used Rose Wonder set. Thank you to my friend Leonie for showing me this technique.  We made this card at my last technique class too. I have heat embossed the images in white,  The inks I have used are Elegant Eggplant, Tempting Turquoise and Bermuda Bay.

image-6194

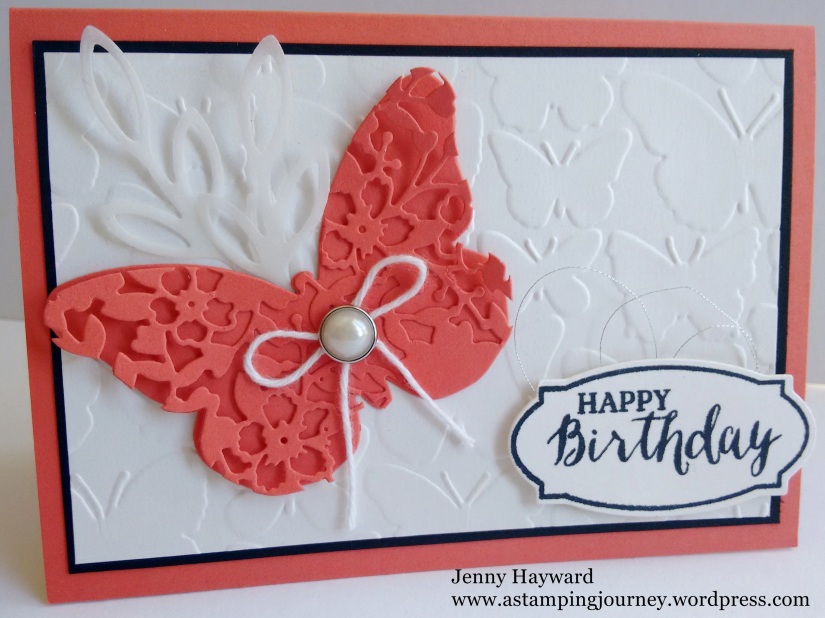
I made another card that day but I didn’t leave the water sitting on the card for long so it doesn’t have as much mottling.  I was a little disappointed with the colour combination. I used Watermelon Wonder, Mint Macaron I think and Lavender Lace. I thought I would show you the card anyway. This is using Birthday Blossoms.

image-6191

So how about you have a try at this technique.  Each time you do one it will turn out different. It’s fun.

Thanks for visiting me today.  Have a wonderful day/night.

Jenny

cards, Classes

WATERCOLOUR FUN CLASS!

Watercoluring  is all the rage in the crafting world, have you noticed? We are focusing on 2 fun watercolouring techniques in our class this Saturday.  I hope you can join us.

Here are the details.

SATURDAY 9TH APRIL 2PM

We will make 2 fun cards with different watercolouring techniques.  Here is a sneak peek for you.

Please RSVP by Thursday 7th.

COST:   $15

BYO: Scissors and Adhesives.

I hope you can come. 🙂

3D projects, cards, Classes, Stamp At Home Kits, Stampin' Up!, Tutorials

PARTY POP-UP’S CLASS OR KIT TO GO!

I have an exciting class coming up next week. We are using the Party Pop-Up Thinlits from the Occasions Catalogue. If you can’t make the class (which is a little sad by the way as we do have a lot of fun), you can grab the Kit.

Here are all the details.

We will be using the Thinlits in 3 different ways.

SATURDAY 12TH MARCH    2PM      

Please RSVP by Thursday 10th.

COST:  ** NOTE DIFFERENT CLASS OPTIONS.
a) Class Only:    $20

b) Free Class with ‘Party Pop-Up Thinlits     $50

c) Kit Only: Can’t make the class? Purchase the kit which contains all card and embellishments and cut Thinlits (excludes stamped images). Also includes instructions.                                                                                              $20.

BYO scissors and adhesives.

Here is a sneak.

ATT_1455430144351_image-5251

So join in the class or buy the kit.  Let me know ASAP,

Jenny

Catalogues, Stampin' Up!, Weekly Deals

WEEKLY DEALS THIS WEEK!

Some Weekly Deals for you this week. I love the Decorative Dots Embossing Folder.  I think it is my ‘Go To’ Folder most of the times.  Have you got one yet?? Grab it this week for 25% off. The Paper Piercing Pack is pretty useful too.

Mar 2

cards, Stampin' Up!

BLOOMIN’ HEART BUTTERFLY!

I have another card for you today using the Bloomin’ Heart Thinlits.  This card uses the Thinlits in a different way.  I saw this idea on Pinterest and other blogs and thought I just have to try this myself.

5154

I first cut the Bloomin’ Heart Thinlits from Calypso Coral card then placed the large Bold Butterfly Framelits over the heart and cut it out. I cut a second butterfly straight from Calypso Coral card.  I adhered the both together.

To assemble the card I embossed a piece of Whisper White card with the Fluttering Embossing Folder and layered this piece on to black card and adhered the both pieces to a Calypso Coral card base.

I cut some leaf stems from vellum using the Rose Garden Thinlits and placed them behind the butterfly.  I think it gives a little softness.  The greeting is from the Rose Wonder set and cut with the matching frame.  I added some silver metallic Thread behind the label.  In the centre of the butterfly I added a White Baker’s Twine bow and a Metal Rimmed Pearl.

I was really pleased how this turned out.  I hope you might like it too.

Have a great day/night wherever you may be.

Jenny

cards, Stampin' Up!

HELPING RONALD McDONALD HOUSE CHARITIES – FROM ANYWHERE YOU ARE!!

Ronald McDonald House provides accommodation and support for sick children and their families during their stay in hospital.  Sometimes this can be for months on end. But, we can make a difference for their stay.  Join me in my Ronald McDonald House Charities event this Saturday. If you can’t make the day there are a number of ways you can help still so please take a minute to read on.
—————————————-
Let’s join together in a fun afternoon of games, laughs and creating while we raise money for Ronald McDonald House Charities – and wearing your silly socks!!

SILLY SOCKS FOR SICK KIDS

WHEN: Saturday August 1st at 2pm at my place, East Corrimal
We will make 3 great projects using the RMHC stamp set by Stampin’ Up! “Sprinkles of Life”.
COST: Class only $20 (I will donate $3 to RMHC)
OR
Buy the stamp set and matching punch $64 (See the stamp set below). 
Price includes $3 donated to RMHC by Stampin’ Up!, 10% off the stamp and punch price and a Free class.
RSVP: Wednesday 29th July. Places are limited so book early. (THURS. ABSOLUTE LATEST)
WHAT TO BRING:
:Scissors and adhesives.
: Small change to join in some fun games while we fundraise.
: Wear Silly Socks for some fun plus a gold coin donation.
**(Socks can be mismatched, funky, lots of pairs at once, on your hands.  Whatever you want. There will some prizes!)
: Don’t forget your smile and a sense of fun!
OPTIONAL: Bring along some blank cards to send to RMHC for them to use for the families there.  These could be Kid’s Birthdays, Thinking of You, Sympathy, Get Well. (they can be handmade or store bought.  They don’t have to be using Stampin’ Up! products). You can send your blank cards to RMHC anytime for them to use. :)Here is one of the cards we will make.
P1170061
CAN’T MAKE IT???
You can still help out if you can’t make it.  How??
  • Donate through my RMHC fundraiser page Here.
AND/OR
  • Order your stamp and punch set. (Receive 10% off the price until August 1st.  $3 is donated to RMHC.
AND/OR
  • Donate your blank cards for RMHC to give to the families that stay. Cards must be to me by August 7th.
Here is the fun ‘Sprinkles of Life’ set that you can find on p189 of the catalogue.
Sprinkles
Thanks for supporting this great cause.  Let’s bring a smile to these young sick kids and their families. I look forward to seeing you there. 
Jenny
Classes

CELEBRATE WORLD CARDMAKING DAY!

Take time out for yourself, have fun together, make some cards using your very own ‘Everyday Occasions’ Kit. That’s how we can celebrate World Cardmaking Day 2014.
Come and join us.

The ‘Everyday Occasions’ kit contains all the cardstock, envelopes and embellishments to make 20 cards. What you don’t complete on the day you can take home.
The Kit also includes a 7 piece Stamp set a clear block, 2 Stamping Spot Inkpads and a full colour Brochure of the cards you can make.

Here is the stamp set you will receive. Isn’t it a great one! Stamps for many different occasions in this set.

Kit set

There will be spot prizes, unlimited tea/coffee and fun games throughout the day.

WHEN: Saturday October 4th at 2pm.
PLEASE BOOK AND PAY BY FRIDAY 26TH SEPTEMBER. **THIS FRIDAY**
COST: $60 which includes a $10 rebate voucher to use on the day.
WHAT TO BRING: Adhesives, Plus bring a plate of food to share for Afternoon Tea.


 Message me to book  your place but be quick.  This Friday is the closing date so I can  have your kit in time.

DON’T MISS OUT!!!

Uncategorized

JUST ADD INK #229 – RAINBOWS

It has been a while since I had a chance to play along with a Challenge.  I had a little time today and when I saw the challenge at Just Add Ink this week I thought this would be a good one to try. This week ‘ Rainbows’.  We certainly have had a lot of rain recently to relate to this but I did like the fun colours to work with.  Here is the inspiration.

JAI229

Here is the card I came up with.  It certainly took a lot longer than I thought it would but I am pleased with the final result.  I love all the bright, happy colours.

P1140349

This was the first chance I have had to use the Star stencil too so that was fun.  I sponged sections with Tempting Turqoise, Daffodil Delight, Pumpkin Pie and Melon Mambo.  This was adhered to a Melon Mambo mat and Tempting Turquoise card base.  I added some Burlap ribbon across the front.  I coloured sections of the stamp from ‘Amazing Birthday’ with the markers.  I stamped some again to raise them up too.  This was adhered to a piece of Melon Mambo card and raised up off the white card front.  What I discovered too was the small star in the Itty Bitty Accents Punch Pack co-ordinates nicely with the small star framelit.  So I punched out the small star in Pumpkin Pie and then cut out the star using the framelit around the punched one.  I cut another star in Melon Mambo and adhered them together. I was quite excited about the result.  I punched out some more stars in Tempting Turquoise and Daffodil Delight.  I added some Brights Candy Dots to the centre of the stars too.

Job done! Challenge Completed!!  I hope this brightens your day wherever you are.

If you want to join in the Just Add Ink challenge then head to the blog post here.  There is not a lot of time left.

Jenny

cards

FAREWELL SALE-A-BRATION 2014!

Last day of Sale-A-Bration! I can’t believe how fast these last 2 months have flown by.  I am a bit sad that Sale-A-Bration is over for another year.  I have really loved playing with these products.  Here is a quick card today to say Farewell to Sale-A-Bration – and to ‘Petal Parade’.  When I first saw this set the brochure I really wasn’t sure of it BUT I REALLY LOVE IT!!!  I am a bit sad to finish with this set.  I hope you have your set of ‘Petal Parade’ already or any of the other Sale-A-Bration products.

This card I shared in my ‘Stamp Spectacular’ Event the other week but I thought I would show you today as we say Farewell to Sale-A-Bration.

P1110545


I love how you can multi-stamp the images and create your own Background paper or you can use the images on their own.  For this I have used Crisp Canteloupe, Summer Starfruit, Pistachio Pudding and Coastal Cabana.  The sentiment is from ‘Remembering Your Birthday’.  I have used the Scallop Tag Topper Punch and layered the sentiment.  The Whisper White card was 3.5cm wide (I think) and the Summer Starfruit was 4cm. (Something like that).  Place the card in the punch and look through the window underneath to line it up evenly.

So, today is the last day.  Email or phone me with your order.  You can choose one Sale-A-Bration gift with every $90 order  OR head to my store here and place your order.

OK, I have to run.  Have a Happy Day 🙂

Jenny