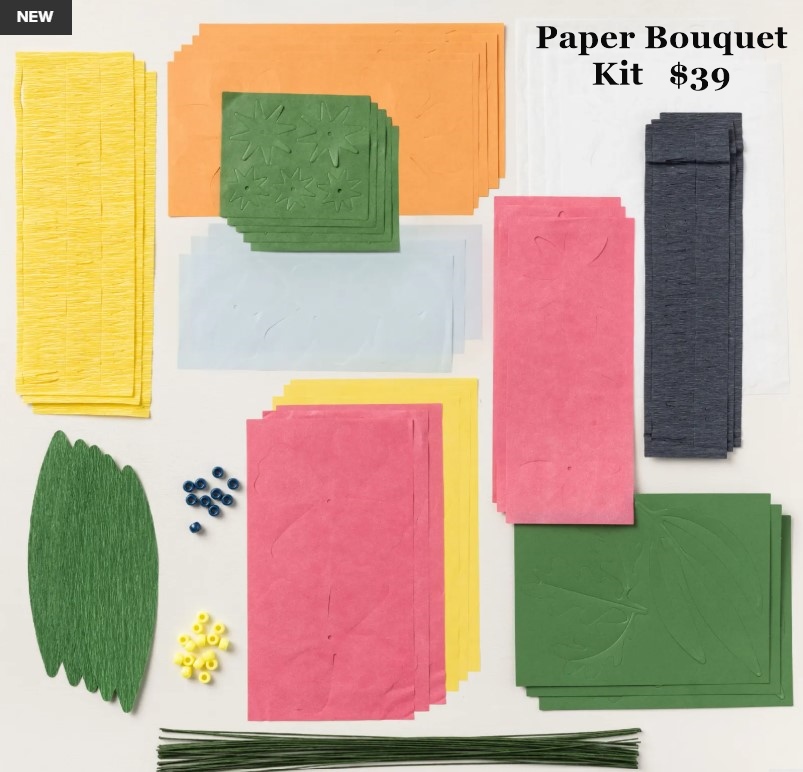
Have you noticed this new kit out?? It’s the Paper Bouquet Kit. It’s our Hidden Gem for this week.
No need to worry about fresh flowers dying off in no time. These will last a long time.
Isn’t it pretty with all those bright coloured flowers??
The Kit contains all you will need to create the 23 flowers and 11 leaves with stems and beads and all the pieces.
The Kit includes one of each item listed below. – Step-by-step instructions – Precut paper pieces – Floral wire – Pony beads – A 9-7/8″ x 6-1/2″ x 2-3/4″ (25.1 x 16.5 x 7 cm) printed box for storage or crafting on the go
You will need a Hot Glue Gun to assemble the flowers.
If you would love to grab this for yourself and you are in Australia then Head to my store -> HERE OR Contact me directly.
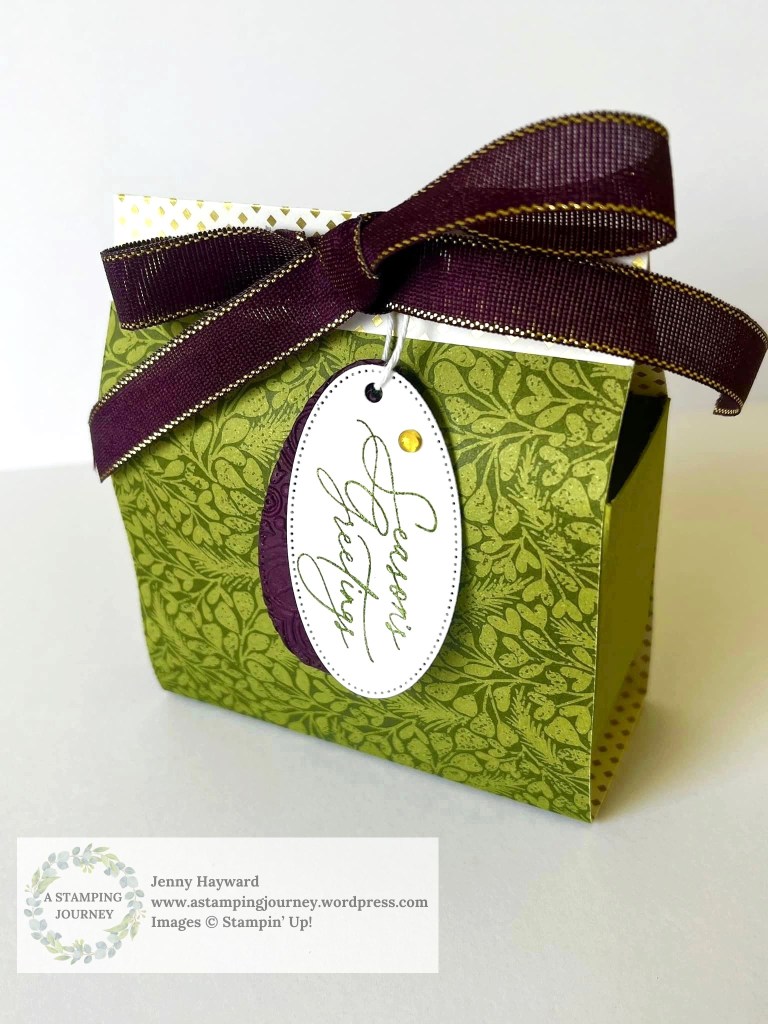
It’s Week 8 for 12 Weeks of Christmas with an easy Christmas Gift Bag to make. This cute bag could be used for any occasion.
I have used the Season of Green and Gold Specialty Paper on this bag. I created some other version and I will share them later.
You can follow along with the video here. If it isn’t shown then head straight to my Youtube Channel and you can find it.
It’s hard to see but I have some extra texture to the Blackberry Bliss card on the tag. I have used the Distressed Tile Embossing Folder. This is a close up of the tag.
I send out a written tutorial to all my newsletter subscribers with the full measurements and details. Are you a subscriber yet? I send out a free tutorial each week. You can find the link to join my subscriber list in the tab on the right hand column on my blog.
Thanks for following along.
Happy Creating,
Jenny
You can PIN it Now to Pinterest to come back to later.
Need to order and you are in Australia? I would love to help you.
You can shop in my store Online -> HERE. Please use the Host Code: EXSTTBB6
OR contact me directly.
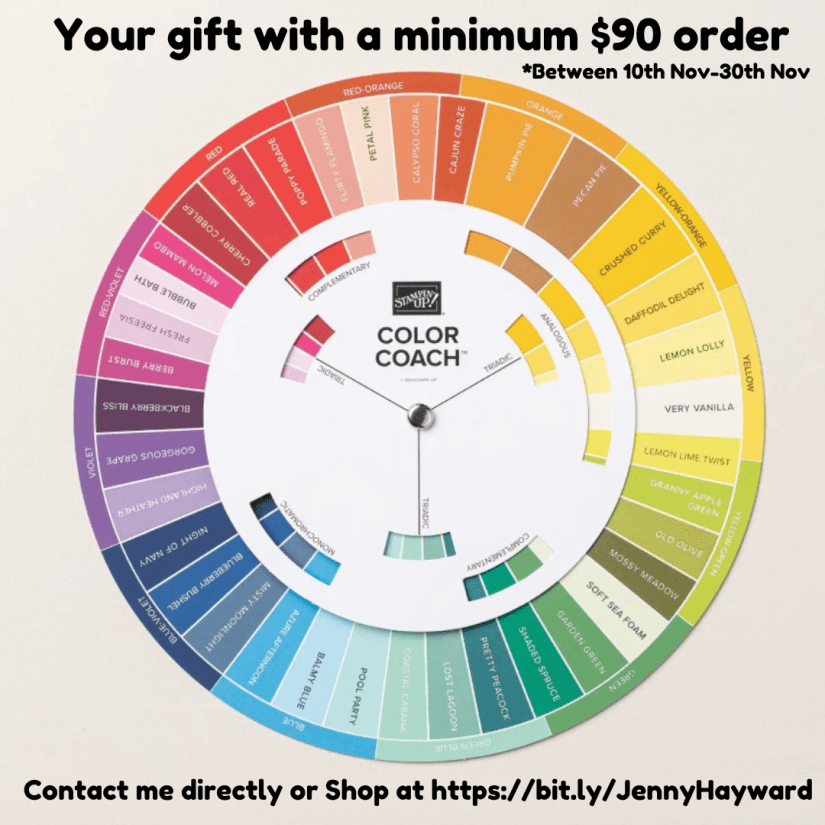
And don’t miss out on your Color Wheel as a gift this month. All orders over $90 with me will receive one.
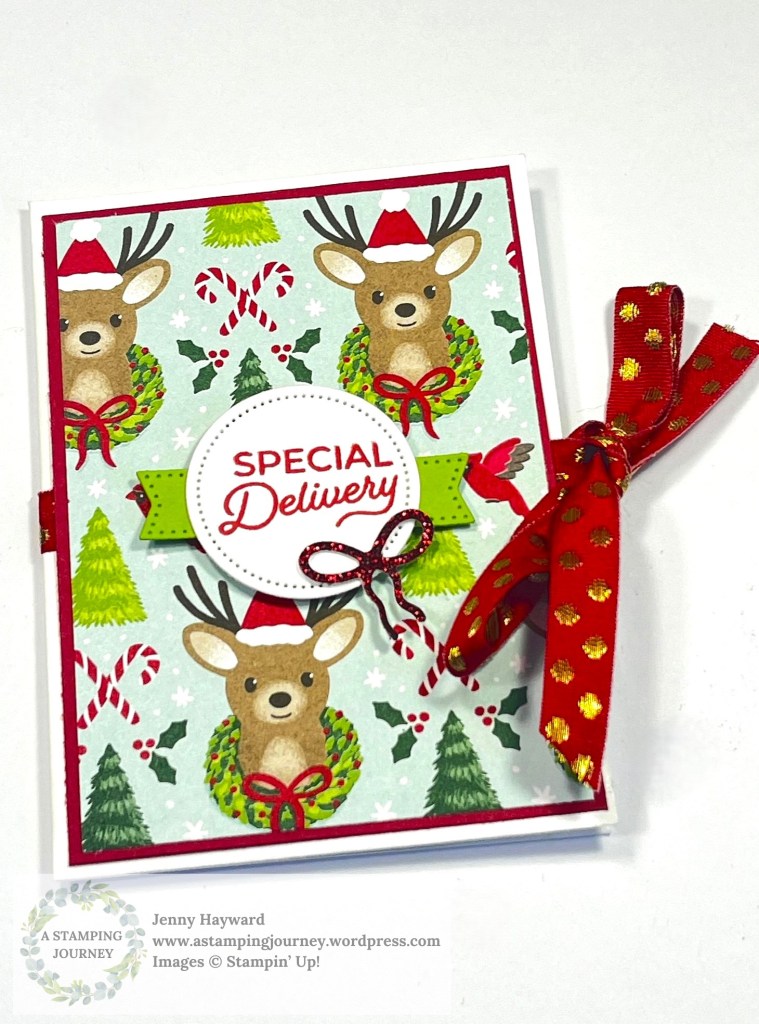
It’s Week 6 of our 12 Weeks of Christmas Series. Can you believe we are half-way through already!
This week’s project is a Gift Card Holder. It is so easy to create. It’s made with a standard White Envelope, some festive paper and matching ribbon.
You can see how to make one in the video below. Gift Cards are a popular gift for Christmas so I hope you get to make one for yourself.
This is the Gift Card I created in the video. I will share some other versions in a later post.
I decorated this one with the Reindeer Days Designer Series Paper. The words on the front are from the Trucking Along Stamp Set. The inside is one from the Greetings of the Season Stamp Set.
You can PIN this now on Pinterest to come back to.
If you have missed out on past projects from the 12 Weeks of Christmas then be sure to head back some posts on my blog here Or head to Youtube. They are all on my Channel.
If you would like the written tutorial for these projects then be sure to subscribe to my newsletters. I send out a free tutorial each week. You can find the link to subscribe in the right hand column on my blog.
Have fun creating,
Jenny
Do you need supplies and you are in Australia? I would love to serve you.
You can head to my store -> HERE. Please use the Host Code: EXSTTBB6 Or contact me directly.
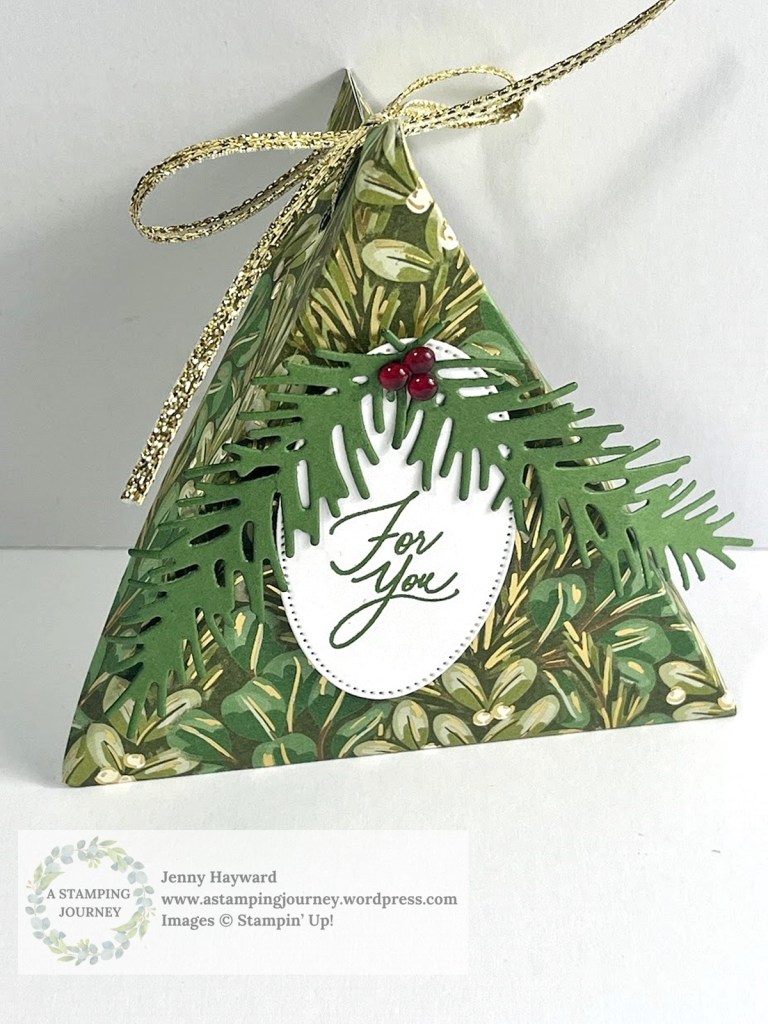
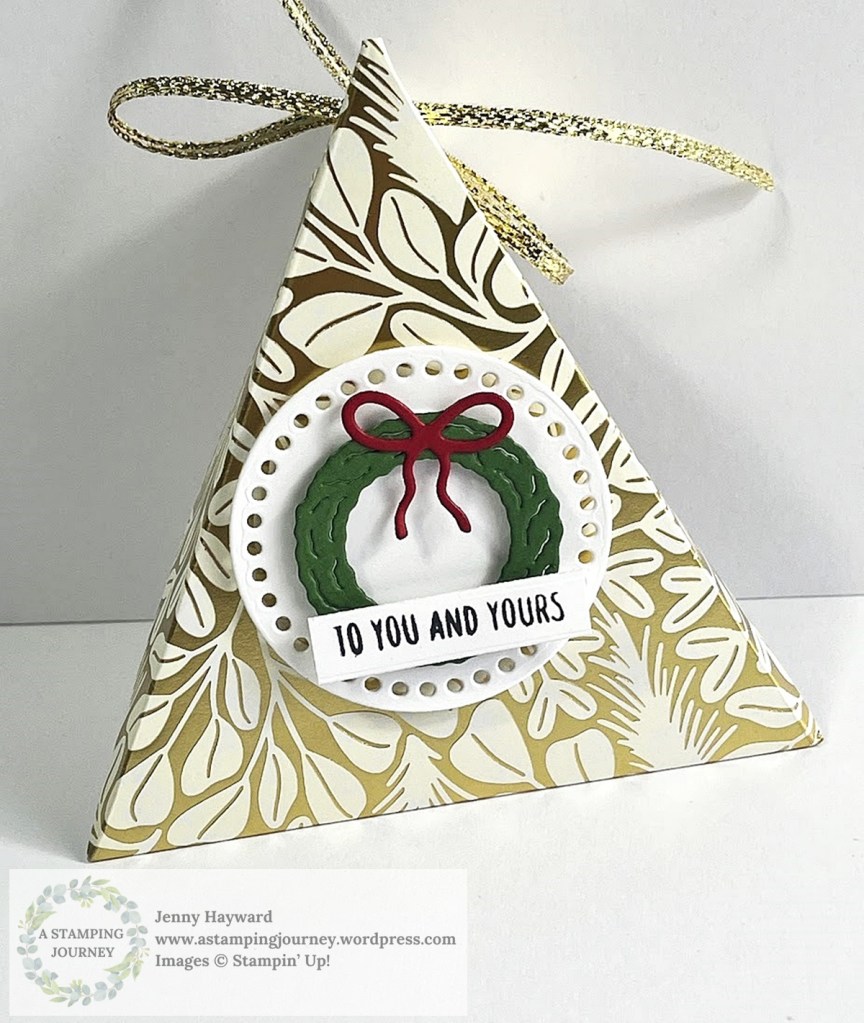
A Triangle Box would have to be one of the easiest type of boxes to make I think. No gluing. Just cut and score and fold.
Triangle Boxes have been around for some time. I used to make them a lot way back when I first started with Stampin’ Up! – 16 years ago!
I was reminded of them recently so pulled it out to make for a recent class. I wanted to share it with you.
These are using the Green and Gold Specialty Designer Series Paper. Seen Here.
The Green one was decorated with the Golden Greenery Dies and the sentiment from the Greetings of the Season. The Gold one was using the Reindeer Dies available in the upcoming Mini Catalogue.
With this particular Triangle Box you can make it any size you like. The length needs to be double the width. For this one it is 20cm x 10cm (8″x4″).
You can follow along with the Video. Find it on my Youtube if it is not showing here.
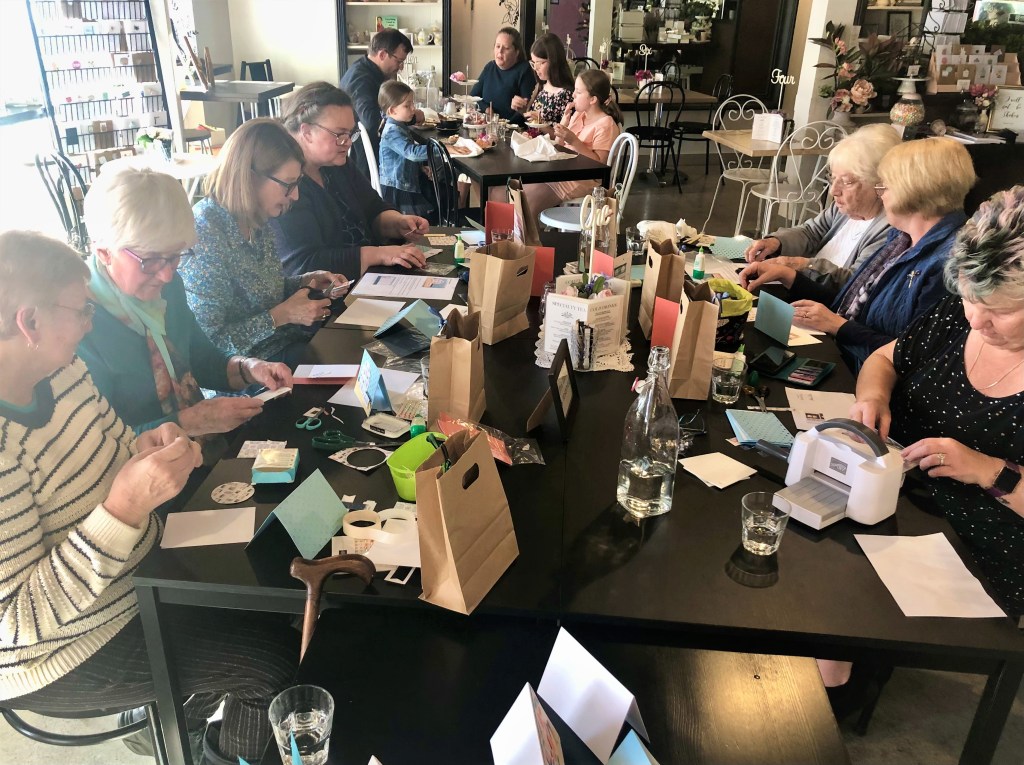
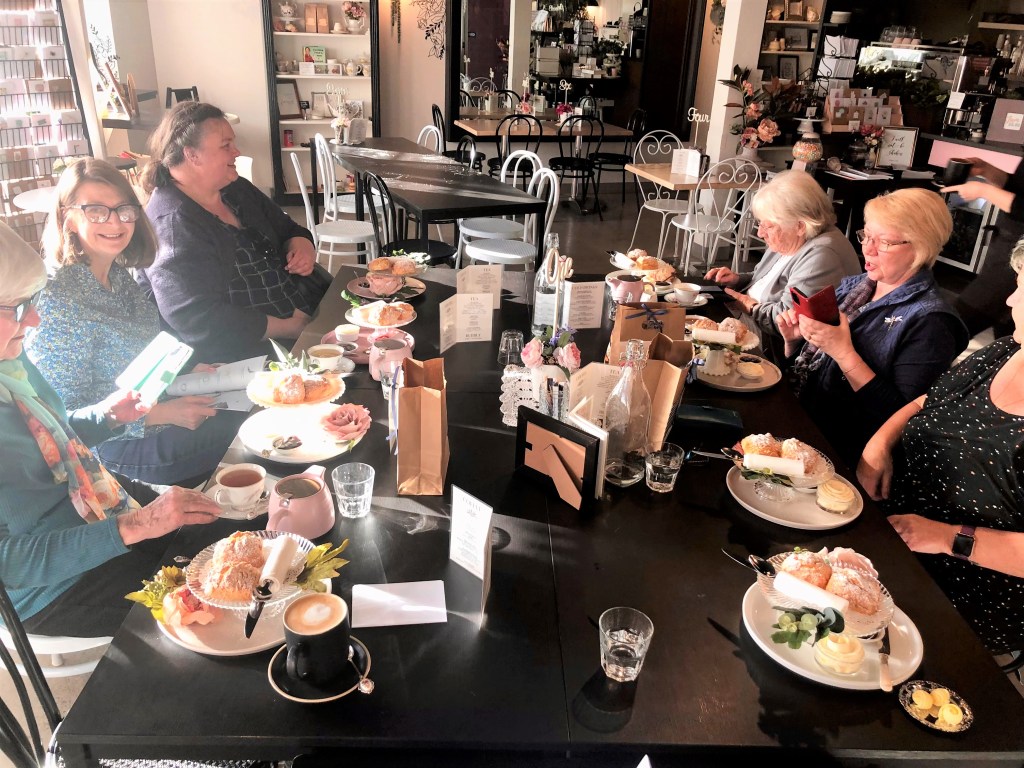
I recently held my Winter Crafternoon event at a local Tea Room. It’s always such a lovely afternoon of crafting and Devonshire Tea. I thought I would share some photos with you especially if you missed it all on Facebook and Instagram.
Gift Bags I made for everyone.
I purchased the brown gift bags from a local discount shop and dressed them up with the Les Shoppes Designer Series Paper shopfronts. The paper mat pieces under the shopfronts were using retired Designer Series Paper.
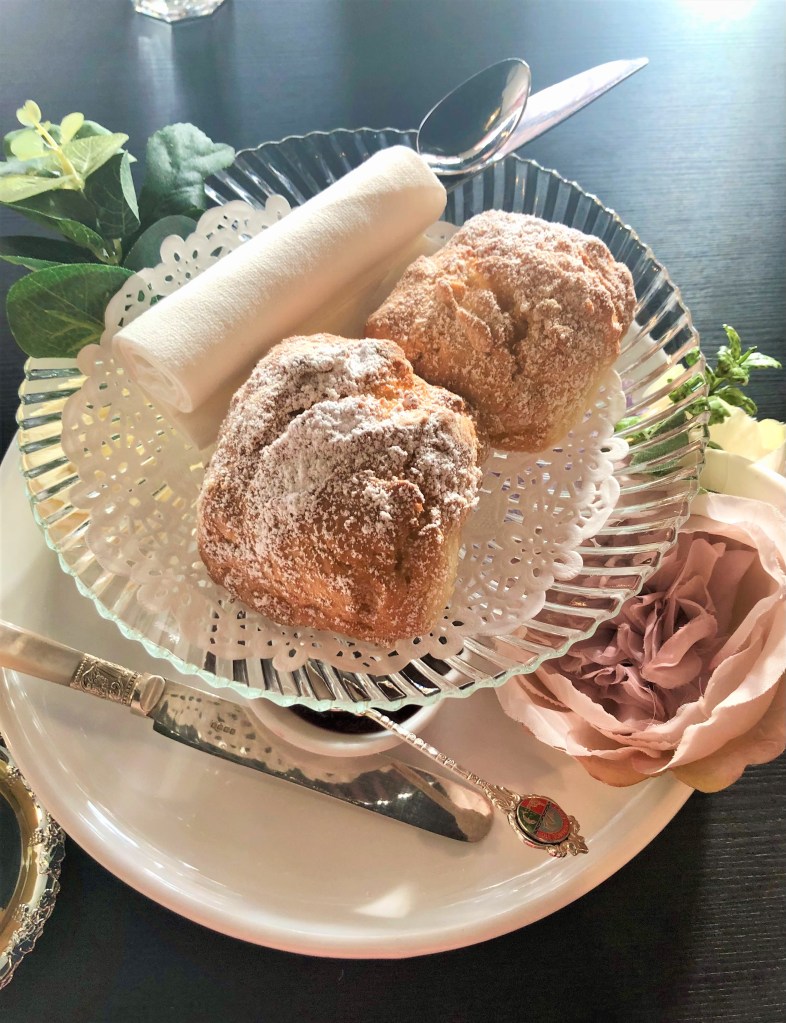
Here is a close-up of 2 of them.
Isn’t’ the sentiment just so sweet?? 🙂 This is from the Irresistible Blooms stamp set.
We have the Treat Bags. I added some retired Glimmer Paper and ribbon and of course a chocolate treat. It’s a must isn’t it. 😉 The topper of the bag was using the retired paper to match the Gift Bags.
Some of the crafting fun.
And Yummy Devonshire Tea. This was held at Sugar, Butter, Eggs Tea Room if you are in the Woonona area. You really must go.
I think this will be a regular event on the calendar each year. It is such a special time.
If you are local you need to join us. Contact me to keep up to date with the happening events.
Playing more with the Cheerful Daisies Bundle I created a Split Easel Card.
I used the Fresh as a Daisy Paper with it too.
It folds up flat so you can post it.
You will want to decorate the inside for this one.
Do you want to make one too?
I have the video below. If it doesn’t show you can go straight to Youtube ->HERE.
I have the basic measurements further below for you in both Metric and Imperial.
MAKE A SPLIT EASEL CARD
Card Base: Lemon Lolly – 1 cm x 14.8 cm. Score at 10.5cm. 5 1/2” x 8 ½” . Score at 4 ¼” Centre piece – 8.8cm x 10.5cm 3 ¼” x 4 ¼” Early Espresso Cardstock Side strips – 2 @ 10.1cm x 2.6cm 2 @ 4 ⅛” x 1” Front Panel mat – 8.4cm x 10.1cm 3 ⅛” x 4 ⅛” Designer series paper Side Strips – 2 @ 9.7cm x 2.2cm 2 @ 4” x ⅞” Front Panel – 8cm x 9.7cm 3” x 4” Inside – 10.1cm x 5cm 4 ¼” x 2 ⅛” Whisper White card stock Inside – 10.1cm x 10.1cm 4 ¼” x 4 ¼”
This is the lovely Cheerful Daisies Bundle.
But what about the Fresh as a Daisy Designer Series Paper.
Do you need any of the lovely Stampin’ Up! Supplies for your creating and you are in Australia?
You can head to my store and order -> HERE. Please use the Host Code: 4RY72TBP
Or contact me directly and I can help you with your order.
I made up some really quick and simple Treat Holders for all those who came along to my Catalogue Launch recently.
I didn’t have a lot of time but they were just the right size for a small chocolate treat.
Here it is a little closer.
I used a mix of the Countryside Inn Designer Series Paper and the Fresh as a Daisy Designer Series Paper. Then diecut the piece with the largest size die from the Countryside Corners Dies. Punch a hole in the top and add some ribbon.
Sweet, simple and fast. That’s all you need though right.
Of course, it would have been good to have a cute tag BUT, time ran out.
Maybe you can create your own to give a little treat to someone.
Happy Crafting,
Jenny
In Australia and need some crafting supplies? I would love to serve you. You can head to my store -> HERE and shop. Please use the Host Code: 4RY72TBP Or contact me directly.
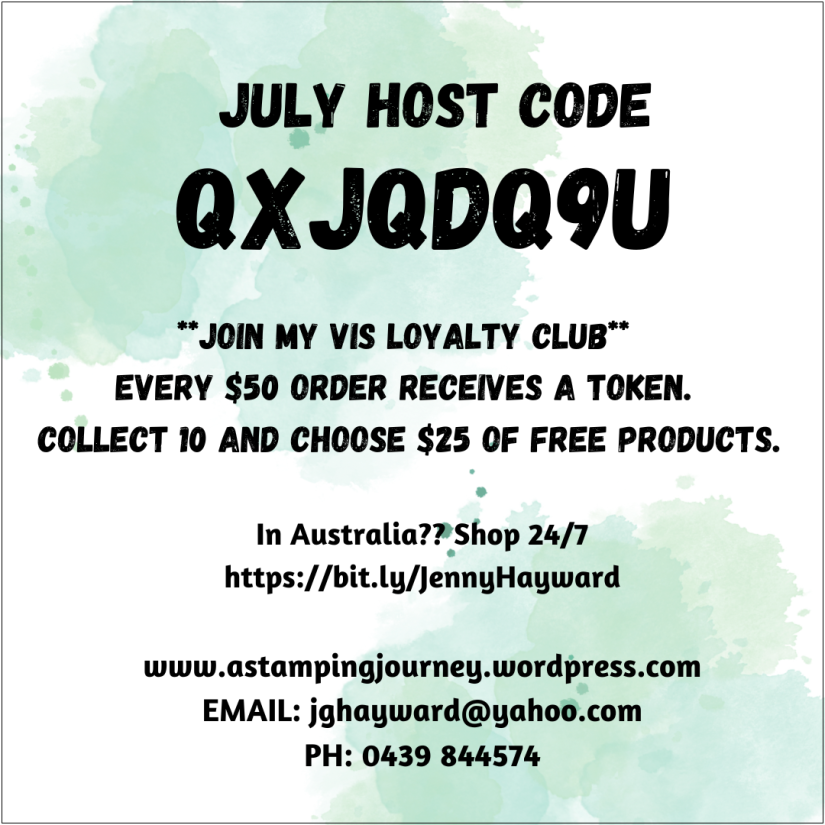
AND – are you a VIS (Very Important Stamper) Loyalty Club Member? Every $50 earns a Point. Collect 10 and receive $25 of products of your choice. Happy Shopping.
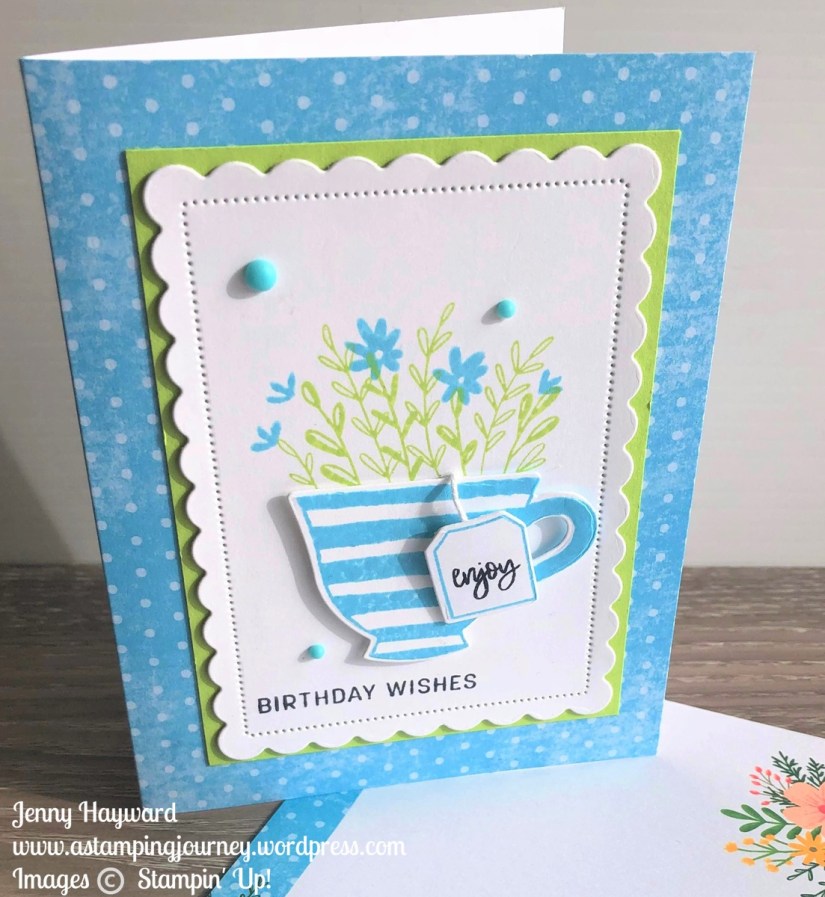
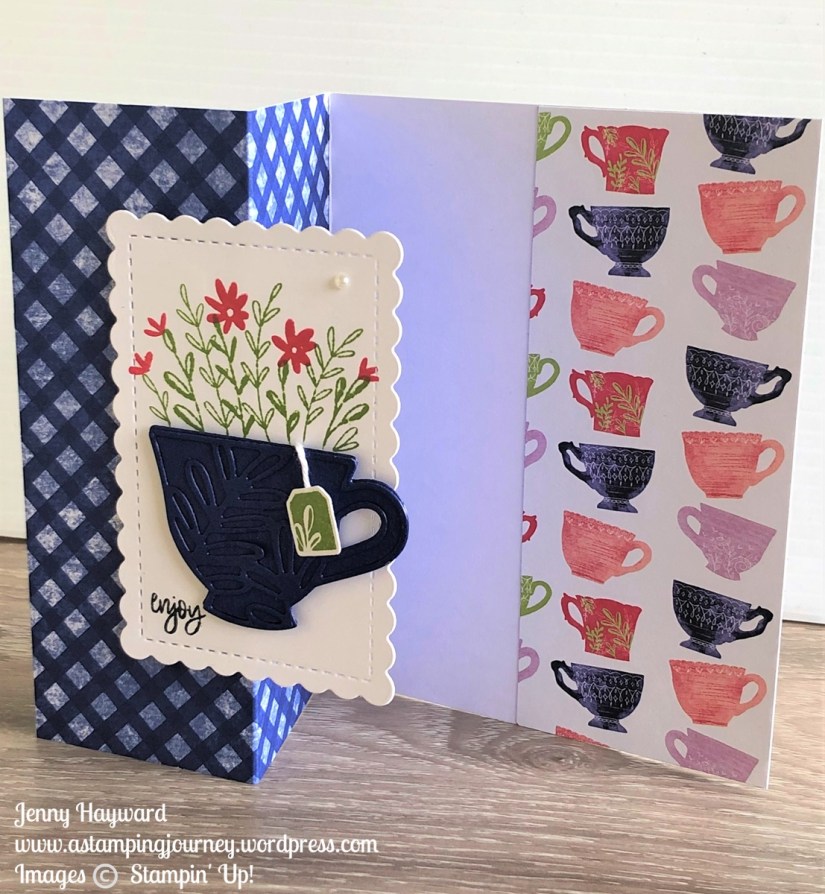
I’m sad the Tea Boutique Suite is leaving us. We have had lots of fun with them especially at our Winter Crafternoon event last year.
I thought I would share some of the sweet projects created. The Teacup Dies are still available and the Tea Boutique Designer Series Paper. So you can still make yourself a cup of tea. BUT sadly the stamp set is not available anymore. That’s why you need to be quick on these Last Chance offerings. They don’t stay around long.
You can find the Tutorial and the video link for the Front Fold Pocket Card on my blog -> HERE.
You can find the Tea Boutique Paper in my store -> HERE.
So be quick if you want any of these Last Chance items. Not much more time left. I would hate for you to miss out. Head to my store to order or contact me directly and I can help you out.
If ordering in my store please use the Host Code: RXX6ZW4V
All orders over $50 receive a Token in my VIS loyalty program. Collect 10 and you receive free products. With every order over $90 you will also receive a Tutorial Bundle with over 50 projects. Thank You for your order.
It’s been another busy year of crafting here. Thanks for following me along.
I thought I would take a few minutes and share my favourite projects from the past year. So come on a little journey with me. And click on the heading of the project to take you back to the original post and read more about them. Even catch the video of many of them.
I loved this gorgeous Friendly Hello Paper available for Sale-A-Bration in January. And this is great fold to show both sides of the gorgeous paper. (Must try that again).
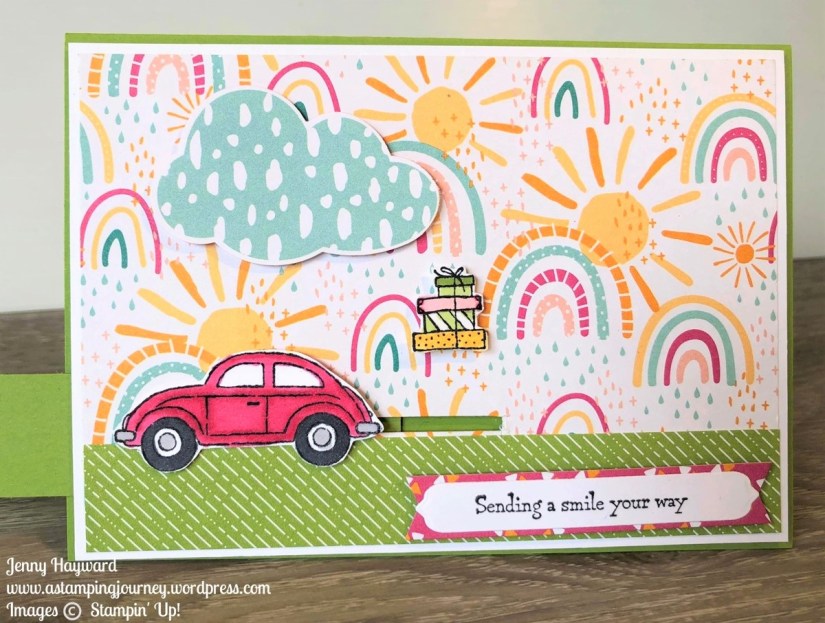
This was a great stamp set to create a Slider card. But you can try this with any of your stamps. What about that Sunshine and Rainbows paper. So bright and Happy. 🙂
Let’s face it – Male cards are hard to make aren’t they?? We had a great Masculine Cards Class earlier in the year. The Let’s Set Sail stamps and punch were fun to use.
The Wild and Sweet Stamp set was one of my top picks from the new catalogue in May. I don’t do a lot of colouring but I loved colouring this cute Koala. I shared some tips colouring this image in the video for this card.
The Hues of Happiness was another of my top picks from the catalogue. I think many people also loved this suite. The Tunnel cards I created with this has been very popular.
The most popular event this year with the Winter Crafternoon. It was such a fun time crafting together followed by a Devonshire Tea. Watch out for more events in the new year.
Another very popular Fun Fold from this year was the Diagonal Fold Card with the Christmas Lights Bundle. Lots of people have shared their versions with me which has been so great.
Is there a theme here with Fun Folds that are my favourite projects for the year. I do love a Fun Fold card. This one was the Half Fold Easel Card with the Hippest Hippos Stamp set for Sale-A-Bration.
It was great to be part of a collaboration to share you some fantastic Christmas projects. I kicked the 12 days series off with my project, A candle with the Merriest Moments stamps and dies. You just have to go back to that post and start the 12 Days of Christmas to check out all the projects.
I hope you have enjoyed looking back at these projects. I can’t wait to share more with you in the coming year.
To lots of creating in 2022. Come and join in with me and follow along.