cards, Techniques, Tutorials, Videos

CREATING LANDSCAPES WITH THE WATERFRONT SET FOR WEDNESDAY’S WOW #17!

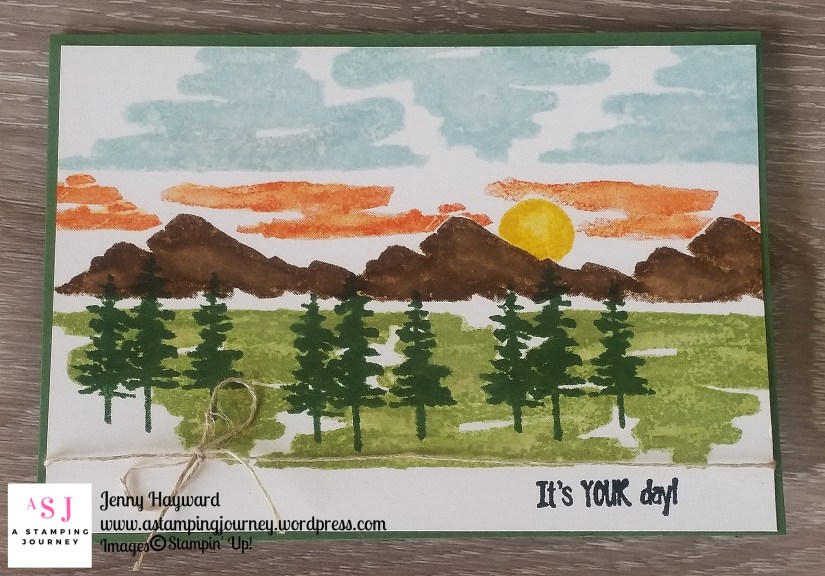
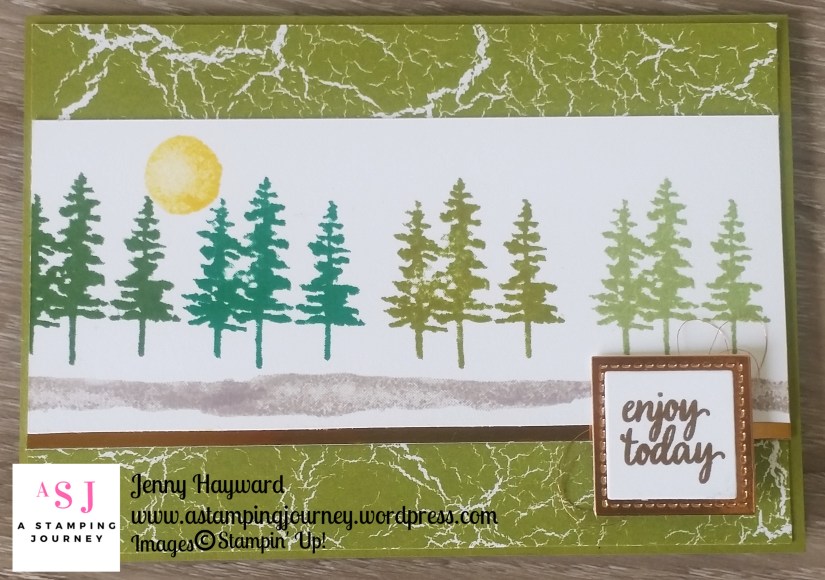
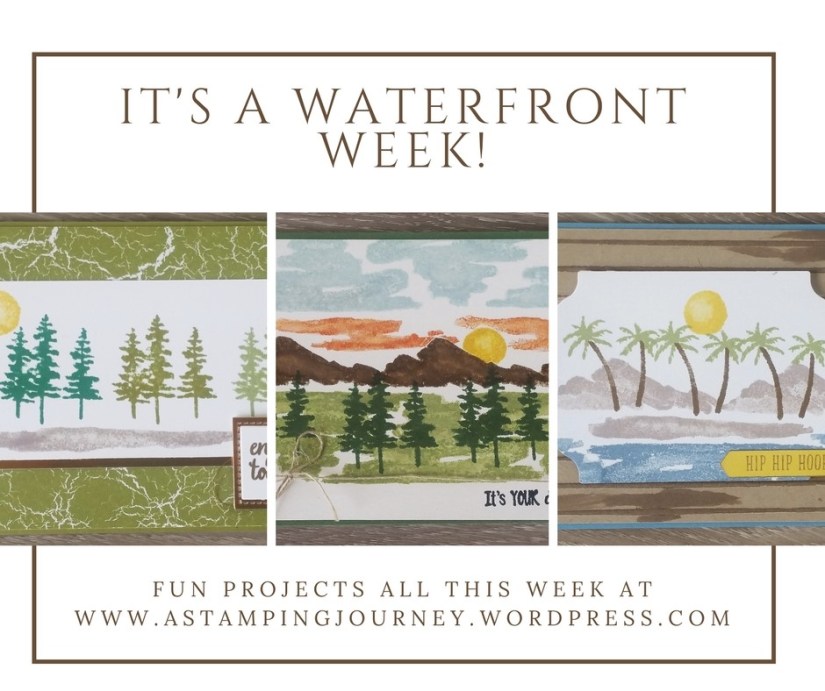
We have seen some simple stamping with this set and I will show you in the coming days but today for Wednesday’s WOW! #17 I thought it would be a good opportunity to share with you how you can create watercoloured landscapes.  It’s truly amazing and I have had fun creating these.  I will share the cards in later posts.

For today though I asked a lovely Demo friend Linda Dalke if she would mind if I shared her video to create watercoloured landscapes.  She can show it so much better than I could.  You really must watch this.  It is long, about 18 minutes, but totally worth it.  Firstly, this is her card, then watch the video below.


Isn’t it amazing! If you want to see more of Linda’s work do check her blog out.  She creates such gorgeous cards.  Visit her blog -> HERE. 

Tomorrow I will share one of my watercoloured creations.  I have shared this card already on my Facebook and Instagram and I think it was well received, so watch out for it.

Jenny

***Order the Waterfront stamp set this week either online or directly to me and receive 4 x A4 sheets of Shimmery White cardstock PLUS a tutorial for an exclusive project.  

You can order online in my store -> HERE.  Please use the Host Code this week: SBZEJCNH

cards, Techniques

ANOTHER MOUNTAIN SCENE WITH WATERFRONT!

Yesterday’s post I mentioned that when I first get a stamp set I check out Pinterest.  Is that your first port of call too??

What I have found with the Waterfront set is that inspiration is all around you.  (Well, it is with most creativity isn’t it?)  But with the Waterfront set you start to see the landscapes differently.  On this card I was inspired by a photo on our computer log in screen.

For this card I simply stamped to get a feel for how they can work together to create a landscape.

Do you think it looks like the setting sun over the mountains?  Hope so anyway.

The sentiment is from Confetti Celebration and I wrapped some Linen Thread around the stamped piece.  The card base is Garden Green.

Thanks for watching.  We start to get a little more artistic with this set tomorrow so be sure to check in.

Jenny

***Order the Waterfront stamp set this week either online or directly to me and receive 4 x A4 sheets of Shimmery White cardstock PLUS a tutorial for an exclusive project.  

You can order online in my store -> HERE.  Please use the Host Code this week: SBZEJCNH

cards, Catalogues

MOUNTAINS AND TREES WITH THE WATERFRONT SET!

Welcome to my Waterfront Week.  I am showing you projects with this great, versatile set all week.

You will find in the set there are a mountain shape, a circle (for sun), trees, a little hut and then there are a few squiggly shapes.  It’s only up to your imagination what  you do with them.

When I first start with a stamp set I have a look around Pinterest for ideas.  It’s always good to CASE a card first to get a feel for the set (ie.  CASE = Copy and Share Everything).  Stampers are good sharers. 🙂

The first card I created with this set was simply stamping the images.

This card was CASED from Helen Read in the UK. You can find her original card -> HERE.

This is a simple scene with the mountains, trees and the lake.  The sentiments are really lovely in this set too.  I finished it off with some Linen Thread.

Another idea I saw from on Pinterest by Su Mohr. You can see it HERE. was stamping a line of trees in greens.  I took that idea and created this next card.

The colours I used for the trees are Garden Green, Emerald Envy, Old Olive and Pear Pizzazz.  I stamped the “ground” in Crumb Cake.  Under the white card I added a strip of Copper Foil before adhering it to the paper from the Color Theory Designer Series Paper Stack.  I think this paper has been feeling a little bit neglected lately.

Sentiment is from Eastern Beauty set and stamped in Soft Suede.  The white card was cut from the Smallest Framelit in the Layering Squares set then adhered to a square cut in Copper Foil using the Stitched Shapes Framelits.  I don’t know why I bother putting these Framelits away really.  I used them all the time.

More with this set tomorrow so stop on by.

Jenny

Don’t miss a blog post.  Subscribe to my blog to get updates as soon as I post them.  Click on the link in the right hand column. 🙂


cards, Classes, Stampin' Up!

IT’S A WATERFRONT WEEK!

All this coming week I have some fun projects for you using the Waterfront stamp set.  I have been playing with this set this past week and there is more to this set than you might think. I hope you will join me this week as I share projects and tips to create with this set.  I can’t wait to share them with you.

It all culminates next weekend with my WATERFRONT WOW! class in the studio for my local peeps where we will be creating some special projects in class.

So be sure to stop on by this blog.  If you haven’t subscribed already be sure to click in the tab in the right hand column so you don’t miss out.

———–

For my Local people.  Here are the details for the WATERFRONT WOW! Class.  Be sure to book early as places are limited on this one.

WHEN: Friday 9th March at 10am OR Saturday 10th March at 2pm.

WHERE: In my studio in East Corrimal (Wollongong).

COST:  $20  BYO: Scissors and adhesives.  $5 extra to use my adhesives.

Here is a sneak of the projects we will be making.


***Order the Waterfront stamp set this week either online or directly to me and receive 4 x A4 sheets of Shimmery White cardstock PLUS a tutorial for an exclusive project.  

You can order online in my store -> HERE.  Please use the Host Code this week: SBZEJCNH

Thanks so much

Jenny


cards, Catalogues

CHARMING CAFE IN BERRY BURST!

A few weeks back I shared a number of cards using the Charming Cafe Bundle.  If you missed them you can head back -> HERE and also HERE.  There were a number of cards as well as a video on some tips in using this bundle.

I realised I had missed this card.  I didn’t show it at the time as it needed some modifications and I have only got back to it recently.  So here you go!

I embossed a separate piece of Berry Burst with the Scattered Sequins Embossing Folder.  I think this folder is a little hidden in the catalogue and you can skim right past it.  You can find it on Page 13.   Some of the gorgeous Berry Burst Metallic Edge Ribbon was wrapped around the piece before it was adhered down to the Berry Burst card mat.  The flower wreath was stamped on to white and the sentiment was stamped in the centre.  I coloured the flowers with the Markers.  To be honest, I think it would have been nice to stamp the flowers again and cut them and raise them up off the piece.  You can try that on your version yourself.

I think I may have added a little Wink of Stella to add some sparkle.  I felt it wasn’t finished so just tucked a piece of Paper Doily under the left hand side very carefully as I had already stuck it down with Dimensionals.  Bling to finish is an essential on most of my cards. 🙂

This is a simple card but isn’t that sentiment lovely?

I have been having lots of fun with the Waterfront set this week so stay tuned for a week of Waterfront next week.

Have a great weekend,

Jenny

You can find the Charming Cafe Bundle in my store now -> HERE.  $88 W   $75.50 C

cards, Catalogues, Sale-A-Bration, Stampin' Up!

WEDNESDAY’S WOW #16 – BLOOMING BASKET BUNDLE!

You have probably seen the new release Sale-A-Bration items especially the Blooming Basket Bundle.  I have just received this bundle so I was interested to see what can be done with it.  I thought I would focus on this bundle for Wednesday’s WOW! today.

I came across this video from Stampin’  Up! that highlights this set and shows some gorgeous ways to colour it.  I will share the cards featured in it further below.

Isn’t this colouring gorgeous???

How do you feel about cutting around the basket?  Just a tip in cutting the handle:  If you snip the handle down near the flowers on one side it is much easier to cut inside the handle area.  Then when you adhere it down you can tuck the handle back behind the handle and no one will even know.  Saves so much aggravation. 🙂


How clever is this idea in the card below?  Snip the flowers and leaves off the basket and add them to the card in a different way.  Gorgeous!!!

Now I am excited to play with this bundle.  Stay tuned to see what I get to do.

Jenny

You can grab this bundle FREE as a Level 2 Sale-A-Bration choice.   Which means for orders from $180 AUS you can pick up the stamp set and the Basket Weave Dynamic Embossing Folder.  Do you still need to stock up on card and ink?  Head to my store -> HERE, shop away and then remember to select your Sale-A-Bration choice. 

Please use the Host Code this week: SBZEJCNH

cards, Challenges

LIFT ME UP FOR COLOUR INKSPIRATION CHALLENGE #27

I wasn’t sure if I would get to join in on this colour challenge.  I really wanted to.  The colours are so pretty together and it has been on my mind the last 2 weeks.  Yesterday was a rainy day here which meant I could sneak away and play. 🙂

These are the colours for the Colour Inkspirations #27 challenge this week. Powder Pink, Pool Party, Melon Mambo, Island Indigo.

When I sit down to make a card for a challenge I pull out the inkpads first and see how they sit together.  Then pull out the stamps that I think might work well with these colours.  After tossing around a few ideas and looking on Pinterest for some inspiration I decided to work with the Lift Me Up set.  (well dusted it off!!).  This is the card that resulted.  Have to say it didn’t take that long to pull this all together.  For me that’s pretty good. 🙂

THE PROCESS OF STAMPING THE HOT AIR BALLOONS

I gave the Hot Air Balloons a 2-tone effect.  To do this I first inked up the balloon in the lighter ink, for example the Powder Pink, then patted on the darker ink on to the lower half of the balloon.  Then stamped the balloon on to the Whisper White card.  I cleaned the stamp before inking again using the same process.  Then changed inks and did the same with the Pool Party with Island Indigo.  I will say I was a little nervous  stamping it straight on the card in case I messed it up. Also, it was a little tricky to see how much I have inked the stamp but you know, it’s only a little bit of white card.  If it doesn’t work well just turn the card over and try again OR get another piece of card.  No stress. 🙂

To assemble the card I adhered the stamped white piece on to a mat of Powder Pink and on to a card base in Pool Party.  The sentiment was stamped on a strip of Powder Pink card.  Then to finish I cut a detailed Hot Air Balloon from the Up and Away Thinlits in Silver Foil and a few clouds in Vellum.  Of course, Rhinestones were added for the bling factor.

So I got it done in time- and posted to the Facebook group Thankfully.  If you want to join the group and see all the creations then head -> HERE.

Thanks for stopping by,

Jenny

cards, Sale-A-Bration

MINI LOTS OF LAVENDER THANKS!

I thought I would show you the mini Thank you cards I made for my customers last month using the Lots of Lavender set available for Sale-A-Bration.

I have to say, in my hurry to get them out I missed stamping the “thanks” on the front.  Silly me! 🙂 I had the stamp set on my desk too.  Never mind!  I wrote inside to say Thanks to them and that I appreciate their order.  I like to send little notes like these often.  They don’t need to be big standard size cards.  For these I used the Narrow Note Cards and Envelopes in the Occasions Catalogue.

The Lots Of Lavender set is a great 2 step stamp set.  Some of the time (well most of the time) I don’t feel like colouring, so you can stamp the outline and then fill in the image with another stamp.  I used 2 colour variations.  One on the left – Powder Pink and Berry Burst.  On the right (Wisteria Wonder and Elegant Eggplant).  The leaves were stamped in Wild Wasabi.  I went over the lines of the leaves with the Wild Wasabi marker.  The stems were coloured with the Old Olive marker.  I added a little bow with the Linen Thread and attached it with a Glue Dot.

This is the Lots of Lavender set if you hadn’t noticed it in the Occasions Catalogue.  It’s great for quick cards.  This set is one of the free choices available for Sale-A-Bration with orders over $90.  

Thanks for visiting my little corner of Blogland.  I do appreciate each one of you.  I wish I could send a Thank You card to each and everyone of you. xx

Jenny


You can order online now -> HERE and grab your Lots of Lavender set (or one of the other free choices) OR contact me directly.

cards, Personal Ramblings, Stampin' Up!

WEDNESDAY WOW! #15

Something different from me this week for Wednesday WOW! #15.

I don’t normally share quotes or things like this on my blog.  When I was thinking of what to post today this came up on my Facebook feed.  I thought it was very apt and maybe you can relate?

Really I didn’t have to go past number 1! I always compare my work to others. Often I feel it isn’t good enough.

What about you? do you compare your work to others.

Anyway, #2 consoled me. Someone, somewhere will love what you do.

I hope that I inspire someone with projects that I share on my blog here.


So hopefully this might encourage you in some way – and remember #5. Sometimes mistakes lead to the greatest masterpieces.

Have a great day,

Jenny

cards, Challenges, Techniques

A DIFFERENT COLOUR WITH THE SPRINGTIME FOILS SPECIALTY DESIGNER SERIES PAPER!

A couple of posts back I showed you a card with the Springtime Foils Specialty Designer Series Paper.  If you missed it then just head back -> HERE.

After a little discussion with a lovely friend, a different colour was suggested – Pool Party.  I thought that sounded a great idea.  How would this gorgeous paper turn out in other colours? I had a little time on Saturday and quickly whipped up this card.  I think the longest part was colouring the sentiment from the Label Me Pretty set.  I haven’t used this set very much so it was good to play with it and I dusted off the Detailed Dragonfly Thinlits.  

So what do you think of this version?

For this one to be quick I patted the Pool Party ink pad over the paper then I used a sponge to rub over it to smooth out the ink.  I was impatient. 🙂

I kept the card simple layering it on to a black card mat and then a Pool Party card base.  I added the line of dragonflies from the Detailed Dragonfly Thinlits.

The sentiment from Label Me Pretty was coloured with the Stampin’ Blends.  I added a few loops of the Copper Thread under the sentiment and added some tiny Pearls in the flower centres.

Still shiny and sparkly!  Thanks Lynda for the tip to try another colour. 🙂

See you next time,

Jenny