cards, Catalogues, Classes, Techniques

BRUSHO WITH CHARMING CAFE!

On a previous post I showed you the cute Thank You cards using the Party Pandas and they had a fun Brusho background. (If you missed it then head back 2 posts).

Today I have a similar little card to show you using the Brusho Crystals but this time using the Charming Cafe set.  These little cards are to welcome new members to my team who have joined during Sale-A-Bration.  It’s so nice to have them in the JEN’s INK team. 🙂

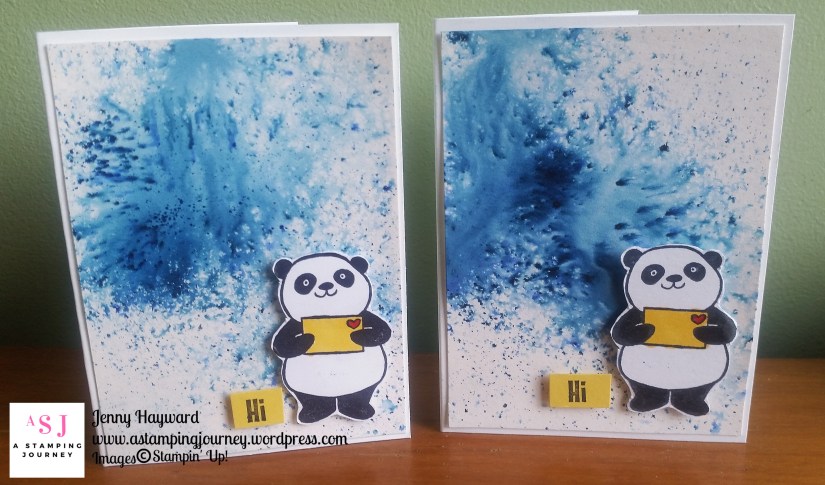
Here are a couple of them for you to see.


Aren’t they fun backgrounds?  Each time they turn out different. The pieces were made in my Brusho classes to demonstrate how they work before each class member made their own.  I thought why not use them for these cards rather than waste them.

For these I sprinkled over some Brusho Crystals and I used Glossy card this time.  Then I spritzed lightly with water.  I also tilted the cards slightly so you get the colour run.

The pieces were then adhered to a small card base made with the Thick Whisper White card.  You can make these any size but to give you the approximate size of these.

The Brusho card piece measures 8cm x 12.4cm ( 3 1/8″x 4 7/8″).  The card base is 8.4cm x 24.8cm, scored at 12.4cm.  (3 3/8″ x 7.3/4″ scored 4 7/8″  ** Please check the imperial size measurements beforehand).

The sweet little cafe chairs and table from the Charming Cafe set was stamped and coloured with Watercolor Pencils then cut with the Framelits.  Once I had adhered the Brusho piece to the card base then a vellum circle cut with the Stitched Circle Framelits was lightly adhered to the front.  So you couldn’t see the adhesive I added some dabs of snail adhesive near the centre so it would be covered with the table and chairs.   Then the Table and chairs were raised up with Dimensionals. The sentiment piece is from the Color Me Happy set and simply stamped in Black and cut around.   Before they were adhered down I looped around some Silver Thread.

Just a quick reminder:  Get 2 free stamp sets up to $174 in total when you join the Stampin’ Up! family during Sale-A-Bration.  (only just over a week left).  You might well receive one of these cards when you join my JEN’s INK team (and a little gift 😉 ).  What’s the rest of the story??  Order up to $235 of products and pay only $169.  No shipping costs either.  Then you get the 2 free stamp sets (all your choice). You get a minimum 20% discount on orders after that.  You have the choice if you do parties or classes.  You have the choice  when (and if you want) to leave.  You have the choice of when and what you do.  So what are you waiting for??  It’s time NOW.  

If you are in Australia and would like to join you can do so right now.  Head to my website -> HERE and click JOIN THE FUN.  Just have your order together first it might save some time.  I can’t wait to send you one of these sweet cards.

Thanks for stopping by,

Jenny

cards, Stampin' Up!, Techniques

WEDNESDAY’S WOW! #19 – TAILORED TAG PUNCH BANNERS!

I have a little trick for you today for Wednesday’s WOW! this week.  I discovered this on my blog travels a couple of weeks ago and have been pondering the idea since so I thought I would share it with you.

WEDNESDAY’S WOW! #19 – Making Banner ends with the Tailored Tag Punch.

The Tailored Tag Punch featured in the Occasions Catalogue is not just great for punching around sentiments and adding to your cards BUT did you know that it is a handy, dandy little punch to create Banner ends in any size.  How cool is that!

I will show you below.

Just slip your card strip into your punch with just the end showing in the angled section on one side.  Be sure to centre the piece first, then punch.  If you are a little unsure that you will line it up in the centre then you can mark the centre with a pencil.  For the 2 ended banner I marked the centre on both ends so I would be sure that both ends would be aligned.

Create the banners for your sentiment pieces, or you can make a banner and add a sentiment on a separate piece of card to layer on top.

I hope you find this tip very useful.

Thanks for visiting today,

Jenny


cards

BRUSHO THANKS WITH THE PARTY PANDAS!

A few weeks back now I had a big Brusho Weekend on the blog here.  You might remember it.  If not then head back some posts and you will see lots of fun projects with these great Brusho Crystals. Recently I made up some mini Thank You cards for people who bought the Brusho Crystals over the weekend.  I thought it was time I showed you some of them.

Gotta love those Party Pandas.  I will miss these little fellows.

The base card measures 10.5cm x 15cm (approximately 4 1/8″ x 6 1/8″).  They are scored half way on the long side.  The card piece  that I created the background with was slightly smaller and I used Shimmery White for this.

To create the background I sprinkled over some Prussian Blue Brusho Crystals and then used the Spritzer with water and sprayed lightly over the card.  You can watch the Crystals change before your eyes.  It’s quite magical to watch.  The more water you add the more “dilute” or “whispery” it becomes.  Each card piece you do will end up different.  Just amazing really!

I let the card pieces dry and then stamped the little Panda in Memento Black and coloured the envelope he has with the Stampin’  Blends.  The heart was coloured with the Stampin’  Write Markers.  Just a simple sentiment is all that is required I think.  That was stamped on a small piece of Daffodil Delight and snipped down to size.  The sentiment and Panda were raised up with Dimensionals on the coloured card piece which had been adhered to the White card base.

Thanks for looking.

Jenny

PS: Not much time left to get your Party Panda set or other Sale-A-Bration choice Free with your qualifying order.  Don’t leave it too late.

cards, Cards by Mail, Classes, Sale-A-Bration

CELEBRATE SALE-A-BRATION AT CLASS THIS WEEK!

These 3 months have flown by so quickly and Sale-A-Bration is coming to an end! I can’t believe it.  This week’s class we will be giving one last love to some of the products.

Come and Celebrate Sale-A-Bration.

If you are a Wollongong local come and join in.  Can’t make it because of time or distance?  Order the kit for $15 (stamped images not included).

We will be making 2 cards and a small slider gift box.  (Thanks for some amazing demonstrators for the inspiration for these). You can choose Pool Party or Flirty Flamingo (pink).  Advise me the colour when booking.

Here are the details.

WHEN: Friday 23rd March at 10am or 7pm

COST: $15   (advise me of colour choice either Pool Party or Flirty Flamingo).
             Plus an additional $5 if using my adhesives.
             NB: eggs aren’t included.

BYO: Scissors and adhesives.

RSVP: Wednesday 21st March.

I look forward to seeing you there.

Jenny

cards, Catalogues, Sale-A-Bration, Videos

WEDNESDAY’S WOW! #18 WITH HAPPY WISHES!

Today’s Wednesday’s WOW! we are looking at the Happy Wishes set in the Sale-A-Bration Catalogue.  I have to say I haven’t really paid much attention to this set but I think it might be one of those hidden gems.  I didn’t realise just how versatile it is.  There are so many different sentiments in the set and you can layer them together before and after the main word or just have one of the 2 main words which are pretty in themselves with the flowery swirls.  So since I didn’t pay much attention to it I thought you might not have either.  So here is a video from Stampin’ Up! showcasing it. Take a quick look at it.

The cards look pretty with some simple colouring and a few of the sentiments.

Here are 2 of the cards shown in the video.  These ones are fancy with the Textured Embossing Paste.

This is the stamp set.  So many sentiments. How could you use them?

This set is available Free with a qualifying orders from $180.  So be sure to grab it very soon.  There is only 2 weeks left for Sale-A-Bration so be quick.

Have a great day,

Jenny

cards, Catalogues, Sale-A-Bration

BLOSSOMING BASKET BIRTHDAY!

I have just received the new Blossoming Basket Bundle which is a new Sale-A-Bration choice.  I had a little colour with it on the weekend.

Here is a quick HOW-TO.

Emboss the Whisper White card with the Basket Weave Embossing Folder.

Stamp the basket from the set in Memento Black on Thick Whisper White and colour with the Stampin’ Blends.  Cut the basket out with scissors (sorry no framelits for this one).  Just a tip to cut inside the handle: snip the handle just at the flowers on the right hand side.  Then cut the white section on the inside of the handle.  Then add a tiny dab of Multipurpose adhesive just behind the flowers and adhere the handle back in place.  No one will even know but it makes cutting so much easier.   Stamp the little tag and the butterfly as well and colour those with the Stampin’ Blends also.

Cut a circle from Pink Pirouette card using one of the largest circles from the Layering Circle Framelits.  Run the piece through the Big Shot with the Scattered Sequins Embossing Folder.  

Stamp the sentiment from You’re Inspiring Set on crumb Cake card.  Punch out with the Duet Banner Punch.  Punch another banner out in Pink Pirouette.  Cut the pink banner in half and adhere these to the back of the Crumb Cake one with the ends of the pink extending past the Crumb Cake banner.

To assemble the card:  Wrap around some White Organza Ribbon around the white card.  Adhere to a Crumb Cake base.  Raise up the Pink Pirouette Circle off the white card and raise up the Basket off the circle.  Raise up the Sentiment banner down the bottom.

I coloured over the flowers and the butterfly with the Clear Wink of Stella Pen although I didn’t take a close up of the flowers.  It is very sparkly though.

———

This is a really lovely stamp set and very easy to colour especially with the Blends.  This Bundle is one of the free choices for Sale-A-Bration with a qualifying order over $180.  There is just over 2 weeks left so you don’t want to leave this too long if you want to grab the Bundle.

See it in my store -> HERE now.  You can order from there too and be sure to check off your Sale-A-Bration choice before you finish your order.

Thanks for looking.

Jenny


cards, Stampin' Up!, Techniques

PALM TREE ISLAND WITH THE WATERFRONT AND NOW TO PICK YOUR FAVOURITE!

We are up to the last day of Waterfront Week.  You are probably glad of that hey!  It’s been a big week.

Don’t head off too quickly today.  I have shared a lot of cards this week but I would love to know what card you have liked the most.  So at the end of this post is a little Poll.  Tick the box for your favourite.

This last card came together quite quickly and I kinda like it. 🙂

I think I would like to be lying on that beach somewhere.  It reminds me of Hawaii.  I first cut the white card with the Lots of Labels Framelits.  I think it was the 2nd largest. Then stamp your 2 mountains in Crumb Cake and stamp the palm trees 3 times.  I added the thin streak stamp in Crumb Cake underneath the palm trees and the scribbly streaks in Marina Mist.  Don’t forget your sun in Daffodil Delight.

The Crumb Cake card mat was embossed with the Simple Stripes Embossing Folder.  I only just received this folder so I wanted to check it out. Once embossed I swiped the Crumb Cake inkpad over the card to add some ink in places.  To assemble, wrap around some Burlap Ribbon and adhere to the Marina Mist card base.  The stamped piece is raised up with Dimensionals.  The sentiment is from the Happy Birthday Gorgeous set stamped on Daffodil Delight and punched with the Classic Label punch.  I added some Clear Epoxy Shapes to finish.

Well that’s it for the Waterfront from me for a little while.  I think I should move on now right.  Hope you have enjoyed it as much as I have had in creating them and sharing them with you.

Now before you head off, I am interested to see what your favourite card has been this past week.  Can you take less than a minute to take this little poll.  Thanks so much.

Vote for your favourite Waterfront card by clicking on the image below.  If you can’t remember the card properly just head back through the posts for the past week.


cards, Catalogues, Personal Ramblings

LAKE SCENE WITH THE WATERFRONT SET!

OK.  I have another Waterfront card for you.  Are you sick of seeing these cards yet? Sorry about that.  Tomorrow is the last one for a while.

Today though I have a Lake scene stamped with this stamp set.  It might be your typical scene with it.  I was trying to recreate this scene from one of my favourite places in the world – Cradle Mountain in Tasmania, Australia.  It didn’t quite look as I wanted to but I like the card anyway.

This is the scene and then I will show you my card.  You be the judge. 🙂  I made this early on in my playing with this set so I was still getting a feel for it.


I climbed to the top of that mountain peak in the distance last year.  It was a HUGE effort.  It had been a goal of mine for maybe 18 years.  It holds a special place in my heart.

The trees are a little larger in the forefront but I had to work with what I had. I can see a few changes that I would make now. It doesn’t matter.  It doesn’t have to be exact.  The landscape images are just to inspire us.  Maybe I will have another go at it.

Thanks for your patience this week while sharing these projects.  Last one for the week tomorrow.

Have a great day,

Jenny 

*** You still have time to order the Waterfront stamp set this week either online or directly to me. Receive 4 x A4 sheets of Shimmery White cardstock PLUS a tutorial for an exclusive project.  

You can order online in my store -> HERE.  Please use the Host Code this week: SBZEJCNH    Thank  You.  🙂

cards, Classes

WATERCOLOURED LAKE WITH THE WATERFRONT!

Continuing on with Watercoloured landscapes scenes I have this card to share with you.  This card is one we will be doing at classes this weekend  but I thought I would share it with you.  I found this landscape scene on Pinterest and thought I would try to recreate it.  See what you think of the card with the original photo??

I used the Waterfront set to create the mountains and land and stamped the trees.  The lake and the sky are watercoloured with the Inkpads and Aquapainter.

Here is the finished card.

I kept the card simple.  With these cards you don’t want to cover up all the scene with a big sentiment or lots of fuss.  The sentiment is from Sprinkles of Life.

I have 3 sessions of classes this weekend so I hope they enjoy making this card and another 2.  I wish you could join us. 🙂

I will be back tomorrow though with another card.  This one is back to some simple stamping with the set.

Jenny

cards, Classes, Stampin' Up!, Tutorials

LOOKING THROUGH THE CAVE WITH THE WATERFRONT SET!

Today I am following on from yesterday’s post with watercolouring the Waterfront set.  If you missed yesterday’s post and video then be sure to head back a post.

I have another card created in the same way that I had made last week.  I shared it on Facebook and Instagram and received lots of comments.  I hope you might like it too.

Firstly, I did a search on Pinterest for landscapes to find some inspiration.  There is a lot let me tell you.  But this image particularly jumped out at me I think because of the colours and it was a little different to the “typical” scenes you might be seeing using the Waterfront set.  This is a photo from the Flinders Ranges in South Australia.

So here is the image with the card I created trying to recreate it.

Here is a closer photo for you.

I was pleased with the result but it took some time to create.  Like 2 hours!!  I won’t share step-by-step but I will point out some tips for you to create your own.

TIPS TO RECREATING THIS CARD

With any of the watercoloured images I have created I start with the right mid-point of the card.  For this one I worked around from this edge in a clock wise direction and filled in the centre last.

I used Shimmery White card.  I prefer to use that card as it doesn’t have the textured surface that watercolour paper has.  You do use the Aquapainter but it’s only a small amount.

The inks I used are Tangerine Tango, Soft Suede, Crumb Cake, Rose Red, Crushed Curry and then for the sky and land I also used Soft Sky and Blushing Bride.

For most of the “cave” shape I used only the mountain stamp in the set and twisted and turned it to develop the shape and to fill in the areas of rock. I used the Aquapainter to blend the ink regularly after I stamped.  I think this is what took most of the time.

The right hand rock surface looked orange when I looked at it on the Ipad which is why I did it in orange tones but when I looked at the print-out of the scene it looked more red. Oh Well! Artistic interpretation right. 😉

I will show you how I added the edge marks on the rocks down below.  I have used this a lot now on different scenes I have done.

For the sky I watercoloured some streaks with the Blushing Bride ink and the Aquapainter and then filled in the rest of the area with the Soft Sky ink.  For the centre ground area I watercoloured areas of Blushing Bride and Crumb Cake.

For the trees I inked them up in Crushed Curry and then use the Soft Suede marker to colour the tree trunks and part of the branches.

After I finished it and it dried I wanted to keep the card simple.  I wrapped around some Linen Thread and adhered that on to a Crumb Cake base. The sentiment is from Teeny Tiny Sentiments.  I wanted to keep that small so not to cover too much of the image.

Create the edge marks to create depth/shadow

Firstly stamp your mountain image on your card.  It will depend on what you are creating as to how they would be positioned.  For this one to create the rock wall I stamped the mountain stamp a few times down the side of the card.  On the sample below I have just stamped this twice to give you an idea.

Ink up your mountain stamp again on just the tip of the peaks.  To do this take your stamp on to the inkpad not the inkpad on to the stamp.  Tilt the stamp so just the edge of the stamp will be inked. For this one I inked the tip in Soft Suede.

Position the stamp over your pre-stamped mountain shapes and stamp down.  Just the tip will be inked.  You will do this several times over your project.

I have done this too when I wanted a grassy edge to a mountain top by stamped the tips in Old Olive.

——

So what do you think?? I would love your thoughts.  If you create one do share with me.  I would love to see it.

Hope you are enjoying the projects for Waterfront Week.  There is still more to come.

Have a great day,

Jenny

Have you got your own Waterfront set yet?  If you are in Australia, you can grab it in my store now -> HERE.  Please use the Host Code this week: SBZEJCNH

As a Bonus this week: receive 4 x A4 sheets of Shimmery White cardstock PLUS a tutorial for an exclusive project.