The gorgeousness just keeps on coming for Sale-A-Bration. Yesterday was the 2nd release of fantastic, beautiful new free choices that you can receive with your qualifying orders.I think you will love them. I do. 🙂 If you haven’t seen them yet then I will show them to you in the next couple of posts.
Today I want to show you the gorgeous Springtime Foils Specialty Designer Series Paper.To be honest it really doesn’t do it justice in the catalogue but you can see them in this image.
Last week I shared a video on my Facebook page showing the sparkle and shine of this paper. It truly is just gorgeous! If you didn’t see it head to my page -> HERE and scroll down a little to see it. You really must.
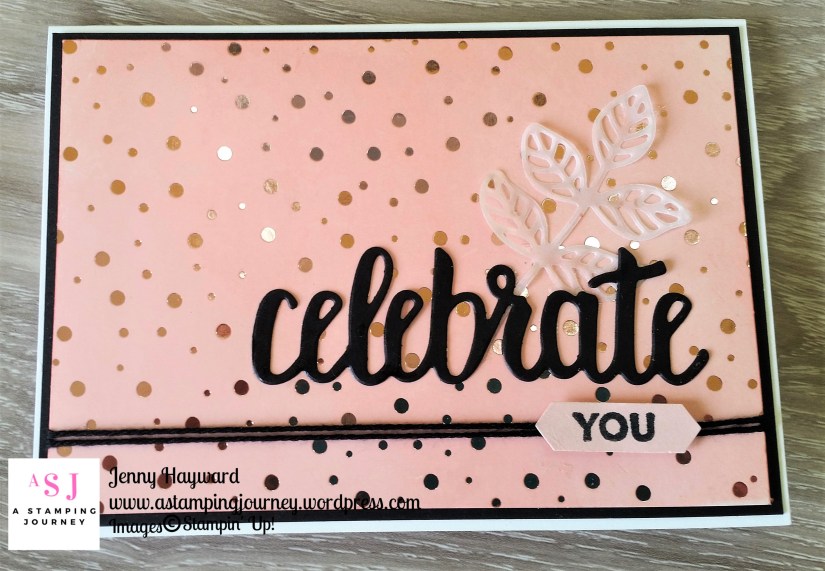
Today I was playing around with it. I have seen some images of it this past week inking it so thought I would give it a whirl. I have to say it just lifts the gorgeousness to a whole new level. This is the finished card I made.
I posted a video on Youtube of how to colour this gorgeous paper. It was a very quick video but might give you some idea.
Here it is for you.
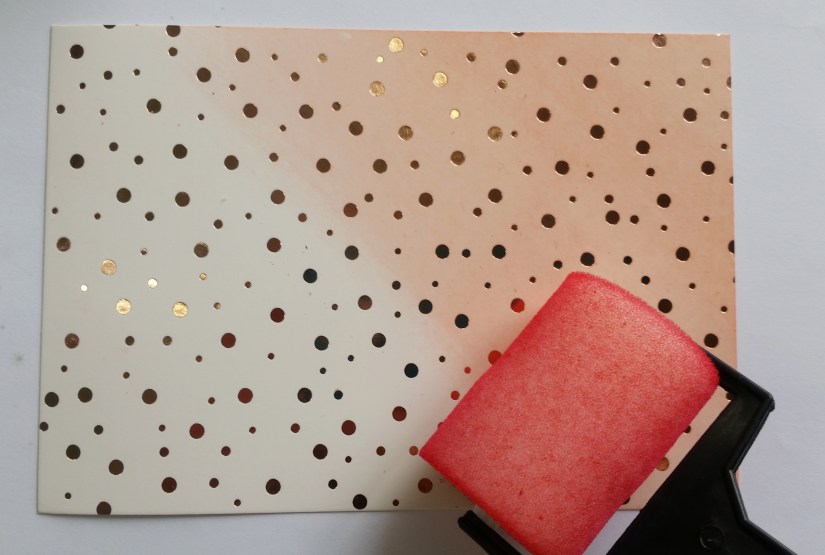
If you like a visual of this then it is simply a matter of rolling over it with your sponge roller and inkpad. It does take some time but it is worth it. I did dab some ink on with my inkpad too. You can do that if you get a bit impatient. Then roll over it with the roller to smooth it.
On my card to finish I cut the “celebrate” from the Celebrate You Thinlits and added the “YOU” stamped on Powder Pink. I found that a better match with the inked paper in the end. I finished it off with some Black Baker’s Twine and cut a vellum leaf from the Flourish Thinlits.
Hope you like it? I really think you need this paper. It is a free choice now added for Sale-A-Brationwhen you have a minimum $90 order. It doesn’t take much to get to $90 by the time you grab a stamp set and stock up on your paper and adhesives. What about the sponge rollers? Do you have them?
I look forward to playing more with this paper so stay tuned.
Have a great weekend,
Jenny
IN AUSTRALIA?
You can order these products and any other Stampin’ Up! products in my store -> HERE now. Please use the Host Code this week: 6NRCJVMT
I was going to share these cards with you as part of a Bloghop tonight BUT I was too busy making the cards and fussing around with other things that when I came to register for the Bloghop I found that it was full already. That’s a bit disappointing. 😦 It doesn’t matter big time really I guess. I can still share them with you. I hope that you like them.
The theme for the Bloghop was colouring. Stampin’ Up! have a great number of choices for colouring with the Inkpads, markers, Blends, Watercolour Pencils and now the Brusho Crystals. So many choices what should I do?? I am no way an expert in colouring but I have been trying my hand at it a bit recently. I decided in the end to go with the Stampin’ Blends.
I used a technique you might have seen around a bit. The Black Magic technique. It’s an oldie but a goodie. It’s colouring over White heat embossed images. You can use pencils or the markers.
STEPS TO CREATE YOUR BLACK MAGIC CARDS
Of course you can use a multiple of colours for your images but I thought for this particular image one colour worked better. I made a set of cards in 4 different colours.
To create it:
1.First stamp your image on black card in versamark and heat emboss with White Embossing Powder. Don’t forget to use your Embossing Buddy to help reduce the little stray specks. 🙂
2. Allow to cool slightly and then colour over it with the Stampin’ Blends. I went over the image twice to intensify the colours.
3. I coloured some of the White Organza Ribbon with the Stampin’ Blendsto match and layered it on a strip of the Silver Foil.The sentiment was stamped on the coloured card and cut with the Stitched Shapes Framelits and that was raised up with Dimensionals.
4. The black card was adhered to a piece of Silver Foil. TIP: cut the centre from the foil so you can use it for something else. It is only getting hidden after all. Before you adhere this piece to your card base stamp your card base with the “earphone” image in the set in the same colour as the card.
This Epic Celebrations set is one of the free choices for Sale-A-Bration. Have you got your set yet? It’s great for the young teen cards.
So I hope you like this “epic” set. Thanks for stopping by.
I have some exciting news to share with you tomorrow so stay tuned.
I think this is my favourite card. I really like how it turned out. Can I say that?? Sometimes I am hesitant to say that about something I have made. But I like the effect of it and I have to say it is just chance really. When you use these Brusho Crystals you don’t know how it will work.
The butterfly is from A Beautiful Dayset. For the sentiment I masked the first word in the sentiment from the set to just stamp the “thinking of you” and heat embossed it in white.
To find out how to create this effect I have a video for you.
So what are your thoughts on the Brusho Crystals? Have you tried them? Do you think now you might give them a go? Let me know what you think. I would love to hear.
Just a reminder that my 15% off the Brusho Crystalsends at 8pm tonight. If you want to grab them and save money on then just drop me a comment or email me and I will get that sorted for you. Included is an information sheet to help you use your set of Brushos. I hope you will give them a try. I don’t think it is the last you will see of these from me.
Thanks for joining me in this. I hope you have had a great weekend.
What did you think of yesterday’s project?? I have a another project for you today.
We saw yesterday creating a background with the background. They are really fun to use them that way. This is another type of background. I don’t have a video for this one but I will walk you through it.
CREATING A BACKGROUND WITH THE BRUSHO CRYSTAL COLOURS
On this card I have used Shimmery White card and I have added the Brusho to dry card.
On your card sprinkle over your Brusho Crystals. I added the Brilliant Red in the right hand corner, a small amount of the Gamboge in the centre section and the Yellow on the left. Use the Spritzer and lightly spritz the card with water. It’s always magical watching the crystals dissolve and the colour emerge. It’s one of those moments like heat embossing. Do you feel that?? 🙂
Take your time and just play and watch what happens. You may want to spritz more or you may want to add more crystals. The “speckly” effect is created by sprinkling with the Crystals and only spritzing lightly so they are more spots than actually blended if that makes sense??
Leave your card to dry.
Once dry you can assemble the card. For this one I stamped the flowers from Birthday Blossomsin the corner and the sentiment at the top. I was going to stamp the sentiment and raise it up and I think I should have done that but never mind it’s more to see the Brusho effect. I love the thin White Organza ribbon. So soft and pretty to tie. The base card is Flirty Flamingo. It worked out a good match for it even with using the Red on the card. The bird from Birds and Blooms Thinlits were cut in Silver Foil.
Thanks for stopping by for this one. Come on by tomorrow. I think I have left my favourite until last.
We start today! I am excited to bring these projects to you for our Brusho Long Weekend. I have been playing with these Brushos (as I commonly call them) for the past few weeks. Each day over the next 3 days I will bring you a fun new project with a video and tips. I hope you enjoy them. Plus don’t miss out on the Special bonus savings this weekend if you are an Australian resident.
Warning: These Brushos are fun, addictive and at times messy. 🙂
DAY 1
My first project is creating a simple background similar to this one I have shown on this Dragonfly card.
Here is a video to create a washed out effect but I have also written a description below with a few tips.
NB.The above card was made a few weeks ago as I was still experimenting. For the card above I used watercolour card and sprinkled over the powder with the card dry and then wet it. It does give a slightly different effect. On watercolour card the colour doesn’t run as well. You can create a background like this or how I have in the video.
In the video: I chose to use Gloss cardand wet the card with the Aquapainter before I added the Brusho Crystals as the water enables the Crystals to spread easier.
Sprinkle over some Brusho Crystals lightly on your card after you have wet the card. I have used the Prussian Blue. You only need a small amount and for this technique I would keep it to one colour.
Spritz the card with water. Tilting the card will help make the colour run. Spritz lightly with more water if you think it needs more or you can sprinkle over more colour if need be. When you are happy with the effect, leave the card aside to dry. Once dry you can assemble the card.
On the card above I stamped the Dapper Denim base with the dots from the Dragonfly Dreamsset. A dragonfly was cut from the Detailed Dragonfly Thinlits in Gold Foil.I stamped a few of the dots from Timeless Textures in Versamark on my coloured card piece and heat embossed them in gold. The paper is from the Eastern Palace Specialty Designer Series Paper.
Just a note on the sentiment:I masked part of the sentiment from the Dragonfly Dreamsset and inked it with versamark. After I stamped it on the Dapper Denim card I heat embossed it in gold. It was cut with the smallest framelits in the Lots of Labels Framelits. I added a few loops of the Gold Thread behind the sentiment.
I hope you like this project. Each time you do it the effect will be different.
Come back tomorrow for a second project.
Grab 15% off your Brusho Crystals this weekend. (ends Sunday 11th 8pm). Details below. Includes an information sheet on ways to use your Brusho Crystal Colours.
It’s coming this weekend. It’s a Brusho Crystals Long Weekend and I am inviting you to be my guest.
I have been busy experimenting, preparing, creating and videoing ready for you. I have 2 face-to-face classes happening tomorrow and Saturday but I have some projects to share with you too. It all starts on my blog here tomorrow so be sure to stop by. If you haven’t already subscribed to my blog to get updates then click on the link in the right hand bar so you won’t miss out on the updates.
So what do I have in store?
I have 3 projects to share with youincluding some videos of different ways to use the Brusho Crystal Colours. The projects I share will be different to the ones I am doing in the classes but they will be special.
In addition, I have a special on the Brushosfor Australian residents only. (sorry folks!).
**Receive 15% off the price. RRP is $52 Take off $7.80 Weekend price = $44.20 (+S&H). This is for Australian residents only. Special not available in store. Contact me directly. Includes an information sheet on using your Brusho Crystal Colours. Offer ends 8pm Sunday 11th Feb.**
Watch It Wednesday’s and Wednesday’s WOW! are back for 2018. I have decided to combine them both in to Wednesday’s WOW! Each Wednesday I will bring you a stamping WOW! It might be a video, a tip, a product that has caught my attention or a special project. I hope you enjoy these episodes. You never know what I might uncover.
Today we have Wednesday WOW! #13.
Do you find sometimes you go through a catalogue and see a stamp or maybe a die set and think Mmm? Maybe? But it doesn’t really do it for you. I found that with the Sale-A-Bration setHeartfelt Blooms. Another flower set and the flowers weren’t all that exciting. What do you do with a stamp like that???
Well! I have been watching this little sleeper over the last few weeks and I have to say I am quite surprised with what this stamp can do. Firstly, this stamp is a different type of stamp. It is a “distinktive” stamp. Meaning that the stamp lays down the ink at different opacities. So you get different depths of colour. It gives a Photographic finish. Clever!
Stampin’ Up! have recently released a Youtube video highlighting this stamp. I was impressed. I thought I would share it with you if you hadn’t noticed it.
What do you think of this stamp? I would love to see some of your cards using this set. Why not email them to me and I might just share them here. (I might event send out a random prize of some handmade cards). I have just got this set so I look forward to playing with it.
There are so many different ways that people have used this set. Some people have coloured it with pencils, or with ink and daubers. They have cut and layered the flowers. If you want some inspiration, I have put together a Pinterest Board with this set. Head on over -> HEREto see them.
Now this stamp is a Free one. Really! Grab this as one of your Free Sale-A-Bration choiceswhen your order reaches $90 AUS. Available in Wood and Clear Mount. See it in store now -> HERE.
I was stumped this week for the Colour Inkspirations challenge. I love green and I use a lot of green but to use all these colours together was hard.
I tried a couple of different things and it just wasn’t working. This card was maybe the 4th stamped attempt. I went back to my 3rd attempt and ended up finishing up with this. Still not sure. It’s simple which is what I do but it’s just not enough I think. Anyway, I thought I would show you.
The lady from Beautiful You is stamped in each of the greens and then the centre filled with the pattern in the Sahara Sand. I used the Sahara Sand marker to fill in the hat.
The “dots” are from Timeless Textures. They were stamped in the Sahara Sand and then I stamped some with Versamark and embossed them in Gold. The sentiment and Banner is from Happy Birthday Gorgeous. I wrapped around some Gold Thread before adhering the card to a piece of the Bubbles and Fizz DSP. That worked well. The little flower is from theSprinkles of Life set and punched with the Tree Builder Bunch. That was an afterthought this morning when I looked at the card again in the light.
So nothing fancy and I didn’t have a lot of time this weekend. But I am putting it out there to have a go right. 🙂
I have been having lots of fun playing with the Brusho Crystal Colourslately. I will show you some of the projects over the next week or 2 but today I want to tell you about this week’s class for the local Peeps. And I have a special offer for the Brushosthis week whether you come to the class or not.
BRUSHO MAGIC CLASS
The Brusho Crystal Coloursare magical to work with. Just add water and you have incredible backgrounds and colours.
This weekend’s class we will be creating magic. These are the 2 cards we will make.
Along with these 2 fun cards we are making we will try out a few more ways to use them.
All materials included. Bring your own scissors and adhesives.
Friday 9th February 10am OR Saturday 10th February 2pm. WHERE: East Corrimal. (address given when you reply). COST: $15
RSVP: Wednesday 7th February.
BRUSHOS WEEKEND SPECIAL.
For next weekend only(available if you come to the class or not) Receive 15% off the price. RRP is $52 Take off $7.80 Weekend price = $44.20 (+S&H). This is for Australian residents only. Special not available in store. Contact me directly.