cards, Catalogues

MOUNTAINS AND TREES WITH THE WATERFRONT SET!

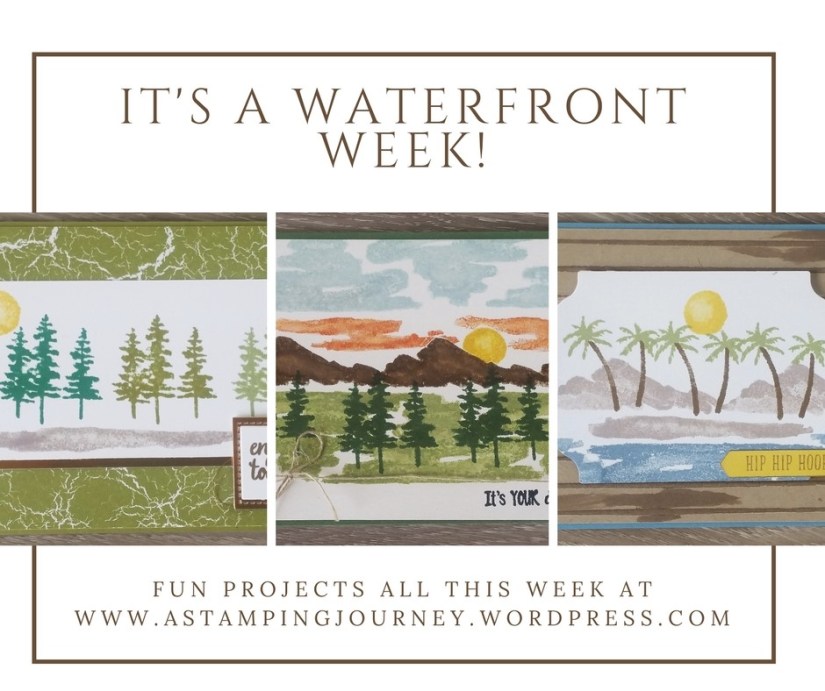
Welcome to my Waterfront Week.  I am showing you projects with this great, versatile set all week.

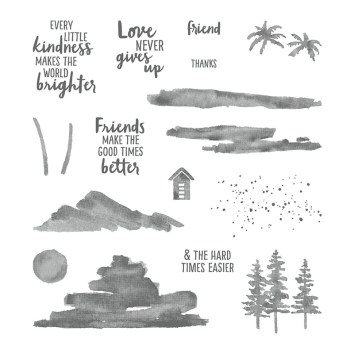
You will find in the set there are a mountain shape, a circle (for sun), trees, a little hut and then there are a few squiggly shapes.  It’s only up to your imagination what  you do with them.

When I first start with a stamp set I have a look around Pinterest for ideas.  It’s always good to CASE a card first to get a feel for the set (ie.  CASE = Copy and Share Everything).  Stampers are good sharers. 🙂

The first card I created with this set was simply stamping the images.

This card was CASED from Helen Read in the UK. You can find her original card -> HERE.

This is a simple scene with the mountains, trees and the lake.  The sentiments are really lovely in this set too.  I finished it off with some Linen Thread.

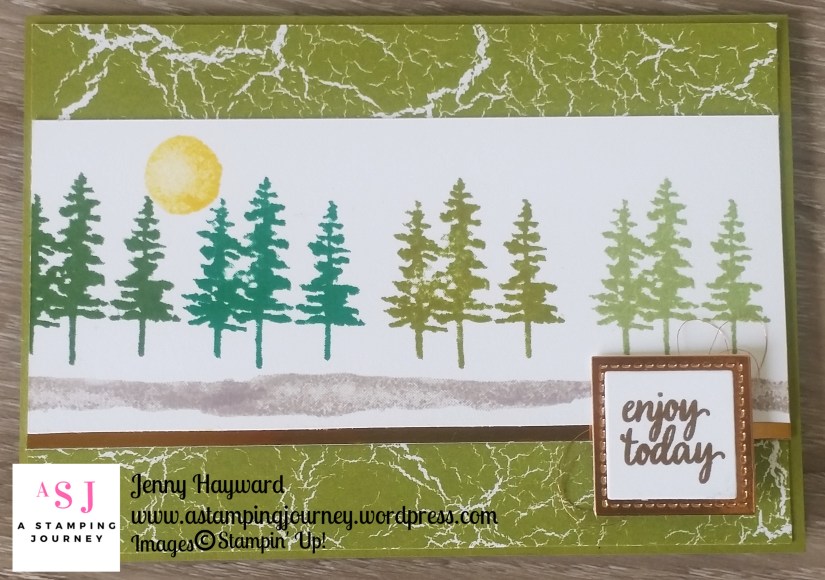
Another idea I saw from on Pinterest by Su Mohr. You can see it HERE. was stamping a line of trees in greens.  I took that idea and created this next card.

The colours I used for the trees are Garden Green, Emerald Envy, Old Olive and Pear Pizzazz.  I stamped the “ground” in Crumb Cake.  Under the white card I added a strip of Copper Foil before adhering it to the paper from the Color Theory Designer Series Paper Stack.  I think this paper has been feeling a little bit neglected lately.

Sentiment is from Eastern Beauty set and stamped in Soft Suede.  The white card was cut from the Smallest Framelit in the Layering Squares set then adhered to a square cut in Copper Foil using the Stitched Shapes Framelits.  I don’t know why I bother putting these Framelits away really.  I used them all the time.

More with this set tomorrow so stop on by.

Jenny

Don’t miss a blog post.  Subscribe to my blog to get updates as soon as I post them.  Click on the link in the right hand column. 🙂


cards, Catalogues

CHARMING CAFE IN BERRY BURST!

A few weeks back I shared a number of cards using the Charming Cafe Bundle.  If you missed them you can head back -> HERE and also HERE.  There were a number of cards as well as a video on some tips in using this bundle.

I realised I had missed this card.  I didn’t show it at the time as it needed some modifications and I have only got back to it recently.  So here you go!

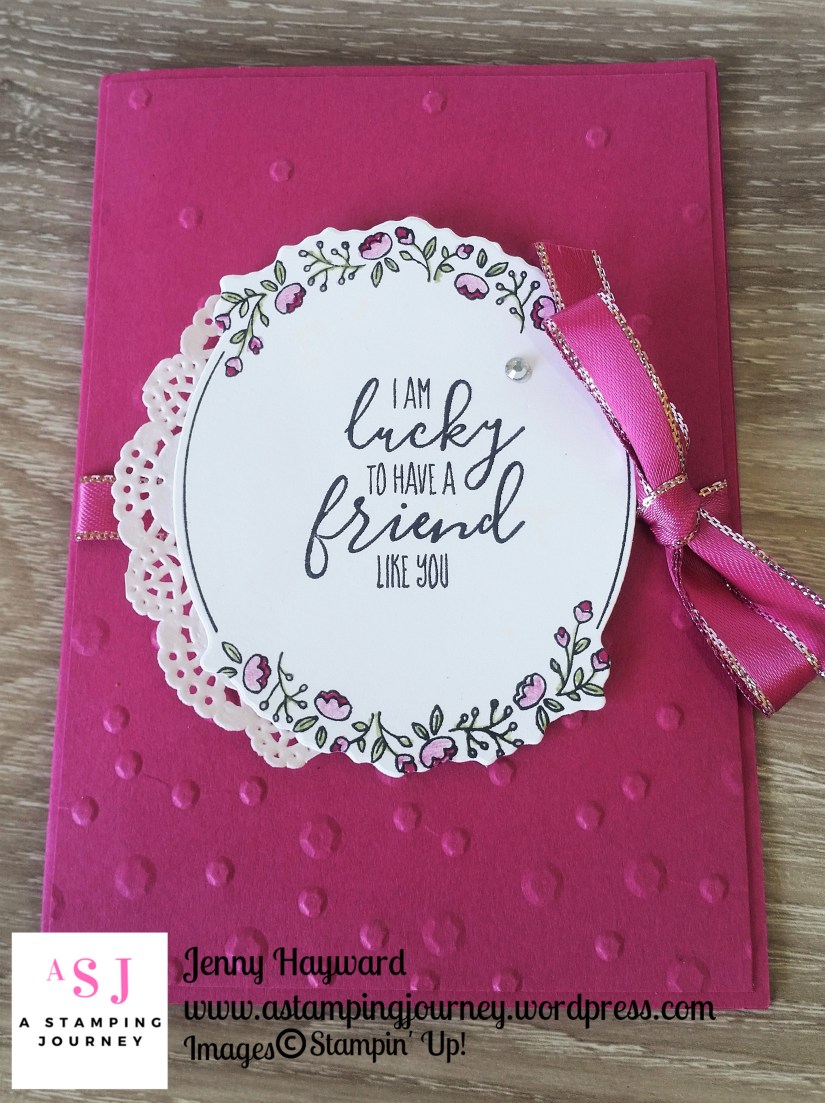
I embossed a separate piece of Berry Burst with the Scattered Sequins Embossing Folder.  I think this folder is a little hidden in the catalogue and you can skim right past it.  You can find it on Page 13.   Some of the gorgeous Berry Burst Metallic Edge Ribbon was wrapped around the piece before it was adhered down to the Berry Burst card mat.  The flower wreath was stamped on to white and the sentiment was stamped in the centre.  I coloured the flowers with the Markers.  To be honest, I think it would have been nice to stamp the flowers again and cut them and raise them up off the piece.  You can try that on your version yourself.

I think I may have added a little Wink of Stella to add some sparkle.  I felt it wasn’t finished so just tucked a piece of Paper Doily under the left hand side very carefully as I had already stuck it down with Dimensionals.  Bling to finish is an essential on most of my cards. 🙂

This is a simple card but isn’t that sentiment lovely?

I have been having lots of fun with the Waterfront set this week so stay tuned for a week of Waterfront next week.

Have a great weekend,

Jenny

You can find the Charming Cafe Bundle in my store now -> HERE.  $88 W   $75.50 C

cards, Catalogues, Sale-A-Bration, Stampin' Up!

WEDNESDAY’S WOW #16 – BLOOMING BASKET BUNDLE!

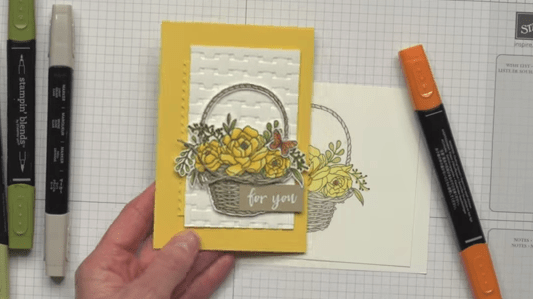
You have probably seen the new release Sale-A-Bration items especially the Blooming Basket Bundle.  I have just received this bundle so I was interested to see what can be done with it.  I thought I would focus on this bundle for Wednesday’s WOW! today.

I came across this video from Stampin’  Up! that highlights this set and shows some gorgeous ways to colour it.  I will share the cards featured in it further below.

Isn’t this colouring gorgeous???

How do you feel about cutting around the basket?  Just a tip in cutting the handle:  If you snip the handle down near the flowers on one side it is much easier to cut inside the handle area.  Then when you adhere it down you can tuck the handle back behind the handle and no one will even know.  Saves so much aggravation. 🙂


How clever is this idea in the card below?  Snip the flowers and leaves off the basket and add them to the card in a different way.  Gorgeous!!!

Now I am excited to play with this bundle.  Stay tuned to see what I get to do.

Jenny

You can grab this bundle FREE as a Level 2 Sale-A-Bration choice.   Which means for orders from $180 AUS you can pick up the stamp set and the Basket Weave Dynamic Embossing Folder.  Do you still need to stock up on card and ink?  Head to my store -> HERE, shop away and then remember to select your Sale-A-Bration choice. 

Please use the Host Code this week: SBZEJCNH

3D projects, Blog Hops, Catalogues, Stampin' Up!, Tutorials

ESAD BLOGHOP SALE-A-BRATION 2018!

Today I am joining in on a Bloghop with lots of other demonstrators in Australia and New Zealand in the ESAD Facebook group.  (ie Extra Special Australian and New Zealand Demonstrators.  We are all special though!).  We are focusing on Sale-A-Bration.  You might be starting here or might have come from Melinda’s blog -> HERE.  Either way, enjoy the fabulous creations along the way. 

Firstly, what is ESAD.  Let’s get that out of the way.
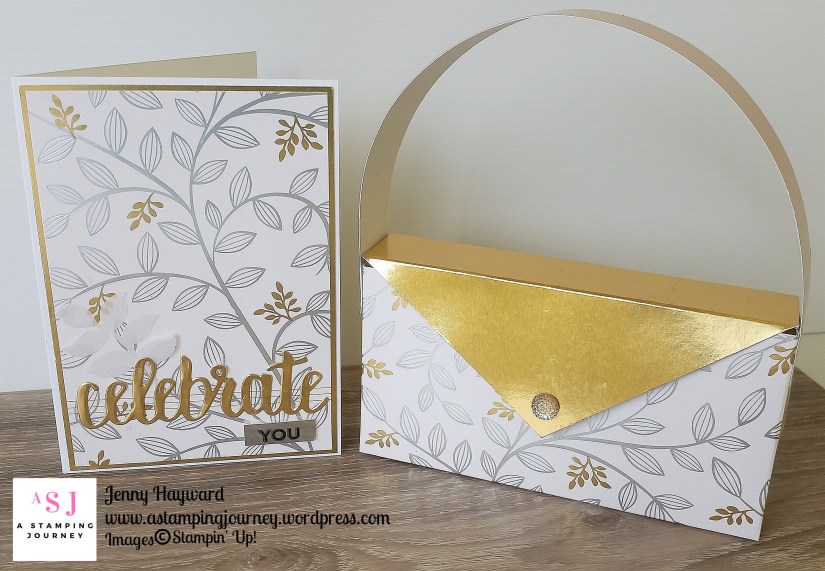
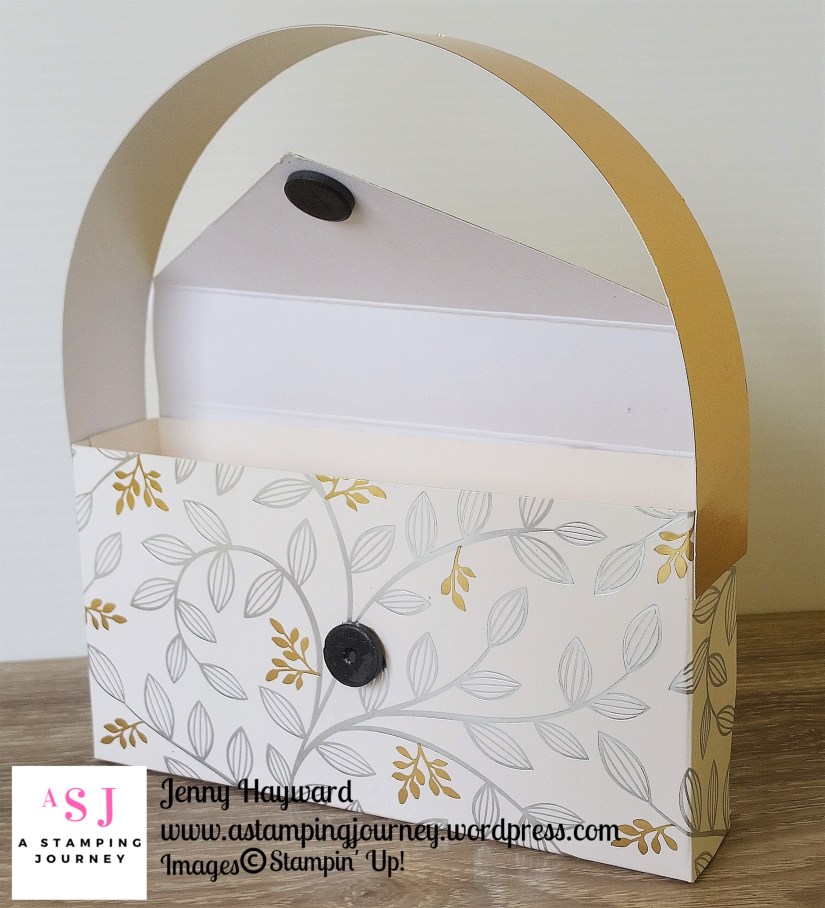
I am loving the gorgeous new Springtime Foils Specialty Designer Series Paper that has just become available for the second release for Sale-A-Bration last week. You have already heard me go on about it.  🙂  Anyway, I thought a CLASSY CLUTCH BAG AND CARD was in order with this gorgeous paper!!

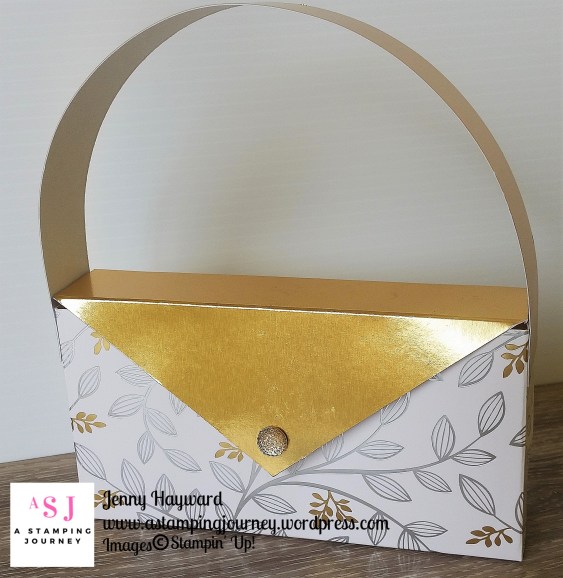
What special gifts you could fill in this clutch bag. It’s a good size for chocolates, a small gift, makeup???? So many different gifts for a very special occasion.  I will show you how to make the clutch bag further below.
———–

Firstly, the card.
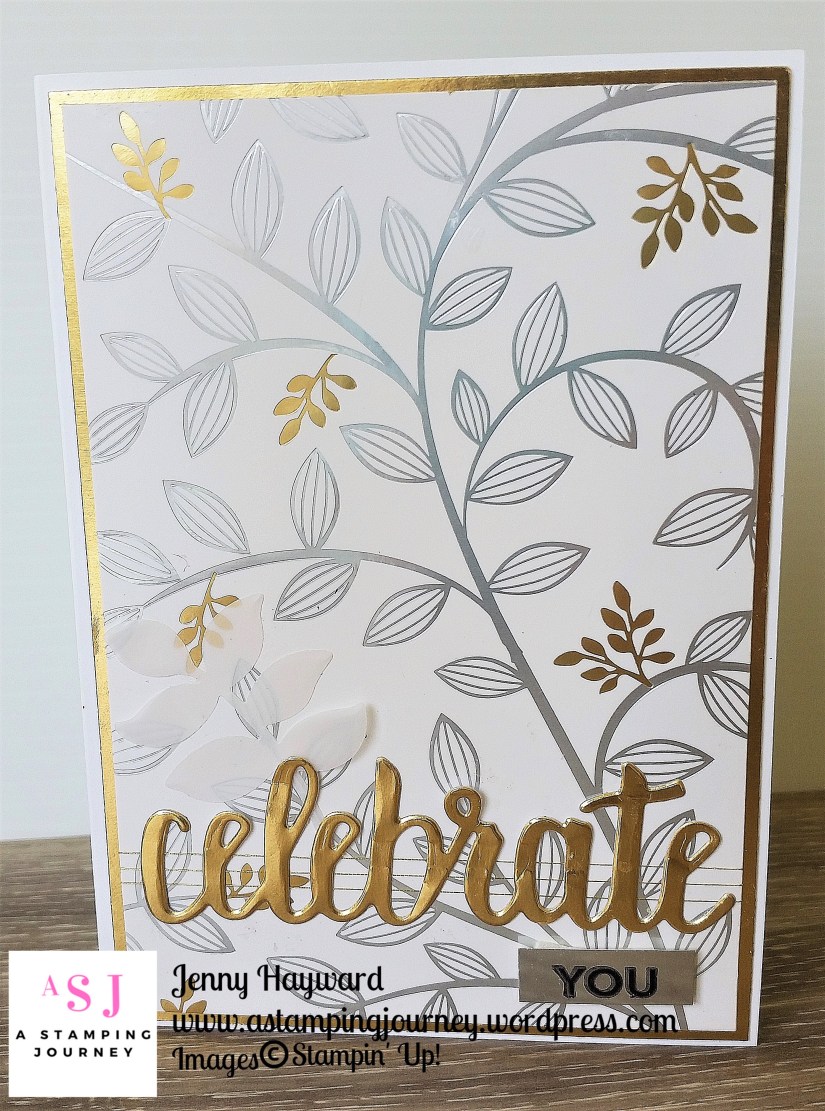
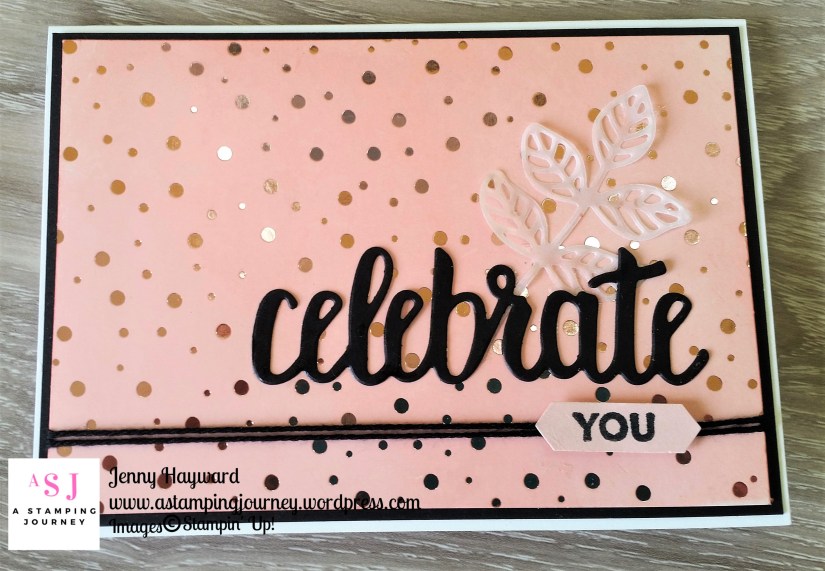
Really, you don’t need to do too much when you add this gorgeous paper to a card.

Firstly I wrapped some Gold Thread several times around the bottom section of the paper.  Then adhered this piece to a Gold Foil mat and then adhered them both to a Thick Whisper White card base.  The “celebrate” is cut from the Celebrate You Thinlits from Gold Foil.  Another bonus choice for Sale-A-Bration.  It is hard to tell but I stamped the “YOU” on to a small piece of Silver Foil in Black Stazon.  I also added a small Vellum leaf under the “celebrate”.  This is from the Eclectic Layers Thinlits set.

MAKE A CLUTCH BAG FOR A SPECIAL GIFT

I originally made this bag back in 2010.   You can see that version -> HERE.  I have been wanting to create it again for some time so this was a great opportunity.

This is the front view.
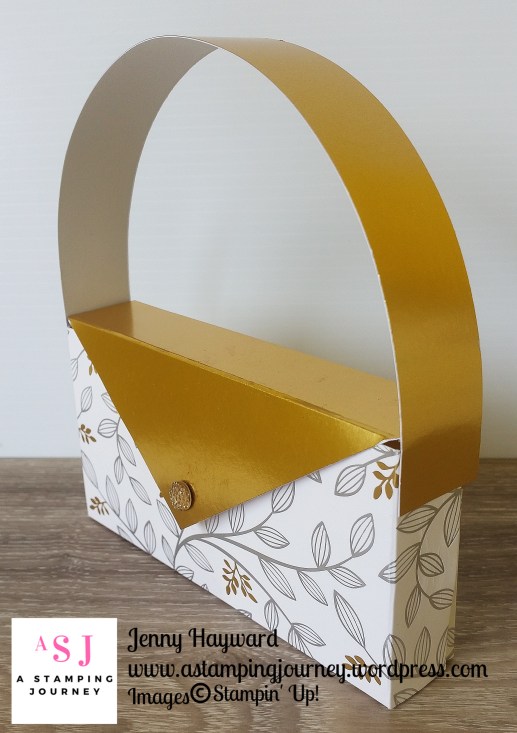
And we have the side view.
To make your clutch.

NB: Measurements are in Metric and Imperial. (please check the Imperial measurements in scrap card to check. It’s always a good idea to test run your projects beforehand anyway).

1. Cut a piece of the Springtime Foils Specialty Designer Series Paper (or other card of choice) to 19cm x 20cm (7 1/2″ x 7 7/8″).  NB: Check the pattern of your piece is running the way you want it to.  The 20cm side (7 7/8″) is the front/back.

Score on the 19cm (7 1/2″) side at 8cm and 11cm (3 3/8″ and 4 5/16″).

Score on the 20cm (7 7/8″) at 2.5cm and 17.5cm (1″ and 6 7/8″).

2. Cut up the tabs on the side to meet the score line.  Fold on the score lines. Fold up to form a box and then you can see where to place your adhesive.

Add adhesive to your tabs.  Fold up and adhere together in the box shape.

3.  Create your handle. Cut a strip of the Gold foil for your measuring 3cm x 30.5cm (approximately 1 1/4″ x 12″).  TIP:  I ran this piece along the edge of the table a few times to help curl the card strip.  Place adhesive on the ends of the strip and adhered this to the sides of the box.

4. Create your flap for you bag.  From Gold Foil cut your piece 15cm x 10.5cm (6″ x 4 1/8″).  Score on the 10.5cm side (4 1/8″ side) at 5.5cm and 8.5cm (2 3/16″ and 3 3/8″).  Cut the front flap to a triangle if you like.  To do this mark the edge of the Foil piece at 7.5cm (3″) which is the mid-point.  Then cut from the point to the side of the card where the score line meets on both sides.  See the photo to show how it would look. 
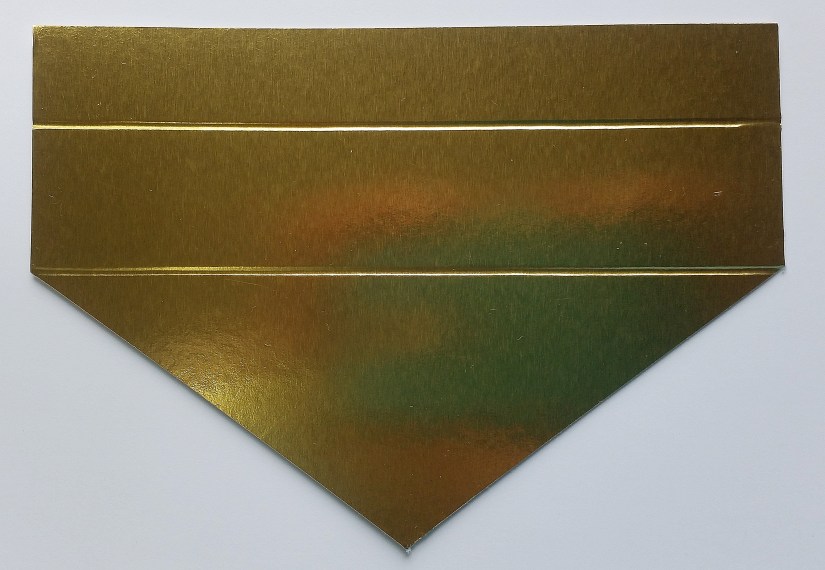
5. Place adhesive on the inside edge of the narrow tab. Adhere this to the back of the bag.

6.  I used magnets to hold the bag closed.  Place a magnet on the underside of the front flap.  Then line it up and place a magnet on the front.  I would have preferred to have the magnet inside the bag and I tried several times but the magnets weren’t strong enough for the card thickness.  Maybe your magnets would be better. 🙂
I hope you like this project.  I can imagine it in so many different papers but this paper is just so gorgeous.

Thanks for hopping.

 

 Now you are off to Lou’s blog -> HERE.


Here is a list of participants if you get lost.

Blog Hop Participant List

  1. Lou Kitzelman
  2. Sandra Mastello
  3. Courtenay Heuston
  4. Ellen Woodbridge
  5. Cheryl Algie
  6. Peta Stephen
  7. Nicole Wilson
  8. Maree McIntosh
  9. Kristel Rimmer
  10. Libby Dyson
  11. Leonie Schroder
  12. Jessie Holton
  13. Megan Lenske
  14. Delys Cram
  15. Rachael Lewsley
  16. Kim Oliver
  17. Sharon Dalton
  18. Melinda Whittington
  19. Jenny Hayward


Catalogues, Sale-A-Bration, Stampin' Up!

WHAT’S NEW FOR SALE-A-BRATION!

I mentioned last post of 3 gorgeous new products for the 2nd release of Sale-A-Bration.  I showed the beautiful Springtime Foils Specialty Designer Series Paper.  I have more to share with that paper don’t you worry.  Today though let’s talk about these lovely products.  Also, just a reminder of what Sale-A-Bration is all about.


1) Eclectic Expressions – a fun stamp set with spots, dashes and other shapes along with “Happy Birthday” and “Thank you”.  Available as a FREE choice with a minimum order of $90.

2) Springtime Foils Specialty Designer Series Paper.  Just Gorgeous! 12 sheets of 12″x12″ paper.  3 each of 4 designs with Silver, Gold, Rose Gold and Copper embossed patterns.  Available as a FREE choice with a minimum order of $90.

If you missed the post yesterday about colouring this beautiful paper then be sure to jump back a post.  Stay tuned for more projects though with this paper.

3) The gorgeous Blossoming Basket Bundle.  With a beautiful stamp set the Blossoming Basket and the Basket Weave Embossing Folder.  This bundle is available as a FREE choice with a minimum order of $180.

What do you like the look of?  It really is hard to choose though isn’t it.

You can see all the Sale-A-Bration choices -> HERE.

SALE-A-BRATION UPDATE

Just a reminder of what Sale-A-Bration is if you are unsure.  It runs until 31st March and you get the Free products.  

HOW?

With every qualifying order (either $90 or $180) you choose a free item from the Sale-A-Bration choices.  
See them all -> HERE.

Step 1: Pick a Date.
Step 2: Invite your friends for a fun time out creating.
Step 3: If you like, choose your projects or theme.
Step 4: Let’s stamp.

It’s that easy!  And if people choose to order and orders are over $400 you can an extra $40 to spend on free products.  Let’s make a date.

If you love the products and love Free stuff this is for you!  Pay $169 for $235 of products of your choice (save $66),  Plus choose an additional 2 free stamp sets up to $174. (Bonus!).  Plus there is no shipping. (saving again).

So $240 of free products PLUS save on shipping.

Come and join me on my JEN’s INK team whether you just want the free stuff, you want the discount each time or you want to share stamping with others.  Either way it’s a WIN!
Ask me if you have any questions or I can send you an Information Pack. (For Australian residents only)

Thanks for visiting today.  I hope your weekend has been great.  Until next time.

Jenny

Need some stamping supplies?

You can order online directly in my store -> HERE. Australian residents only.   This week’s Host Code: 6NRCJVMT
OR
Order by emailing me directly.
cards, Catalogues, Techniques, Tutorials

EXTRA GORGEOUSNESS FOR SALE-A-BRATION WITH THE SPRINGTIME FOILS PAPER!

The gorgeousness just keeps on coming for Sale-A-Bration.  Yesterday was the 2nd release of fantastic, beautiful new free choices that you can receive with your qualifying orders. I think you will love them.  I do. 🙂  If you haven’t seen them yet then I will show them to you in the next couple of posts.

Today I want to show you the gorgeous Springtime Foils Specialty Designer Series Paper. To be honest it really doesn’t do it justice in the catalogue but you can see them in this image.

Last week I shared a video on my Facebook page showing the sparkle and shine of this paper.  It truly is just gorgeous!  If you didn’t see it head to my page -> HERE and scroll down a little to see it.  You really must.

Today I was playing around with it.  I have seen some images of it this past week inking it so thought I would give it a whirl.  I have to say it just lifts the gorgeousness to a whole new level.  This is the finished card I made.

I posted a video on Youtube of how to colour this gorgeous paper.  It was a very quick video but might give you some idea.

Here it is for you.

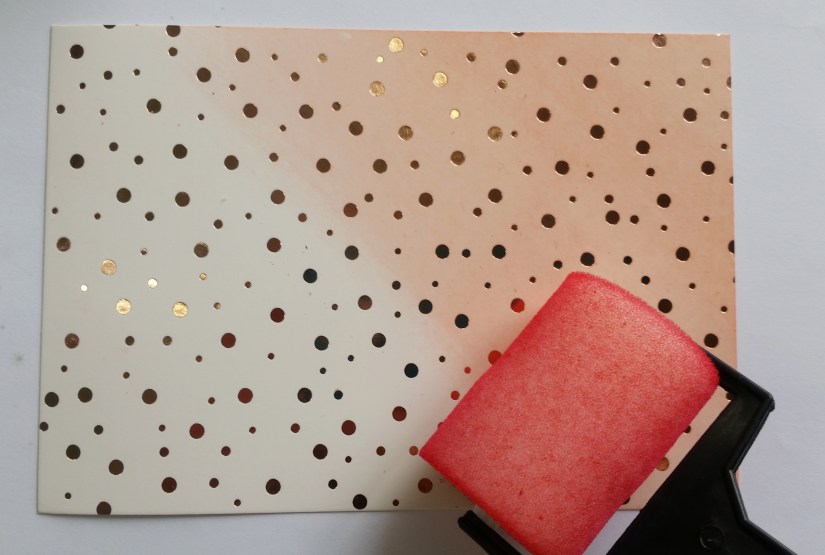
If you like a visual of this then it is simply a matter of rolling over it with your sponge roller and inkpad.  It does take some time but it is worth it.  I did dab some ink on with my inkpad too.  You can do that if you get a bit impatient. Then roll over it with the roller to smooth it.

On my card to finish I cut the “celebrate” from the Celebrate You Thinlits and added the “YOU” stamped on Powder Pink.  I found that a better match with the inked paper in the end.   I finished it off with some Black Baker’s Twine and cut a vellum leaf from the Flourish Thinlits.

Hope you like it? I really think you need this paper.  It is a free choice now added for Sale-A-Bration when you have a minimum $90 order.  It doesn’t take much to get to $90 by the time you grab a stamp set and stock up on your paper and adhesives.  What about the sponge rollers?  Do you have them?

I look forward to playing more with this paper so stay tuned.

Have a great weekend,

Jenny

IN AUSTRALIA? 

You can order these products and any other Stampin’  Up! products in my store -> HERE now.  Please use the Host Code this week: 6NRCJVMT


3D projects, Catalogues, Stampin' Up!, Tutorials, Videos

THERE IS “LOTS TO LOVE” ON VALENTINE’S DAY!

I showed you in yesterday’s post the cute Flip Top Treat Box using the Lots To Love Box Framelits.  Here it is if you missed it but you can jump back to the last post though too and see more of it and the instructions.


This is actually a cute little Framelit set but there were parts that I wasn’t sure what they were used for.  Like those little tiny arch shaped dies down at the bottom of the image below???

I found this video from Stampin’ Up! explaining the pieces and showing some great projects.  I thought for my Wednesday WOW! #14 this week we will take a look at this set.  Very timely today being Valentine’s Day right. ❤  It does work well with the matching Sure Do Love You stamp set too.

That explains everything!

You can grab the Framelits in my store now -> HERE $57 AUS or grab the bundle and use them together.  Clear mount stamp set is $84.50 AUS  See that -> HERE.

Aren’t these projects pretty? These are from the current Occasions Catalogue and shows how gorgeous the products are especially with the beautiful Painted with Love Specialty Designer Series paper. SO much prettiness!

Thanks for visiting me today.  Always nice of you to drop by whether you are from near or far.  I hope your day has been a great one.

Until next time.

Jenny x


cards, Catalogues, Techniques, Videos

BRUSHO LONG WEEKEND DAY 3 – A SPECKLED BUTTERFLY!

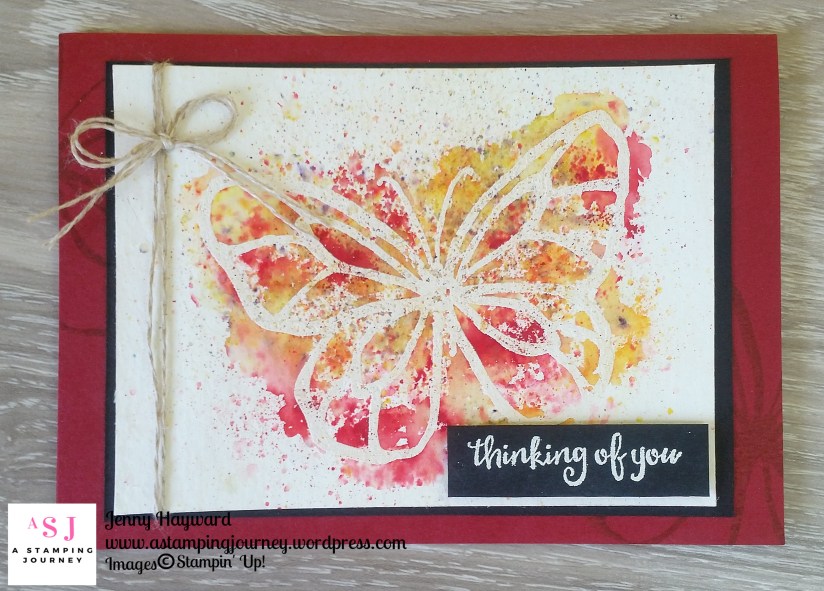
I think this is my favourite card.  I really like how it turned out.  Can I say that??  Sometimes I am hesitant to say that about something I have made.  But I like the effect of it and I have to say it is just chance really.  When you use these Brusho Crystals you don’t know how it will work.

The butterfly is from A Beautiful Day set.  For the sentiment I masked the first word in the sentiment from the set to just stamp the “thinking of you” and heat embossed it in white.

To find out how to create this effect I have a video for you.

So what are your thoughts on the Brusho Crystals?  Have you tried them?  Do you think now you might give them a go?  Let me know what you think.  I would love to hear.

Just a reminder that my 15% off the Brusho Crystals ends at 8pm tonight. If you want to grab them and save money on then just drop me a comment or email me and I will get that sorted for you.  Included is an information sheet to help you use your set of Brushos.  I hope you will give them a try.  I don’t think it is the last you will see of these from me.

Thanks for joining me in this.  I hope you have had a great weekend.

Jenny

cards, Catalogues, Techniques, Tutorials

BRUSHO CRYSTALS LONG WEEKEND – DAY 2!

What did you think of yesterday’s project??  I have a another project for you today.  

We saw yesterday creating a background with the background.  They are really fun to use them that way.  This is another type of background.  I don’t have a video for this one but I will walk you through it.

CREATING A BACKGROUND WITH THE BRUSHO CRYSTAL COLOURS

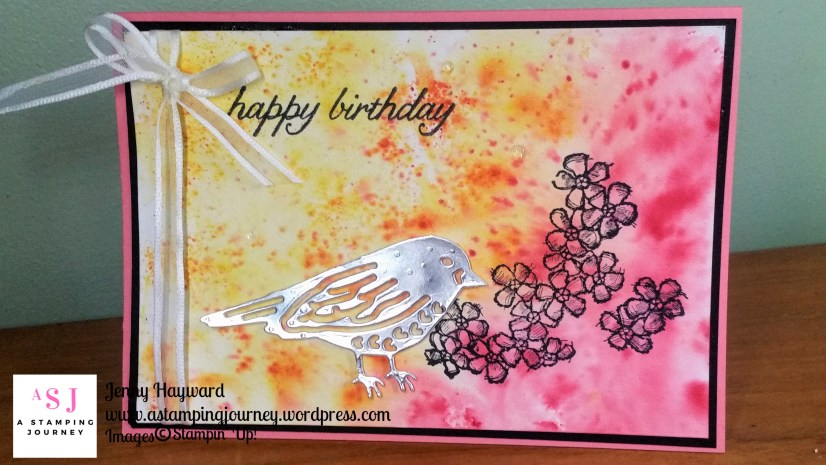
On this card I have used Shimmery White card and I have added the Brusho to dry card.

On your card sprinkle over your Brusho Crystals.  I added the Brilliant Red in the right hand corner, a small amount of the Gamboge in the centre section and the Yellow on the left.  Use the Spritzer and lightly spritz the card with water. It’s always magical watching the crystals dissolve and the colour emerge.  It’s one of those moments like heat embossing.  Do you feel that?? 🙂

Take your time and just play and watch what happens.  You may want to spritz more or you may want to add more crystals.  The “speckly” effect is created by sprinkling with the Crystals and only spritzing lightly so they are more spots than actually blended if that makes sense??

Leave your card to dry.

Once dry you can assemble the card.  For this one I stamped the flowers from Birthday Blossoms in the corner and the sentiment at the top.  I was going to stamp the sentiment and raise it up and I think I should have done that but never mind it’s more to see the Brusho effect.  I love the thin White Organza ribbon.  So soft and pretty to tie.  The base card is Flirty Flamingo.  It worked out a good match for it even with using the Red on the card.  The bird from Birds and Blooms Thinlits were cut in Silver Foil.


Thanks for stopping by for this one.  Come on by tomorrow.  I think I have left my favourite until last.

cards, Catalogues, Stampin' Up!, Techniques, Tutorials, Videos

IT’S ALL ABOUT THE BRUSHOS THIS WEEKEND + GET15% OFF!

It’s coming this weekend.  It’s a Brusho Crystals Long Weekend and I am inviting you to be my guest.

I have been busy experimenting, preparing, creating and videoing ready for you. I have 2 face-to-face classes happening tomorrow and Saturday but I have some projects to share with you too. It all starts on my blog here tomorrow so be sure to stop by.  If you haven’t already subscribed to my blog to get updates then click on the link in the right hand bar so you won’t miss out on the updates.

So what do I have in store?

I have 3 projects to share with you including some videos of different ways to use the Brusho Crystal Colours. The projects I share will be different to the ones I am doing in the classes but they will be special.

In addition, I have a special on the Brushos for Australian residents only. (sorry folks!).

**Receive 15% off the price. RRP is $52    Take  off $7.80    Weekend price = $44.20 (+S&H).  This is for Australian residents only.  Special not available in store.  Contact me directly.  Includes an information sheet on using your Brusho Crystal Colours.  Offer ends 8pm Sunday 11th Feb.**

So stop by tomorrow for our first project.

Jenny