cards, Classes, Stampin' Up!

PETAL PALETTE TRIO CLASS ON THIS WEEK!

The Petal Palette is a gorgeous bundle that I have recently started playing with.  We will be focusing on this set in class this week.  I have added an additional time so hopefully you can come. 

Create 3 beautiful cards using the gorgeous  Petal Palette set.  These cards were inspired by some lovely cards I found on Pinterest. 

Here is a sneak peek.

Class details:  Do check for the additional class time added.
Friday 13th April 10am       RSVP: Wed 11th
Saturday 14th April 2pm     RSVP: Wed 11th
****AND NOW
Tuesday 17th April 7pm   RSVP:  Sunday 15th.
All classes are held in my studio in East Corrimal. RSVP by emailing me at jghayward@yahoo.com
COST:  $20  BYO: adhesives and scissors (an additional $5 is charged to use my adhesives)
**WEEKEND SPECIAL:   Order the Petal Palette Bundle (CM $108) and receive 20% off  COST = $86.40 + Shipping ($5.40)   TOTAL = $91.80.  Discount available for Wood mount as well.  Orders can only be made directly through me not online.

PS. Isn’t it a gorgeous set. 🙂


cards, Classes, Techniques

BRUSHO + EPIC CELEBRATIONS!

Just over one week left of Sale-A-Bration now.  I still have a number of cards to share with you using these fun, free Sale-A-Bration items.  So this next week we are cramming them all in.

This Epic Celebrations set is so cool and such a good set for the “teens”.

The stamped and coloured sneaker piece was made a few weeks ago now when I made the coloured set.  You can see that post -> HERE.  This piece was left over when I was testing the results.  I thought it would be worth keeping and using.  To make that I stamped the sneaker in Versamark and then heat embossed in White powder.  After it cooled a little I went over it with the Dark Pumpkin Pie Stampin’  Blends.  The black card piece was then cut with the Stitched Shapes Framelits.

I have shown you some Brusho Crystals backgrounds in the last couple of posts too.  Since I had a piece of the inked Brusho samples lying around still I thought I would add that to the card.  They seemed to match in well.  To create this piece I sprinkled over some Shimmery White card with the Yellow Crystals and the Gamboge colour.  Then the piece was misted with water with the Spritzer.

To finish the card, I embossed a piece of white card with the Brick Wall Embossing Folder.  Then the piece was stamped with the sentiment from Party Pandas and the “spots” from Epic Celebrations.  The card base is Pumpkin Pie.

———-

***URGENT NOTE ON THE STAMPIN’ BLENDS: 

Due to a huge demand for the Stampin’  Blends over the past few months the supply of these are very low.  New supplies won’t be in stock for some time so Stampin’  Up! have made the decision to make these unavailable to order until late May.  SO, if you want any (or all) and you can’t wait until late May then ORDER NOW – TONIGHT BY 8PM AEST.  I will be finalising an order tonight so contact me OR order online -> HERE.  Please use the Host Code: UUDCYQDV

cards, Catalogues, Classes, Techniques

BRUSHO WITH CHARMING CAFE!

On a previous post I showed you the cute Thank You cards using the Party Pandas and they had a fun Brusho background. (If you missed it then head back 2 posts).

Today I have a similar little card to show you using the Brusho Crystals but this time using the Charming Cafe set.  These little cards are to welcome new members to my team who have joined during Sale-A-Bration.  It’s so nice to have them in the JEN’s INK team. 🙂

Here are a couple of them for you to see.


Aren’t they fun backgrounds?  Each time they turn out different. The pieces were made in my Brusho classes to demonstrate how they work before each class member made their own.  I thought why not use them for these cards rather than waste them.

For these I sprinkled over some Brusho Crystals and I used Glossy card this time.  Then I spritzed lightly with water.  I also tilted the cards slightly so you get the colour run.

The pieces were then adhered to a small card base made with the Thick Whisper White card.  You can make these any size but to give you the approximate size of these.

The Brusho card piece measures 8cm x 12.4cm ( 3 1/8″x 4 7/8″).  The card base is 8.4cm x 24.8cm, scored at 12.4cm.  (3 3/8″ x 7.3/4″ scored 4 7/8″  ** Please check the imperial size measurements beforehand).

The sweet little cafe chairs and table from the Charming Cafe set was stamped and coloured with Watercolor Pencils then cut with the Framelits.  Once I had adhered the Brusho piece to the card base then a vellum circle cut with the Stitched Circle Framelits was lightly adhered to the front.  So you couldn’t see the adhesive I added some dabs of snail adhesive near the centre so it would be covered with the table and chairs.   Then the Table and chairs were raised up with Dimensionals. The sentiment piece is from the Color Me Happy set and simply stamped in Black and cut around.   Before they were adhered down I looped around some Silver Thread.

Just a quick reminder:  Get 2 free stamp sets up to $174 in total when you join the Stampin’ Up! family during Sale-A-Bration.  (only just over a week left).  You might well receive one of these cards when you join my JEN’s INK team (and a little gift 😉 ).  What’s the rest of the story??  Order up to $235 of products and pay only $169.  No shipping costs either.  Then you get the 2 free stamp sets (all your choice). You get a minimum 20% discount on orders after that.  You have the choice if you do parties or classes.  You have the choice  when (and if you want) to leave.  You have the choice of when and what you do.  So what are you waiting for??  It’s time NOW.  

If you are in Australia and would like to join you can do so right now.  Head to my website -> HERE and click JOIN THE FUN.  Just have your order together first it might save some time.  I can’t wait to send you one of these sweet cards.

Thanks for stopping by,

Jenny

cards, Cards by Mail, Classes, Sale-A-Bration

CELEBRATE SALE-A-BRATION AT CLASS THIS WEEK!

These 3 months have flown by so quickly and Sale-A-Bration is coming to an end! I can’t believe it.  This week’s class we will be giving one last love to some of the products.

Come and Celebrate Sale-A-Bration.

If you are a Wollongong local come and join in.  Can’t make it because of time or distance?  Order the kit for $15 (stamped images not included).

We will be making 2 cards and a small slider gift box.  (Thanks for some amazing demonstrators for the inspiration for these). You can choose Pool Party or Flirty Flamingo (pink).  Advise me the colour when booking.

Here are the details.

WHEN: Friday 23rd March at 10am or 7pm

COST: $15   (advise me of colour choice either Pool Party or Flirty Flamingo).
             Plus an additional $5 if using my adhesives.
             NB: eggs aren’t included.

BYO: Scissors and adhesives.

RSVP: Wednesday 21st March.

I look forward to seeing you there.

Jenny

cards, Classes

WATERCOLOURED LAKE WITH THE WATERFRONT!

Continuing on with Watercoloured landscapes scenes I have this card to share with you.  This card is one we will be doing at classes this weekend  but I thought I would share it with you.  I found this landscape scene on Pinterest and thought I would try to recreate it.  See what you think of the card with the original photo??

I used the Waterfront set to create the mountains and land and stamped the trees.  The lake and the sky are watercoloured with the Inkpads and Aquapainter.

Here is the finished card.

I kept the card simple.  With these cards you don’t want to cover up all the scene with a big sentiment or lots of fuss.  The sentiment is from Sprinkles of Life.

I have 3 sessions of classes this weekend so I hope they enjoy making this card and another 2.  I wish you could join us. 🙂

I will be back tomorrow though with another card.  This one is back to some simple stamping with the set.

Jenny

cards, Classes, Stampin' Up!, Tutorials

LOOKING THROUGH THE CAVE WITH THE WATERFRONT SET!

Today I am following on from yesterday’s post with watercolouring the Waterfront set.  If you missed yesterday’s post and video then be sure to head back a post.

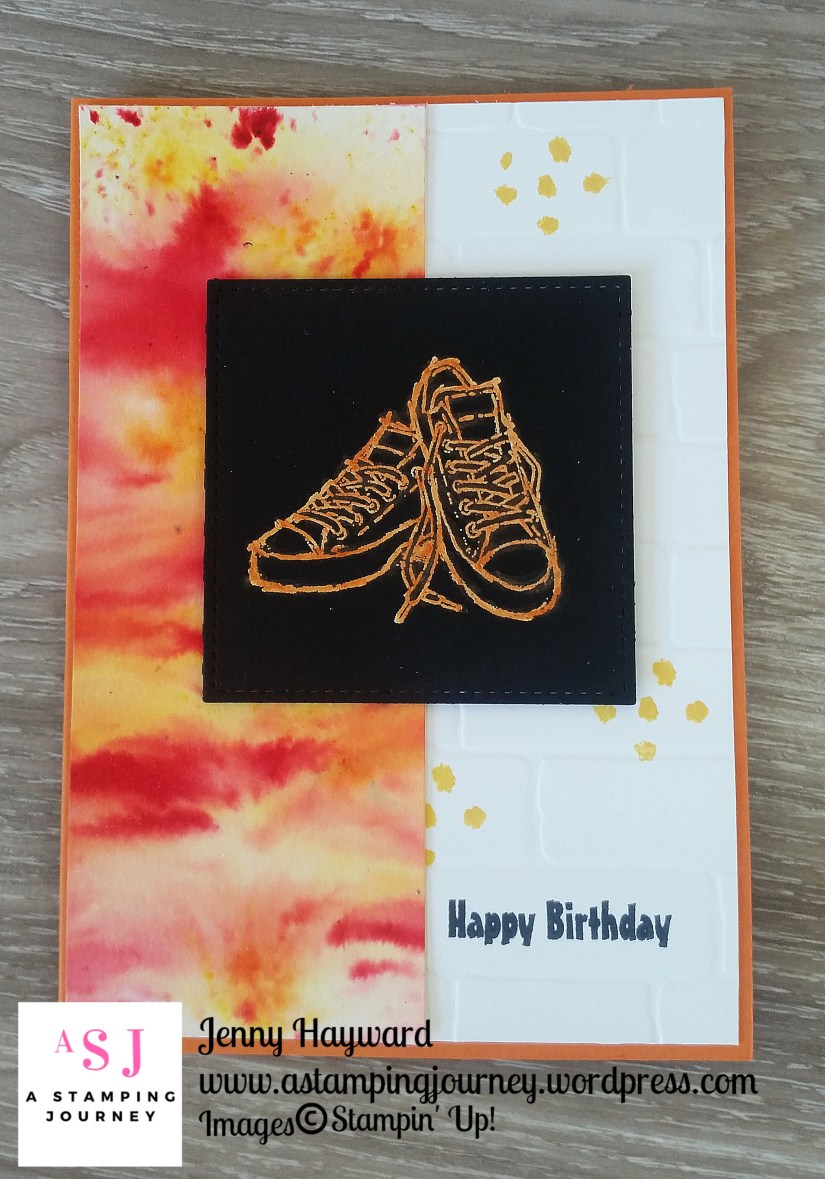
I have another card created in the same way that I had made last week.  I shared it on Facebook and Instagram and received lots of comments.  I hope you might like it too.

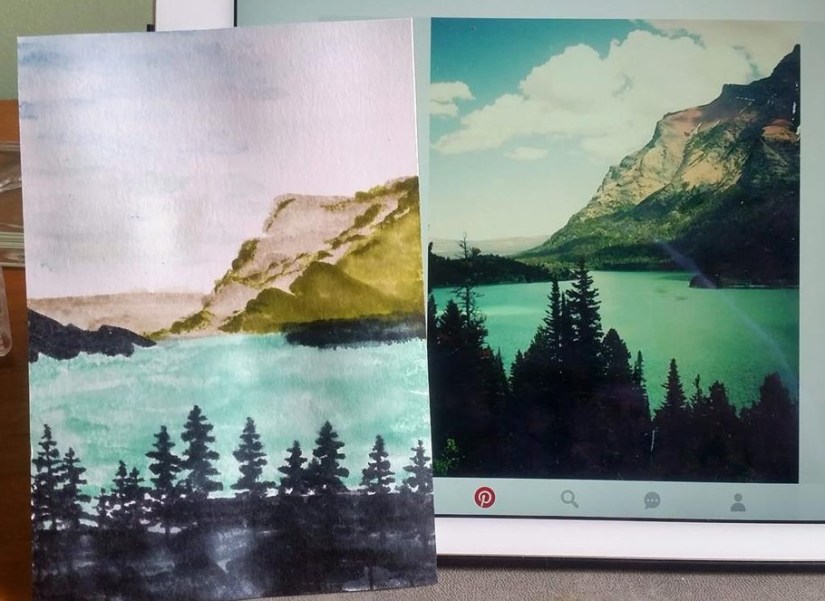
Firstly, I did a search on Pinterest for landscapes to find some inspiration.  There is a lot let me tell you.  But this image particularly jumped out at me I think because of the colours and it was a little different to the “typical” scenes you might be seeing using the Waterfront set.  This is a photo from the Flinders Ranges in South Australia.

So here is the image with the card I created trying to recreate it.

Here is a closer photo for you.

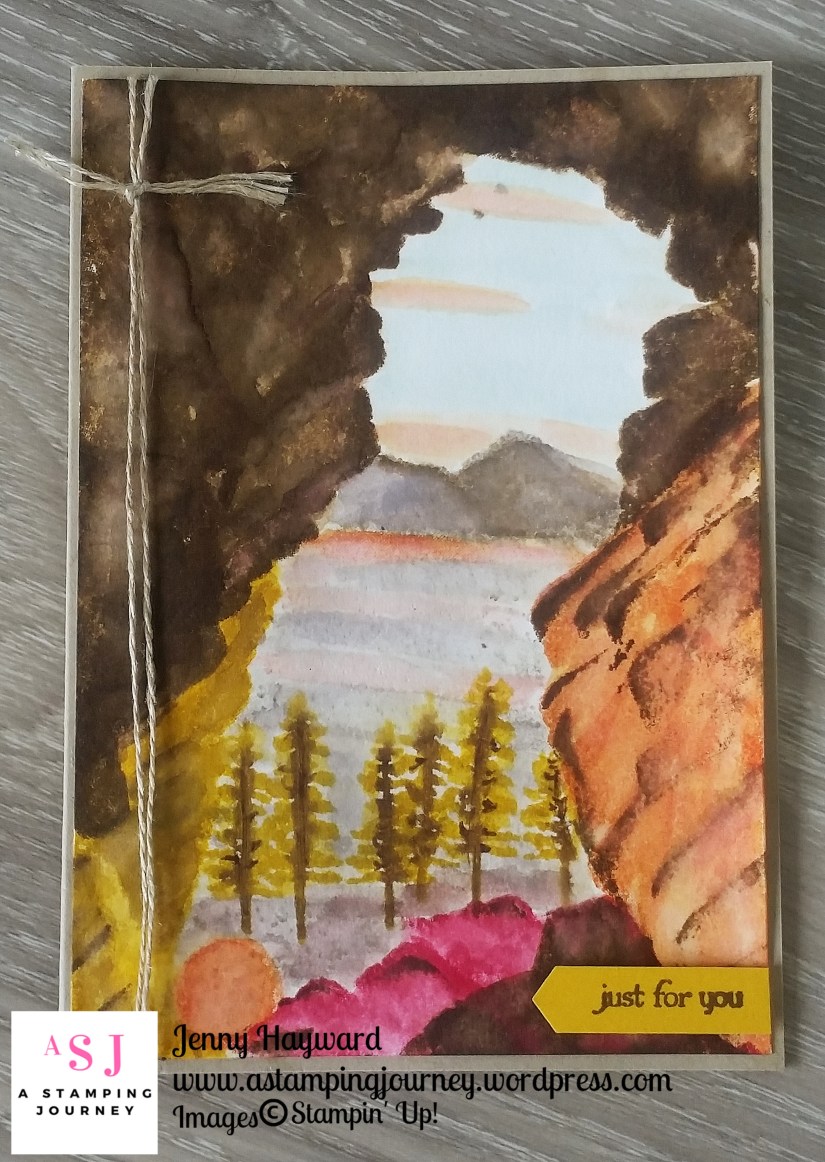
I was pleased with the result but it took some time to create.  Like 2 hours!!  I won’t share step-by-step but I will point out some tips for you to create your own.

TIPS TO RECREATING THIS CARD

With any of the watercoloured images I have created I start with the right mid-point of the card.  For this one I worked around from this edge in a clock wise direction and filled in the centre last.

I used Shimmery White card.  I prefer to use that card as it doesn’t have the textured surface that watercolour paper has.  You do use the Aquapainter but it’s only a small amount.

The inks I used are Tangerine Tango, Soft Suede, Crumb Cake, Rose Red, Crushed Curry and then for the sky and land I also used Soft Sky and Blushing Bride.

For most of the “cave” shape I used only the mountain stamp in the set and twisted and turned it to develop the shape and to fill in the areas of rock. I used the Aquapainter to blend the ink regularly after I stamped.  I think this is what took most of the time.

The right hand rock surface looked orange when I looked at it on the Ipad which is why I did it in orange tones but when I looked at the print-out of the scene it looked more red. Oh Well! Artistic interpretation right. 😉

I will show you how I added the edge marks on the rocks down below.  I have used this a lot now on different scenes I have done.

For the sky I watercoloured some streaks with the Blushing Bride ink and the Aquapainter and then filled in the rest of the area with the Soft Sky ink.  For the centre ground area I watercoloured areas of Blushing Bride and Crumb Cake.

For the trees I inked them up in Crushed Curry and then use the Soft Suede marker to colour the tree trunks and part of the branches.

After I finished it and it dried I wanted to keep the card simple.  I wrapped around some Linen Thread and adhered that on to a Crumb Cake base. The sentiment is from Teeny Tiny Sentiments.  I wanted to keep that small so not to cover too much of the image.

Create the edge marks to create depth/shadow

Firstly stamp your mountain image on your card.  It will depend on what you are creating as to how they would be positioned.  For this one to create the rock wall I stamped the mountain stamp a few times down the side of the card.  On the sample below I have just stamped this twice to give you an idea.

Ink up your mountain stamp again on just the tip of the peaks.  To do this take your stamp on to the inkpad not the inkpad on to the stamp.  Tilt the stamp so just the edge of the stamp will be inked. For this one I inked the tip in Soft Suede.

Position the stamp over your pre-stamped mountain shapes and stamp down.  Just the tip will be inked.  You will do this several times over your project.

I have done this too when I wanted a grassy edge to a mountain top by stamped the tips in Old Olive.

——

So what do you think?? I would love your thoughts.  If you create one do share with me.  I would love to see it.

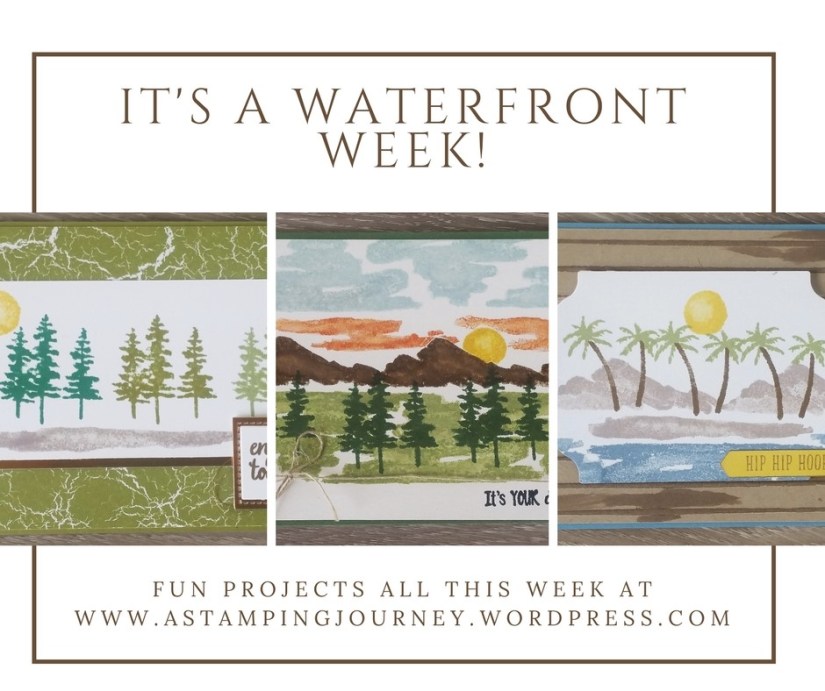
Hope you are enjoying the projects for Waterfront Week.  There is still more to come.

Have a great day,

Jenny

Have you got your own Waterfront set yet?  If you are in Australia, you can grab it in my store now -> HERE.  Please use the Host Code this week: SBZEJCNH

As a Bonus this week: receive 4 x A4 sheets of Shimmery White cardstock PLUS a tutorial for an exclusive project.  


cards, Classes, Stampin' Up!

IT’S A WATERFRONT WEEK!

All this coming week I have some fun projects for you using the Waterfront stamp set.  I have been playing with this set this past week and there is more to this set than you might think. I hope you will join me this week as I share projects and tips to create with this set.  I can’t wait to share them with you.

It all culminates next weekend with my WATERFRONT WOW! class in the studio for my local peeps where we will be creating some special projects in class.

So be sure to stop on by this blog.  If you haven’t subscribed already be sure to click in the tab in the right hand column so you don’t miss out.

———–

For my Local people.  Here are the details for the WATERFRONT WOW! Class.  Be sure to book early as places are limited on this one.

WHEN: Friday 9th March at 10am OR Saturday 10th March at 2pm.

WHERE: In my studio in East Corrimal (Wollongong).

COST:  $20  BYO: Scissors and adhesives.  $5 extra to use my adhesives.

Here is a sneak of the projects we will be making.


***Order the Waterfront stamp set this week either online or directly to me and receive 4 x A4 sheets of Shimmery White cardstock PLUS a tutorial for an exclusive project.  

You can order online in my store -> HERE.  Please use the Host Code this week: SBZEJCNH

Thanks so much

Jenny


cards, Classes

STAMP A STACK OF BIRTHDAYS!

It’s great having a card on hand when Birthdays come around –  And we all need birthday cards right!

In a Stamp A Stack you create 6 cards.  We will be making 2 each of 3 designs just right for Birthdays These are just 2 of them.

(cards inspired by Vicky Wright and Jackie Bolhuis)

WHEN:  Friday Feb 23rd   10am or 7pm.

WHERE: East Corrimal

COST:    $15 please BYO own adhesives.  $5 extra to use mine.

RSVP:    Wednesday 21st.

Can’t make it?
1) Let’s make another time with you and a couple of friends.

or

2) Order the card kit. $15.  Includes card cut to size. You can substitute the stamp sets.


I look forward to seeing you.


3D projects, cards, Catalogues, Classes

CHARMING CAFE MAKE AND TAKE!

Last weekend I had my Catalogue Kick Off for the year.  It was so great to get back stamping with my lovely class ladies.  We do have fun.  This is our “therapy”.  I am sure you can relate to that.

We looked at a lot of the new products in the Occasions Catalogue and the excitement of Sale-A-Bration.  Of course we did do some stamping surprisingly. 😉

I thought I would share you some of the fun.  If you are on my Facebook page you might have seen the video I shared.  I am not able to share it here but you can check it out -> HERE if you like.  Just scroll down a bit and you will come across the video.  By the way, Have you LIKED my page yet.  You can keep updated there on some of the excitement.

One of the Make and Takes we did was using the Charming Cafe Bundle.  I shared some tips with using this bundle on a post or 2 back.   You can head back there to check it out.

I kept the card fairly simple for the class.  The images were stamped in Memento Black and coloured with the Watercolor Pencils.  They weren’t watercoloured so it was OK just to use the Memento.   The paper is from the free Bubbles and Fizz Designer Series Paper from Sale-A-Bration.  Just a tip:  Adhere your piece of DSP to the card base BEFORE you cut the window with the Framelit.  Much easier. 😉

The sentiment is from the Thoughtful Banners set.  I love the gorgeous Whisper White Organza ribbon. So soft and beautiful.  It ties so easily too.  You need to get yourself some of that.

The other project we made was using the new Whisper White Narrow Note Cards and Envelopes. You can find these on page 19 in the Occasions catalogue.

I have used the Bubbles and Fizz DSP on these and of course added a cute hedgehog from the Hedgehugs set.

These little cards don’t take long to decorate and they are great for that little note to someone or a good size for a Gift Card. Don’t forget to stamp the matching envelope when you make these.

I made up little gift packs too to thank everyone for coming.  They were a mix of the Bubbles and Fizz paper and the Petal Passion paper.  I added some diecuts from the Celebrate You Thinlits.  The sentiment on the front is from Epic Celebrations.

Of course there is the Lucky Door Prize.  I made up little gift boxes using the Silver Gable Boxes and decorated them with the Bubbles and Fizz paper.  I had some of the new Glitter and Clear Epoxy Shapes, an ink spot and some ribbon.

I will share some samples over the next few posts too so stop by again.

Jenny

3D projects, cards, Catalogues, Christmas, Classes, Masculine, Stampin' Up!, Techniques

SOME FAVOURITE CARDS FROM 2017!

It’s the end of another year.  I have to say I have really enjoyed my stamping this year.  I have tried some new techniques and got involved in some challenges.  It’s been fun!

I thought I would look back at some of my favourite projects from this past year.  Now I did think I would pick one from each month but it was getting too hard.  So I have just picked a few.  If you click on the title you can see more details of the project.

** Apologies in advance: lots of photos. 🙂

Delicate Details Dragonfly

I think the Delicate Details stamp set was my favourite for Sale-A-Bration for 2017.

Multi Stamping for the boys cards

The Nailed It set was great for the boys cards earlier this year.

Carousel Birthday Bendi Card

I have wanted to make a Bendi for a long time so it was great to finally make one.  I must make another one again soon.

Flower Box 

This was the most popular class for the year.

Meeting the 2017 Incolors 

I am still loving Lemon Lime Twist but I seem to use Berry Burst a lot.

Baby Card in a Box

I love making Card in a Box type cards.

A 90th with Oh! So Eclectic

Oh! So Eclectic

Be sure to check the post after this particular post too for more cards with Oh! So Eclectic.

It’s All Weddings

I have had to make lots of wedding cards this year, and still continue to need to make them.

Z-Fold cards with Colorful Season

These Z-fold cards have been hugely popular on my blog these past few months.

Flap Fold Daisy Card

I love this one for it’s different fold.


Black and White Dragonfly Dreams

A different type of fold card I made for a Blog Hop.

Christmas Pines Eclipse

Merry Patterns Half Fold card

This one below was probably my favourite Christmas card though.

UPDATE: To make it easier for you I have a collage below ready to PIN of some of the favourites.  PIN this and it will bring you back to this post later.

So what’s your favourite from this year?

What would you like to see more of?  I would love to know.

Thanks for sharing this journey with me this year.

To lots more creating and sharing in 2018.

Jenny