cards, Stampin' Up!, Techniques, Tutorials

A FLAP FOLD DAISY CARD!

This card I am showing you today was actually the first card I made with the Daisy Delight Bundle.  Usually my first couple of cards with a new set I turn to Pinterest and CASE a card.  I liked the idea of this card.  It is a Flap fold card.  Just a little different to the standard card.  I CASED it from Janet’s blog HERE.  I will give you the measurements shortly.  Janet has just the imperial measurements for her card but I will give you the Metric as well as the Imperial. First I guess you want to see the card.

Isn’t the Delightful Daisy Designer Series Paper just gorgeous??  On the top flap I stamped the Daisy in Calypso Coral twice and punched them out.  They were layered together and off-set slightly.  The centre was stamped in Pool Party and punched with the 1/2″ circle punch. I stamped the leaves in Old Olive for the outline and the solid image.  These were hand cut. The Daisy was then layered on a circle cut with the Layering Circle Framelits in Pool Party and then a larger one with the Stitched Shapes Framelits.  

The sentiment is from the Happy Birthday Gorgeous set. I made a discovery when I cut the sentiment out using the Straight banner die from the Bunch of Banners Framelits.  I cut the white card which I had stamped the sentiment on and it had left the centre where that was stamped but also a banner frame. So I cut another Banner in Calypso Coral to create a frame.  Cool trick!

Here is the inside of the card.  Just a simple “happy birthday” from the Happy Birthday Gorgeous set.

I think I have to make some more of these cards.  Do you want to make one?  Here is how.

FLAP FOLD CARD

Metric: Cut an A4 sheet of card lengthways in half.  This will measure 29.7cm x 10.5cm.  Score on the long side at 10.5cm and 14cm.

Imperial:  Cut standard card lengthways to measure 11″ x 4.25″.  Score at 2″ and 7.5″.

Your Designer Series Paper pieces for the front panels are cut just slightly smaller.

Thanks for visiting.  Have a great weekend,

Jenny

cards, Catalogues, Classes, Stampin' Up!

BOGO SALE ON THIS WEEKEND IN WOLLONGONG!

I have to get rid of all this stuff and I need you to help me out.

I am selling off all my retired Stampin’  Up! products.  It’s a BOGO Sale. For every $1 you spend you receive the same Free of new stuff from the new catalogues.  How cool!

Here is a little tour to show you what you can see at the sale.

Stamps
Christmas
Bundles
Big Shot
Handmade boxes and cards

If you are in Wollongong come along.  Help me get rid of all this!

Saturday 9th 2pm – 3.30pm and Sunday 10th 2.30-3.30pm

If you are not local, stay tuned.  I will list what I have left after the weekend.

Jenny


Catalogues, Christmas, Classes, Stampin' Up!, Workshops

MERRY PATTERNS CHRISTMAS SET FOR FREE!

What do you think of this Merry Patterns Stamp set?? Pretty cool Hey!  It’s a special free bonus during September and October.

If you hold a cardmaking event whether it is a party, private card class, catalogue order or even your own order (Ssh! I won’t tell), and the total of the orders are over $450, it is your’s for Free!  

It wouldn’t take much to get to that amount with everyone keen to get started on their Christmas cards and a fantastic Holiday Catalogue released today.

Who do you think you could invite over to make cards?? I am sure you can think of a few people.  Invite them over, I show some ideas and we all make cards and sit and have coffee and –  not get interrupted by family members … 🙂  Grab a date and let me know so I can book you in.  Can’t wait!!  I always love sharing cardmaking with others.

To show you just some of the ideas you can create with this set here is a group of projects created by Stampin’  Up! artists.  Such a diversity!

I look forward to creating cards together with you and your friends. Book me in ASAP.

Jenny


Catalogues, Christmas, Stampin' Up!

A NEW CATALOGUE IS HERE. GET READY FOR CHRISTMAS!

September 1st always brings excitement.  The start of Spring. YES!  Although it has been a mild winter really.  What I am really excited about also is …

THE  HOLIDAY CATALOGUE IS LIVE AND YOU CAN NOW ORDER AND IT IS ALL GORGEOUS AND WONDERFUL AND BEAUTIFUL!!!   🙂

I have mailed some catalogues out recently but if you still haven’t got one, drop me a comment or email and I will get one to you ASAP,  because you just have to see it for yourself.

I have picked a few favourites from the catalogue.  

This was one of my first choices.  I think because it is just a bit different.

Brightly Lit Bundle  $72

You don’t need to add much to a card with the gorgeous Thinlits in the set.

Night In Bethlehem Bundle  W $95.25    C $83.50

A great one for Aussie Christmas cards. Beachy Little Christmas   W $49   C $35


Are you a cat person or a dog person?? I am a dog person. I know a few people who will love this punch. I think it will be very popular.

Cat Punch $31


I am interested to try these Foil Sheets. How gorgeous!  Maybe some elegant Christmas boxes??  Champagne Foil Sheets $7


View these and many more gorgeous products in the catalogue now.  View it online -> HERE

To order:

Contact me directly by email or phone

OR 

Order online -> HERE   Please use the Host Code: HSVFAXRX

Visit tomorrow when I have some sweet cards to show you,

Jenny


cards, Catalogues

HAPPY BIRTHDAY GORGEOUS!

I have another card for you using the Happy Birthday Gorgeous set.

This card was CASED from Marcy Denning on a Facebook group I am on. I couldn’t find a blog for her sorry.

Berry Burst and Lemon Lime Twist are such a lovely combination aren’t they?

For this card; stamp some outline flowers in Berry Burst diagonally across the white card mat, then stamp the solid flower in Powder Pink. Add some Lemon Lime Twist leaves to some of the flowers.  Adhere this to a Berry Burst card mat and then a Thick Whisper White Card base.

The sentiment from the Happy Birthday Gorgeous set is stamped and then cut with the Stitched Circle Framelits using Black Stazon.  Then give a little wash over the sentiment with the Aquapainter and some Powder Pink ink.

Cut a Scallop Circle with a Layering Circles Framelits in Berry Burst and adhere this behind the Stamped circle.  For my card I added some loops of Silver Thread to the back of the circle before adhering it to the card with Dimensionals.

I hope your weekend has been great??  I have been at a Craft Show all weekend and had lots of fun talking to people about stamping and making a card with some of them.  Hope you have had some crafty time yourself.

Jenny

cards, Catalogues, Personal Ramblings, Stampin' Up!, Workshops

CELEBRATING 9 YEARS WITH STAMPIN’ UP!

9 years ago today I joined Stampin’ Up! I really can’t believe it!

I thought I would share my journey in discovering Stampin’  Up! all those years ago.  I hope you don’t mind.

I remember that first workshop I went to. All I knew of stamping was messy kids stamps but I went because I was just starting to make cards. Well! I was so impressed! It was all so beautiful, the colours, the stamps, oh! and the heat embossing. So magic! I was hooked.

I remembered feeling so overwhelmed though. Where do you start? So I bought the stamp set we used Seeing Spots and some card and ink. When I got it though I had no idea what to do. It sat for a while on my desk. There was no Pinterest then and I didn’t know about Google searching. I was not tech savvy to search too much for that.

I eventually had a go with the products – with interesting results.  Today in celebration I thought I would share my cards with you. I think we know each other well enough now for me to put myself out there and to give you a little chuckle.

Aren’t they lovely?? 😜

I used my Seeing Spots set. The white card has the spots heat embossed I think. I added a few little extra embellishments that I had. Haha! I think I have improved over the time. I hope so anyway??

It took 18 months before I actually joined Stampin’ Up! though after that first workshop. My husband was diagnosed with Cancer and life changed. Thankfully after treatment he made a full recovery.  Then I joined Stampin’  Up! and began my creative journey.  I have met some amazing people along the way and many have become good friends. I love that Stampin’  Up! has brought us together whether they are fellow demonstrators or customers.  Also I love that I have made friends near and far.  I think I now have friends in nearly every continent of the world.  How exciting and richer my life has become.

I started this blog not long after I joined. I had no idea of blogging  but I wanted to share my journey with stamps and ink, hence why I called this blog “a stamping journey”.

So THANK YOU for sharing in my journey. I hope I have inspired you along the way. I look forward to sharing many more projects with you in the future.

To another year of stamping. 🙂

Jenny

If you would like to make your own journey with Stampin’ Up! Then ask me more. I have a growing team and love supporting you whether you are a hobby demonstrator for the discount or to share your own journey in classes and workshop.  If you want to know more then you can head to my Join my Stampin’ Up! Team page HERE and look at ’10 reasons why you need to be a part of the Stampin’  Up! family’  – Jenny 


3D projects, Stampin' Up!, Techniques, Tutorials

MORE 6″x6″ TREAT HOLDERS!

Yesterday I showed you some more Z-fold cards and they had little treat holders.  I thought I would share with you how to make those particular ones.

Firstly, the Dapper Denim Napkin fold.

These are one of the easiest, quickest treat holder you could possibly make.  I used to make them a lot when I was younger but had forgotten about them until recently.  They are a good size to fit a small chocolate treat in.  Here is how to make them.

Of course, you can make these any size you like.  The principal is the same.  Just be sure that your paper is square.

For this particular version I used the Color Theory paper stack in which the piece measures 6″x6″ (15.2cm x 15.2cm).

NAPKIN FOLD TREAT HOLDER

1. Fold your paper piece in half diagonally.

2.  With the fold towards you, take the left hand corner and fold it to about the mid point on the paper on the opposite side.  See the photo below to see what I mean.

3. Fold the right hand corner so it overlaps the last fold and for the point to reach the mid point on the opposite side.  Place a little adhesive behind the folds to help it stay closed.

4. Take the top point and fold just one layer down over the 2 folds. Place adhesive behind it to keep it closed.

Add a tag or embellishment as you like.  For this version, I used the Dapper Denim marker over just the “smile” word in one of the sentiments from the Colorful Seasons set.  Cut that with the Stitched Oval Framelits.  I stamped a few snowflakes on to the piece too and finished it off by cutting some “snowflake” embellishments from the Layered Seasons Thinlits.

OLD OLIVE MINI BOX

This little mini box is so cute.  You could fit a lipstick or lip balm in it or a small chocolate.  The finished size measures 7cm Wide (2 3/4″),  3.2cm Deep (1 1/4″) and 2.2cm Height (7/8″).

This was made with the Envelope Punch Board.  When I went back to find the tutorial for this I couldn’t seem to find it.  I am sure I used the one by my lovely friend Tanya HERE.  When I made it up again though it was slightly longer.  The tutorial at that link is a paid Tutorial for lots of different sized boxes with the Envelope Punch Board, but for $2 it is not a bad purchase. 🙂  Have a look on Pinterest though for a few other versions.  There are larger ones but I was in keeping with the 6″x6″ paper.

So here are the 4 little treat holders made just with a piece of 6″x6″ paper.  There are so many others too but it is amazing what you can make with such a small piece.

JUST A NOTE: If you want to see the tutorials for the Daffodil Delight bag Head -> HERE (Pootles blog) and for the Berry Burst Bag Head -> HERE.

Enjoy,

Jenny


cards, Catalogues, Stampin' Up!, swaps

RAK CARD SWAP!

I recently took part in a card swap with Demonstrators around Australia.  There were several groups.  I thought I would share the card swaps I received.  This was for the RAK card swap (Random Acts of Kindness Facebook group).

Firstly, this is the card I created.  This was a card I made several weeks ago using the Eastern Palace Suite so I thought that I would make these.  You can see the post for this card HERE. 

So these are the cards I received in return.

Aren’t they great?? 🙂 Perhaps these might inspire you in one of your creating endeavours.

Thanks for looking,

Jenny


3D projects, cards, Techniques, Tutorials

A 90TH OH SO ECLECTIC Z-FOLD!

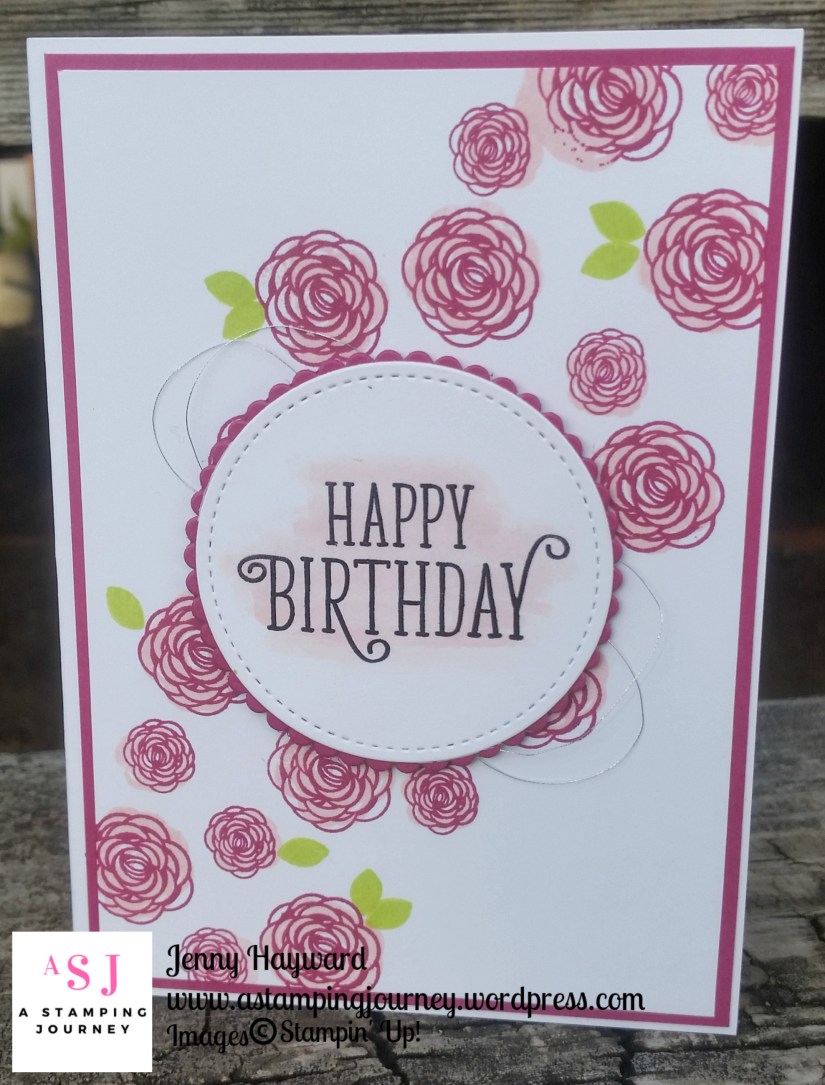
It is my Mother-in-Law’s 90th birthday today.  We had a small family get together yesterday.  I thought I would show you the card I made for her.  She had put in a request for it to be in Berry Burst, her new favourite colour. The pressure was on as she expected a grand creation!   I hope it made the grade.  There were lots of Oohs! and WOW! so I think I might have made the grade. 🙂

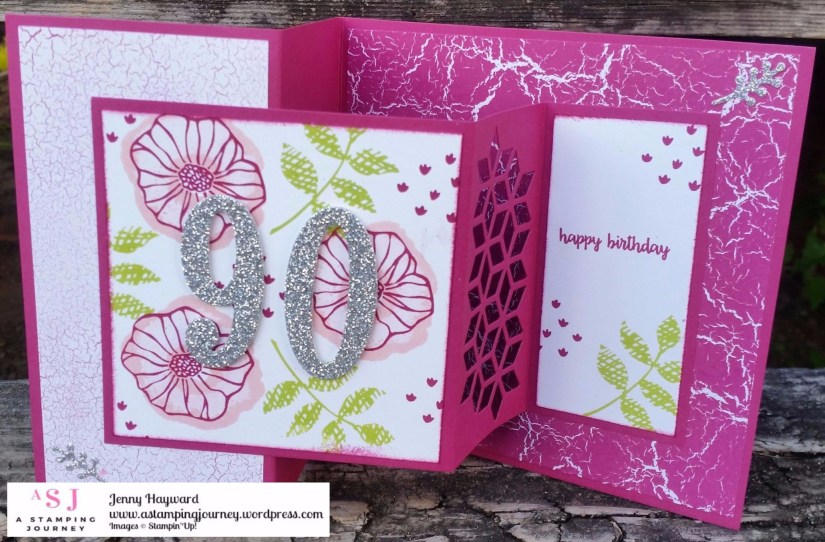
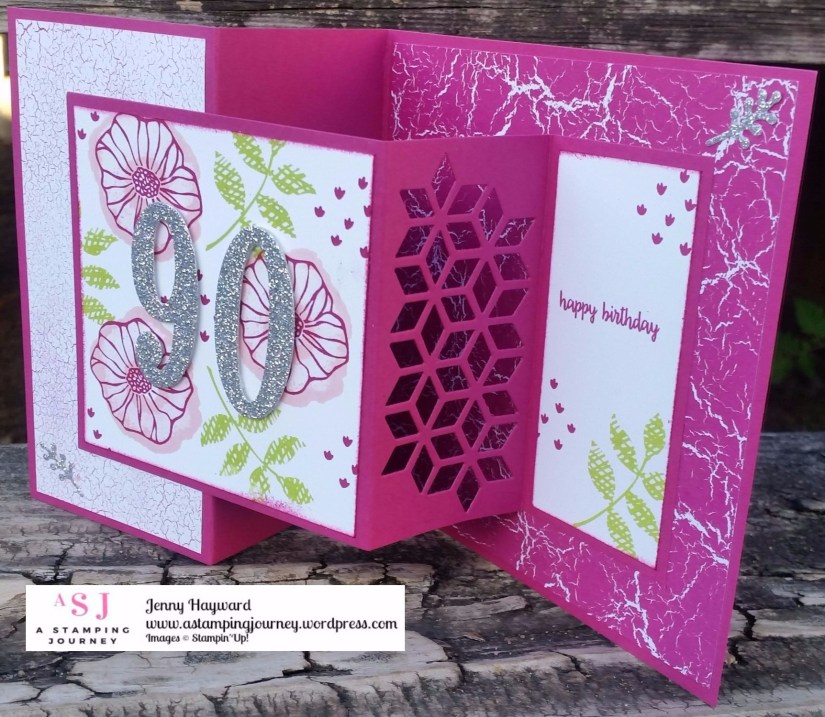
I think this is my new favourite stamp set – Oh! So Eclectic!  I have made quite a few creations with this recently which I will get to show you soon.  The sentiment is from Happy Birthday Gorgeous.

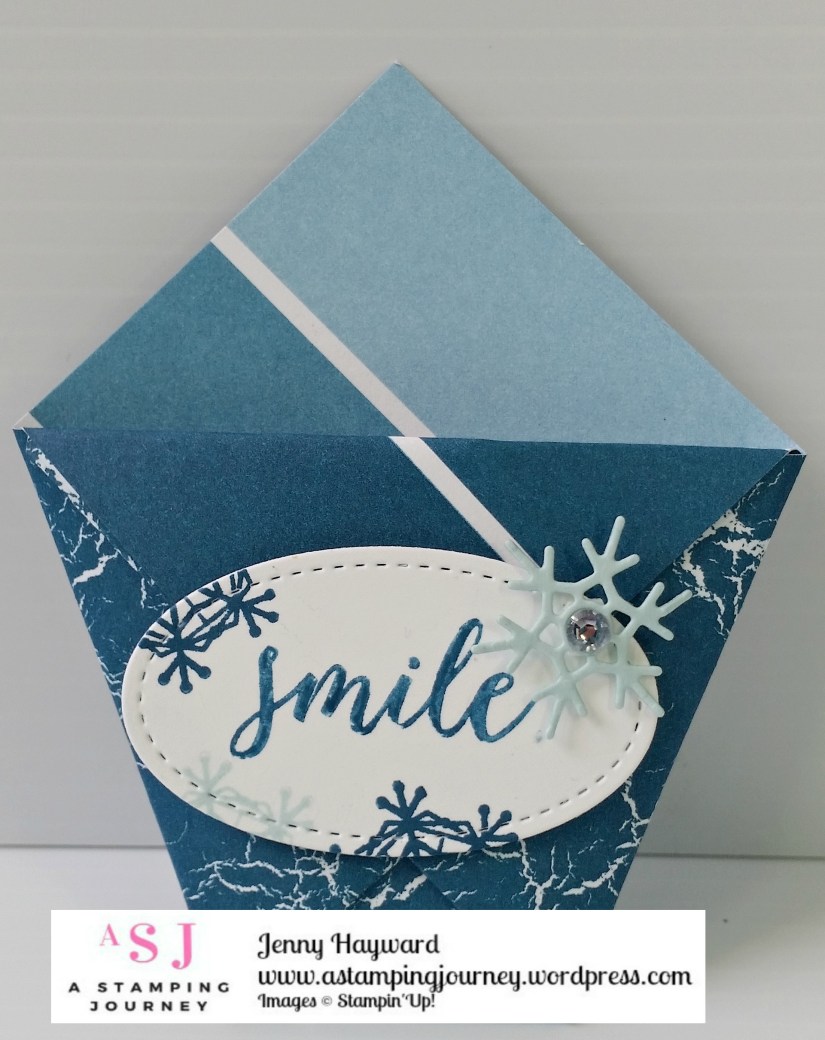
This card took me about 1/2 hour to create as I have had so much going on this week. It’s the fun Square Z-fold Cards which I have made a standard one recently.  (See that HERE).  I will share all the instructions further below.

I wasn’t sure if diecutting the diamond pattern in the side would make it too flimsy but I thought I would try it.  It worked fine and gives it a little more WOW!  The Designer Series Paper is the Color Theory Paper Stack.

SQUARE Z-FOLD CARD

Original Z-fold card is from Amanda Bates HERE.  I have slightly different measurements so thought I would share them with you.  These are in Metric.  If you are wanting Imperial measurements then rather than me converting them and ending up with lots of “sixteenth” measurements, then head to Amanda’s blog post in that link and follow those directions.

There are 2 pieces to this card.

1. Card Base:

Cut card 14.8cm x 29.7cm.  Score on the long side at 7.4cm and 14.8cm.

Designer Series Paper:

Front Panel: 7cm x 14.4cm             Back Panel:  14.4cm x 14.4cm 


2. Inner Card:

Cut card 10.5cm x 21cm.  Score on the long side at 5.2cm and 10.5cm.

Whisper White Card:

Front: 10.1cm x 10.1cm         Back: 4.8cm x 10.1cm


To Assemble your Card

1. Take your Inner Card piece and cut the Diamond pattern from the Eclectic Layers Thinlits set on your middle panel.

2. Stamp your Whisper White card pieces as you like.  I have used the Oh! So Eclectic stamp set.  Adhere these to the Inner Card piece.

3. Adhere your Designer Series Paper Pieces to the Card base.

4. Take your Inner card piece and on the front panel section (left hand end), place adhesive on ONLY HALF of the panel at the back.  Place that in position on your card base.  ** I used the Multipurpose Liquid Adhesive as this gives you a little time to wiggle the piece around in place if need be.

5Then on the  Right Hand end of the Inner card piece, place adhesive at the back. Carefully fold up the card on the score lines as it should fold. Close the card and allow the piece to fall in to place where it should sit.  Once in position press firmly to adhere. 

Hope this is easy to follow.  Please ask if you have any further questions.

Thanks for stopping by,

Jenny

3D projects, cards, Catalogues, Personal Ramblings, Stampin' Up!

A SPECIAL CARD IN A BOX!

I know we’re in the midst of the all the excitement with the new catalogue but I just have to share this project.  I know it is using retired products now but I thought you might still like to see it.

A couple of weeks ago a friend of mine asked me to make a special baby card for her new grandchild.  At that time she didn’t know what the gender was and requested it to be Teal Green in colour with splashes of red. I knew the family as well so I wanted it to be pretty special.  I recreated a card in a box that I made some time ago.  You can see that original project HERE. That card in a box has been repinned 3.3K times on Pinterest so I thought it might just be “good enough”. 🙂

The only paper I had to match the Bermuda Bay card was this retired paper.  I can’t even remember the name of it.  I just found a few scraps of it in my retired paper box. Lucky!!!

I dug out my ‘Something For Baby’ set too from my retired box.  That was lucky too as I don’t have any new baby stamps as yet.

So enough of the chatter.  Here it is.

I used Watermelon Wonder which matched. (Grabbed that out of the retired box too!).

I realised I didn’t get a photo of the left side flap.  That had little booties in Crushed Curry and I tied teeny, tiny bows in White Baker’s Twine.  The sentiment is from ‘Baby Bear’ – yes! That is current! I probably could have used that but Baby Bear was a bit big for the box.

Well it was very well received and I can tell you that baby Phoebe arrived safely last week.  She is very gorgeous and they were all delighted and fascinated in the card.  It can be displayed on the shelf in the nursery for some time to come.

Thanks for indulging me.  Back to current products in next post.

Jenny