cards, Stampin' Up!

SIX-SIDED SAMPLER CASES!!

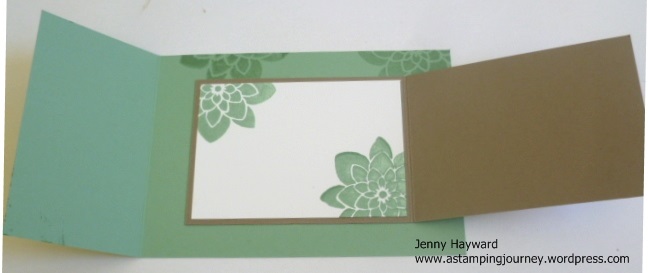
How was your weekend?? Monday comes around too quickly doesn’t it!! I have another 2 projects from out Stamping weekend.  These are with the set ‘Six-Sided Sampler’.  I don’t own this set so it was good to use it. Both these cards were unashamedly CASED.  I am not sure the original creators but they were from Pinterest I believe.

First one uses the set ‘Awesomely Artistic as the main images.  These are stamped on Smoky Slate cardstock and matted on Early Espresso and Island Indigo is the base.  The flowers/blossom is stamped on Whisper White card in Island Indigo and fussy cut around.  The centre of the leaves/flowers are coloured with Blender Pens and then I used a Daffodil Delight Marker in the centres.  This was raised up off the card with Dimensionals. The hexagon shape from ‘Six Sided Sampler’ set is stamped in Whisper White craft ink.  The ink is so wet so you just need to touch the inkpad very lightly.  I just eye-balled to line up the hexagons but you could use the Stamp-A-Ma-Jig if you like.  I am just a bit lazy and didn’t bother getting it out!!!  The centre of 2 of the hexagons are coloured in with the chalk marker.  I finished it off with some Linen Thread and then Dazzling Diamonds on the dragonfly.

P1170046

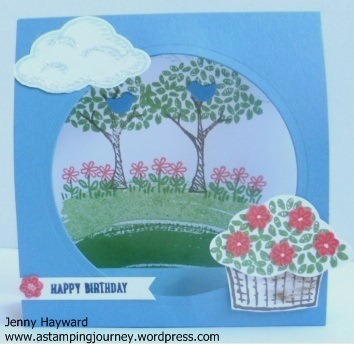
This next card was the last card we made on the weekend.  We literally had about 15 minutes left but just had to make this.  It was a bit stressful to be honest as the clock was ticking. So I just stamped and punched and then headed home to finish assembling it back home.  I chose to make mine in Watermelon Wonder.

P1170044

I have also used ‘Papillion Potpourri’ stamp set and the greeting is from ‘A Dozen Thoughts’.  The greeting is cut with the little label from the ‘Mini Treat Bag’ Thinlets. Some of the hexagons are raised up and some adhered directly onto the doily.

I have just a couple of cards left from our stamping weekend.  I am really excited to get more stamping done with the new holiday products though.  One thing at a time hey!!!

Thanks again for visiting.  I do appreciate it.  Do stop by and say Hello. 🙂

Jenny 

cards, Catalogues, Stampin' Up!

FESTIVE FLOWER POINSETTIA!

I received my preorder for some new goodies from the upcoming Holiday Catalogue.  Oh! It was just like Christmas – literally!! Opening up all the fun new products and the sparkly papers.  It was all so festive.  I had to open all the packets straight away and punch and cut and emboss.  One of the first things I used was the new Festive Flower Builder Punch. I can’t show you the punch yet (just wait until September 1st).  I made up the flower and today just added it to a card.  Here you are….

pointsettia.

I have used Real Red for the card base.  The flower is Real Red and Old Olive.  You will find a few new products on this card.  Apart from the fun Builder Punch you have a co-ordinating stamp set which the greeting is from – ‘Reason For The Season’ (Don’t you love that font!), and the gorgeous new Embossing Folder ‘Boughs and Berries’.

So now you really want to see the Catalogue don’t you?? If you would like me to send you a catalogue, then just leave me a comment or email me and I will send one to you. Australian residents only.  I am going to start mailing them next week.

Thanks for stopping by,

Jenny

Stampin' Up!, Weekly Deals

SHINY STUFF FOR THIS WEEK’S WEEKLY DEALS!!

I have been thinking Christmas.  Probably because I have been playing with new toys from the upcoming Holiday Catalogue.  It is good being a Demonstrator because you get to see and play with products earlier.  That’s a bonus with joining Stampin’ Up! if nothing else 😉 but of course there are so many good reasons.

Anyway, I want to show you this week’s Weekly Deals.  There are a few shiny items on this week’s deals.  Isn’t shiny and sparkly just the thing for Christmas!!

To order please email me ASAP or you can order directly Online at my store HERE.

aug 12

cards, Techniques

CRAZY ABOUT YOU JOY FOLD!

Just a quick post for you. Back to more projects from our Crafty Weekend. It has been some time since I have done this type of card. Here is this one for you.

P1170040

P1170041

I have used ‘Crazy About You’ stamp set and ‘Hello You’ Thinlets to make this card in Mint Macaron and Soft Suede.  This is a JOY FOLD card.  It is very easy to make.  It is a basic size card but cut your card vertically and score halfway. The front flap is cut in half.  Then a smaller folded card is adhered to the inside and they overlap when folding.  If that all makes sense??? You can find a tutorial to make your own on Splitcoaststampers HERE.  It was fun to make.  I must make another one again very soon.

Today I have been playing with some new toys from the upcoming Holiday Catalogue.  I will share them very soon.

Enjoy your day whatever you may do.

Come and visit again soon,

Jenny

cards, Classes, Techniques

FUN FOLD CLASS – IS FUN!!!

These are the fun cards we are making at my Saturday Stampers class this Saturday 15th August. (2pm). Cost $15 If you are local to Wollongong do come on by.  You just need to let me know by Thursday so I can have all the card cut.  They might look a bit tricky but they are really not hard to do.  I think you will like them.

P1170174

cards

BIRTHDAY BLOSSOMS IN BERMUDA BAY!!

I thought I would get back to sharing the cards I made at our stamping weekend a few weeks ago. This one I think is one of my favourites.  First off, Andrea CASED the card on Pinterest with a few changes.  We all loved it and had to copy although I changed mine a little too. Here is the card.

P1170030

This is a 10cm x 10cm card (4″x4″).  On a piece of white square (I think it is about 6.1cm x 6.1cm).   I sponged in towards the centre of the card in Pool Party.and then sponged the edges in Bermuda Bay.  I stamped the small blossoms from ‘Birthday Blossoms’ in Bermuda Bay. Check out the stamping spots/stars at the top of the card piece.  Can you tell what I used??  This is from the stars in the ‘Celebrate Today’ set.  The greeting from ‘Circle of Spring’ is stamped in Black StazOn.

I tied around some Whisper White Baker’s Twine. Then the sponged card piece was layered on another piece of white and then on a piece of Basic Black.  The flowers are stamped in Black StazOn and punched out with the Pansy Punch.  I then sponged the edges of these in Bermuda Bay.  They were raised up with dimensionals and I added some Adhesive Rhinestones to the centres of the flowers and then added a couple on the card.

I hope you like????  🙂

Have a great weekend.  Sadly, I didn’t receive my preorder today from the upcoming Holiday Catalogue. Not that I have a lot of time to stamp this weekend.  SIGH! I guess I have some other stamps to work with if I do. I can’t wait to get my new Christmas goodies.  I tell you, you are going to L.O.V.E. it.  September 1st is the day so stay tuned but I am mailing out Holiday Catalogues in the next couple of weeks so let me know if you would like your own.

Stop by and visit again soon,

Jenny

cards, Challenges, Stampin' Up!

VELLUM BIRTHDAY BLOSSOMS!

On a Facebook group I am on they recently set a little game.  It was a Tic Tac Toe Board.  Pick 3 items in the one row to make your card.  I thought that would be fun.  I took a little time out from my regular creating to have a go.  I will show you the card but first I will tell you the process I went through in making this card.  Maybe it will help you when the MOJO has gone out the window. 🙂

Firstly, I selected the 3 elements from the Tic Tac Toe Board to include on my card.  I chose Birthday, Flowers and Red.  That’s half the battle right!!  Well I pull out all my flower stamps – and there are quite a few.  I really wanted to use one of the new ones. OK, Birthday Blossoms, Definitely Dahlia or Garden in Bloom??

The colour was already chosen.  I don’t often use red except for Christmas but I chose Cherry Cobbler.  I love the richness in this colour. I knew I wanted to white emboss the vellum too.  Just an idea I had.

How to put it together though?? That is what sends me undone and generally I just put it all aside in the “too hard” basket.  I contemplated things for a little while and wondered what to do. When the ideas weren’t really coming together for a card I thought … Why not look at a card sketch.  I went to Pinterest and I have a board for Card sketches. You know you can actually use the ideas you pin not just PIN them to a board!!! 😉 Straight away I looked at the board and found what I was after.

So here is the sketch I worked with. It is from this great site HERE. I like the simple sketches.

CTS_130

Here is the final result.

P1170158

I used Birthday Blossoms Heat embossing the small blossoms in White Embossing Powder onto the Cherry Cobbler card.  The larger flowers were heat embossed in white on vellum and then punched out with the Pansy Punch. To get the curve on the card I hand-drew a curvy pencil line on scrap paper until I was happy with it.  I cut that out and then used that as a stencil on the Cherry Cobbler card.  I lightly drew the line and then cut this curve out.  I was happy with the result of that.  It really could have gone any way!!

The greeting was stamped in Cherry Cobbler onto Thick White Cardstock as a card base. I added some large Adhesive pearls to the centre of the flower and finished it off by wrapping some White Baker’s Twine around the card a few times. I did stamp the inside with the blossoms in Cherry Cobbler and one of the greetings in the set.  I didn’t take a photo of that.

I hope explaining the process might help you next time.  I will try and remember that myself 😉

Have a great “stampy” week.  I will be back to share more soon.

Jenny

cards, Stampin' Up!

SPRINKLES OF LIFE FOR RONALD MCDONALD HOUSE CHARITIES!

Today I had my Ronald McDonald House Charities Fundraiser. Thanks everyone who came today.  It was a lot of fun.  We played some fun games with a guessing competition plus a coin toss for some great Stampin’ Up! prizes.Of course there was some stamping. We made 4 cute cards so I thought I would share the cards we made today.

P1170135

I will share each of them with you. Once again sorry for the lighting of the cards.  I think I need to check my camera settings!!! 🙂

P1170138


Firstly, this one in Delightful Dijon.  This was actually the last card I made.  I was wanting to make 4 different cards showing many ways you can use this set.  I really didn’t know what to do but just wanted the tree on it’s own.  I will just tell you a little trick with the leaves on the tree.  I inked the leaves in Delightful Dijon and then used the Cherry Cobbler marker to “thump” on the leaves.  That is just tapping the stamp with the thick end of the marker onto the stamp to pick up some of the Cherry Cobbler colour on the leaves.  The rest of the card was fairly straight forward and using some of the gorgeous Delightful Dijon Dotted Lace Trim.

This next card. (terrible lighting!).  This card was inspired by a card by Patty Bennett. Colours are Bermuda Bay for the base card.  The strip of card on the left is Watermelon Wonder with a banner from Cherry on Top Designer Series Paper

P1170137

This one was CASED from one of my stamping friends Rachael Lewsley – Thanks Rachael 🙂  I love the splodges from Gorgeous Grunge. Colours are Tip Top Taupe for the cone and then Mint Macaron, So Saffron and Blushing Bride for the “icecream scoops”.

P1170061

This one was CASED from Chiaki on Stampingpro.com.  Base card is Whisper White thick cardstock.  I cut the oval in the centre of the Pool Party card and then embossed with the Brickwall Embossing Folder. The scene is stamped on the white card base.  The stripes for the grass are stamped using the ‘Work of Art’ set.  I added the greeting by stamping in Memento Black and then cutting it using the Itty Banners Framelits.

P1170141

I have shared a lot of cards using this ‘Sprinkles of Life’ set all week. Have you liked the projects??? There are so many ways of using this set.  It is incredible.

Now I am extending my special bundle offer for the stamp and punch until Monday.  

Purchase the ‘Sprinkles of Life’ set + Tree Punch for $64.  That is 10% off the combined price.

This is not available as a Bundle in the catalogue. You need to order this directly from me. This is not available through my Online Store.  Australian residents only. 🙂

Thanks for looking.  I hope you are enjoying your weekend??

Until next time,

Jenny


cards, Classes

SPRINKLES OF LIFE CONVENTION CASE!

These 3 cards I have made using ‘Sprinkles of Life’ set have been CASED from an onstage presentation at the South Pacific Stampin’ Up! Convention back in early May.  It seems so long ago now. I loved the idea of them so I have wanted to make them for a while.  Here they are and then I will tell you about them.

P1170146

Each of them have the same layout and they show a number of ways you can put the different elements together.  On my cards I have used the Woodgrain Embossing Folder and instead of a strip of Designer Series Paper or similar on the original I tied around some Whisper White Baker’s Twine. What do you think?? Cute??

Thanks for stopping by. Tomorrow is my big Fundraiser for Ronald McDonald House Charities using this set.  I will stop by and share the cards we will make later tomorrow.

Have a great day,

Jenny 🙂

cards

SPRINKLES OF LIFE TENT CARD!!

Are you ready for another Sprinkles of Life card?? I hope you are not getting sick of them yet.  Here is another fun card I made yesterday. (lighting is not the best – sorry!)

P1170148

P1170150

This is called a Tent card.  I will explain how to make it below.  I found the original idea of the card on Stampin’ Connection which is a Demonstrator site and has THOUSANDS of samples (and I am not lying about that!!).  I don’t visit it often but it is always full of inspirational ideas.  Anyway, this style of card was on there that I found a couple of years ago I think and I filed it away. I thought it would be great to try it out with this stamp set.

The base is Marina Mist (lighting is not the best).  Inside the card I created a sweet scene using a number of images in the set. Then I added the basket and a cloud on the front. You have to have sparkle on that cloud!

P1170152

So how do you make it??

Here are the instructions for you to make your own TENT CARD.

1. Cut your base card to measure 10.5cm x 29.5cm.    (4 1/4″ x 11 5/8″)

2. Score on the long side at 2.5cm, 5cm, 7.5cm, 18.5cm. (1″, 2″, 3″, 7 1/4″).  Fold on the score lines.

3. Cut your window from the front using your Framelit of your choice.

4. Add adhesive onto the small tab and adhere to the inside of your folded card at the back. (Just fold up the card first to work out the best place for your adhesive).  I had the tab to attach to the back of the card so you can’t see it inside the front).

5. Cut a piece of Whisper White 11cm x 10.5cm. (4 1/4″ x 4  5/16″).  Decorate this piece as you like. Adhere to the back of the card on the inside.

I hope these measurements make sense???  🙂

Enjoy making one of these.  What stamp sets can you make this with??

Have a good day,

Jenny